
In this article, we will be self-hosting GLM-OCR for local document processing. This article will focus on local deployment with vLLM.
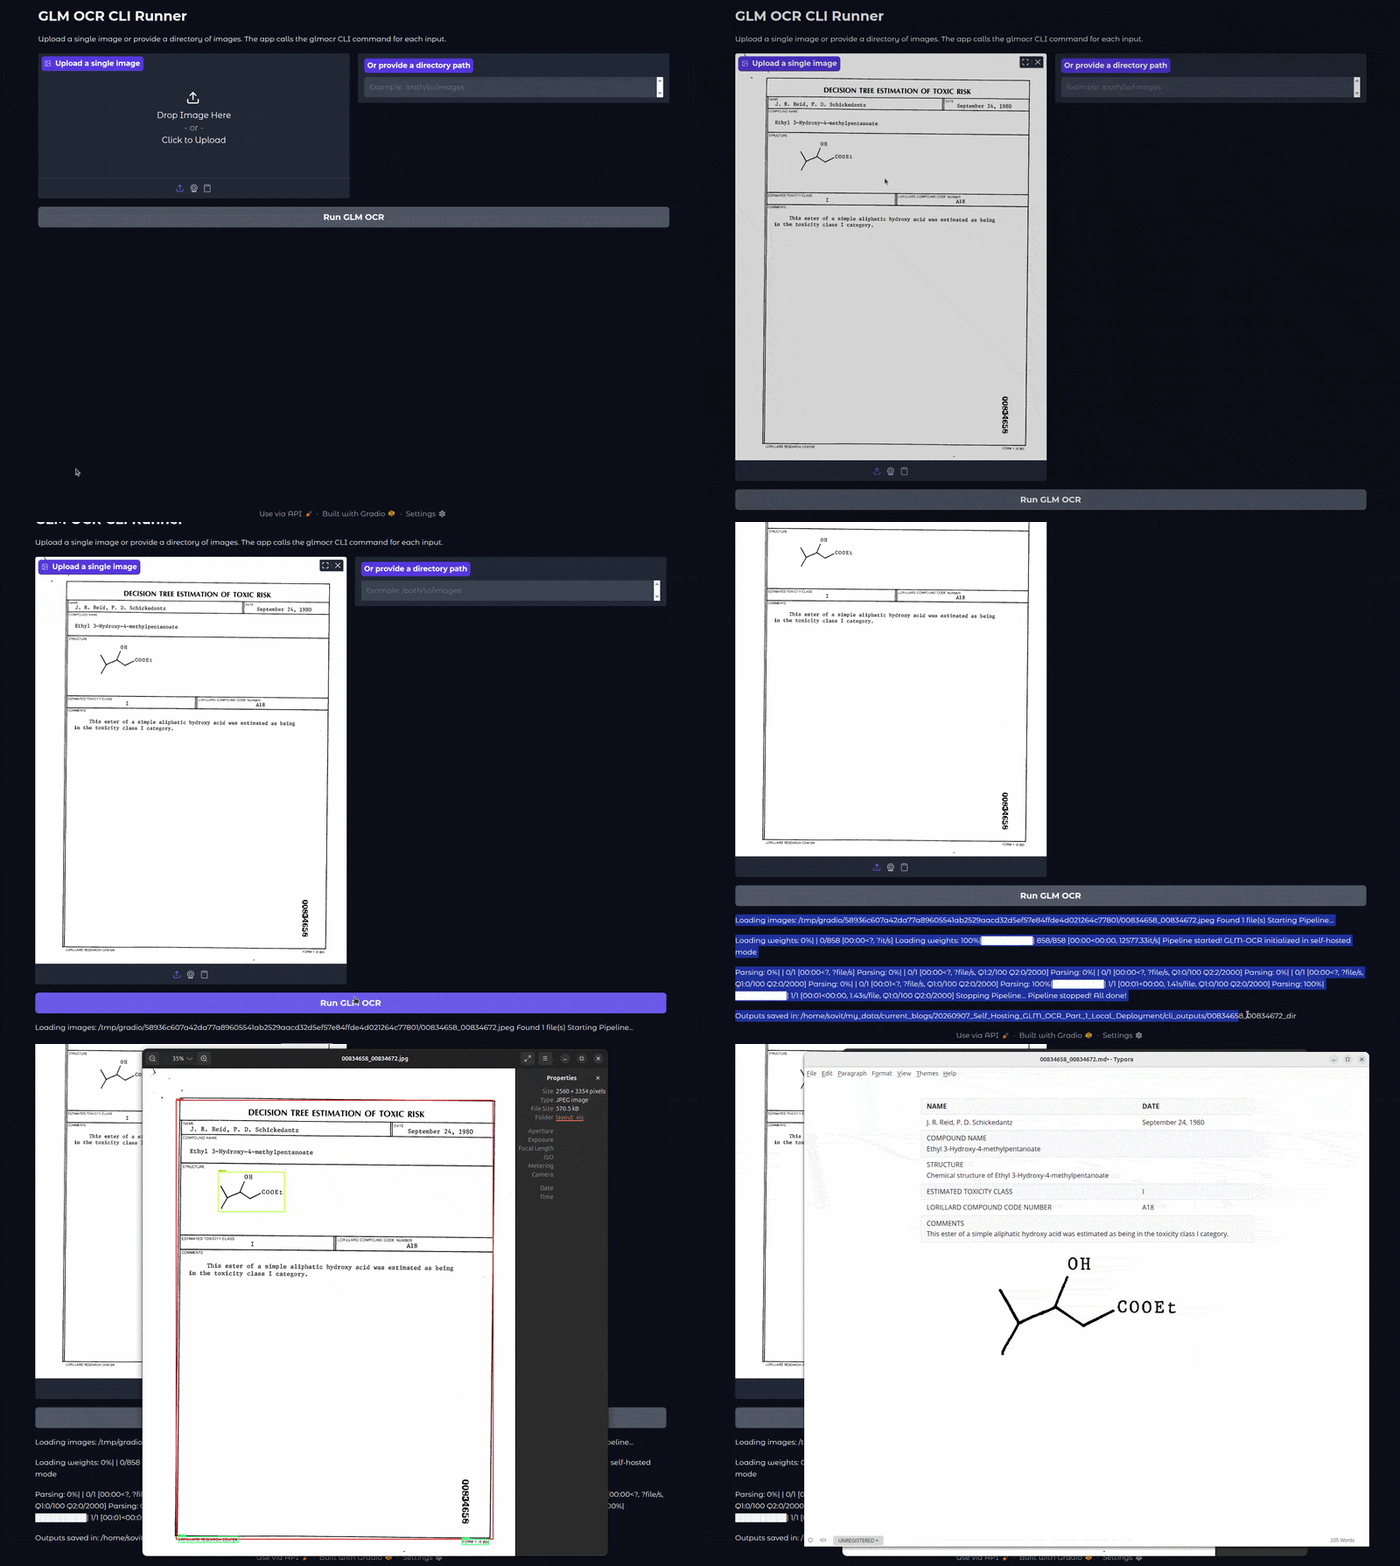
This article focuses on how we can self-host the full document layout analysis + OCR pipeline of GLM-OCR locally within 10 GB of VRAM. The entire pipeline is powered by vLLM for the inference backend and Gradio for the frontend.
We will focus on the following here:
- Complete deployment with the
glmocrpackage that combines PP-DocLayoutV3 for layout detection and then GLM-OCR for downstream text recognition. - Deploying only the text recognition component without layout detection.
- Both deployments will happen via vLLM.
- We will compare the difference in results between the two on form recognition.
Why Do We Need the Complete GLM-OCR Pipeline?
In a previous article, we covered inference with GLM-OCR. In the article, we discussed the technical report and ran inference locally using the model, powered by Hugging Face Transformers. The inference experiments revealed that the model sometimes performs poorly on structured documents like tables and forms.
The primary reason for that is the absence of the layout model, that is, PP-DocLayoutV3. The technical report mentions that the layout model is part of the architecture; however, if we just run the model from Hugging Face, we only get OCR processing.
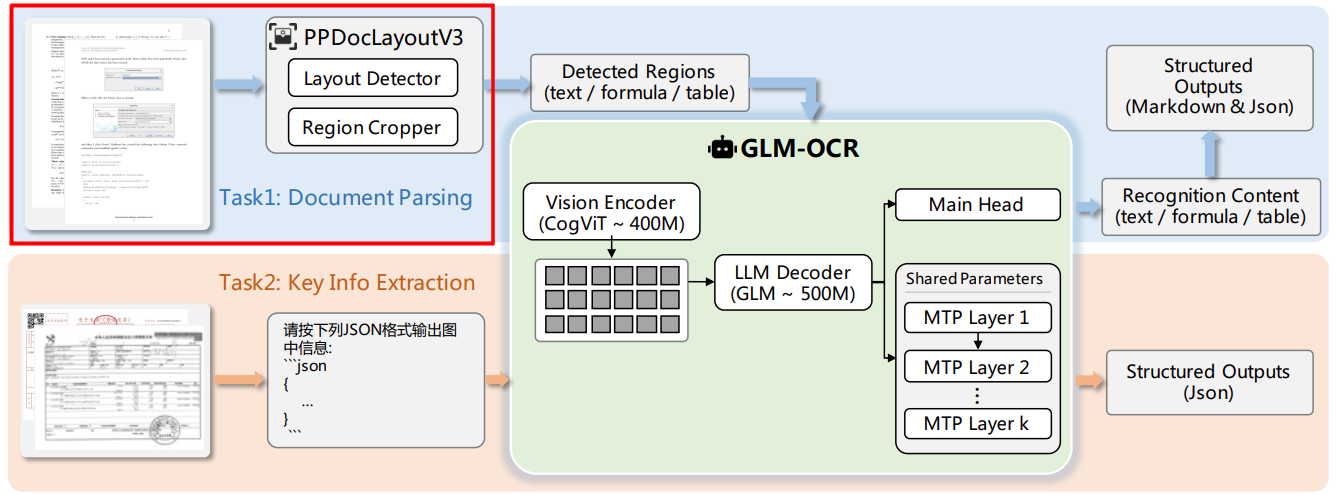
To get the full layout parsing + OCR running, we need to self-host the entire GLM-OCR pipeline. The steps for this are mentioned in the official GLM-OCR GitHub repository. We will cover them shortly in one of the next sections.
What is different with layout analysis + OCR, and what advantages do we get?
- The layout analysis component uses the PP-DocLayoutV3 model, which detects different components in an image before the OCR step. This is document object detection, where each critical part is classified into a specific class.
- Along with the detected classes, the coordinate information acts as metadata to create the final markdown file. If there are images in a document, they are cropped and stored in a local directory that the resulting markdown file references.
- As LLMs are becoming more competent in RAG and document extraction, we can feed these markdown files along with extracted image file paths for a complete RAG pipeline, which we can seldom achieve with just text content.
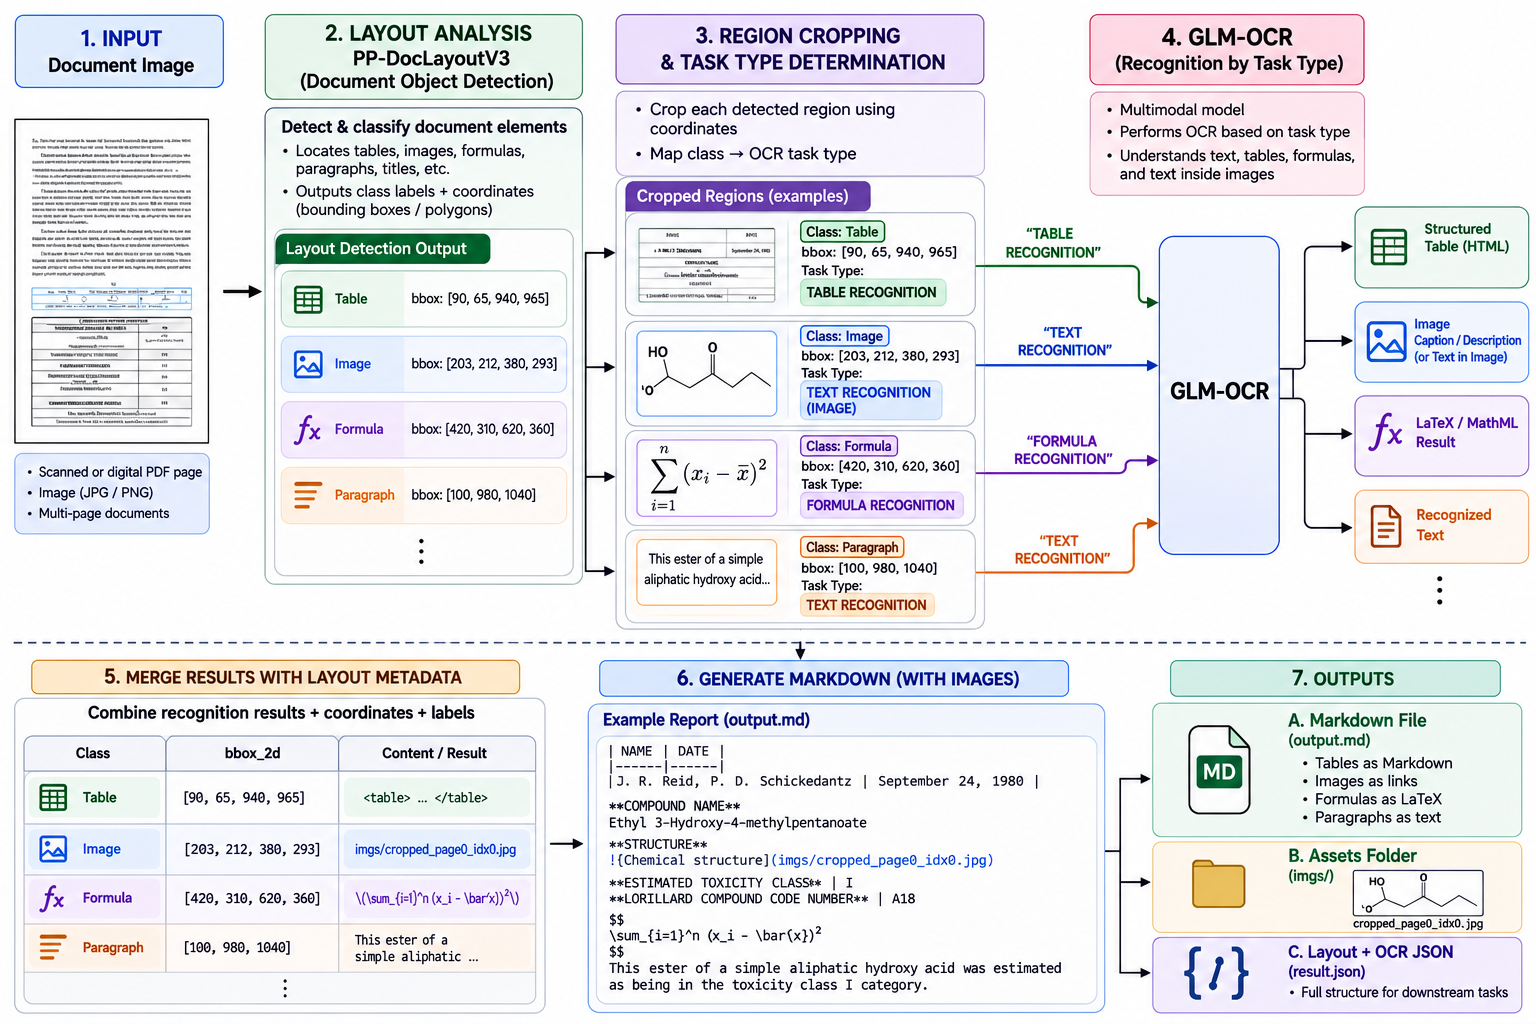
The complete pipeline of GLM-OCR is a two-stage pipeline. First, PP-DocLayoutV3 detects and classifies different elements such as tables, formulas, paragraphs, etc. The coordinate information is used to crop these regions and derive the task type, which can be either of the three: “Text Recognition”, “Table Recognition”, or “Formula Recognition”. The cropped regions, along with the task type, are passed down to the GLM-OCR.
Finally, the result from the OCR and the coordinate information are used to create the markdown file. If any images are detected during layout detection, then they are also embedded into the markdown file.
Project Directory Structure
Let’s take a look at the project directory structure.
├── cli_outputs
│   ├── Form  [431 entries exceeds filelimit, not opening dir]
│   └── PUBLICATIONS058430-8_dir
│       └── PUBLICATIONS058430-8
│           ├── layout_vis
│           ├── PUBLICATIONS058430-8.json
│           ├── PUBLICATIONS058430-8.md
│           └── PUBLICATIONS058430-8_model.json
├── custom_outputs
│   └── Form_20260712_105936  [431 entries exceeds filelimit, not opening dir]
├── input
│   ├── formula
│   │   ├── eq_00000.png
│   │   ...
│   │   └── eq_00042.png
│   ├── scanned_docs
│   │   └── dataset
│   │       ├── ADVE
│   │       ├── Email
│   │       ├── Form
│   │       ├── Letter
│   │       ├── Memo
│   │       ├── News
│   │       ├── Note
│   │       ├── Report
│   │       ├── Resume
│   │       └── Scientific
│   ├── sroiev2
│   │   ├── X00016469612.jpg
│   │   ...
│   │   └── X51005268200.jpg
│   └── table
│       ├── table_1.png
│       ├── table_2.png
│       └── table_3.png
├── config.yaml
├── glm_ocr_cli.py
├── gradio_app.py
├── gradio_app_vllm.py
└── README.md
- We have two output directories,
cli_outputsandcustom_outputs. We will get to the details of these while covering the codebase. - The
inputdirectory contains the images that we will use for testing. - We have three Python scripts. All of them are Gradio applications.
glm_ocr_cli.pyinvokes the entire document layout + OCR pipeline powered by theglmocrpackage.gradio_app_vllm.pycontains just the GLM-OCR pipeline without the document analysis step. Both of these use the vLLM inference engine in the backend.gradio_app.pyis also a Gradio application with just the GLM-OCR component. However, the model is loaded via Hugging Face Transformers directly. We can ignore this file in this article.
All the Python files are available for download via the zip file that comes with the article
Download Code
Setup Steps
Install the glmocr self-hosted pipeline.
pip install "glmocr[selfhosted]"
We need vLLM to serve the model locally.
pip install -U "vllm>=0.19.0"
And the latest version of tranformers.
pip install "transformers>=5.3.0"
The model can also be deployed using SGLang; however, we will go the vLLM route here.
GLM-OCR and PP-DocLayoutV3 Pipeline
Let’s jump into the implementation of our codebase. Here, we are covering the comparison of the outputs from two different approaches:
- One is simply deploying the GLM-OCR model without the layout detection pipeline
- The other is self-hosting the complete GLM-OCR pipeline
Both inference experiments use vLLM as the inference engine.
We will cover the codebase of glm_ocr_cli.py, which is the complete pipeline, in detail here.
Before that, let’s have an overview of the OCR-only pipeline.
Overview of the OCR-Only Pipeline
The code for this lives in the gradio_app_vllm.py file. We have simply created a wrapper around the vLLM inference.
To run the application, first, we need to run the vLLM server for GLM-OCR.
vllm serve zai-org/GLM-OCR --port 8080 --served-model-name glm-ocr --max-model-len 8192 --gpu-memory-utilization 0.5
The model itself uses around 4.5GB of VRAM to load entirely into the memory. Furthermore, we are allocating around 50% of the GPU for KV-cache and runtime inference overheads.
Second, we execute the Gradio application script.
python gradio_app_vllm.py
The UI looks like the following:
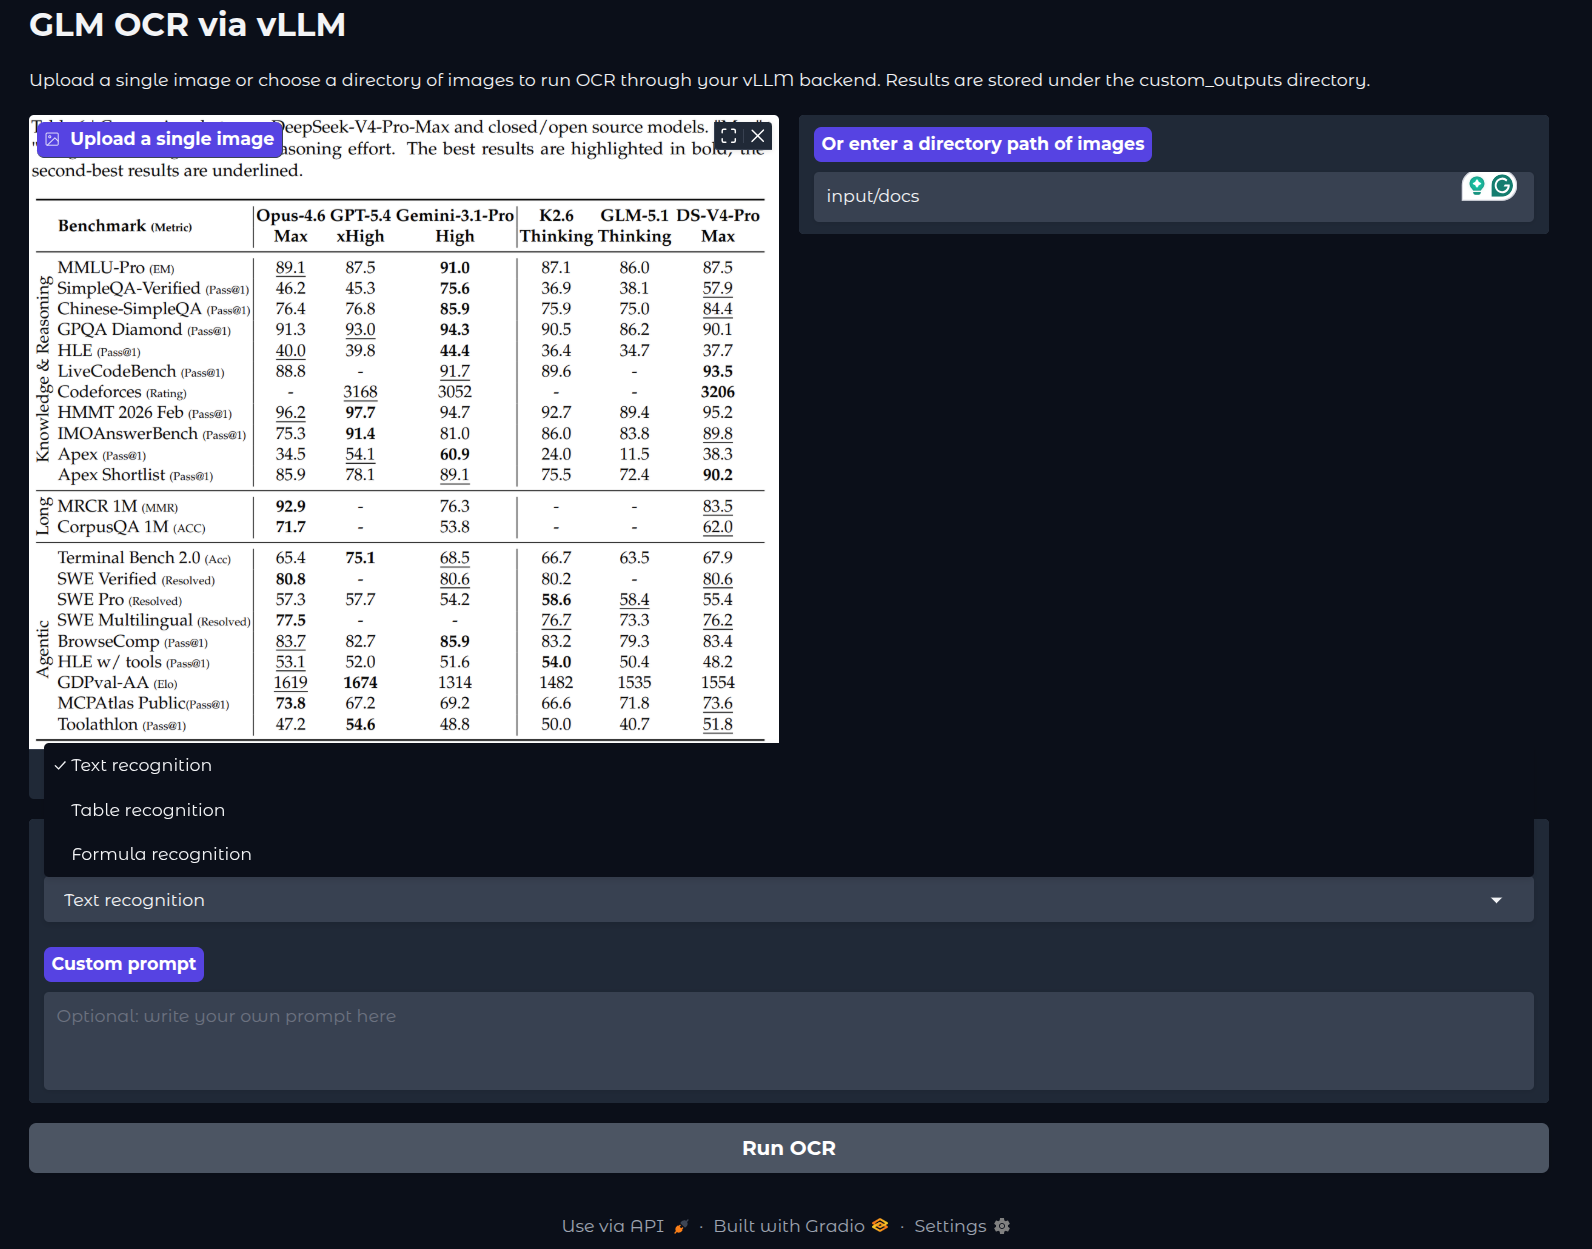
We can either upload an image or provide the path to a directory containing images. Furthermore, we can choose between three modes for inference: Text recognition, Table recognition, or Formula recognition.
All the results for this pipeline stay in the custom_outputs directory.
Complete GLM-OCR + PP-DocLayoutV3 Pipeline
The glm_ocr_cli.py file contains the code for the complete pipeline. The following is the entire code.
import os
import subprocess
from pathlib import Path
from typing import Optional

import gradio as gr

WORKSPACE_ROOT = Path(__file__).resolve().parent
CONFIG_PATH = WORKSPACE_ROOT / 'config.yaml'
CLI_OUTPUT_ROOT = WORKSPACE_ROOT / 'cli_outputs'


def list_image_files(directory_path: str) -> list[str]:
    if not directory_path or not os.path.isdir(directory_path):
        return []

    extensions = {'.png', '.jpg', '.jpeg', '.bmp', '.webp'}
    images = []
    for root, _, files in os.walk(directory_path):
        for filename in sorted(files):
            if os.path.splitext(filename)[1].lower() in extensions:
                images.append(os.path.join(root, filename))
    return sorted(images)


def resolve_output_dir(input_path: str) -> Path:
    if not input_path:
        return CLI_OUTPUT_ROOT / 'default_dir'

    input_path_obj = Path(input_path)
    if input_path_obj.is_dir():
        return CLI_OUTPUT_ROOT / input_path_obj.name

    return CLI_OUTPUT_ROOT / f'{input_path_obj.stem}_dir'


def run_glmocr_command(input_path: str) -> str:
    if not input_path or not os.path.exists(input_path):
        return f'Input path not found: {input_path}'

    output_dir = resolve_output_dir(input_path)
    output_dir.mkdir(parents=True, exist_ok=True)

    cmd = [
        'glmocr',
        'parse',
        input_path,
        '--layout-device',
        'cpu',
        '--config',
        str(CONFIG_PATH),
        '--output',
        str(output_dir),
    ]

    try:
        completed = subprocess.run(
            cmd,
            cwd=str(WORKSPACE_ROOT),
            capture_output=True,
            text=True,
            timeout=1800,
        )
    except FileNotFoundError:
        return 'glmocr command was not found. Please install it and ensure it is available in your PATH.'
    except subprocess.TimeoutExpired:
        return 'glmocr timed out while processing the image.'

    output_parts = []
    if completed.stdout.strip():
        output_parts.append(completed.stdout.strip())
    if completed.stderr.strip():
        output_parts.append(completed.stderr.strip())

    if completed.returncode != 0:
        return 'glmocr failed.\n\n' + '\n\n'.join(output_parts) if output_parts else 'glmocr failed with no output.'

    if output_parts:
        return '\n\n'.join(output_parts) + f'\n\nOutputs saved in: {output_dir}'
    return f'Completed successfully for {input_path}\n\nOutputs saved in: {output_dir}'


def process_input(image_input: Optional[str], directory_input: str) -> str:
    if image_input:
        return run_glmocr_command(image_input)

    if directory_input:
        if not os.path.isdir(directory_input):
            return f'Directory path not found: {directory_input}'

        image_paths = list_image_files(directory_input)
        if not image_paths:
            return f'No supported image files were found in {directory_input}'

        return run_glmocr_command(directory_input)

    return 'Please upload a single image or provide a directory path.'


with gr.Blocks(theme=gr.themes.Soft(), title='GLM OCR CLI Runner') as demo:
    gr.Markdown('# GLM OCR CLI Runner')
    gr.Markdown('Upload a single image or provide a directory of images. The app calls the glmocr CLI command for each input.')

    with gr.Row():
        image_input = gr.Image(type='filepath', label='Upload a single image')
        directory_input = gr.Textbox(
            label='Or provide a directory path',
            placeholder='Example: /path/to/images',
        )

    run_button = gr.Button('Run GLM OCR')
    output_box = gr.Markdown(label='CLI output', value='')

    run_button.click(
        process_input,
        inputs=[image_input, directory_input],
        outputs=[output_box],
    )


if __name__ == '__main__':
    demo.launch(server_name='0.0.0.0', server_port=7862, share=False)
After we run the vLLM server, we are simply wrapping the entire glmocr parse command with a Gradio application. All the logic lives in the run_glm_ocr_command function.
For example, the following block shows how the command works from the CLI.
glmocr parse input/table/table_3.png --config config.yaml
The first argument after the glmocr parse command is the path to either an image or a directory containing images. The second argument is the path to the configuration file.
One additional component here is the reference to the config.yaml file which contains runtime configurations. We have made some minor changes, for example, disabling MaaS (Model as a Service) API and changing the output context length to 8000. The original configuration file can be found in the GLM-OCR repository.
Just like the previous Gradio application, here also we can either upload a single image file or provide the path to a directory containing images.
We can run this similary, by first running the vLLM server and then the Gradio application.
vllm serve zai-org/GLM-OCR --port 8080 --served-model-name glm-ocr --max-model-len 8192 --gpu-memory-utilization 0.5
glm_ocr_cli.py
The following video shows uploading one image and running the application.
All the results of the complete pipeline stays in the cli_outputs directory.
For the complete GLM-OCR pipeline, the resulting directory looks like the following.
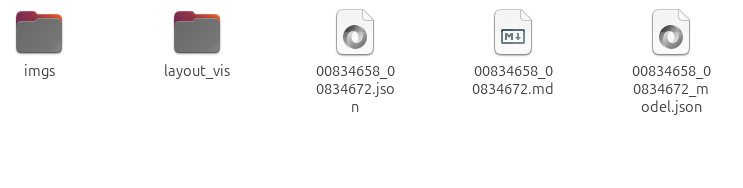
The layout_vis directory contains the annotated image after the PP-DocLayoutV3 pipeline. The following is an example.
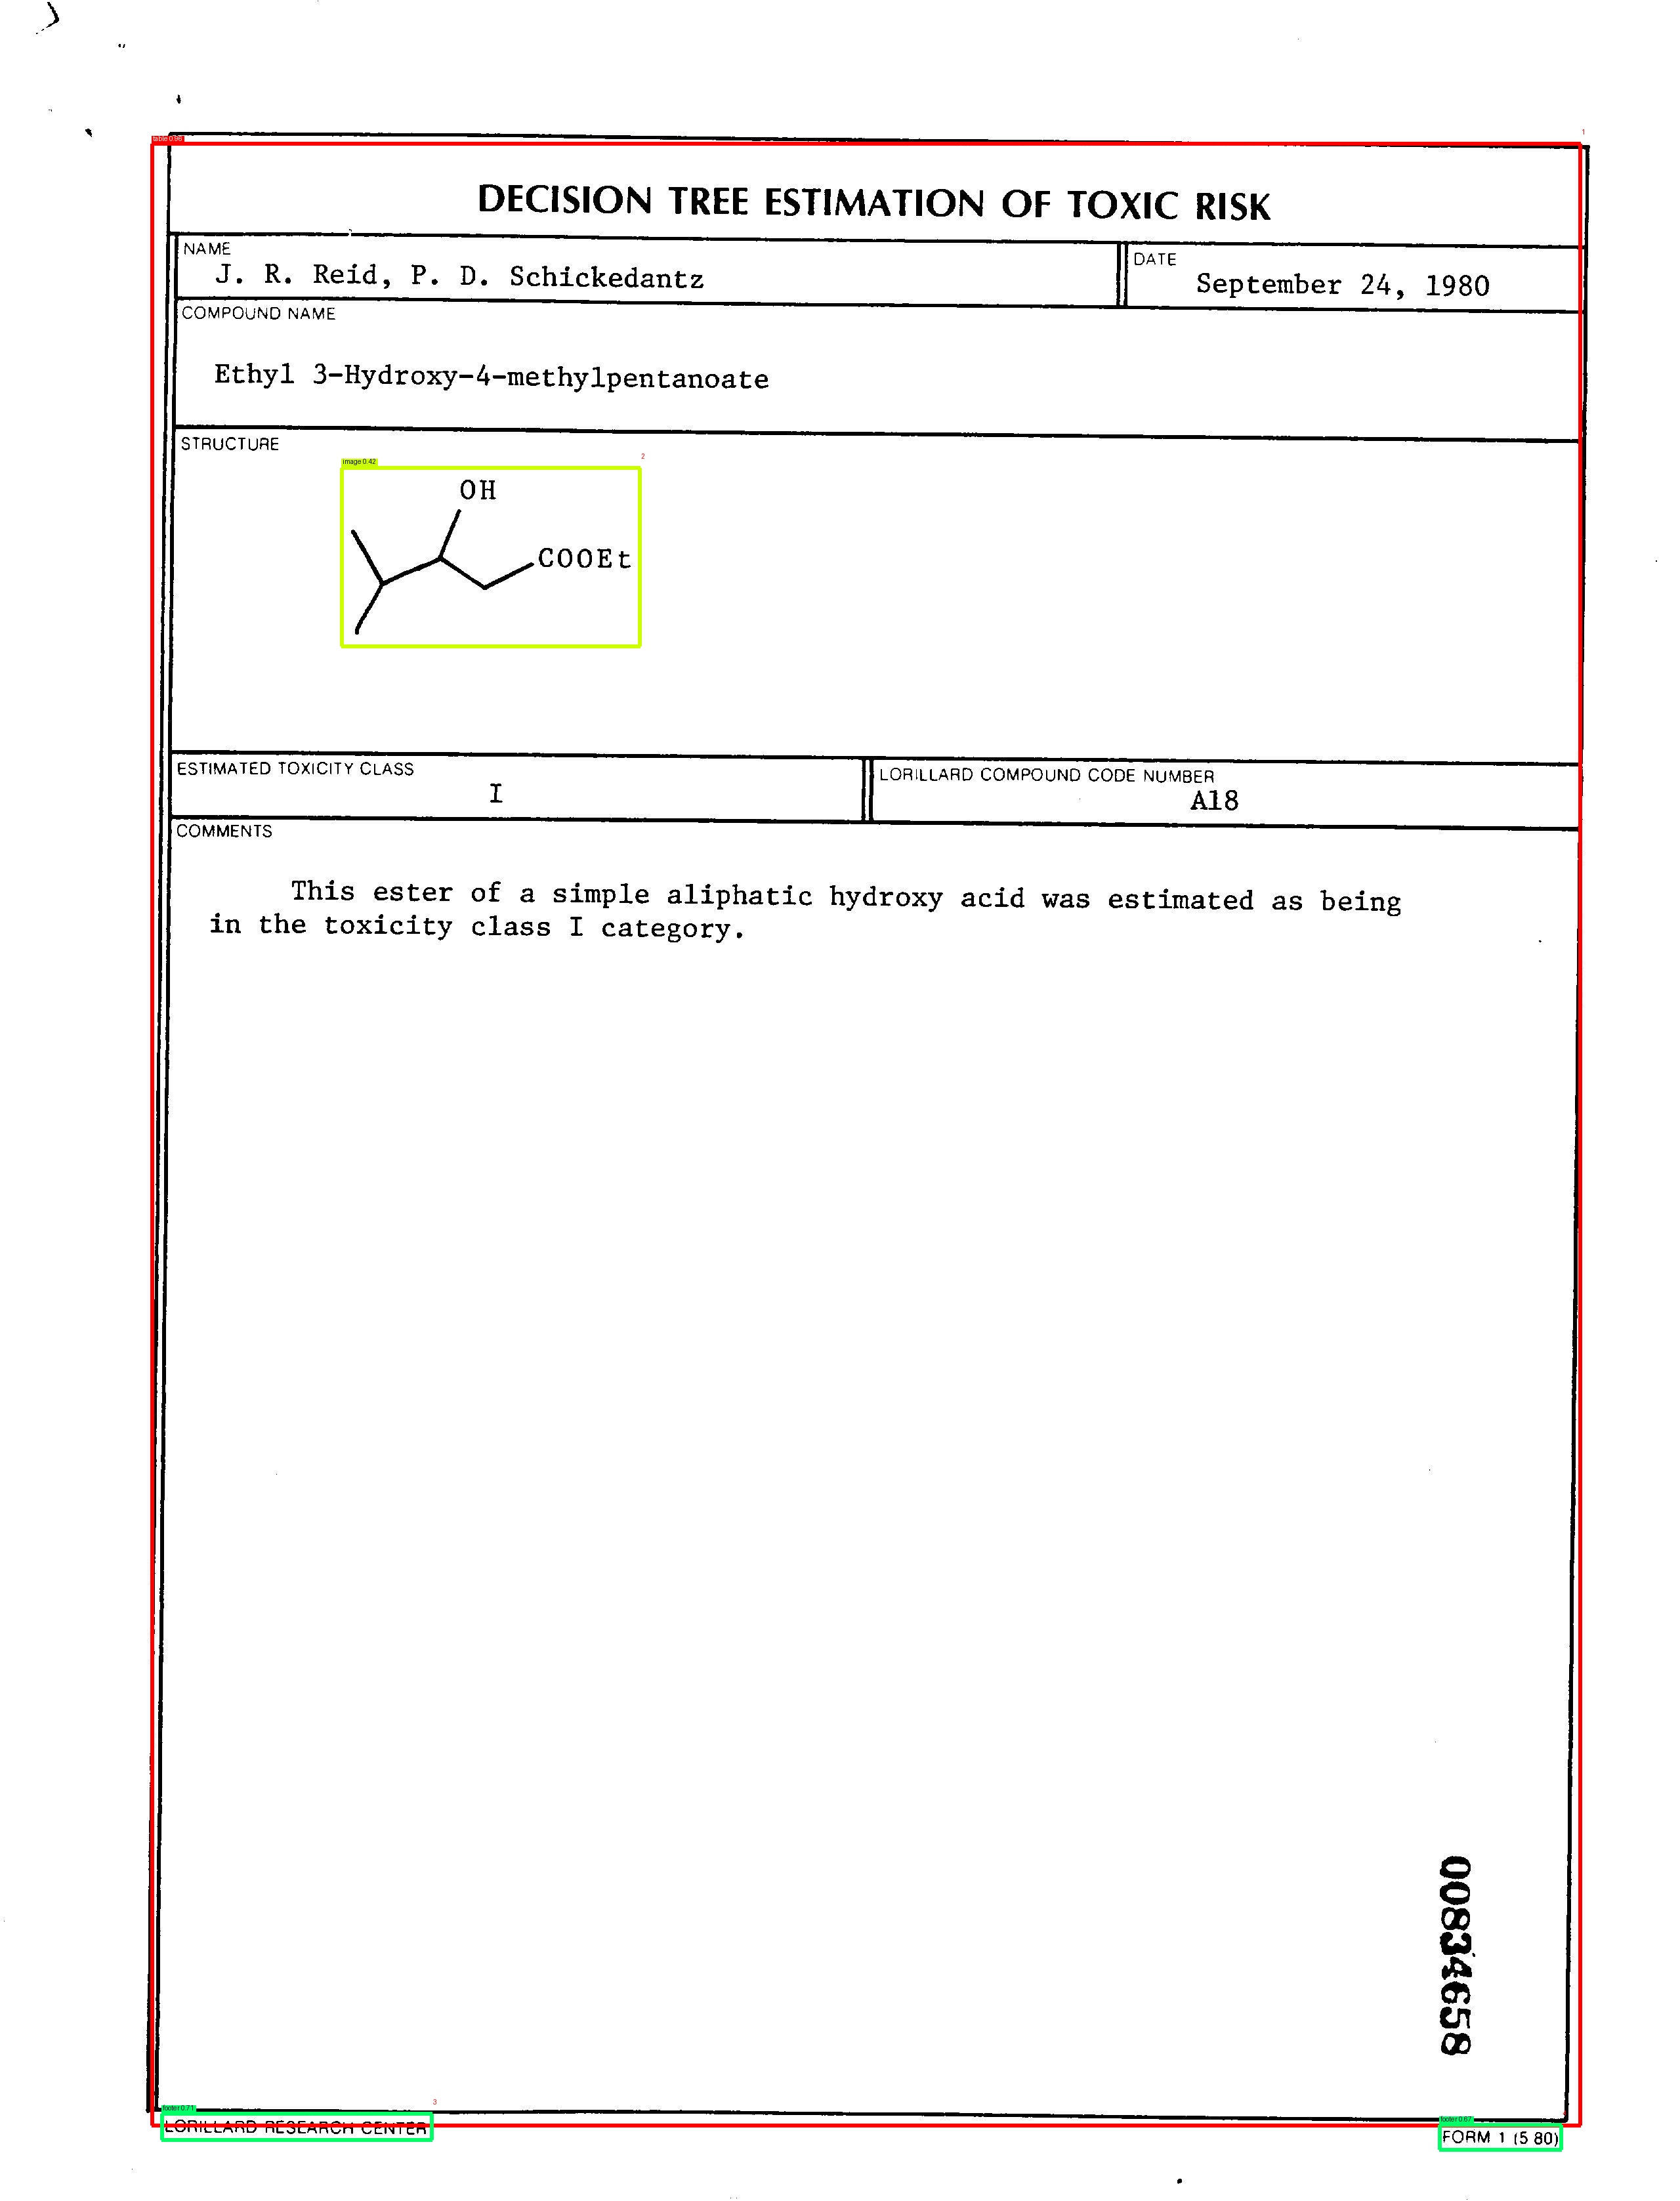
As we can see, PP-DocLayoutV3 classifies different components into their respective classes. If images are present, then the pipeline stores them in the imgs directory. Furthermore, we can see two JSON files. One is output from the layout model with the class labels and the bounding box coordinates. The other is the output after the GLM-OCR has run, with similar content but with an additional content key where the output from the OCR model has been added.
[
  [
    {
      "index": 0,
      "label": "table",
"content": "| NAME | DATE |
|---|---|
| J. R. Reid, P. D. Schickedantz | September 24, 1980 |
| COMPOUND NAME Ethyl 3-Hydroxy-4-methylpentanoate | |
| STRUCTURE Chemical structure of Ethyl 3-Hydroxy-4-methylpentanoate | |
| ESTIMATED TOXICITY CLASS | I |
| LORILLARD COMPOUND CODE NUMBER | A18 |
| COMMENTS This ester of a simple aliphatic hydroxy acid was estimated as being in the toxicity class I category. |
Finally, we have the markdown file. The following screenshot shows the complete Markdown file. The extracted images from the imgs directory were ingested when creating the final markdown file.
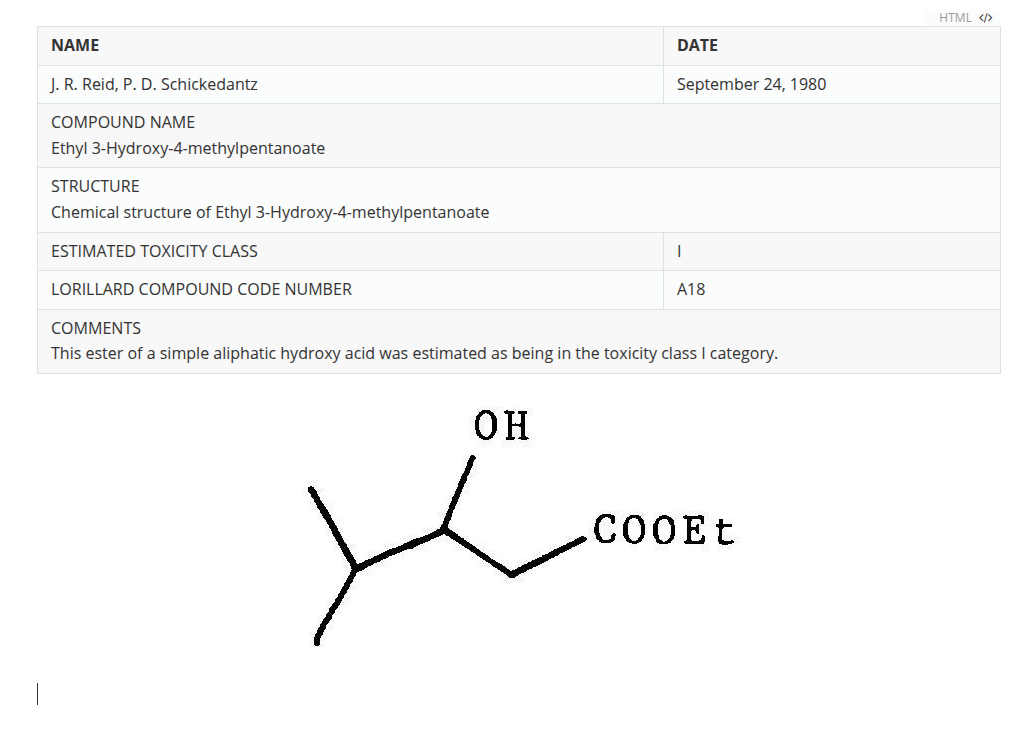
This is where the complete layout detection and the OCR pipeline shine. Let’s say that we have to feed this markdown as content for RAG to any LLM/VLM. It will be able to see the entire content and also the paths to the images, which it can read and understand.
Comparing Form Results Between OCR-Only vs Layout + OCR Pipeline
Let’s compare a few of the results between the two pipelines. For this, we are using the Scanned Images Dataset from Kaggle here.
You can download the dataset and put it in the input directory and rename the original directory as scanned_docs as we have seen in the earlier section when analyzing the directory structure.
We just need to start the Gradio application, provide the path to the Form data and run the pipeline.
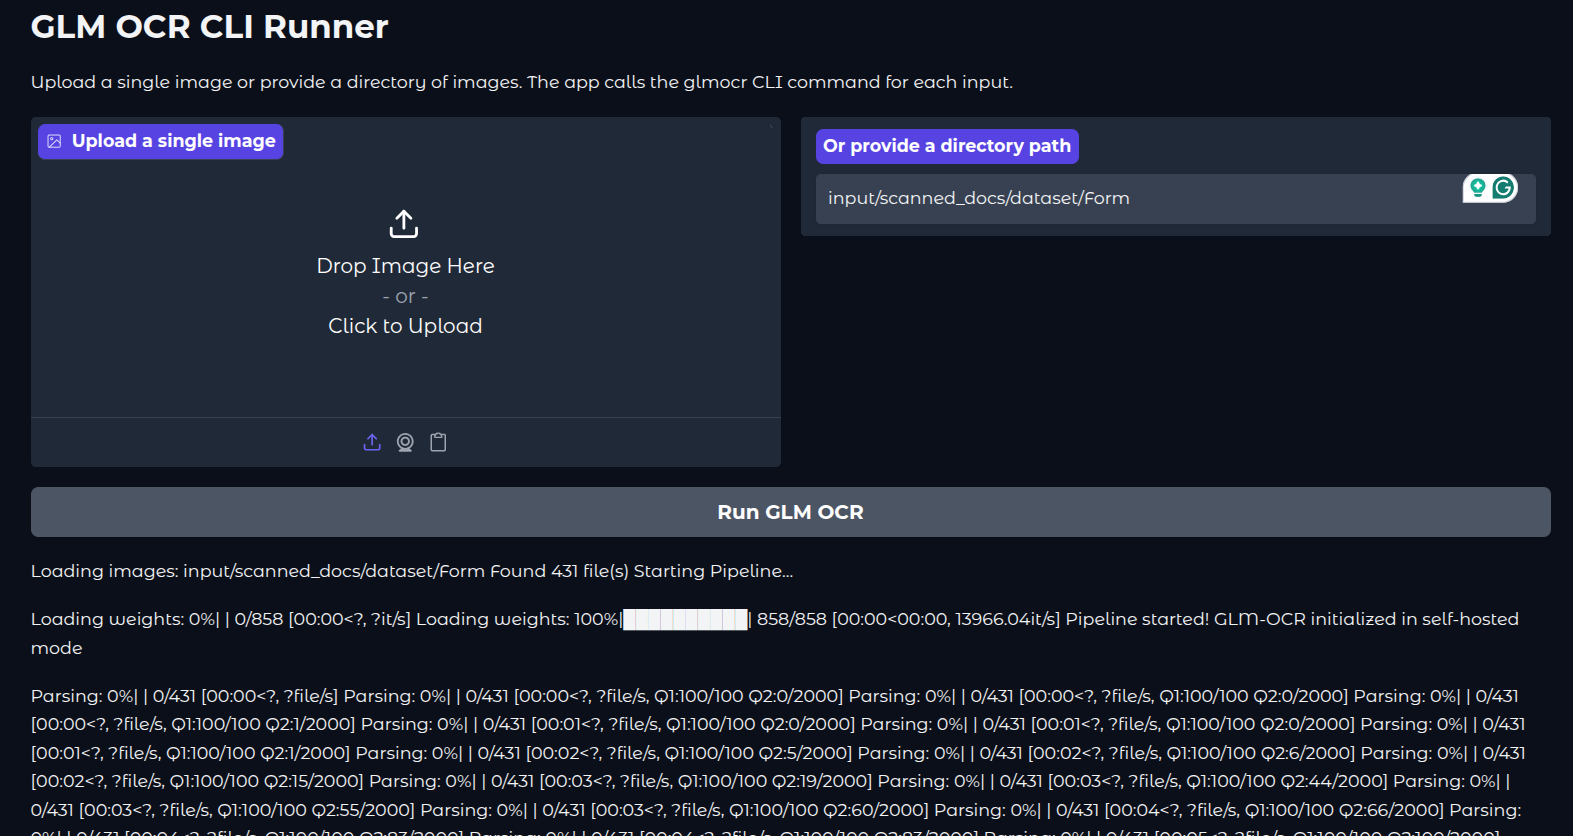
One difference to notice between the two Gradio applications is that the complete pipeline application does not contain a dropdown for the prompt. This is because the pipeline auto-selects the prompt based on the layout detection classes. For the OCR-only pipeline, we choose the prompt as Text recognition.
The following are a few comparisons between the two.
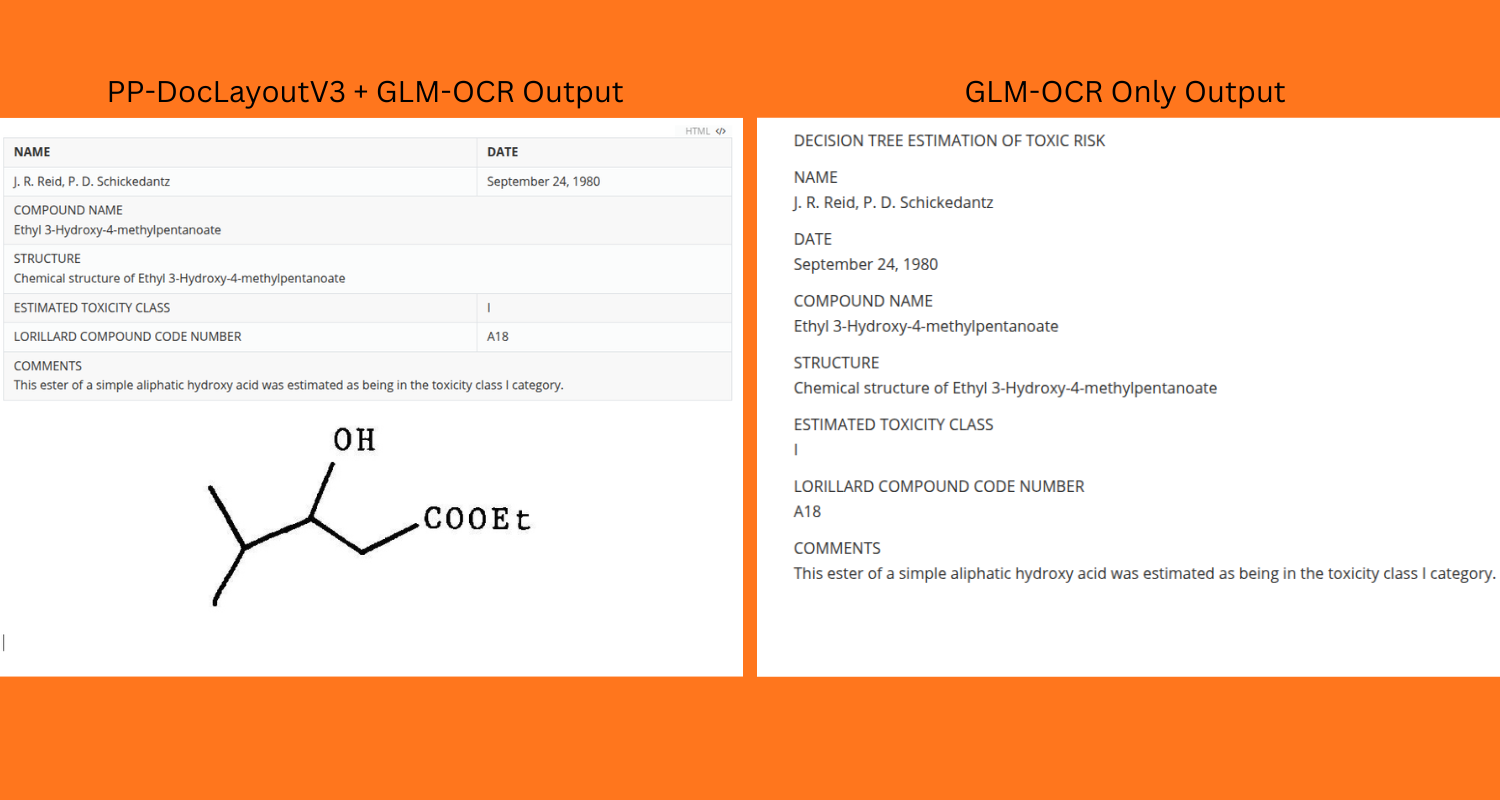
The biggest difference is, of course, the images being embedded into the final markdown files. However, apart from that, we can see that the complete pipeline generates a table wherever necessary. The OCR-only pipeline is plain text. Now, we could have chosen Table recognition prompt for the OCR-only pipeline as well; however, that would have meant every document would have been processed as a table irrespective of the content. This shows the strength of the layout detection, classification, and auto-prompt pipeline.
Let’s take a look at another example, which contains paragraphs and images.
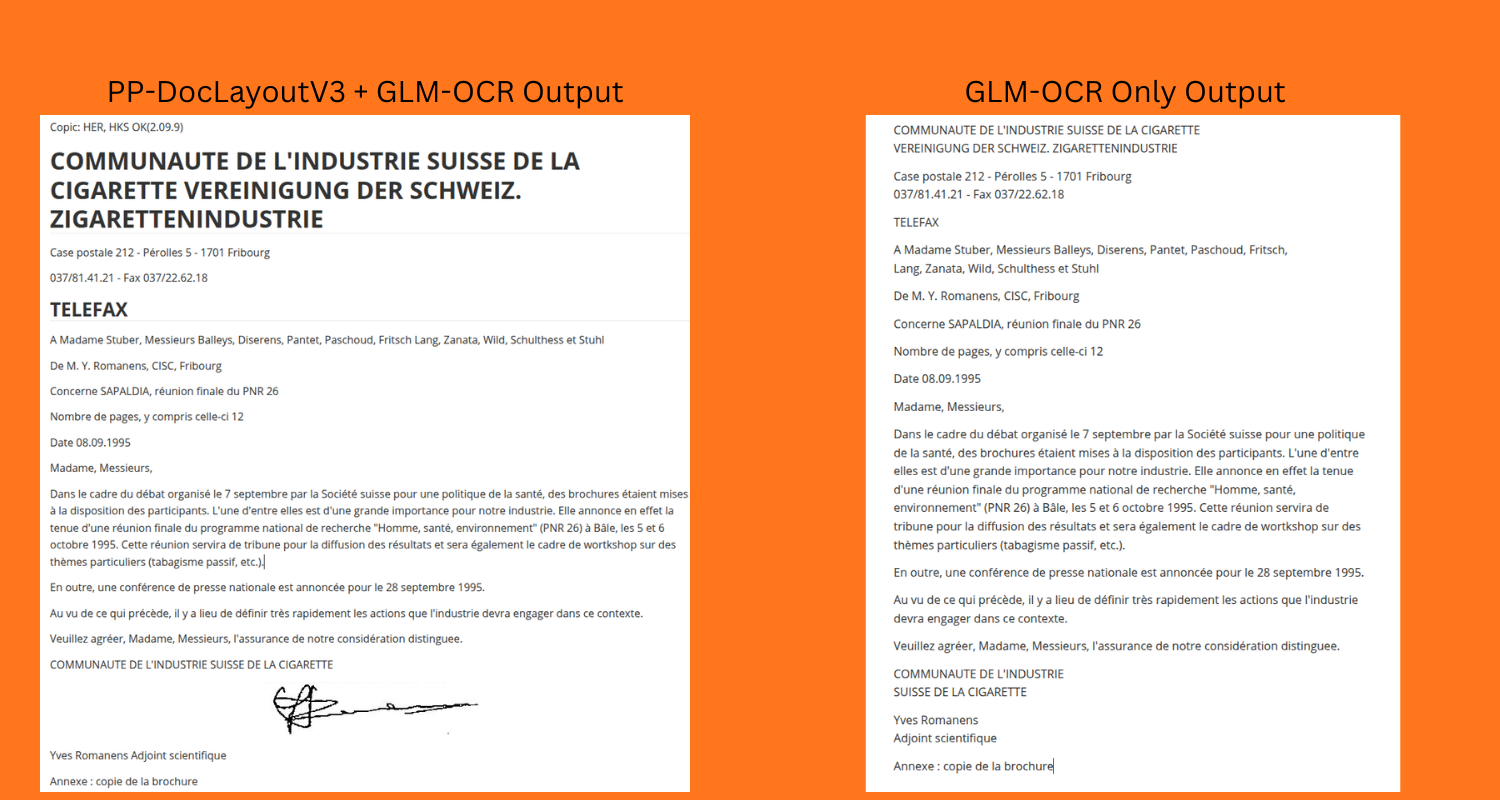
We can clearly see how structured the output of the complete pipeline is. It is able to detect the signatures at the end and place them at the correct position.
Note that we have not done much analysis on the quality of the OCR output, but rather an analysis of how the layout detection helps the OCR pipeline. In future articles, we will try to create RAG pipelines using GLM-OCR and downstream large language models.
Summary and Conclusion
In this article, we created self-hosted vLLM pipelines with GLM-OCR and layout detection. Along with that, we also explored how layout detection helps the OCR model compared to the OCR-only pipeline. I hope this article was worth your time.
If you have any questions, thoughts, or suggestions, please leave them in the comment section. I will surely address them.
You can contact me using the Contact section. You can also find me on LinkedIn, and X.