
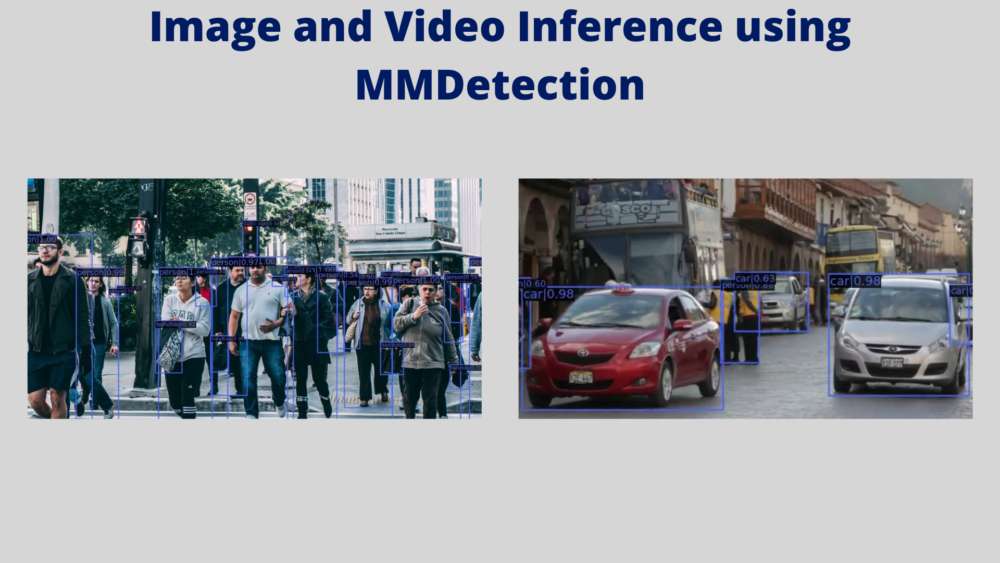
In this tutorial, we will use pretrained object detection and instance segmentation models for image and video inference using MMDetection. Running inference on images and videos becomes important when trying to understand a new deep learning library or framework. Before getting into the depths of training and fine-tuning object detection models, it is better to try out some of the simpler functionalities. For that reason, in this tutorial, we will explore the pretrained models and other inference based functionalities of MMDetection.
This is the second post in the Getting Started with MMDetection for Object Detection series.
- Install MMDetection on Ubuntu and Windows for RTX and GTX GPUs.
- Image and Video Inference using MMDetection.
In this post, we will cover the following points:
- We will start by discussing why this post will help you if you are learning object detection or starting to master MMDetection.
- Then we will get down to the technical and coding part of the post. This includes:
- How to know about all the pretrained models that the MMDetection library/toolbox provides?
- How to use MMCV utilities for effective image and video inference?
- Using almost any of the pretrained object detection and instance segmentation models for inference. Use models like Faster RCNN, YOLOv3 with MobileNet backbones, FCOS for anchor free object detection, and many more models from the MMDetection toolbox.
We will go through all the technical details that there are to create an effective image and video inference pipeline using MMDetection. We will try to minimize hardcoding as much as possible. This even includes providing model weights so that the scripts will download them dynamically from command line arguments.
I hope that you are interested to follow this tutorial till the end.
Before Moving Ahead…
If you are completely new to MMDetection, then I recommend going through the previous post. In that post, we cover the installation of MMDetection on Ubuntu and Windows operating systems for both RTX and GTX GPUs. We need MMDetection on our systems to execute all the inference code in this tutorial.
Why A Post On Image and Video Inference using MMDetection?
MMDetection has a huge collection of object detection, instance segmentation, and panoptic segmentation architectures. In fact, as of this writing, there are nearly 500 model weights across all the models and implementations.
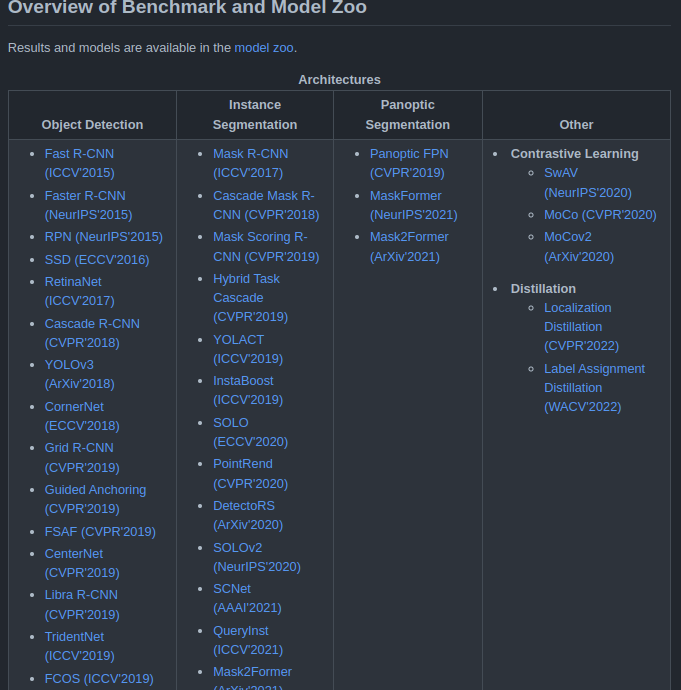
Figure 2 shows only a few of the many model architectures that MMDetection supports. You can find all the details here.
This list keeps on growing with each new release of MMDetection. Just to name a few, MMDetection provides a lot of state-of-the-art model weights. These can range from really big and server-deployable models like Faster RCNN to real-time object detectors like YOLOv3 with MobileNet backbone.
We can either use these weights and models to fine-tune them on our own datasets or run inference on images and videos. In this tutorial, we will focus on running inference on images and videos using a few of the MMDetection pretrained models.
Now, coming to why this post is important. When running inference on images and videos, we may want to try out a few of the models. And changing the model name each time and downloading the pretrained weights can be cumbersome (there are nearly 500 pretrained weights). For this reason, we will make this inference pipeline as automatic as possible.
We will write the code in such a manner that the scripts will figure out which model weights to load from the model name only. We will cover a lot of utility scripts here which will surely help you try out different models. This will also help you figure out the best one that you may want to fine-tune on your own dataset.
Directory Structure
Let’s take a look at the directory structure before moving into the coding part.
├── checkpoint
│   ├── yolact_r50_1x8_coco_20200908-f38d58df.pth
│   └── yolox_tiny_8x8_300e_coco_20211124_171234-b4047906.pth
├── input
│   ├── image_1.jpg
    |...
│   ├── video_1.mp4
│   └── video_2.mp4
├── mmdetection
│   ├── configs
│   ...
│   ├── setup.cfg
│   └── setup.py
├── outputs
│   ├── video_1_yolact_r50_1x8_coco.mp4
│   └── video_1_yolox_tiny_8x8_300e_coco.mp4
├── inference_image.py
├── inference_video.py
├── utils.py
└── weights.txt
- First, we have the
checkpointdirectory. This stores all the model weights that we will use for inference. All the model weights that the scripts will download will be stored here. - Next is the
inputdirectory. This contains all the images and videos that we will use for inference. - Then we have the
mmdetectiondirectory. This is quite important as it is the cloned MMDetection repository. It is important to note that along with installing MMDetection in the environment of our choice, it is important to clone the repository as well so that we can access the model configuration and meta files (more on this later). - The
outputsdirectory contains all the model detection output. - Then we have three Python files. One for carrying out inference on images, one for inference on videos, and another one containing all the helper functions. We will get into the details of these in the coding section of the tutorial.
- Finally, we have the
weights.txtfile that contains a list of all the pretrained models that the current version of MMDetection provides. We will discuss more on this later, including how to generate this and use this.
You will get access to all the files and folders except the mmdetection repository directory and the checkpoint directory when downloading the zip file for this tutorial. The checkpoint directory will be generated automatically when executing any of the inference scripts. And we will check in the next section the cloning of the mmdetection repository.
Image and Video Inference using MMDetection
Now, we will start with the coding section of the tutorial. We will cover all the steps in the following order.
- Cloning the MMDetection repository.
- Writing a few helper functions and utility scripts.
- Image inference using MMDetection models.
- Video inference using MMDetection models.
Let’s get into the details now.
Clone the MMDetection Repository
We need to clone the MMDetection repository first. This step needs to be done in either case, if you download the zip file for this tutorial, or you create the parent project directory on your own. The zip file does not include the cloned repo as cloning it manually is the best approach.
In the parent project directory, execute the following command.
git clone https://github.com/open-mmlab/mmdetection.git
After that, you should see the mmdetection directory as per the structure discussed in the previous section.
Helper Functions
Now, let’s get down to writing the helper functions. These are quite important. There are four helper functions in total and all of them will go into the utils.py file.
Writing the code for each of the functions will make things clearer. Let’s get on to that.
Import Statements and Function to Download Model Weights
We will start with the import statements for the utils.py file and writing the first function definition, that is, download_weights function.
Download Code
import os
import requests
import yaml
import glob as glob

from mmdet.apis import init_detector

def download_weights(url, file_save_name):
    """
    Download weights for any model.

    :param url: Download URL for the weihgt file.
    :param file_save_name: String name to save the file on to disk.
    """
    # Make chekcpoint directory if not presnet.
    if not os.path.exists('checkpoint'):
        os.makedirs('checkpoint')

    # Download the file if not present.
    if not os.path.exists(os.path.join('checkpoint', file_save_name)):
        file = requests.get(url)
        open(
            os.path.join('checkpoint', file_save_name), 'wb'
        ).write(file.content)
We can see that we import the init_detector function from the mmdet.apis module. This function will help us to load the trained model to memory.
Coming to the download_weights function now. This function downloads the pretrained model weights when we provide it with the correct URL (url) and a file name (file_save_name) to save it to disk.
Just to give an example. A model weight URL may look like this:
https://download.openmmlab.com/mmdetection/v2.0/faster_rcnn/faster_rcnn_r101_fpn_2x_coco/faster_rcnn_r101_fpn_2x_coco_bbox_mAP-0.398_20200504_210455-1d2dac9c.pth
And we will be using the following string name entirely to save the model to disk:
faster_rcnn_r101_fpn_2x_coco_bbox_mAP-0.398_20200504_210455-1d2dac9c.pth
This will ensure that the model names match everywhere and there are no discrepancies while loading them.
A few more things to keep in mind. The above function will also create the checkpoint directory if it is not already present. Also, none of the weight files will ever get overwritten by another as each one of them will have a unique name.
Function to Parse Model Meta Files and Get a List of All Model URLs
This part of very critical and may look a bit complicated initially. But let’s go through this part step-by-step and try to understand what each part does.
So, to download any model using any of the URLs we need to store the URLs somewhere. A Python list is a pretty simple way to store them in memory.
But where do we get all the model weight URLs? Well, we can find them inside mmdetection/configs where mmdetection represents the cloned repository directory. Inside the configs directory, apart from a few other subdirectories, there will be directories for all the model architectures and several Python files containing all the variants of the model architecture. And each model architecture also contains metafile.yml file.
Let’s make this even clearer. The following is the truncated directory tree structure for the faster_rcnn models.
mmdetection/configs/faster_rcnn/
├── faster_rcnn_r101_caffe_fpn_1x_coco.py
├── faster_rcnn_r101_caffe_fpn_mstrain_3x_coco.py
├── faster_rcnn_r101_fpn_1x_coco.py
├...
├── faster_rcnn_x101_32x4d_fpn_mstrain_3x_coco.py
├── faster_rcnn_x101_32x8d_fpn_mstrain_3x_coco.py
├── faster_rcnn_x101_64x4d_fpn_1x_coco.py
├── faster_rcnn_x101_64x4d_fpn_2x_coco.py
├── faster_rcnn_x101_64x4d_fpn_mstrain_3x_coco.py
├── metafile.yml
└── README.md
We can clearly see that among all the model variants, we have the metafile.yml. And this YAML file has the following structure/content.
Collections:
  - Name: Faster R-CNN
    Metadata:
      Training Data: COCO
      Training Techniques:
        - SGD with Momentum
        - Weight Decay
      Training Resources: 8x V100 GPUs
      Architecture:
        - FPN
        - RPN
        - ResNet
        - RoIPool
    Paper:
      URL: https://arxiv.org/abs/1506.01497
      Title: "Faster R-CNN: Towards Real-Time Object Detection with Region Proposal Networks"
    README: configs/faster_rcnn/README.md
    Code:
      URL: https://github.com/open-mmlab/mmdetection/blob/v2.0.0/mmdet/models/detectors/faster_rcnn.py#L6
      Version: v2.0.0

Models:
  - Name: faster_rcnn_r50_caffe_c4_1x_coco
    In Collection: Faster R-CNN
    Config: configs/faster_rcnn/faster_rcnn_r50_caffe_c4_1x_coco.py
    Metadata:
      Epochs: 12
    Results:
      - Task: Object Detection
        Dataset: COCO
        Metrics:
          box AP: 35.6
    Weights: https://download.openmmlab.com/mmdetection/v2.0/faster_rcnn/faster_rcnn_r50_caffe_c4_1x_coco/faster_rcnn_r50_caffe_c4_1x_coco_20220316_150152-3f885b85.pth

  - Name: faster_rcnn_r50_caffe_c4_mstrain_1x_coco
    In Collection: Faster R-CNN
    Config: configs/faster_rcnn/faster_rcnn_r50_caffe_c4_mstrain_1x_coco.py
    Metadata:
      Epochs: 12
    Results:
      - Task: Object Detection
        Dataset: COCO
        Metrics:
          box AP: 35.9
    Weights: https://download.openmmlab.com/mmdetection/v2.0/faster_rcnn/faster_rcnn_r50_caffe_c4_mstrain_1x_coco/faster_rcnn_r50_caffe_c4_mstrain_1x_coco_20220316_150527-db276fed.pth
...
Inside the Models attribute there are several Name attributes for each of the model variants. Again, each of them contains a Weights attribute holding the URL to download that model. We need all these URLs for each of the meta files in each of the model architecture directories. Then we will store them in a list.
And just as a heads up, while running inference, we will provide the model name from one of the Name attributes and our helper scripts will find the correct URL, the correct model .pth file, download it, and load it into memory as well.
Okay! the following is the parse_meta_file function.
def parse_meta_file():
    """
    Function to parse all the model meta files inside `mmdetection/configs`
    and return the download URLs for all available models.

    Returns:
        weights_list: List containing URLs for all the downloadable models.
    """
    root_meta_file_path = 'mmdetection/configs'
    all_metal_file_paths = glob.glob(os.path.join(root_meta_file_path, '*', 'metafile.yml'), recursive=True)
    weights_list = []
    for meta_file_path in all_metal_file_paths:
        with open(meta_file_path,'r') as f:
            yaml_file = yaml.safe_load(f)

        for i in range(len(yaml_file['Models'])):
            try:
                weights_list.append(yaml_file['Models'][i]['Weights'])
            except:
                for k, v in yaml_file['Models'][i]['Results'][0]['Metrics'].items():
                    if k == 'Weights':
                        weights_list.append(yaml_file['Models'][i]['Results'][0]['Metrics']['Weights'])
    return weights_list
To get an idea of what the weights_list looks like the following are the first three elements (URLs) in that list after this function has been executed.
['https://download.openmmlab.com/mmdetection/v2.0/ghm/retinanet_ghm_r50_fpn_1x_coco/retinanet_ghm_r50_fpn_1x_coco_20200130-a437fda3.pth',
'https://download.openmmlab.com/mmdetection/v2.0/ghm/retinanet_ghm_r101_fpn_1x_coco/retinanet_ghm_r101_fpn_1x_coco_20200130-c148ee8f.pth',
'https://download.openmmlab.com/mmdetection/v2.0/ghm/retinanet_ghm_x101_32x4d_fpn_1x_coco/retinanet_ghm_x101_32x4d_fpn_1x_coco_20200131-e4333bd0.pth']
I hope it is now clearer how this function works.
Function to Load the Model Weights
Before we can begin any type of image or video inference using the MMDetection models, we need to load the models and pretrained weights to memory.
The get_model function does that for us.
def get_model(weights_name):
    """
    Either downloads a model or loads one from local path if already
    downloaded using the weight file name (`weights_name`) provided.

    :param weights_name: Name of the weight file. Most like in the format
        retinanet_ghm_r50_fpn_1x_coco. SEE `weights.txt` to know weight file
        name formats and downloadable URL formats.

    Returns:
        model: The loaded detection model.
    """
    # Get the list containing all the weight file download URLs.
    weights_list = parse_meta_file()

    download_url = None
    for weights in weights_list:
        if weights_name in weights:
            print(f"Founds weights: {weights}\n")
            download_url = weights
            break

    assert download_url != None, f"{weights_name} weight file not found!!!"

    # Download the checkpoint file.
    download_weights(
        url=download_url,
        file_save_name=download_url.split('/')[-1]
    )
    checkpoint_file = os.path.join('checkpoint', download_url.split('/')[-1])

    # Build the model using the configuration file.
    config_file = os.path.join(
        'mmdetection/configs',
        download_url.split('/')[-3],
        download_url.split('/')[-2]+'.py'
    )
    model = init_detector(config_file, checkpoint_file)
    return model
This function just takes in the mode name. For example, we may provide the faster_rcnn_r50_caffe_c4_1x_coco as an argument for this function. Then this function does the other tasks for us. In short, it calls the parse_meta_file function to get the URL list (line 61). Then it loops through each of the URLs in the weights_list and if the weights_name that we provide is present, it initializes the download_url with that URL (lines 63 to 68).
If for some reason, the provided model weights are not found, we exit the program with an assertion error.
Else, we download the weights by calling the download_weights function (lines 73). Then we obtain the checkpoint file path and model configuration file by splitting the download_url string appropriately. The config_file is just the Python file for that specific model variant. We use these to load the model using the init_detector function on line 85 and finally return that model.
Function to Create a Text File Containing all the Trained Model URLs
The final helper function is not a mandatory one but a good one to have. The write_weights_txt_file function will generate a text file containing all the model URLs so that we can study and choose whatever model we want to use for inference.
def write_weights_txt_file():
    """
    Write all the model URLs to `weights.txt` to have a complete list and
    choose one of them.
    EXECUTE `utils.py` if `weights.txt` not already present.
    `python utils.py` command will generate the latest `weights.txt`
    file according to the cloned mmdetection repository.
    """
    # Get the list containing all the weight file download URLs.
    weights_list = parse_meta_file()
    with open('weights.txt', 'w') as f:
        for weights in weights_list:
            f.writelines(f"{weights}\n")
    f.close()

if __name__ == '__main__':
    write_weights_txt_file()
    weights_list = parse_meta_file()
    print(weights_list[:3])
In the end, we also have the main code block which creates the text file containing the weight URLs and prints a few of the URLs. You may execute the utils.py using the following command to obtain the weights.txt file.
python utils.py
This completes all the helper functions that we need. By now, it is pretty clear that the helper functions will do most of the heavy lifting for us. We just need to write the simple code for image and video inference later on.
Image Inference using MMDetection
Now, it’s time to get down to the actual inference scripts. In this section, we will go over the image inference using MMDetection and in the next, video inference using MMDetection.
If you followed the previous tutorial, then you may realize that we also have installed MMCV. We can call it the foundational library for all of the OpenMMLab computer vision toolboxes. As of that, MMCV provides a lot of wrapper functions which will reduce our work of calling OpenCV functions.
Let’s go over the code and see how to write code for running inference on images using MMDetection.
All of the code here will go into the inference_image.py script.
The first code block contains all the import statements and the construction of the argument parser.
from mmdet.apis import inference_detector
from utils import get_model

import argparse
import mmcv

# Contruct the argument parser.
parser = argparse.ArgumentParser()
parser.add_argument(
    '-i', '--input', default='mmdetection/demo/demo.jpg',
    help='path to the input file'
)
parser.add_argument(
    '-w', '--weights', default='yolov3_mobilenetv2_320_300e_coco',
    help='weight file name'
)
parser.add_argument(
    '-t', '--threshold', default=0.5, type=float,
    help='detection threshold for bounding box visualization'
)
args = vars(parser.parse_args())
We import the inference_detector function from the mmdet.apis module. We need this to carry out the inference as this function will accept the model, the input image, and forward passes the image through the model.
For the argument parser, we have three flags. One to provide the path to the input data, one for the model name or the weight file name, and the final one for the confidence threshold to filter out the detections.
Initialize the Model and Carry Out the Inference
The next few lines of code are going to be pretty simple.
We will:
- Initialize the model.
- Read the image.
- Forward pass the image through the model to carry out the inference.
- Visualize and save the result to disk.
# Build the model.
model = get_model(args['weights'])

img_path = args['input']
image = mmcv.imread(img_path)
# Carry out the inference.
result = inference_detector(model, image)
# Show the results.
frame = model.show_result(image, result, score_thr=args['threshold'])
mmcv.imshow(frame)
# Initialize a file name to save the reuslt.
save_name = f"{args['input'].split('/')[-1].split('.')[0]}_{args['weights']}"
mmcv.imwrite(frame, f"outputs/{save_name}.jpg")
We just call the get_model functions from our utils module by providing the model name as the argument to initialize the model. As you may observe, we are using mmcv functions instead of OpenCV functions to read the image, show the outputs, and also, write the output image to disk. These all work as wrappers around the OpenCV functions and we do not need to do any color conversion or any processing by using these functions.
The predictions happen on line 28. We call the show_result method of the model which outputs the final annotated image by applying the detection threshold. Then we visualize the results and save the image on disk.
Execute image_inference.py
Note that all the image and video inferences that are shown here were carried on a machine with 10GB RTX 3080 GPU, a 10th generation i7 CPU, and 32GB of RAM.
Here, we will run inference on just a single image. We will carry out much more extensive experiments for the video inference part.
To run inference on the image present in the input directory, execute the following command from the command line/terminal.
python inference_image.py --input input/image_1.jpg --weights faster_rcnn_r50_fpn_1x_coco
When you execute this for the first time, the weights will be downloaded to the checkpoint folder. In fact, providing any new model name for the --weights flag will download the weights the first time. It will use the weights from the checkpoint folder in the subsequent runs.
We are using Faster RCNN Model with ResNet50 backbone which has been pretrained on the COCO dataset. The following is the result.
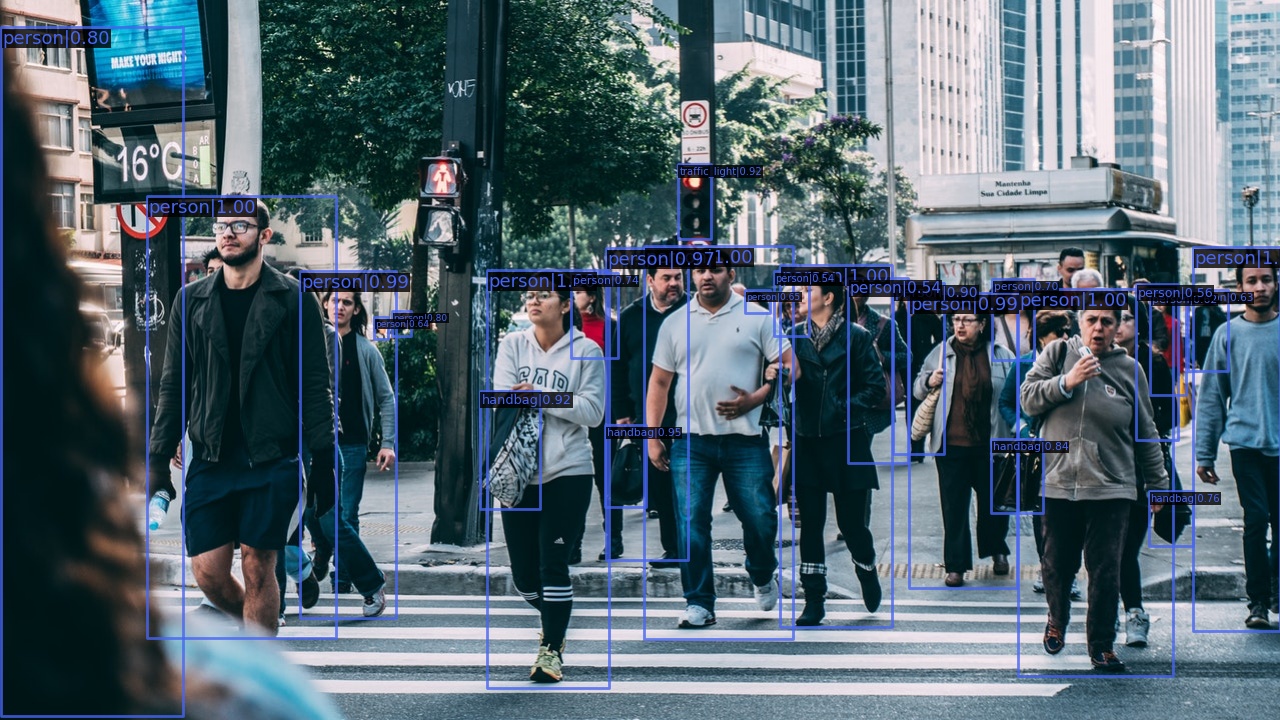
The detections look pretty good. This is expected also as we are using quite a large model. In fact, it is able to detect the persons at the far back which is quite amazing.
Video Inference using MMDetection
Now, we will move on to the video inference part. The code will remain almost the same with a few minor changes that come with when dealing with video frames.
The code for video inference will go into the inference_video.py file.
As usual, let’s start with the import statements and the argument parsers.
from mmdet.apis import inference_detector
from utils import get_model

import argparse
import mmcv
import cv2
import time

# Contruct the argument parser.
parser = argparse.ArgumentParser()
parser.add_argument(
    '-i', '--input', default='input/video_1.mp4',
    help='path to the input file'
)
parser.add_argument(
    '-w', '--weights', default='yolov3_mobilenetv2_320_300e_coco',
    help='weight file name'
)
parser.add_argument(
    '-t', '--threshold', default=0.5, type=float,
    help='detection threshold for bounding box visualization'
)
args = vars(parser.parse_args())
One additional import statement here is cv2 which we need for annotating a few extra things on the output frame. There is no other change either in the imports or the argument parser.
Next, let’s build the model and write some code for the video preprocessing and post-processing.
# Build the model.
model = get_model(args['weights'])

cap = mmcv.VideoReader(args['input'])
save_name = f"{args['input'].split('/')[-1].split('.')[0]}_{args['weights']}"
fourcc = cv2.VideoWriter_fourcc(*'mp4v')
out = cv2.VideoWriter(
    f"outputs/{save_name}.mp4", fourcc, cap.fps,
    (cap.width, cap.height)
)

frame_count = 0 # To count total frames.
total_fps = 0 # To get the final frames per second.
Instead of the OpenCV functions, we use the mmcv function to read the video frames. We also initialize the VideoWriter so that we can save the resulting video frames to disk. We also need the frame_count and total_fps variables for counting the frames when looping through them and keeping track of the total Frames Per Second.
Now, we need to loop through the video frames and run inference on each frame.
for frame in mmcv.track_iter_progress(cap):
    # Increment frame count.
    frame_count += 1
    start_time = time.time()# Forward pass start time.
    result = inference_detector(model, frame)
    end_time = time.time() # Forward pass end time.
    # Get the fps.
    fps = 1 / (end_time - start_time)
    # Add fps to total fps.
    total_fps += fps
    show_result = model.show_result(frame, result, score_thr=args['threshold'])
    # Write the FPS on the current frame.
    cv2.putText(
        show_result, f"{fps:.3f} FPS", (15, 30), cv2.FONT_HERSHEY_SIMPLEX,
        1, (0, 0, 255), 2, cv2.LINE_AA
    )

    mmcv.imshow(show_result, 'Result', wait_time=1)
    out.write(show_result)

# Release VideoCapture()
out.release()
# Close all frames and video windows
cv2.destroyAllWindows()
# Calculate and print the average FPS
avg_fps = total_fps / frame_count
print(f"Average FPS: {avg_fps:.3f}")
The forward pass happens on line 41. We capture the time-stamps before and after the inference step so as to calculate the FPS for each frame. After calculating the FPS, we also annotate the FPS on the resulting frame on line 49. Then we visualize the result and write the resulting frame to disk.
Finally, we release the VideoCapture objects, destroy all the OpenCV windows from the memory and print the average FPS. With this, we complete all the code that we need for carrying out inference on videos.
Execute inference_video.py
Note that all the image and video inferences that are shown here were carried on a machine with 10GB RTX 3080 GPU, a 10th generation i7 CPU, and 32GB of RAM.
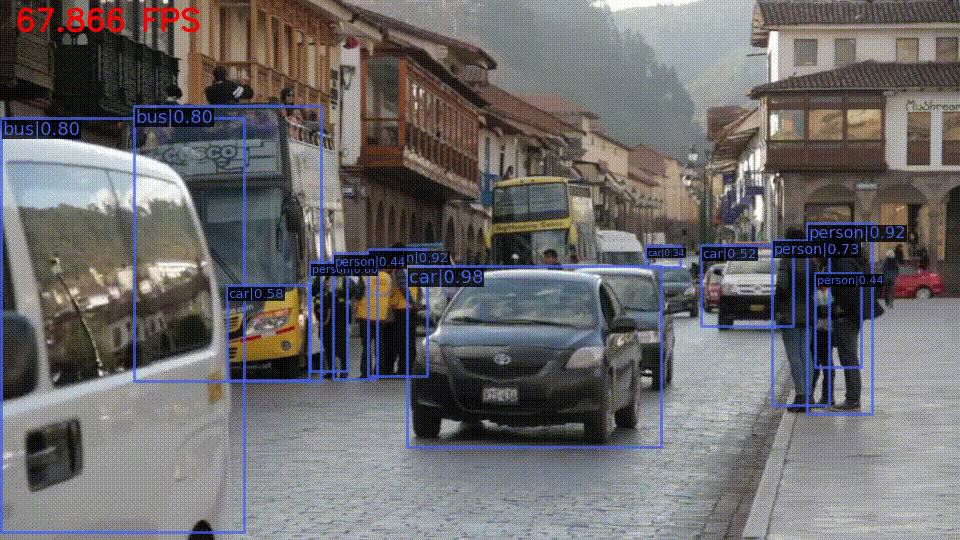
We will use three different models for running inference on video_1.mp4 and video_2.mp4 present in the input directory.
- FCOS with ResNet50 backbone for
video_1.mp4. - YOLOv3 with MobileNetv2 backbone for
video_2.mp4. - SSD Lite with MobileNetv2 backbone for
video_2.mp4.
First is the FCOS model inference. We are using a confidence threshold of 0.25 to filter out the detections for visualization. This will be the same for all cases.
python inference_video.py --input input/video_1.mp4 --weights fcos_r50_caffe_fpn_gn-head_1x_coco -t 0.25
The following is the output after the inference completes.
[>>>>>>>>>>>>>>>>>>>>>>>>>>>>>>>>>>>>>>>>>>>>>>>>>>] 640/640, 7.4 task/s, elapsed: 86s, ETA:     0s
Average FPS: 19.815
The model gave an average FPS of around 20. Frankly, the FPS does not look too good considering the fact that we ran this on an RTX 3080 GPU. Still, let’s take a look at the video results.
The detections are good. So, whatever the model lacks in speed, it makes up for it with good detections.
Next, let’s try out the YOLOv3 model with MobileNetv2 backbone.
python inference_video.py --input input/video_2.mp4 --weights yolov3_mobilenetv2_320_300e_coco -t 0.25
Here, is the average FPS output.
[>>>>>>>>>>>>>>>>>>>>>>>>>>>>>>>>>>>>>>>>>>>>>>>>>>] 856/856, 9.1 task/s, elapsed: 94s, ETA:     0s
Average FPS: 93.005
The model is processing 93 frames per second. This is really good. Let’s check out the output.
The detections are also good. In fact, considering the FPS, the detections are not bad at all. It is even detecting the two persons at the far right end in the initial frames.
Finally, the SSD Lite model with the MobileNetv2 backbone. This will also provide us with a comparison of the above results.
python inference_video.py --input input/video_2.mp4 --weights ssdlite_mobilenetv2_scratch_600e_coco -t 0.25
[>>>>>>>>>>>>>>>>>>>>>>>>>>>>>>>>>>>>>>>>>>>>>>>>>>] 856/856, 9.7 task/s, elapsed: 89s, ETA:     0ss
Average FPS: 71.271
The mode is processing around 20 FPS less compared to the above YOLOv3 model. The following is the output video.
Interestingly, the detections are also slightly worse compared to the YOLOv3 model. But they are not too bad.
Further Experiments
I hope that the above experiments provide some perspective on the working of MMDetection and how to use its pretrained models for inference. Feel free to use other models for inference on varied videos. Also, please share your view and results in the comment section if you find something interesting.
Summary and Conclusion
In this tutorial, we had a detailed walkthrough of using MMdetection for image and video inference. We saw how to check out all the pretrained models that are available. Along with that, we also got to know how to use any of the pretrained models for inference. I hope that this tutorial was helpful to you.
If you have any doubts, thoughts, or suggestions, please leave them in the comment section. I will surely address them.
You can contact me using the Contact section. You can also find me on LinkedIn, and X.

I can’t download the source code,how to do it?
I can’t download the source code,how to do it?
Hello Ean. Sorry to hear that you are facing issues. May I know which browser you are using? And if possible please use Chrome/Edge/Firefox browser for entering the email and downloading the code. Sometimes, adblockers may cause issues as well.
Hello Sovit,
Your article is very interesting. For a semester thesis I have the task to build a detection and prediction pipeline. However, the input for the detection isn’t a mp4 video, but a ros2 node. Do you know ros2 and do you think this is possible with adapting your code? I would love to hear your opinion!
Hello Morit. I have never worked with ros2 node. But if I start working on this I will surely try to write a post on that.