
Preparing data for deep learning is one of the most important steps. Deep neural networks need a lot of data most of the time. Perhaps, this is one of the drawbacks when using deep learning to solve a problem. There are many solutions out there to tackle this situation. But what if we do not have time to do a lot of research? What if we need a working deep learning model as soon as possible and improve later? Well, there is a solution which is fairly easy to follow as it uses the data that we already have at hand.
In this post, you will get to learn how to do image augmentation with Keras. You will learn:
1. How to tackle the problem of fewer data in deep learning (mainly for image data).
2. How to use image augmentation?
3. How to get a good result for a deep learning model with the data at hand?
Why Image Augmentation?
Sometimes, the data that we have is just not enough to get good results quickly. We need to search for more data, clean and preprocess them and then feed them to our deep learning model. That obviously takes a lot of time. Here, image augmentation can help a lot.
Basically, image augmentation is the process of changing the available images by rotating them, flipping them, changing the hue a bit and more. By doing this we can provide our neural network different styles of the present image without collecting external data. This helps to have a broader idea about how our model will perform when we will provide it with even more relevant images later on. This also ensures that we have a good enough working model which can be improved later.
So, let’s start.
Image Augmentation with Keras: The Pipeline
In this section, we will see the steps we need to follow for proper image augmentation using Keras. In the next section, we will go over many of the image augmentation procedures that Keras provides.
Keras provides the ImageDataGenerator class for real-time data augmentation. This class provides a lot of arguments for you to augment the images. To name a few, you can rotate, zoom, flip, rescale the images. The generator iterates over the data and returns the augmented images in batches.
You can initialize an ImageDataGenerator by the following method:
datagen = ImageDataGenerator()
Now that you have initialized the ImageDataGenerator class, you can use the fit() method to compute the parameter quantities and fit them on the data.
datagen.fit(train_data)
The fit() method is important because some values in the data set may be small numerically but statistically very important for the model to learn properly. In that case, this method will calculate the proper statistical values that are required. Also, you only need to use the fit() method if you set the featurewise_center or featurewise_std_normalization or zca_whitening to True.
Next, we need to generate batches of images based on the image generator properties that we have defined. Keras provides flow(), flow_from_directory() and flow_from_dataframe() for this purpose. These methods generate the batches and return them as well. You can choose to use any of them based on your requirements. For example, the following code shows the usage of the flow() method:
x_train_batch = datagen.flow(train_data, batche_size=32)
After we have finished the image augmentation, the final step is obviously using those augmented images to train our model. For that, we use the fit_generator() method instead of the fit() method. This method performs real-time data augmentation when we provide the data generator that we have defined above.
fit_generator(datagen, batch_size=32, steps_per_epochs=len(x_train)/32, epochs=32)
Different Image Augmentation Techniques in Keras
In this section, we will try to cover the different image augmentation techniques in Keras. For that, we will work with the MNIST handwritten digits data.
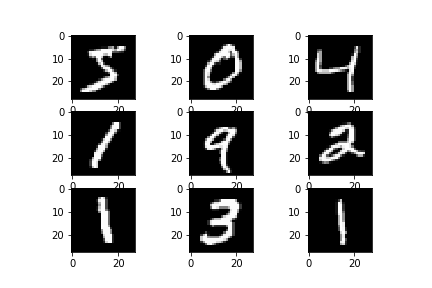
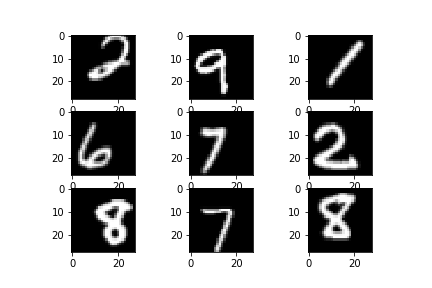
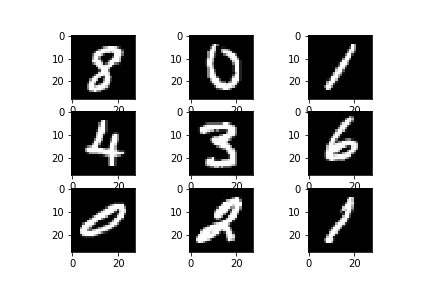
First, let’s see some images without applying any augmentation techniques.
from keras.datasets import mnist

import matplotlib.pyplot as plt

(x_train, y_train), (x_test, y_test) = mnist.load_data()

for i in range(9):
  plt.subplot(330 + 1 + i)
  plt.imshow(x_train[i], cmap='gray')
plt.show()
Feature Normalization
Let’s start with featurewise_center and featurewise_std_normalization. Both of these take boolean values. featurewise_center sets the mean over the data to 0 and featurewise_std_normalization divides the data by the standard deviation. So, we can say that after using these two parameters the mean will be 0 and the standard deviation will be 1.
from keras.preprocessing.image import ImageDataGenerator
from keras.datasets import mnist

import matplotlib.pyplot as plt

(x_train, y_train), (x_test, y_test) = mnist.load_data()

datagen = ImageDataGenerator(featurewise_center=True, featurewise_std_normalization=True)

# reshape the images
x_train = x_train.reshape(x_train.shape[0], 1, 28, 28)
x_test = x_test.reshape(x_test.shape[0], 1, 28, 28)

# fit the data
datagen.fit(x_train)
for x_batch in datagen.flow(x_train):
  for i in range(0, 9):
    plt.subplot(330 + 1 + i)
    plt.imshow(x_batch[i].reshape(28, 28), cmap=('gray'))
  plt.show()
  break
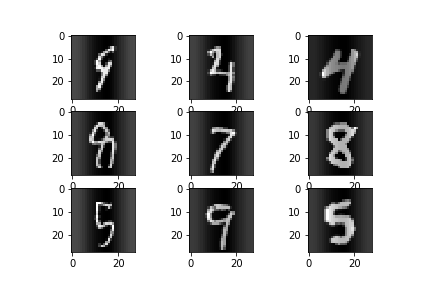
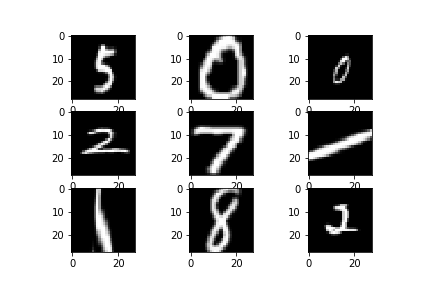
You can see that now, some digits appear darker and some digits appear lighter in color.
Rotations
We can also rotate the images by different angles by using the rotation_range augmentation parameter.
By using the rotated images, we can train the model on many different cases of images that were not previously in the original dataset. The argument takes the rotation range in degrees.
The following is the code implementation for the same.
from keras.preprocessing.image import ImageDataGenerator
from keras.datasets import mnist
from keras import backend as K
K.set_image_dim_ordering('th')

import matplotlib.pyplot as plt

(x_train, y_train), (x_test, y_test) = mnist.load_data()

datagen = ImageDataGenerator(rotation_range=90)

# reshape the images
x_train = x_train.reshape(x_train.shape[0], 1, 28, 28)
x_test = x_test.reshape(x_test.shape[0], 1, 28, 28)

# convert from int to float
x_train = x_train.astype('float32')
x_test = x_test.astype('float32')

# fit the data
datagen.fit(x_train)
for x_batch, y_batch in datagen.flow(x_train, y_train, batch_size=9):
  for i in range(0, 9):
    plt.subplot(330 + 1 + i)
    plt.imshow(x_batch[i].reshape(28, 28), cmap=('gray'))
  plt.savefig('rotation.png')
  plt.show()
  break
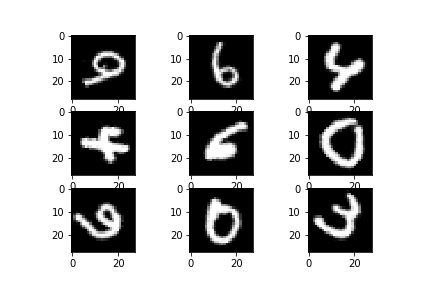
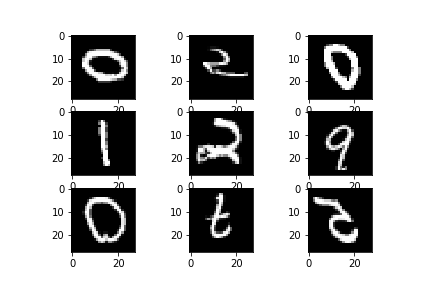
Now you can see that the images are rotated by 90 degrees. This will cover many cases for the model where the written digits may not be properly aligned. This is most useful when you will use the model for testing purposes with real-world data.
ZCA Whitening
ZCA (Zero-Phase Component Analysis) whitening is a transformation technique which decorrelates the data features, in this case the image pixels. This preprocessing method is very similar to PCA (Principal Component Analysis).
Then why use ZCA instead of PCA? This is because ZCA preserves the spatial arrangement of the pixels which is very important when using Convolutional Neural Networks for Deep Learning. So, when using ZCA, we will get whitened images but the images will look similar to the original ones spatially.
In Keras, we can use zca_whitening argument to do so.
from keras.preprocessing.image import ImageDataGenerator
from keras.datasets import mnist

import matplotlib.pyplot as plt

(x_train, y_train), (x_test, y_test) = mnist.load_data()

datagen = ImageDataGenerator(zca_whitening=True)

# reshape the images
x_train = x_train.reshape(x_train.shape[0], 1, 28, 28)
x_test = x_test.reshape(x_test.shape[0], 1, 28, 28)

# convert from int to float
x_train = x_train.astype('float32')
x_test = x_test.astype('float32')

# fit the data
datagen.fit(x_train)
for x_batch, y_batch in datagen.flow(x_train, y_train, batch_size=9):
  for i in range(0, 9):
    plt.subplot(330 + 1 + i)
    plt.imshow(x_batch[i].reshape(28, 28), cmap=('gray'))
  plt.savefig('zca.png')
  plt.show()
  break
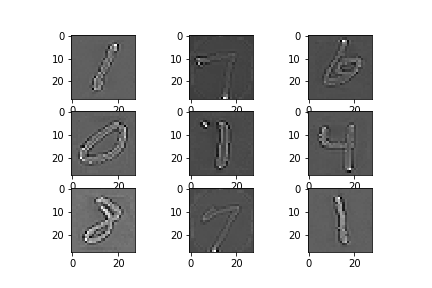
The images have become lighter in color but the pixels are still identically arranged when compared with the original images. Also, you can see that the outline of the digits has become much more prominent now.
Horizontal and Vertical Flips
We can also flip the images horizontally and vertically using the horizontal_flip and vertical_flip arguments respectively. These take boolean values as inputs.
The following code snippet shows how to do flips along the horizontal and vertical axes.
from keras.preprocessing.image import ImageDataGenerator
from keras.datasets import mnist

import matplotlib.pyplot as plt

(x_train, y_train), (x_test, y_test) = mnist.load_data()

datagen = ImageDataGenerator(horizontal_flip=True, vertical_flip=True)

# reshape the images
x_train = x_train.reshape(x_train.shape[0], 1, 28, 28)
x_test = x_test.reshape(x_test.shape[0], 1, 28, 28)

# convert from int to float
x_train = x_train.astype('float32')
x_test = x_test.astype('float32')

# fit the data
datagen.fit(x_train)
for x_batch, y_batch in datagen.flow(x_train, y_train, batch_size=9):
  for i in range(9):
    plt.subplot(330 + 1 + i)
    plt.imshow(x_batch[i].reshape(28, 28), cmap=('gray'))
  plt.savefig('flip.png')
  plt.show()
  break
This would help the model to train on many more instances which are not the part of the original dataset.
Zooming
Zooming is another augmentation technique which can become useful in many cases.
We can perform both magnification and demagnification of the images using the zoom_range argument. This argument takes a float value between 0.0 and 1.0. Then it either magnifies or demagnifies the images randomly by taking the upper value as 1 + zoom_range and lower value as 1 - zoom_range.
Let’s see the code which helps us to achieve the desired results.
from keras.preprocessing.image import ImageDataGenerator
from keras.datasets import mnist
from keras import backend as K
K.set_image_dim_ordering('th')

import matplotlib.pyplot as plt

(x_train, y_train), (x_test, y_test) = mnist.load_data()

datagen = ImageDataGenerator(zoom_range=0.8)

# reshape the images
x_train = x_train.reshape(x_train.shape[0], 1, 28, 28)
x_test = x_test.reshape(x_test.shape[0], 1, 28, 28)

# convert from int to float
x_train = x_train.astype('float32')
x_test = x_test.astype('float32')

# fit the data
datagen.fit(x_train)
for x_batch, y_batch in datagen.flow(x_train, y_train, batch_size=9):
  for i in range(9):
    plt.subplot(330 + 1 + i)
    plt.imshow(x_batch[i].reshape(28, 28), cmap=('gray'))
  plt.savefig('zoom.png')
  plt.show()
  break
This technique may not be particularly helpful in digit classification task as it may cut out some relevant features. But this surely can be used in tasks such as environmental image classification and also facial recognition where we need a mix of both big and small images to cover a lot of examples.
Shift Range
We can shift the images height wise and width wise as well. The height_shift_range and width_shift_range parameters will help us to do that.
from keras.preprocessing.image import ImageDataGenerator
from keras.datasets import mnist
from keras import backend as K
K.set_image_dim_ordering('th')

import matplotlib.pyplot as plt

(x_train, y_train), (x_test, y_test) = mnist.load_data()

datagen = ImageDataGenerator(height_shift_range=0.2, width_shift_range=0.2)

# reshape the images
x_train = x_train.reshape(x_train.shape[0], 1, 28, 28)
x_test = x_test.reshape(x_test.shape[0], 1, 28, 28)

# convert from int to float
x_train = x_train.astype('float32')
x_test = x_test.astype('float32')

# fit the data
datagen.fit(x_train)
for x_batch, y_batch in datagen.flow(x_train, y_train, batch_size=9):
  for i in range(9):
    plt.subplot(330 + 1 + i)
    plt.imshow(x_batch[i].reshape(28, 28), cmap=('gray'))
  plt.savefig('shift.png')
  plt.show()
  break
Shifting the images with respect to the height and width will provide us with cases when the images are not in the center of the frame.
Shear Intensity
Shearing Intensity may not come as a helpful technique is most cases, but still, it is worth knowing. Using the shear_range parameter, which takes a float value, we can produce a slightly deformed image. This produces an image which appears as if some sort of pressure is being applied.
Let’s see the code.
from keras.preprocessing.image import ImageDataGenerator
from keras.datasets import mnist
from keras import backend as K
K.set_image_dim_ordering('th')

import matplotlib.pyplot as plt

(x_train, y_train), (x_test, y_test) = mnist.load_data()

datagen = ImageDataGenerator(shear_range=0.2)

# reshape the images
x_train = x_train.reshape(x_train.shape[0], 1, 28, 28)
x_test = x_test.reshape(x_test.shape[0], 1, 28, 28)

# convert from int to float
x_train = x_train.astype('float32')
x_test = x_test.astype('float32')

# fit the data
datagen.fit(x_train)
for x_batch, y_batch in datagen.flow(x_train, y_train, batch_size=9):
  for i in range(9):
    plt.subplot(330 + 1 + i)
    plt.imshow(x_batch[i].reshape(28, 28), cmap=('gray'))
  plt.savefig('shift.png')
  plt.show()
  break
Summary and Conclusion
In this article, you got to learn some of the most important image augmentation techniques we can do with Keras. You should surely check out the official documentation on the Keras website.
You can click here to access the Colab Notebook in case you want to test the code immediately.
If you liked this article then comment, share and give a thumbs up. If you have any questions or suggestions, just Contact me here. Be sure to subscribe to the website for more content. Follow me on Twitter, LinkedIn, and Facebook to get regular updates.

3 thoughts on “Image Augmentation with Keras for Better Deep Learning”