
Updated on April 19, 2020.
Getting started with Deep Learning and neural networks can be challenging. So, to make things easier, in this post you will get hands-on experience with practical deep learning. You will get to know MNIST digit classification by using Neural Networks.
If you want, you can take a look at one of my previous posts for MNIST digit classification using Scikit-Learn (Not a pre-requisite). You may gain some insights about the test and train data which could help you further along with this article.
Some Prerequisites
We will be using TensorFlow to fetch the data and Keras as the high-level API for building our neural network model. So, some previous knowledge about the two should help. But don’t let the above two stop you from moving further in this article. Learning on the go is one of the best approaches and you can follow it too.
Also, don’t worry if you do not have TensorFlow or Keras installed on your computer. You can always use Google Colab to carry out the implementations.
Let’s Get Started
I hope you have your Jupyter Notebook or Colaboratory ready. Time to get started.
import tensorflow as tf
from tensorflow import keras
The above code is pretty self-explanatory. We are just importing TensorFlow and Keras.
Next, loading the data set.
mnist = tf.keras.datasets.mnist

(X_train, Y_train), (X_test, Y_test) = mnist.load_data()
Now, we will be converting the data from integers to floating points.
# Converting from integers to floating point
X_train, X_test = X_train / 255.0, X_test / 255.0
You may be asking, why? The main reason is that it is easier to train neural networks using floating point numbers rather than integers. For this reason the above step is necessary.
Before moving further, we should visualize the first few digits of the train set using matplotlib. This should give a good perspective on the data set.
# Visualizing the first few digits using matplotlib
import matplotlib.pyplot as plt

for i in range(0, 9):
  digit = X_train[i]
  plt.subplot(330 + i + 1)
  digit = digit.reshape(28, 28)
  plt.imshow(digit)
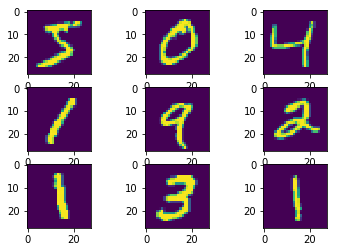
Your output should be similar to the above. Okay, let us move further.
Building the Model using Keras
Now, we will be building the neural network model using Keras. I will be explaining the code, but first let’s see what the code is actually?
from keras.models import Sequential
from keras.layers import Flatten, Dense, Dropout

model = Sequential([
    Flatten(input_shape=(28, 28)),
    Dense(512, activation=tf.nn.relu),
    Dropout(0.2),
    Dense(10, activation=tf.nn.softmax)
])

model.compile(optimizer='adam',
             loss='sparse_categorical_crossentropy',
             metrics=['accuracy'])
The first two line are import statements. Seqential() is used to build a sequential model. With Flatten() we flatten the input. We can add layers using the add() function. The hidden layer will consist of 512 nodes and the activation function is ReLU.
To know more about activation functions, consider reading my previous article Activation Functions in Neural Network. Further on, we assign a Dropout() of 0.2 which prevents overfitting during the training phase. Finally, the output layer consists of 10 nodes with the Softmax activation function.
When compiling the model, we are using adam optimizer. The loss function is sparse_categorical_crossentropy and the evaluation metric is the accuracy score.
All of this may not make much sense on the first go. As you will implement more of these, you will get familiar with the terms. Also, you can always refer to the Keras documentation page for guidance.
The final stage is training and evaluating the model.
model.fit(X_train, Y_train, epochs=5)
model.evaluate(X_test, Y_test)
Most probably you will get accuracy very near to 98% or 99% accuracy. If you referred to my previous Image Classification article, then you will know that it is a much bigger improvement than 88% accuracy.
Conclusion
So, this wraps up the article. I know that some things must have been not so clear if you are implementing Keras for the first time. Still, try to dig deeper on Google, see some other tutorials as well and read the documentation. I will try to post some more articles on practical deep learning in the future. Comment and let me know your experience. Like and share this post. Also, follow me Twitter to get updates on articles.

2 thoughts on “Digit Classification using Neural Networks”