
Detecting distracted drivers is one of the most important aspects of modern cars. Be it autonomous vehicles or high-end cars, almost all of them have a driver monitoring system to continuously track the behavior of the driver. This is essential to ensure that the driver maintains his eye on the road and does not get distracted by other activities. This is vital to preventing life endangering accidents to a great extent. In this article, we use deep learning and the PyTorch for detecting driver distractions in real-time.
We will follow a very simple approach on a simple dataset. We will train an image classification model to predict different driver actions. Then during inference, our model will try to predict what action the driver is performing from a video captured using an internal dashboard camera. Although we will train the model on images, we will run the inference on videos.
We will cover the following points in this article:
- We will start with the description of the dataset that we are going to use.
- Then we will move on to the coding section. Here, we will discuss the model architecture and the dataset preparation.
- Next, we will train the model and analyze the results.
- We will follow this with running inference on videos.
- Finally, we will end the article with the limitations of our driver distraction detection system and how to improve it.
Note: This is a very simple article for getting started with detecting driver distractions. We will use a deep learning image classification approach to solve the problem.
The State Farm Distracted Driver Detection Dataset
We will use the State Farm Distracted Driver Detection dataset in this article.
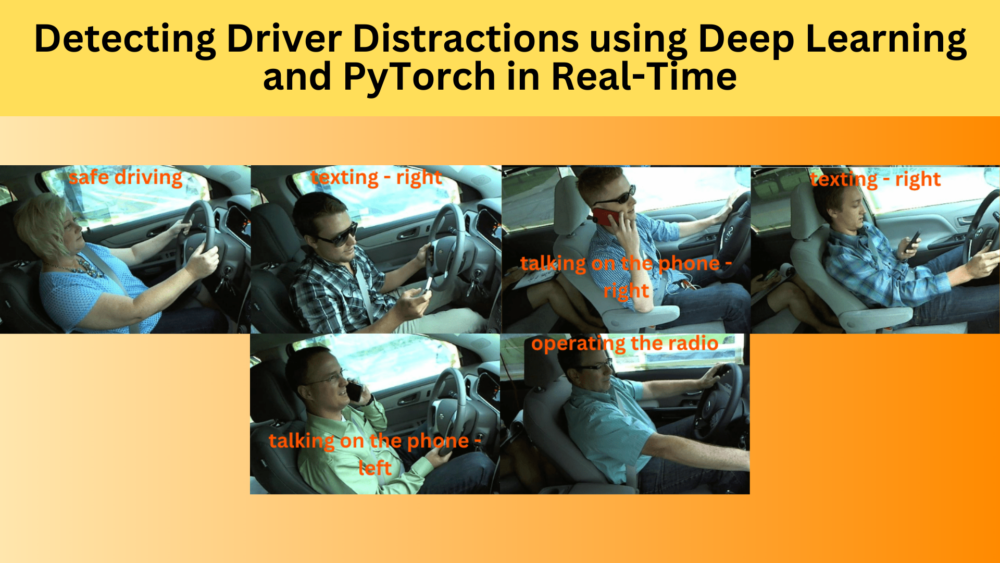
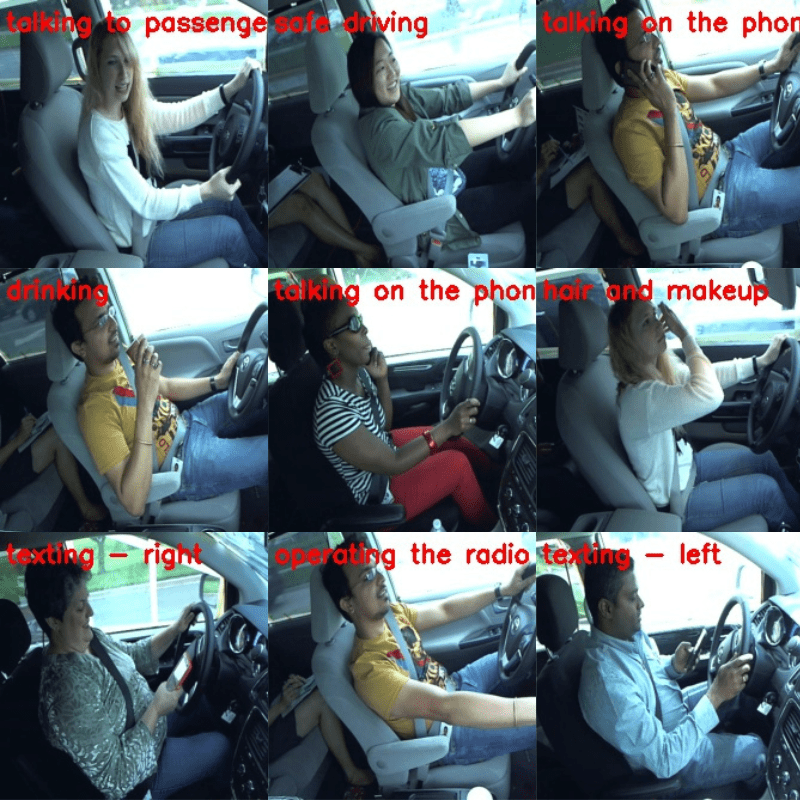
This is a competition dataset available on Kaggle. It contains images of drivers performing different actions recorded from a mounted camera. There are a total of 10 action classes in the dataset. They are:
- c0: safe driving
- c1: texting – right
- c2: talking on the phone – right
- c3: texting – left
- c4: talking on the phone – left
- c5: operating the radio
- c6: drinking
- c7: reaching behind
- c8: hair and makeup
- c9: talking to passenger
Here are a few images from the dataset showing the actions of the drivers.

As we can see the dataset contains different drivers to keep the situation varied enough.
It contains more than 22,000 annotated images and more than 79,000 unannotated images for testing.
The Dataset Structure
The following block shows the structure of the directory after downloading and extracting the dataset.
├── imgs
│   ├── test [79726 entries exceeds filelimit, not opening dir]
│   └── train
│       ├── c0
│       ├── c1
│       ├── c2
│       ├── c3
│       ├── c4
│       ├── c5
│       ├── c6
│       ├── c7
│       ├── c8
│       └── c9
├── driver_imgs_list.csv
└── sample_submission.csv
The imgs directory contains two subdirectories. The train directory contains the class folders which in turn contain the images. We have already seen what each class from c0 to c9 corresponds to. There are unannotated images in the test directory which we can use for testing after training the driver distraction detection model.
As the dataset does not contain a labeled validation set, we will divide the training set into a training and validation set.
The dataset also contains two CSV files. One of them is the submission file for the competition. The other one contains the class name and driver (subject) for each image. We can ignore these files for our use case.
Project Directory Structure
Let’s take a look at the entire project directory structure.
├── inference_data
│   ├── video_1.mp4
│   ├── video_2.mp4
│   ├── video_3.mp4
│   ├── video_4.mp4
│   ├── video_5.mp4
│   └── video_6.mp4
├── input
│   ├── imgs
│   │   ├── test
│   │   └── train
│   ├── driver_imgs_list.csv
│   └── sample_submission.csv
├── outputs
│   ├── inference_results
│   │   └── video_outputs
│   ├── accuracy.png
│   ├── best_model.pth
│   ├── loss.png
│   └── model.pth
└── src
    ├── class_names.py
    ├── datasets.py
    ├── inference.py
    ├── inference_video.py
    ├── model.py
    ├── train.py
    └── utils.py
- The
inputdirectory contains the distracted driver detection dataset as we saw above. - The outputs
directorycontains all the results from training and inference. - We have all the source code in the
srcdirectory. - The
inference_datadirectory contains a few videos to carry out inference after training.
The source code, inference data, and trained weights are available through the download section of the post. If you intend to run the training experiments as well, please download the dataset from the Kaggle link.
PyTorch Version
The codebase for this article has been developed with PyTorch 2.0.1 and Torchvision 0.15.2.
Getting Started with Detecting Driver Distractions
Let’s get into some of the technical aspects of getting started with detecting driver distractions. These include:
- The deep learning model
- The dataset preparation strategy and augmentations
- And the training hyperparameters
Download Code
The MobileNetV3 Large Model for Classifying Driver Actions
Our dataset contains 10 different actions that a driver may carry out while driving the car. All of this will be captured by an internal dashboard camera. To start out, for this post, we can simply train a classification model to predict what action the driver may be performing. For this, we will use the MobileNetV3 Large model.
The model preparation remains in the model.py file inside the src directory. Here is the entire code for model preparation.
from torchvision import models

import torch.nn as nn

def build_model(fine_tune=True, num_classes=10):
    model = models.mobilenet_v3_large(weights='DEFAULT')
    if fine_tune:
        print('[INFO]: Fine-tuning all layers...')
        for params in model.parameters():
            params.requires_grad = True
    if not fine_tune:
        print('[INFO]: Freezing hidden layers...')
        for params in model.parameters():
            params.requires_grad = False
    model.classifier[3] = nn.Linear(
        in_features=1280, out_features=num_classes, bias=True
    )
    return model

if __name__ == '__main__':
    model = build_model()
    print(model)
    # Total parameters and trainable parameters.
    total_params = sum(p.numel() for p in model.parameters())
    print(f"{total_params:,} total parameters.")
    total_trainable_params = sum(
        p.numel() for p in model.parameters() if p.requires_grad)
    print(f"{total_trainable_params:,} training parameters.")
We simply load the ImageNetV2 pretrained MobileNetV3 Large model. We keep the fine-tuning process and number of classes modifiable through parameters.
There is a simple main block for sanity check.
The Dataset Preparation
You may have noticed that all the images in our dataset are from the same camera angle. Also, the environment and color scheme do not change much. This may adversely affect the model while running inference in new environments.
To mitigate this, we use the random rotation augmentation in the dataset preparation pipeline. Interestingly, from experiments I found that other augmentations do not work very well. For instance, model trained with color jitter and other color level augmentations result in worse generalizability during inference.
Other than that, we resize all the images to 224×224 resolution and do not use any cropping. We use 10% of the data for validation and the rest for training. This results in 20182 training images and 2224 validation images.
Training the MobileNetV3 Large Model for Detecting Driver Distractions
There are other utility scripts that we are not going over in this article. They are the general ones like model saving and plotting the accuracy and loss graphs.
The train.py file is the runnable script that we will execute from the terminal to start the training. It contains the following command line arguments:
--epochs: The number of epochs that we want to train the mode for.--learning-rate: This sets the initial learning rate for the optimizer.--batch-size: The batch size for the data loader.--fine-tune: This is a boolean argument indicating whether we want to fine-tune the entire model or just train the new classification head.--save-name: This indicates the file name by which the model will be saved on disk. This defaults tomodel.pth.--scheduler: A boolean argument indicating whether we want to use the learning rate scheduler or not.
To start the training, we can execute the following command in the terminal within the src directory.
python train.py --batch 32 --learning-rate 0.0001 --fine-tune --epochs 10
We are using a batch size of 32 with an initial learning rate of 0.0001, and the model will be training for 10 epochs.
Analyzing the Training Results
The following block shows the truncated output from the terminal.
[INFO]: Epoch 1 of 10
Training
100%|████████████████████| 631/631 [00:22<00:00, 28.38it/s]
Validation
100%|████████████████████| 71/71 [00:02<00:00, 31.90it/s]
Training loss: 0.499, training acc: 84.387
Validation loss: 0.082, validation acc: 97.770

Best validation loss: 0.08179402408439299

Saving best model for epoch: 1

--------------------------------------------------
.
.
.
[INFO]: Epoch 9 of 10
Training
100%|████████████████████| 631/631 [00:20<00:00, 30.62it/s]
Validation
100%|████████████████████| 71/71 [00:02<00:00, 33.48it/s]
Training loss: 0.011, training acc: 99.628
Validation loss: 0.011, validation acc: 99.732

Best validation loss: 0.011396279421843777

Saving best model for epoch: 9

--------------------------------------------------
[INFO]: Epoch 10 of 10
Training
100%|████████████████████| 631/631 [00:20<00:00, 30.46it/s]
Validation
100%|████████████████████| 71/71 [00:02<00:00, 32.38it/s]
Training loss: 0.012, training acc: 99.633
Validation loss: 0.013, validation acc: 99.688
--------------------------------------------------
TRAINING COMPLETE
The best model was saved on epoch 9. The model was able to achieve a validation accuracy of 99.73% and a validation loss of 0.0113.
Here are the accuracy and loss graphs from the training.
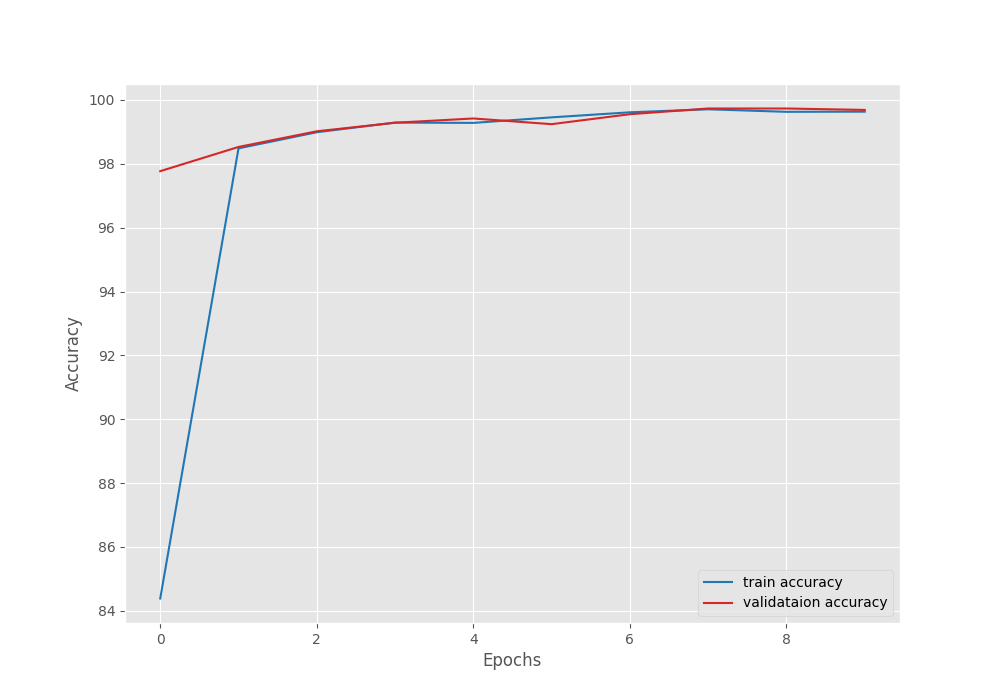
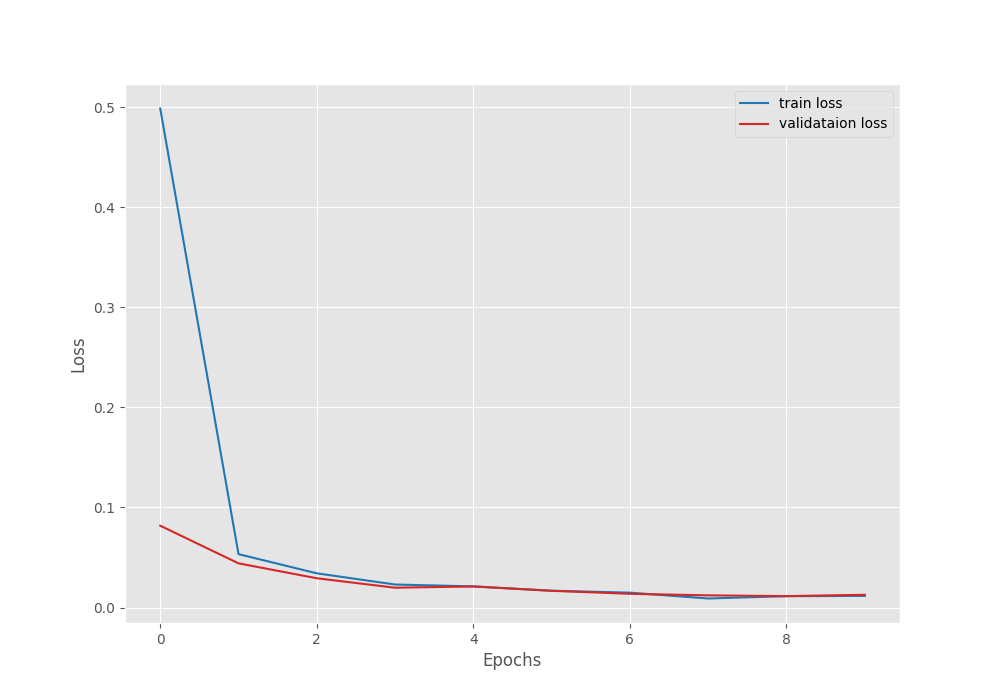
From the graphs, it is clear that we could have trained a little longer where the training lines would have surpassed the validation lines. Still, we have a very good performing model with us that we can carry out inference with.
Inference on Images for Driver Distraction Detection
Let’s start with running inference on the test images that came with the dataset. We can use the inference.py script to run the inference which expects an optional model weight path and an input directory path containing images as arguments.
As there are more than 79000 images in the test set, we will analyze just a few images.
python inference.py --input ../input/imgs/test/
The model correctly predicts almost all the images. Here are a few results from the outputs/inference_results/image_outputs directory.
As we can see, the model is able to predict the actions of all the drivers correctly in the above images.
Inference on Videos for Driver Distraction Detection
Next, let’s jump into video inference. For this, we will use the inference_video.py file.
For the first experiment for running inference using our driver distraction detection model, we will use a video file that is a compilation of frames from the test images. This video includes a single driver performing different actions.
python inference_video.py --input ../inference_data/video_1.mp4
We are getting excellent results with this. The model correctly predicts all the frames. But remember that the model has seen somewhat similar images in the validation set.
Let’s try another video from the internet.
python inference_video.py --input ../inference_data/video_3.mp4
The results are not at all bad. The model is predicting the action as texting – right in almost all the frames. The predictions are wrong in some of the frames though.
But what if the camera angle changes drastically? Here is an example.
python inference_video.py --input ../inference_data/video_2.mp4
This is where the model is making the most mistakes. The initial frames where the action should have been safe driving are wrongly predicted as talking on the phone – right. Only in the final few frames, when the person takes out his phone, the predictions are correct as texting – right.
Limitations and Further Improvements
We can clearly see the limitations of our model in the above results. The model is not able to perform very well when the scene and camera angle change. Because this is only the first post on driver distraction detection, we still have a lot of room for improvement in future posts.
One of the most obvious things to do is expand the dataset to include as many different settings and actions as possible. Additionally, we can expand to another functionality where the model also monitors driver drowsiness.
We will surely try to cover these in future posts.
Summary and Conclusion
In this article, we trained a simple image classification model for detecting driver distractions in real time using deep learning. Although not perfect, our model performs well on data similar to which it was trained. Along with that, we also analyzed the failure cases and discussed how to mitigate them. I hope that this post was helpful for you.
If you have any doubts, thoughts, or suggestions, please leave them in the comment section. I will surely address them.
You can contact me using the Contact section. You can also find me on LinkedIn, and X.
