

In this post, you are going to learn about template matching with OpenCV.
Today, we have a lot of deep learning approaches for object detection and localization. Models like YOLO, SSD, EfficientDets are some of the state-of-the-art methods which can tackle a lot of problems if we train them properly. There is one catch here though. They always need a lot of data to train and also they are compute intensive. It is almost impossible to train them without a proper GPU.
At times, although we need to detect an object in an image, maybe we do not want to use such heavy deep learning models. What if we know exactly what we are looking for and just want to know whether or not it is present in an image? And if it is present, at what position is it present? In such cases, we have a better option that OpenCV provides. That is Template Matching using cv2.matchTemplate.
We will cover the following topics in this post.
- What is OpenCV template matching?
- When to use it?
- Applying OpenCV template matching on an image.
- Applying OpenCV template matching on a video.
- What are the drawbacks and when to avoid?
- Summary and conclusion.
What is OpenCV Template Matching?
Template matching in computer vision is the process of finding a smaller image (template) in a larger image. Basically, template matching uses a sliding window method. The window slides over the source image (larger image in which we want to find the template) while comparing each patch with the template. The sliding window patch that returns the best result is considered as the output.
In OpenCV, we have the cv2.matchTemplate() method to which can help us find a particular template in an image. This returns a NumPy array as a result that contains a grayscale image showing how much the neighboring pixels match the template.
For example, take a look at the following.
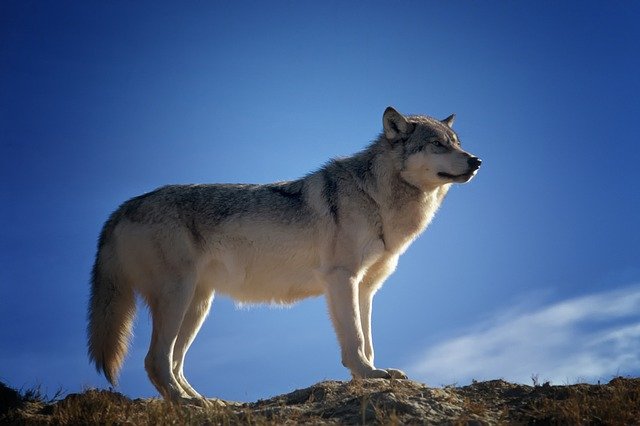
The above figure shows an image of a wolf.
And the following is the template we want to search in the image.
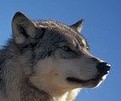
After running cv2.matchTemplate(), we get the following result.

As you can see, the point where the image matches the template is brighter in color. A bright region indicates a good match.
Okay! we have a grayscale image. But how do we proceed from here to localize it and draw the bounding box?
Now, we can use the cv2.minMaxLoc() method to get the minimum and maximum value as well the coordinates indicating the top-left and bottom-right corner for the bounding box that we want to draw. The final result will be something like the following.

It is important to mention that there are many methods for template matching that OpenCV provides that you can find here. But we will use the cv2.TM_CCOEFF_NORMED method in this tutorial which is perhaps one of the most common methods that anyone uses. You can find the formula for the template matching methods in OpenCV here. In fact, in this post, Adrian explains how the above method works in just enough detail without going too much into the technical depth.
When to use Template Matching?
By now we know that we can use OpenCV template matching to localize objects and draw a bounding box around them. Still, there are only a handful of cases where we can use template matching with OpenCV.
This is helpful in cases when:
- We want to find a particular object in an image or video frame.
- We should exactly know what we are looking for. This means that we should have the template image at hand that we want to search for.
- What we want to detect should match the template in most of the cases.
With that in mind let’s take a look at the project structure.
Directory Structure
The following block shows all the files and directories for this tutorial.
├── input
│   ├── image_1.jpg
│   ├── image_1_template.jpg
│   ├── video_1.mp4
│   ├── video_1_template.jpg
│   ├── video_2.mp4
│   └── video_2_template.jpg
├── outputs
│   ├── image_result.jpg
│   ├── template_result.jpg
│   ├── video_1.mp4
│   └── video_2.mp4
├── match_template_image.py
├── match_template_video.py
- The
inputdirectory contains all the data that we will use for template matching using OpenCV in this tutorial. We have one image, two videos, and their corresponding templates. - The
outputsdirectory will store all the results with the detected template in the image. - And there are two Python scripts, one for template matching using OpenCV in images and another for template matching in videos.
If you download the zip file for this tutorial, then you will get all the scripts and input data already set up. You just need to extract it and run the scripts.
Also, be sure to install OpenCV if you intend to execute everything on your local system.
Template Matching with OpenCV
Now, we will start with the coding part of this tutorial. As we have two different scripts here, first we will write the code for template matching with OpenCV in images, and then move on to videos.
Template Matching with OpenCV in Images
Let’s start with the coding part of template matching in images. For this part, we have the following image and the corresponding template that we want to search for in the image.
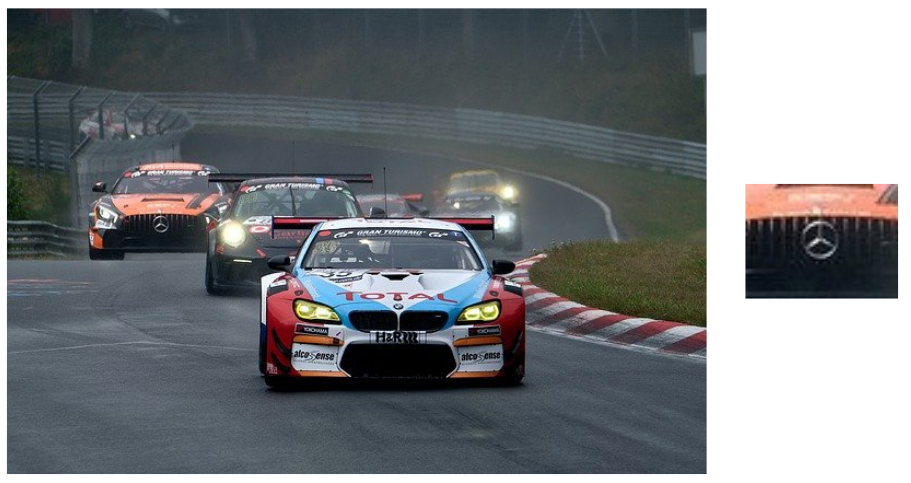
As you can see, we have a few cars in the image, we want to search for the Mercedes logo in it.
The code in this section will go into the match_template_image.py file.
The first code block contains the import of OpenCV, reading of the source image as well as the template image.
import cv2

image = cv2.imread('input/image_1.jpg')
image_copy = image.copy()
# Convert copy of image to Grayscale format as we need that
# for template matching.
image_copy = cv2.cvtColor(image_copy, cv2.COLOR_BGR2GRAY)
# Read the template in grayscale format.
template = cv2.imread('input/image_1_template.jpg', 0)
w, h = template.shape[::-1]
One thing to note here is that for template matching, we need both the source image and the template in grayscale format. But we will also need the colored format of the source image for visualization later. So, first, we are creating a copy of it on line 4, then converting that copy to grayscale format on line 7. For the template, we are directly reading it in grayscale.
We also need the width and height of the template for later stages. That’s why are extracting those on line 10.
Apply Template Matching
The following code block applies template matching on the source image.
# Apply template Matching.
result = cv2.matchTemplate(image_copy, template, cv2.TM_CCOEFF_NORMED)
min_val, max_val, min_loc, max_loc = cv2.minMaxLoc(result)
On line 12, we use the cv2.matchTemplate() method while passing the source image, the template to search for, and the template search method to use as the arguments. This returns us with result which is the grayscale image where pixel intensities show the match for the image. The brighter pixels (good match) will have a value closer to 1, whereas a relatively darker pixel (not so good match) will have a value close to 0.
Then we use the cv2.minMaxLoc() method while providing the result as the argument to it. It returns four things:
- The minimum and maximun score for the template match.
- The four coordinates in top-left and bottom-right format. For example, in our case here,
min_locwill have the x and y pixel coordinates for top-left corners where we want to start drawing the bounding box. Andmax_locwill have x and y coordinates for the botton-right corner of the bounding box.
Let’s complete the final coding part of this script.
# Top left x and y coordinates.
x1, y1 = max_loc
# Bottom right x and y coordinates.
x2, y2 = (x1 + w, y1 + h)
cv2.rectangle(image, (x1, y1), (x2, y2), (0, 0, 255), 2)
cv2.imshow('Result', image)
# Normalize the result for proper grayscale output visualization.
cv2.normalize(result, result, 0, 1, cv2.NORM_MINMAX, -1 )
cv2.imshow('Detected point', result)
cv2.waitKey(0)
cv2.imwrite('outputs/image_result.jpg', image)
cv2.imwrite('outputs/template_result.jpg', result*255.)
On lines 15 and 17, we are extracting the top-left and bottom-right coordinates in the form of (x1, y1) and (x2, y2). Then we draw the bounding box around the original colored image and visualize it. As you may notice, x2 and y2 are derived by adding the width and height of the template with x1 and y1 to capture the entire area that we want to draw the bounding box around.
Before we visualize the grayscale result, we need to normalize it. Otherwise, it will just be black and white patches. We are doing that on line 21, then visualizing it. Finally, we are saving both, the image with the bounding box and the result to disk.
As we are done with the code here, let’s execute it and see the results.
Execute match_template_image.py
You can execute the following command in your terminal/command line from the project directory.
python match_template_image.py
The following images are saved to disk.
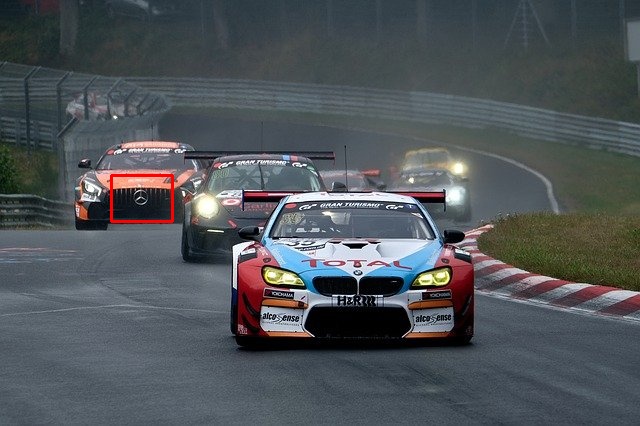
As we can see, the template matching method correctly localized the Mercedes logo in the image. That’s good. We did not employ any deep learning method and yet, we are able to do very simple object detection.
Now, let’s take a look at the result image as well.
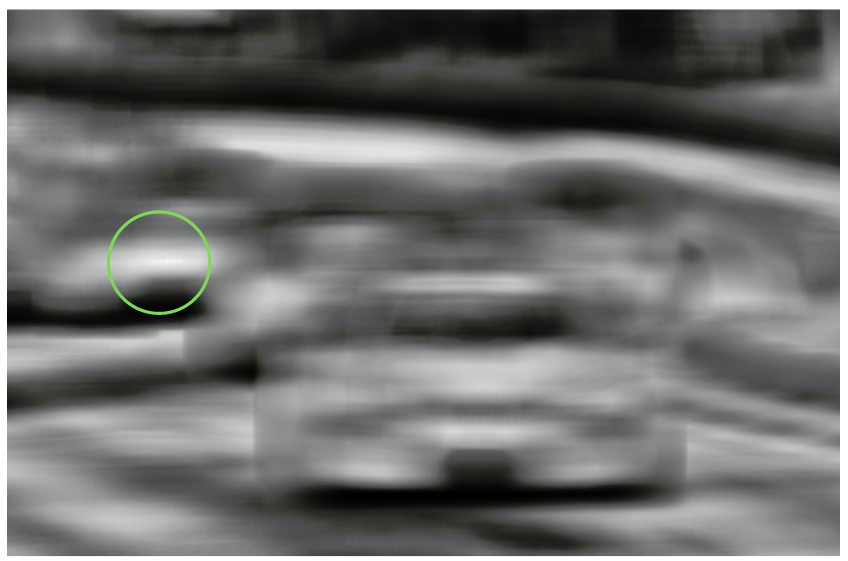
If you observe around the center-left of the image (where the green circle is drawn manually), it contains very bright pixels indicating a high score and also a high chance of the template being matched at that location.
This clears a lot of things. Further, when we move to template matching with OpenCV in videos, things should feel much simpler.
Template Matching with OpenCV in Videos
In this section, we will carry out template matching in videos. Things will be pretty much simple. Instead of a single image, we will loop over the video frames and carry out template matching on each frame.
The code here will go into the match_template_video.py file.
Let’s start with the import statements and construct the argument parser.
import cv2
import pathlib
import time
import argparse
import os

# Construct the argument parser.
parser = argparse.ArgumentParser()
parser.add_argument(
    '-i', '--input', help='path to input video',
    default='input/video_1.mp4'
)
parser.add_argument(
    '-t', '--template', help='path to the template',
    default='input/video_1_template.jpg'
)
args = vars(parser.parse_args())
We need a few extra modules this time. The time module to track the time taken for cv2.matchTemplate for each frame so that we can calculate the FPS. The pathlib module for defining the correct path for the resulting video file to save.
We need an argument parser this time to read the command line arguments. This is because we will be trying out template matching on two different videos. For each run, we will pass the input video and the template that we want to search for.
--input: Flag for the input video.--template: Flag for the corresponding template.
Reading the Input Video and Other Set Ups
Now, let’s capture the input video and complete some other preliminary processes before getting down to iterating over the video.
# Read the video input.
cap = cv2.VideoCapture(args['input'])

if (cap.isOpened() == False):
    print('Error while trying to read video. Please check path again')
# Get the frame width and height
frame_width = int(cap.get(3))
frame_height = int(cap.get(4))

# String name with which to save the resulting video.
save_name = str(pathlib.Path(
    args['input']
)).split(os.path.sep)[-1].split('.')[0]
# define codec and create VideoWriter object
out = cv2.VideoWriter(f"outputs/{save_name}.mp4",
                      cv2.VideoWriter_fourcc(*'mp4v'), 30,
                      (frame_width, frame_height))

# Read the template in grayscale format.
template = cv2.imread(args['template'], 0)
w, h = template.shape[::-1]

frame_count = 0 # To count total frames.
total_fps = 0 # To get the final frames per second.
After reading the video, we capture its frames’ width and height (lines 24 and 25) that we will use later while saving the result again to disk.
We also create a VideoWriter object on line 32 which uses the save_name string to save the video to disk.
On line 37, we read the template in grayscale format and capture its width and height.
Then we create two variables. frame_count to keep count of the frames that we loop through, and total_fps to keep adding the FPS (Frames Per Second) of each frame.
Iterate Through Each Frame and Do Template Matching
It’s time to iterate through the input video’s frames and do template matching on each frame. The next block contains the entire code for this.
# Read until end of video.
while(cap.isOpened()):
    # Capture each frame of the video.
    ret, frame = cap.read()
    if ret:
        image = frame.copy()
        image = cv2.cvtColor(image, cv2.COLOR_BGR2GRAY)
        start_time = time.time()
        # Apply template Matching.
        result = cv2.matchTemplate(image, template, cv2.TM_CCOEFF_NORMED)
        end_time = time.time()

        # Get the current fps.
        fps = 1 / (end_time - start_time)
        # Add `fps` to `total_fps`.
        total_fps += fps
        # Increment frame count.
        frame_count += 1
        min_val, max_val, min_loc, max_loc = cv2.minMaxLoc(result)
        # Top left x and y coordinates.
        x1, y1 = max_loc
        # Bottom right x and y coordinates.
        x2, y2 = (x1 + w, y1 + h)
        cv2.rectangle(frame, (x1, y1), (x2, y2), (0, 0, 255), 2)
        cv2.putText(frame, f"{fps:.1f} FPS",
                    (15, 25),
                    cv2.FONT_HERSHEY_SIMPLEX, 1, (0, 255, 0),
                    2, lineType=cv2.LINE_AA)
        cv2.imshow('Result', frame)
        out.write(frame)
        # Press `q` to exit.
        if cv2.waitKey(1) & 0xFF == ord('q'):
            break
    else:
        break

# Release VideoCapture() object.
cap.release()
# Close all frames and video windows.
cv2.destroyAllWindows()
We carry out template matching on the grayscale image on line 51 in the above code block. We capture the timestamp before and after that.
From lines 55 to 59, we calculate the current frame’s FPS and increment the frame_count. Starting from line 62, we extract the coordinates, draw the bounding box on the frame , and put the FPS text on it too. Then we show the video on the screen. Pressing the q key on the keyboard anytime will close the OpenCV video window.
Finally, we release the VideoCapture object and close all OpenCV windows.
With this, we complete all the code we need for template matching in videos.
Execute match_template_video.py
We have two video files in the input directory. Let’s start with video_1.mp4 for which we have the following template.

Note: The following experiments are run on a machine with an i7 10th Gen CPU and 32 GB RAM. Your results will vary according to the hardware the code is being run on.
Execute the following command in the terminal.
python match_template_video.py --input input/video_1.mp4 --template input/video_1_template.jpg
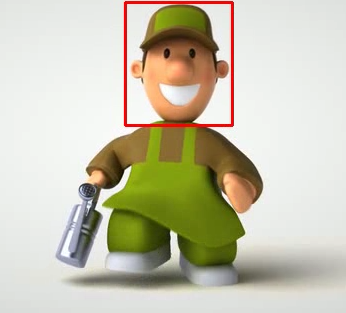
The following is the video result.
Astonishingly, the template matching algorithm is able to detect the face (template in all frames). And that too with more than 200 FPS. This is quite amazing.
Obviously, this is working very well. But there are limitations to it. Running the Python script with the second video will help us uncover those. For the second video, we have the following Mercedes logo as the template.

Following is the command.
python match_template_video.py --input input/video_2.mp4 --template input/video_2_template.jpg
Now, let’s check out the output.
Okay! We can already say the results are bad. Let’s list out all the issues here.
- The logo is not getting detected in all the frames.
- Whenever the logo is larger or smaller than the template, the detections are failing.
- Whenever the logo is a bit rotated or at a different orientation, the detections are failing.
- There are multiple false detections as well.
Looks like we have found our limitations to such a good method as template matching.
When Not to Use Template Matching
These are some instances where you should avoid using template matching as an object detection method.
- When the source template and the intances it appears in the image or video vary greatly in size. In such cases, template matching is very likely to fail.
- If the instances of template will be rotated or oriented at a different angle in the source image or video.
- When there are other objects/noise/clutter around the object of interest on which we want to find the template. In this case, false detections will arise.
If you have the above scenarios, then using a more advanced method like object detection using deep learning will work much better.
Summary and Conclusion
In this tutorial, you learned about template matching with OpenCV in images and videos. Along with its benefits, you also got to know its drawbacks and the cases where it is likely to fail. I hope that this article proves useful to you.
If you have any doubts, thoughts, or suggestions, please leave them in the comment section. I will surely address them.
You can contact me using the Contact section. You can also find me on LinkedIn, and X.

1 thought on “Template Matching with OpenCV”