
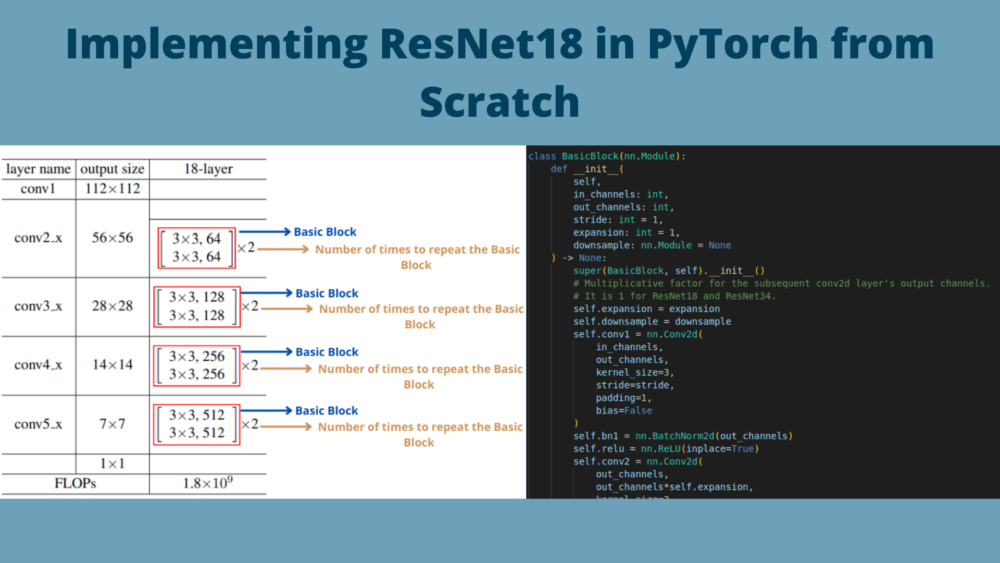
When working in the field of deep learning, we always tend to rely on frameworks like PyTorch. Almost always, when we need a model, we use the model architecture from the framework and also the pretrained weights. But sometimes, to get a deeper understanding of the model architecture, we must implement it from scratch. In this tutorial, we will be implementing the ResNet18 deep learning model in PyTorch from scratch.
Torchvision already provides many image classification models that we can use out of the box. All of them contain pretrained weights as well. Most of the time it is advisable to use the models directly from the library. But implementing a model from scratch lets us learn the intricacies of building a complex neural network model.
For this tutorial, we will get into the details of implementing ResNet18 and understand all the underlying concepts.
If you need a refresher on ResNets you may look into the following post.
The above post discusses the ResNet paper, models, training experiments, and results. If you are new to ResNets this is a good starting point before moving into the implementation from scratch.
We will cover the following points in this post:
- A brief discussion of the ResNet models.
- Implementing ResNet from scratch using PyTorch.
This is going to be a short yet informative post and will help anyone who wants to get a deeper understanding of building neural network models.
The ResNet Neural Network Models
Generally, deeper neural networks face the issue of vanishing gradients. The ResNet neural networks introduced the concept of skip connections. This allows us to create deeper networks without worrying about vanishing gradients. Also, ResNets were able to surpass most of all the other neural networks in terms of accuracy,
In the original paper, there were mentions of 5 ResNet models. They were ResNet18, ResNet34, ResNet50, ResNet101, and ResNet152.
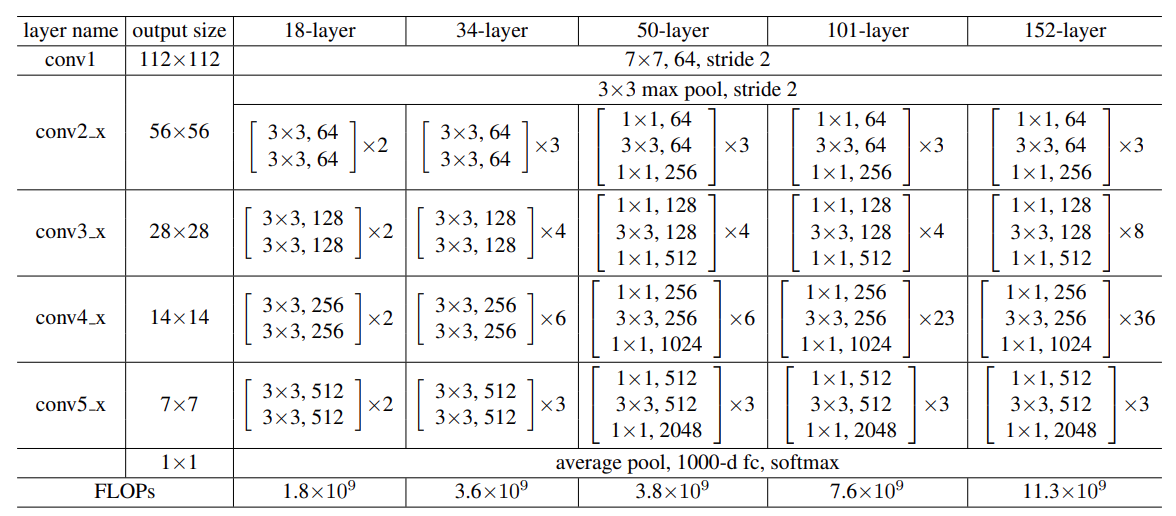
The numbers in the names of the models represent the total number of convolutional layers in each of the architectures.
In this tutorial, we will be focusing on building the ResNet18 architecture from scratch using PyTorch. Subsequently, in further blog posts, we will explore training the ResNets that we build from scratch and also trying to create a generalized pipeline for building ResNets.
We will go through different components of ResNet when coding it in PyTorch to get a better understanding of the overall architecture.
Directory Structure
Before moving into the coding section, let’s take a look at the directory structure for the files of this tutorial.
.
└── resnet18.py
The project directory has only one file, resnet18.py. We don’t need anything else for building ResNet18 from scratch using PyTorch.
Implementing ResNet from Scratch using PyTorch
Let’s jump into the implementation part without any further delay. We will break down each component of the ResNet18 network into different subsections. Each subsection will contain the code for that part and possibly the image as well (wherever relevant). This process will make it a lot easier to understand the network architecture.
All the code that we write here will go into the resnet18.py script file.
Download Code
First of all, let’s check out all the import statements that we will need.
import torch.nn as nn
import torch

from torch import Tensor
from typing import Type
Apart from the different PyTorch modules, we also import Type for type checking which can be necessary when building complex neural network architectures.
Building the ResNet18 BasicBlock from Scratch using PyTorch
The most important part of any ResNet architecture is its basic block. It contains a stacking of a few convolutional, batch normalization, and ReLU activation layers which are common for all the ResNet models.
Let’s just focus on the ResNet18 model here.
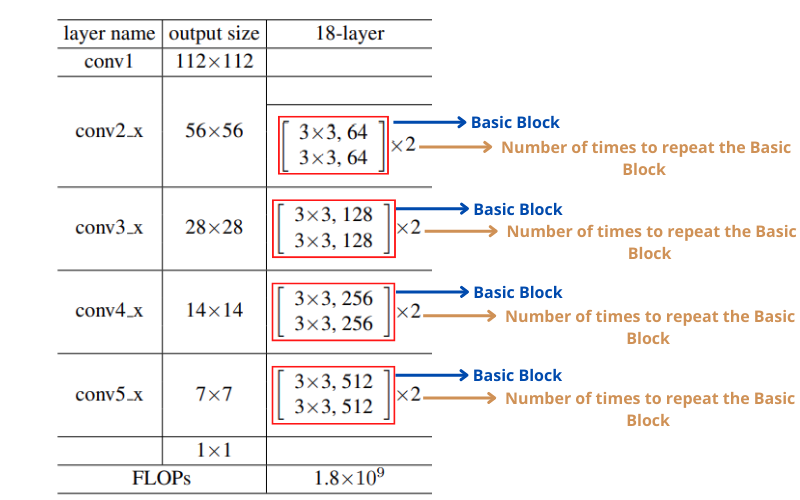
For ResNet18 (as well as for other ResNet variants), we have four different types of Basic Blocks. If you observe, the only change that occurs across the Basic Blocks (conv2_x to conv5_x) is in the number of input and output channels. We need not define these blocks multiple times. We can define one simple Python class which will take care of everything according to the logic that we implement.
The numbers beside each block represent how many times we need to repeat the Basic Blocks while building the network. It is the same (2) for all Basic Blocks of ResNet18.
In other words, each conv2_x to conv5_x will contain 2 Basic Blocks stacked together one after the other. Let’s call conv2_x to conv5_x as layer1 to layer4:
- conv2_x => layer1
- conv3_x => layer2
- conv4_x => layer3
- conv5_x => layer4
Then each of the layers (or we can say, layer block) will contain two Basic Blocks stacked together. The following is a visualization of layer1:
(layer1): Sequential(
    (0): BasicBlock(
      (conv1): Conv2d(64, 64, kernel_size=(3, 3), stride=(1, 1), padding=(1, 1), bias=False)
      (bn1): BatchNorm2d(64, eps=1e-05, momentum=0.1, affine=True, track_running_stats=True)
      (relu): ReLU(inplace=True)
      (conv2): Conv2d(64, 64, kernel_size=(3, 3), stride=(1, 1), padding=(1, 1), bias=False)
      (bn2): BatchNorm2d(64, eps=1e-05, momentum=0.1, affine=True, track_running_stats=True)
    )
    (1): BasicBlock(
      (conv1): Conv2d(64, 64, kernel_size=(3, 3), stride=(1, 1), padding=(1, 1), bias=False)
      (bn1): BatchNorm2d(64, eps=1e-05, momentum=0.1, affine=True, track_running_stats=True)
      (relu): ReLU(inplace=True)
      (conv2): Conv2d(64, 64, kernel_size=(3, 3), stride=(1, 1), padding=(1, 1), bias=False)
      (bn2): BatchNorm2d(64, eps=1e-05, momentum=0.1, affine=True, track_running_stats=True)
    )
  )
The following is the code for building Basic Blocks in ResNet18.
class BasicBlock(nn.Module):
    def __init__(
        self,
        in_channels: int,
        out_channels: int,
        stride: int = 1,
        expansion: int = 1,
        downsample: nn.Module = None
    ) -> None:
        super(BasicBlock, self).__init__()
        # Multiplicative factor for the subsequent conv2d layer's output channels.
        # It is 1 for ResNet18 and ResNet34.
        self.expansion = expansion
        self.downsample = downsample
        self.conv1 = nn.Conv2d(
            in_channels,
            out_channels,
            kernel_size=3,
            stride=stride,
            padding=1,
            bias=False
        )
        self.bn1 = nn.BatchNorm2d(out_channels)
        self.relu = nn.ReLU(inplace=True)
        self.conv2 = nn.Conv2d(
            out_channels,
            out_channels*self.expansion,
            kernel_size=3,
            padding=1,
            bias=False
        )
        self.bn2 = nn.BatchNorm2d(out_channels*self.expansion)

    def forward(self, x: Tensor) -> Tensor:
        identity = x

        out = self.conv1(x)
        out = self.bn1(out)
        out = self.relu(out)

        out = self.conv2(out)
        out = self.bn2(out)

        if self.downsample is not None:
            identity = self.downsample(x)

        out += identity
        out = self.relu(out)
        return  out
Explanation of the ResNet18 BasicBlock
In each of the Basic Blocks (layer1 to layer4), we have two convolutional layers. The first convolutional layer is followed by Batch Normalization and ReLU activation. The second is only followed by Batch Normalization.
We need to take care of a few important points here:
- We have an
expansionvariable which increases the output channel size in the second convolutional layer. If you observe figure 2, you will notice that the output channels for the second convolutional layer are the same as the first in each block. That means theexpansionfactor here is 1 (for ResNet18). It is 1 for ResNet34 as well. - Next is the stride of the second convolutional layer. It is 1 by default and we do not change that.
- We also pass down an optional downsample parameter which is actually an
nn.Moduleinstance. If it is notNone, then we pass the input tensor through 1×1 convolution to reduce the computational parameters. You may observe that in theforwardmethod. We will discuss the reason for having this in one of the subsequent sections.
In the forward method, the very first thing we observe is the identity variable. This variable stores a copy of the original tensor (x) that is being passed down the BasicBlock. Then we add this identity tensor with the previous layer’s output on line 52. This is where the famous skip connection or identity connections of the ResNets happen.
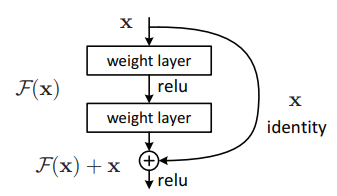
The above figure depicts the residual building block which was first introduced in the ResNet paper.
Then we pass the final output through a ReLU activation unit and return it.
The ResNet Module
The entire ResNet18 architecture will consist of the BasicBlock layers. All the additional layers and logic will go into the ResNet module. This is going to be the final module that will combine everything to build the ResNet18 model.
The following code block contains the code for the ResNet module.
class ResNet(nn.Module):
    def __init__(
        self,
        img_channels: int,
        num_layers: int,
        block: Type[BasicBlock],
        num_classes: int  = 1000
    ) -> None:
        super(ResNet, self).__init__()
        if num_layers == 18:
            # The following `layers` list defines the number of `BasicBlock`
            # to use to build the network and how many basic blocks to stack
            # together.
            layers = [2, 2, 2, 2]
            self.expansion = 1

        self.in_channels = 64
        # All ResNets (18 to 152) contain a Conv2d => BN => ReLU for the first
        # three layers. Here, kernel size is 7.
        self.conv1 = nn.Conv2d(
            in_channels=img_channels,
            out_channels=self.in_channels,
            kernel_size=7,
            stride=2,
            padding=3,
            bias=False
        )
        self.bn1 = nn.BatchNorm2d(self.in_channels)
        self.relu = nn.ReLU(inplace=True)
        self.maxpool = nn.MaxPool2d(kernel_size=3, stride=2, padding=1)

        self.layer1 = self._make_layer(block, 64, layers[0])
        self.layer2 = self._make_layer(block, 128, layers[1], stride=2)
        self.layer3 = self._make_layer(block, 256, layers[2], stride=2)
        self.layer4 = self._make_layer(block, 512, layers[3], stride=2)

        self.avgpool = nn.AdaptiveAvgPool2d((1, 1))
        self.fc = nn.Linear(512*self.expansion, num_classes)

    def _make_layer(
        self,
        block: Type[BasicBlock],
        out_channels: int,
        blocks: int,
        stride: int = 1
    ) -> nn.Sequential:
        downsample = None
        if stride != 1:
            """
            This should pass from `layer2` to `layer4` or
            when building ResNets50 and above. Section 3.3 of the paper
            Deep Residual Learning for Image Recognition
            (https://arxiv.org/pdf/1512.03385v1.pdf).
            """
            downsample = nn.Sequential(
                nn.Conv2d(
                    self.in_channels,
                    out_channels*self.expansion,
                    kernel_size=1,
                    stride=stride,
                    bias=False
                ),
                nn.BatchNorm2d(out_channels * self.expansion),
            )
        layers = []
        layers.append(
            block(
                self.in_channels, out_channels, stride, self.expansion, downsample
            )
        )
        self.in_channels = out_channels * self.expansion

        for i in range(1, blocks):
            layers.append(block(
                self.in_channels,
                out_channels,
                expansion=self.expansion
            ))
        return nn.Sequential(*layers)

    def forward(self, x: Tensor) -> Tensor:
        x = self.conv1(x)
        x = self.bn1(x)
        x = self.relu(x)
        x = self.maxpool(x)

        x = self.layer1(x)
        x = self.layer2(x)
        x = self.layer3(x)
        x = self.layer4(x)
        # The spatial dimension of the final layer's feature
        # map should be (7, 7) for all ResNets.
        print('Dimensions of the last convolutional feature map: ', x.shape)

        x = self.avgpool(x)
        x = torch.flatten(x, 1)
        x = self.fc(x)

        return x
We have three methods in the above ResNet class. Let’s go over each of them individually to understand the components.
The __init__ Method
Beginning with the __init__ method. It accepts 4 parameters. We provide the image channels (img_channels) to work with either grayscale or RGB images. We also provide a num_layers parameter that accepts the number of layers that we want to build the ResNet model with. For this blog post, it is going to be 18 as we are building a ResNet18 model. Then we have a block parameter that accepts an instance of BasicBlock. Finally, we have the num_classes parameter for the number of classes.
On line 64, we check whether num_layers is 18 or not. In case it is, we create a layers list to include the number of BasicBlock types for each of these. You may remember this from figure 2 where a number was shown for each of the layers blocks. We also define the expansion variable here according to the number of layers. It is 1 for ResNet18.
We don’t check for any other number of layers as we want to completely focus on the ResNet18 model.
Coming to the next important thing. Before the BasicBlock layers, every ResNet model has a stacking of Conv2d => Batch Normalization => ReLU followed by a max pooling layer for the first three layers.
In the paper, it is shown as the following in Table 1.

These very first blocks, output a feature map of 112×112 spatial dimension after the max pooling layer if our image input has 224×224 spatial dimension.
Starting from line 86, we call a _make_layer method by providing the following arguments:
- An instance of
BasicBlocktype asblock. - The number of output channels.
- The number of
BasicBlocklayers to include as given in thelayerslist. - And an optional
strideargument.
The final two layers are the Average Pooling and fully connected layers. The number of input features for the fully connected layer also depends on the expansion factor.
The _make_layer Method
We have already seen the input it accepts. Let’s directly jump to the code explanation.
The very first thing we do is define a downsample block as either None or as a Sequential block. For ResNet18 it is based on one condition, when the stride is not 1. This means that the downsample block will get defined for layer2 to layer4 that we saw in the __init__ method. You can also find the details in section 3.3 of the ResNet paper. This downsampling block helps reduce the number of parameters in the network as well as downsample the identity layer’s spatial dimension for proper addition to the previous layer.
Then we have a layers list to which we keep on appending the stacking of different layers (lines 119 and 120). We begin by adding the very first BasicBasic to our ResNet18 model.
One important thing is that we need to keep updating our input channels (in_channels) by multiplying the output_channels that is being passed down to the _make_layer method with the expansion factor. This ensures that we can build different ResNet models without changing/hardcoding the number of channels.
Then we iterate over the number of blocks for BasicBlock that we need on line 127 and stack the layers. Note that here the stride will always remain as 1 by default.
The __forward__ Method
Finally, we have the forward method. This is very simple as we just keep on calling one layer after the other.
One important thing here is that all the ResNet18 as well other ResNet models output a feature map with a 7×7 spatial dimension after the last convolutional layer for input with 224×224 spatial dimension. This along with the number of parameters is an excellent way to check the correctness of our model. That’s why we have a print statement on line 147.
Passing a Dummy Tensor
Let’s create a dummy tensor and pass it through the network. This is the final code block.
if __name__ == '__main__':
    tensor = torch.rand([1, 3, 224, 224])
    model = ResNet(img_channels=3, num_layers=18, block=BasicBlock, num_classes=1000)
    print(model)

    # Total parameters and trainable parameters.
    total_params = sum(p.numel() for p in model.parameters())
    print(f"{total_params:,} total parameters.")
    total_trainable_params = sum(
        p.numel() for p in model.parameters() if p.requires_grad)
    print(f"{total_trainable_params:,} training parameters.")

    output = model(tensor)
We create a dummy tensor and call it tensor. It has 3 channels and a 224×224 spatial dimension. We create the ResNet18 model by passing the appropriate number of layers, then print the number of parameters, and pass the tensor through the model.
Use the following command in the terminal to execute the code.
python resnet18.py
It should give the following output.
ResNet(
  (conv1): Conv2d(3, 64, kernel_size=(7, 7), stride=(2, 2), padding=(3, 3), bias=False)
  (bn1): BatchNorm2d(64, eps=1e-05, momentum=0.1, affine=True, track_running_stats=True)
  (relu): ReLU(inplace=True)
  (maxpool): MaxPool2d(kernel_size=3, stride=2, padding=1, dilation=1, ceil_mode=False)
  (layer1): Sequential(
    (0): BasicBlock(
      (conv1): Conv2d(64, 64, kernel_size=(3, 3), stride=(1, 1), padding=(1, 1), bias=False)
      (bn1): BatchNorm2d(64, eps=1e-05, momentum=0.1, affine=True, track_running_stats=True)
      (relu): ReLU(inplace=True)
      (conv2): Conv2d(64, 64, kernel_size=(3, 3), stride=(1, 1), padding=(1, 1), bias=False)
      (bn2): BatchNorm2d(64, eps=1e-05, momentum=0.1, affine=True, track_running_stats=True)
    )
    (1): BasicBlock(
      (conv1): Conv2d(64, 64, kernel_size=(3, 3), stride=(1, 1), padding=(1, 1), bias=False)
      (bn1): BatchNorm2d(64, eps=1e-05, momentum=0.1, affine=True, track_running_stats=True)
      (relu): ReLU(inplace=True)
      (conv2): Conv2d(64, 64, kernel_size=(3, 3), stride=(1, 1), padding=(1, 1), bias=False)
      (bn2): BatchNorm2d(64, eps=1e-05, momentum=0.1, affine=True, track_running_stats=True)
    )
  )
  (layer2): Sequential(
    (0): BasicBlock(
      (downsample): Sequential(
        (0): Conv2d(64, 128, kernel_size=(1, 1), stride=(2, 2), bias=False)
        (1): BatchNorm2d(128, eps=1e-05, momentum=0.1, affine=True, track_running_stats=True)
      )
      (conv1): Conv2d(64, 128, kernel_size=(3, 3), stride=(2, 2), padding=(1, 1), bias=False)
      (bn1): BatchNorm2d(128, eps=1e-05, momentum=0.1, affine=True, track_running_stats=True)
      (relu): ReLU(inplace=True)
      (conv2): Conv2d(128, 128, kernel_size=(3, 3), stride=(1, 1), padding=(1, 1), bias=False)
      (bn2): BatchNorm2d(128, eps=1e-05, momentum=0.1, affine=True, track_running_stats=True)
    )
    (1): BasicBlock(
      (conv1): Conv2d(128, 128, kernel_size=(3, 3), stride=(1, 1), padding=(1, 1), bias=False)
      (bn1): BatchNorm2d(128, eps=1e-05, momentum=0.1, affine=True, track_running_stats=True)
      (relu): ReLU(inplace=True)
      (conv2): Conv2d(128, 128, kernel_size=(3, 3), stride=(1, 1), padding=(1, 1), bias=False)
      (bn2): BatchNorm2d(128, eps=1e-05, momentum=0.1, affine=True, track_running_stats=True)
    )
  )
  (layer3): Sequential(
    (0): BasicBlock(
      (downsample): Sequential(
        (0): Conv2d(128, 256, kernel_size=(1, 1), stride=(2, 2), bias=False)
        (1): BatchNorm2d(256, eps=1e-05, momentum=0.1, affine=True, track_running_stats=True)
      )
      (conv1): Conv2d(128, 256, kernel_size=(3, 3), stride=(2, 2), padding=(1, 1), bias=False)
      (bn1): BatchNorm2d(256, eps=1e-05, momentum=0.1, affine=True, track_running_stats=True)
      (relu): ReLU(inplace=True)
      (conv2): Conv2d(256, 256, kernel_size=(3, 3), stride=(1, 1), padding=(1, 1), bias=False)
      (bn2): BatchNorm2d(256, eps=1e-05, momentum=0.1, affine=True, track_running_stats=True)
    )
    (1): BasicBlock(
      (conv1): Conv2d(256, 256, kernel_size=(3, 3), stride=(1, 1), padding=(1, 1), bias=False)
      (bn1): BatchNorm2d(256, eps=1e-05, momentum=0.1, affine=True, track_running_stats=True)
      (relu): ReLU(inplace=True)
      (conv2): Conv2d(256, 256, kernel_size=(3, 3), stride=(1, 1), padding=(1, 1), bias=False)
      (bn2): BatchNorm2d(256, eps=1e-05, momentum=0.1, affine=True, track_running_stats=True)
    )
  )
  (layer4): Sequential(
    (0): BasicBlock(
      (downsample): Sequential(
        (0): Conv2d(256, 512, kernel_size=(1, 1), stride=(2, 2), bias=False)
        (1): BatchNorm2d(512, eps=1e-05, momentum=0.1, affine=True, track_running_stats=True)
      )
      (conv1): Conv2d(256, 512, kernel_size=(3, 3), stride=(2, 2), padding=(1, 1), bias=False)
      (bn1): BatchNorm2d(512, eps=1e-05, momentum=0.1, affine=True, track_running_stats=True)
      (relu): ReLU(inplace=True)
      (conv2): Conv2d(512, 512, kernel_size=(3, 3), stride=(1, 1), padding=(1, 1), bias=False)
      (bn2): BatchNorm2d(512, eps=1e-05, momentum=0.1, affine=True, track_running_stats=True)
    )
    (1): BasicBlock(
      (conv1): Conv2d(512, 512, kernel_size=(3, 3), stride=(1, 1), padding=(1, 1), bias=False)
      (bn1): BatchNorm2d(512, eps=1e-05, momentum=0.1, affine=True, track_running_stats=True)
      (relu): ReLU(inplace=True)
      (conv2): Conv2d(512, 512, kernel_size=(3, 3), stride=(1, 1), padding=(1, 1), bias=False)
      (bn2): BatchNorm2d(512, eps=1e-05, momentum=0.1, affine=True, track_running_stats=True)
    )
  )
  (avgpool): AdaptiveAvgPool2d(output_size=(1, 1))
  (fc): Linear(in_features=512, out_features=1000, bias=True)
)
11,689,512 total parameters.
11,689,512 training parameters.
Dimensions of the last convolutional feature map:  torch.Size([1, 512, 7, 7])
Our model model has 11,689,512 parameters. If you check the official Torchvision model, then it has the same number of parameters as well. On top of that, the feature map from the last convolutional layer has a 7×7 spatial dimension. So, everything looks good.
Summary and Conclusion
In this tutorial, we learned how to create the ResNet18 model from scratch using PyTorch. We started with creating the building blocks of the model and then built the entire model on top of that. In the next few tutorials, we will train this ResNet18 model from scratch on a classification dataset and also learn a generalized way to build all the ResNet models. I hope that the tutorial was helpful for you.
If you have any doubts, thoughts, or suggestions, please leave them in the comment section. I will surely address them.
You can contact me using the Contact section. You can also find me on LinkedIn, and X.

I understand now clearly what ResNet18 is. I had no idea why we need it in our models. Thanks
I am glad that it helped you, Josephine.
Fantastic write-up! Opens up a black box and shows everything under the hood.
Thanks a lot Sara.
i readed a lot of “tutorial” teaching how this kind of networks work, but this was the most clear of them all. And the first that i had actually made to something usefull. Thanks for your time, amazing article.
Thanks a lot Sergio. Glad that you liked it.