
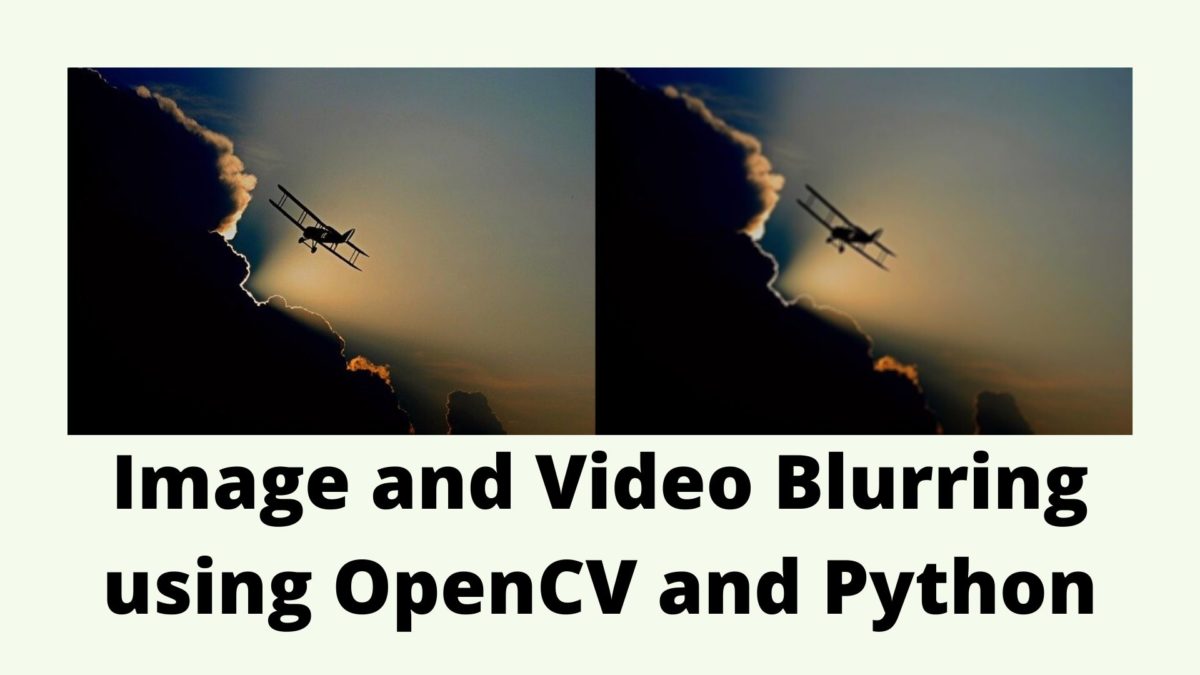
In this tutorial, you will learn image blurring and smoothing using OpenCV and Python. Image blurring in computer vision and machine learning is a very important concept. We will use different filters that are available in the OpenCV library to blur images, video streams, and webcam feeds.
A Bit of Background First…
So, currently, I am working on a large project for ASL (American Sign Language) recognition using deep learning for computer vision. It is on my checklist to finish the project as soon as possible and get the tutorial out here.
While working on the project, I found that training the neural network on the direct RGB images of sign language did not produce the best results. I did a bit of research and found out that edge detection might help. While I tried that, I did not get the best results either. A bit more research led to blurring and edge detection combined. And this brought me to think about writing a tutorial on image and video blurring using OpenCV. After all, it is related to Computer Vision and Python. And the next tutorial is going to be edge detection using OpenCV and Python. So, stay tuned for that one.
What You Will Learn in This Tutorial?
- What is blurring in computer vision?
- Basics of kernel and convolution.
- Different types of blurring techniques:
- Averaging over a low pass filter.
- Using OpenCV:
blur().medianBlur().GaussianBlur().bilateralFilter().
- How to blur video streams?
- How to blur a webcam video feed?
Image Blurring in Computer Vision
Computer vision applications are increasing every day in almost all the fields we can think of. Starting from security to detection, there are many real-world applications.
While working with images in the computer vision field, we may need to blur images and videos sometimes.
Image Blurring using 2D Convolution Kernel
First, we need to know what is a kernel and convolution operations in an image.
While blurring an image, we apply a low pass filter or kernel over an image. This low-pass filter is also called a convolution matrix.
When applying the kernel over the image, we carry an operation called the convolution operation. From this discussion, there may be two questions that arise in your mind.
What is a kernel and what is a convolution operation?
Kernel in Image Processing
A kernel, or convolution matrix, or mask is a matrix that consists of some numerical values. This matrix can be used for blurring, sharpening, and even detecting edges in an image.
Now, let’s suppose that we want to blur an image. To blur an image, we apply this kernel to the image that we have.
We know that an image consists of pixel values arranged in a matrix. And each pixel value gives the RGB color that defines an image. Also, it is almost always likely that the neighboring pixels (pixels close to each other in the matrix) have similar values. In this regard, whenever there is an edge in an image, then there is a drastic change in the pixel value.
So, to blur an image, we average the neighboring pixel values using this low pass filter/kernel. This process smoothens out the edges in an image as well.
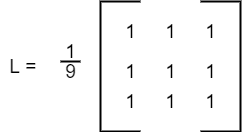
The above image shows a simple 3×3 low-pass filter. Notice that we are dividing the matrix by 9. This ensures the normalization of the values so that all the values are between 0 and 1.
The above process of applying a low pass filter over the pixel values of the image is called a convolution operation.
2D Convolution in Images
When we apply convolution operation to an image, then we can say that we do a simple mathematical operation over the image. This convolution operation changes the values of the pixels in the image to some degree.
As we have discussed, we carry out the convolution operation using the kernel or the filter.
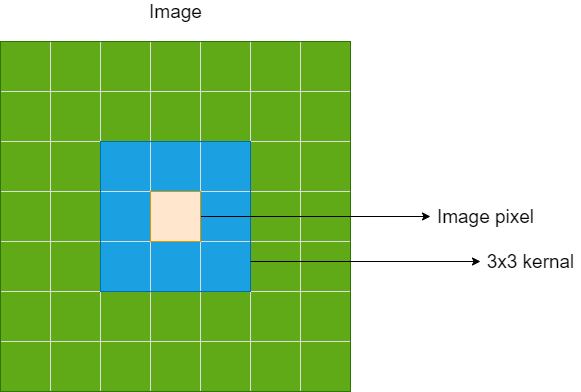
In figure 2, you can see that we are applying a 3×3 kernel over a 7×7 dimensional image. The values of the image pixels will change depending on the values of the kernel.
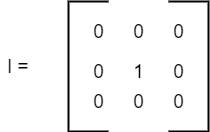
When we use an identity kernel to carry out the convolution operation in an image, then the resulting image is the same as the original image. The following is an image of the identity kernel.
Now, there is one thing to keep in mind here. Using a kernel we can not only blur an image. We can also detect and highlight edges, sharpen, and unsharpen images. But in this article, we will focus on the blurring of images using a kernel.
Next, let’s define the directory structure for this tutorial so that you will find it easy to follow along.
Directory Structure
The following is the directory structure for this tutorial.
│   cam_blur.py
│   image_blur.py
│   video_blur.py
│
├───blurred_images
│
├───images
│
├───out_videos
│
└───videos
In the above block, first there are three python files. We will write the code to blur images inside the image_blur.py file. We will see the different techniques provided by OpenCV and apply those to a few images. Inside the video_blur.py file, we will write the code to capture and blur a video stream. And we will also see how to blur the feed of a webcam. That code will go into cam_blur.py file.
The blurred_images folder will contain all the blurred images that we will process. images folder contains all the images that we will use to test the different methods. The videos and out_videos folders will contain the original and the blurred videos respectively.
You can use images and videos of your choice for this tutorial. But if you want the same images as me, then you can download those by clicking the button below.
In the next section, we will start writing the code for the blurring of images and videos using OpenCV.
Image and Video Blurring using OpenCV and Python
From here on, we will start writing the code. We will go through the explanation of each of the blurring types while writing the code.
Image Blurring in Computer Vision using OpenCV
For the blurring of images, we will write the code into the image_blur.py file.
Let’s start by importing the libraries and modules that we require.
import cv2
import numpy as np
import argparse
We need just three libraries.
- The OpenCV library imported as
cv2. - The NumPy library.
- And the
argparselibrary for parsing command line arguments. We will specify the type of blurring that we want to apply to the image using the command line argument.
The Argument Parser
Next, let’s define the argument parser. While executing the image_blur.py file, we will specify the type of blurring we want to apply to the image. Instead of hard-coding it, it is a better idea to provide it as an argument parser.
# the argument parser
parser = argparse.ArgumentParser()
parser.add_argument('-b', '--blur', type=str, default=None,
                    help='type of blur to add')
args = vars(parser.parse_args())
The default blur type is None, in case we do not want to add any blurring to the image.
We can also read the image now only. Whatever operation we will do, we will need the image. So, let’s read the image from the disk using OpenCV.
img = cv2.imread('images/aircraft.jpg')
We are reading the aircraft.jpg image in the above line of code.
Code for None Blur Type
The following code block defines the code for not adding any blurring to the image. This is the default case according to the argument parser.
if args['blur'] == None:
    print('No noise added...')
    cv2.imshow('Original', img)
    cv2.waitKey(0)
In this case, we will just show the image on a new screen, no other operations will happen.
Applying Identity Kernel to the Image
Previously we have discussed how carrying convolution operation over an image using an identity kernel does not change the image at all. In this section, we will verify that using python code.
We will define an identity kernel, and then carry a convolution operation on the image using the identity kernel. Now, how to convolve an image in regards to computer vision and image processing?
OpenCV library provides the filter2D() function that we can use. This function is very helpful in the field of computer vision when we want to convolve an image using a defined kernel. Basically, we need to define a filter which is the identity filter in this case. Then we can use filter2D() to apply the filter/kernel to the image.
Writing the code will make things much clearer.
if args['blur'] == 'id_blur':
    id_kernel = np.array([[0, 0, 0], [0, 1, 0], [0, 0, 0]])
    blur_img = cv2.filter2D(img, -1, id_kernel)
    cv2.imshow('Identity filter', blur_img)
    cv2.imshow('Original', img)
    cv2.imwrite('blurred_images/id_blur.jpg', blur_img)
    cv2.waitKey(0)
- Starting from line 1, we first check if the blur type is
id_bluror not. Then everything goes inside theifblock. - Then at line 2, we define a 3×3 identity kernel using NumPy.
- At line 3, we apply the identity kernel to the original image. The
filter2D()function takes in three arguments, the original image, the depth (-1 here), and the kernel (theid_kernelin this case). - Next, we visualize the images using
imshow()function.
Now, let’s execute the code and visualize the output.
python image_blur.py --blur id_blur


Comparing the above figures, we can see that the two images are exactly identical. This means that the identity kernel convolution operation does not change the image.
Applying a 5×5 Kernel using filter2D for Image Blurring
Here, we will see how we can actually blur an image.
We will use a 5×5 kernel for blurring the image using the filter2D() function. The convolution operation we will carry out in this section will average the original image pixels with the 5×5 kernel that we will define.
Let’s see how to do that using python code.
if args['blur'] == 'avg_kernel':
    avg_5x5 = np.ones((5, 5), np.float32) / 25.0
    blur_img = cv2.filter2D(img, -1, avg_5x5)
    cv2.imshow('5x5 filter', blur_img)
    cv2.imshow('Original', img)
    cv2.imwrite('blurred_images/5x5_blur.jpg', blur_img)
    cv2.waitKey(0)
The above code block will execute if we provide the blur type as avg_kernel in the command line.
- On line 2, we define a 5×5 kernel. This consists of 1s only. We divide the kernel by 25.0 to normalize the values.
- On line 3, we apply the 5×5 kernel using the
filter2D()function. - Then we show both, the original and the blurred images and save the blurred image to the disk as well.
Execute the code using the following command.
python image_blur.py --blur avg_kernel

In figure 6 you can see that the image is much more blurred than the original image. This is the result of applying the 5×5 kernel over the image.
We can also perform the above averaging operation by just using the blur() function that is provided in the OpenCV library. The following code shows how to do this while applying a 3×3 kernel instead of a 5×5 one.
if args['blur'] == 'blur':
    blur_img = cv2.blur(img, (3, 3))
    cv2.imshow('3x3 blur', blur_img)
    cv2.imshow('Original', img)
    cv2.imwrite('blurred_images/3x3_blur.jpg', blur_img)
    cv2.waitKey(0)
You can execute the python file now by using the following command.
python image_blur.py --blur blur
You should see a less blurry image than in the previous case by applying the 3×3 kernel.
Applying Gaussian Blurring to the Image using OpenCV
In this section, we will apply Gaussian blur to the image. We will use the GaussianBlur() function from the OpenCV library to do so.
To apply Gaussian blurring, we will define a kernel the width and height values. These values will have to be positive and odd. The GaussianBlur() function takes three mandatory arguments. The source image, the kernel size and the standard deviation sigmaX.
In computer vision use cases, we can also use Gaussian blurring to remove Gaussian noise from images. But that application is out of the scope of this tutorial.
The following code block shows how to add Gaussian noise to the image.
if args['blur'] == 'gauss_blur':
    blur_img = cv2.GaussianBlur(img, (3, 3), 0)
    cv2.imshow('Gaussian blur', blur_img)
    cv2.imshow('Original', img)
    cv2.imwrite('blurred_images/gauss_blur.jpg', blur_img)
    cv2.waitKey(0)
The above code block will execute of the command line blur type id gauss_blur. At line 2, we apply the Gaussian blurring using GaussianBlur(). The first argument is the source image, the second one is the kernel size (3×3), and we have given the sigmaX standard deviation as 0.
Execute the python file using the following command.
python image_blur.py --blur gauss_blur

Figure 7 shows the image with Gaussian blur applied to it. If you observe closely, then you will see that the Gaussian blurring for the same kernel size is less prominent than the average blurring for the same kernel size.
Applying Median Blurring to Image using OpenCV
Here, we will apply median blurring to the image.
In median blurring, the kernel’s median value is used to blur the image. So, all the central pixel values in the image will be replaced by the kernel’s median value.
We will use the medianBlur() function from the OpenCV library to apply median blurring to the image. It takes in two arguments. One is the source image, and the other is a single odd and positive value defining the kernel size. This kernel size needs to be greater than 1.
if args['blur'] == 'median_blur':
    blur_img = cv2.medianBlur(img, 5)
    cv2.imshow('Median blur', blur_img)
    cv2.imshow('Original', img)
    cv2.imwrite('blurred_images/median_blur.jpg', blur_img)
    cv2.waitKey(0)
If we give the command line blur type as median_blur, then the above code block will execute. On line 2, we are applying the median blurring to the image with a kernel size of 5.
You can execute the code by using the following command.
python image_blur.py --blur median_blur

Figure 8 shows how median blurring affects the original image in computer vision.
Bilateral Filtering in OpenCV
In computer vision, sometimes we may need to preserve some information in an image and blur out the others.
For example, what if we want to preserve the sharp edges in an image while blurring the other parts? In all the above blurring scenarios, the blurring method blurs the whole image including the edges.
We can use a method called bilateral filtering to preserve the sharp edges in an image while blurring out the other parts. Whenever there is an edge in an image, then the pixel values change quite a lot. So, bilateral filtering ensures that the blurring is applied to similar pixel values in a neighborhood. At the same time, it tries to keep those pixel values unchanged where the intensities vary (edges).
We will use the bilateralFilter() from OpenCV to apply bilateral filtering to the image. It takes the source image, a diameter d of each pixel to use during filtering, sigmaColor, and sigmaSpace as arguments. You can read more in the official documentation.
The following code block shows how to apply bilateral filtering to an image.
if args['blur'] == 'bilateral':
    img = cv2.imread('images/snail.jpg')
    blur_img = cv2.bilateralFilter(img, 19, 75, 75)
    cv2.imshow('Bilateral blur', blur_img)
    cv2.imshow('Original', img)
    cv2.imwrite('blurred_images/bilateral_blur.jpg', blur_img)
    cv2.waitKey(0)
We are using a different image in this case, the snail.jpg image. This is because this contains a lot of textures and edges to compare the effects of bilateral filtering.
- We have given
das 19,sigmaColoras 75, andsigmaSpaceas 75.
Execute the above code by using the following command in the terminal.
python image_blur.py --blur bilateral

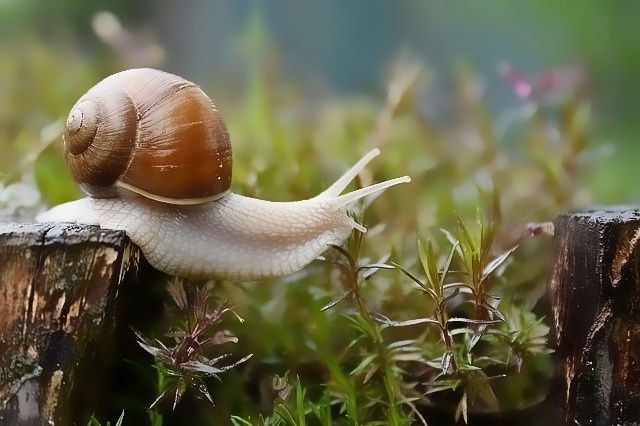
In figures 9 and 10, you can see that the textures on the snail’s body are blurred after applying the bilateral filtering. The same is true for the snail’s shell as well. But if you observe the blades of the grass, then you can see that the sharp edges are preserved fairly well. This is because of the bilateral filtering. Any other blurring technique from above would not have helped to preserve such sharpness in the edges.
All of the blurring techniques we saw have their respective usages in the computer vision field. And if you work with deep learning, then you can use them for different deep learning and computer vision projects as well.
Blurring Videos in Computer Vision using OpenCV
Beginning from this section, you will learn how to blur videos in computer vision using OpenCV and python. Specifically, we will learn about two methods:
- Reading a video stream and blurring the frames.
- Blurring video from the camera feed.
The video that we are going to use in this section is in the videos folder that you unzipped after downloading it. Its fine if you are going to use your own video as well. Just make sure that you keep the video file inside the videos folder.
Blurring Frames from Video Streams using OpenCV
In this section, we will learn how to blur the frames of external video streams.
For blurring the frames, we will use the Gaussian blurring method. You can easily try out the other methods after learning how to do it with one method.
All the code from here on will go into the video_blur.py file. Let’s start with the imports and the basic setup for reading the frames.
import cv2
import numpy as np

# create VideoCapture object
cap = cv2.VideoCapture('videos/marketing.mp4')

if (cap.isOpened() == False):
    print('Error while trying to open video. Plese check again...')

# get the frame width and height
frame_width = int(cap.get(3))
frame_height = int(cap.get(4))

# define codec and create VideoWriter object
out = cv2.VideoWriter('out_videos/marketing_out.avi', cv2.VideoWriter_fourcc('M','J','P','G'), 30, (frame_width, frame_height))
- On line 5, we are capturing the video file (
marketing.mp4) usingVideoCapture()module. - Next, we check if we are unable to read the file.
- On lines 11 and 12, we get the height and width of the video frame which is required for saving the video file.
- On line 15, we define the codec (
fourcc) for saving the blurred video and create aVideoWriterobject for that.- Note that we will save the blurred video in
out_videosfolder.
- Note that we will save the blurred video in
Note: If you want to learn more about fourcc video codec format, then you will find this link much helpful.
Next, we will read the video file frames until the end of the video and carry on the desired operation (i.e. blurring).
# read until end of video
while(cap.isOpened()):
    # capture each frame of the video
    ret, frame = cap.read()
    if ret == True:
        # add gaussian blurring to frame
        frame = cv2.GaussianBlur(frame, (5, 5), 0)

        # save video frame
        out.write(frame)
        # display frame
        cv2.imshow('Video', frame)

        # press `q` to exit
        if cv2.waitKey(27) & 0xFF == ord('q'):
            break

    # if no frame found
    else:
        break

# release VideoCapture()
cap.release()

# close all frames and video windows
cv2.destroyAllWindows()
- Starting from line 2, we are reading the video file until it ends. On line 4, we capture the frame of the video.
- Then for each
Trueframe (from line 5):- We apply Gaussian blurring to the frame at line 7.
- Save the frame at line 10.
- And show the frame at line 12.
- Finally, after reading all the frames from the video, we release the
VideoCapture()object and destroy all video frame windows.
Now, execute the video_blur.py file by typing the following command in the terminal.
python video_blur.py
The following short clips show the original and the blurred videos.
You can see that clip 2 is actually blurred. This shows how easy it is to blur videos using OpenCV. You can now try out other blurring methods on different videos.
Blurring Webcam Video Feed using OpenCV
Blurring webcam video feeds using OpenCV is just as easy.
In fact, we just need to change only one line of code from the previous one to use our webcam and blur the camera feed by capturing the frames.
You just need to make sure that you have a working webcam attached to your computer. Or if you are working on your laptop, then it must be in-built with a webcam.
The following is the complete code for capturing and blurring the webcam feed in OpenCV. This code goes into the cam_blur.py file.
import cv2
import numpy as np

cap = cv2.VideoCapture(0)

if (cap.isOpened() == False):
    print('Error while trying to open camera. Plese check again...')

# get the frame width and height
frame_width = int(cap.get(3))
frame_height = int(cap.get(4))

# define codec and create VideoWriter object
out = cv2.VideoWriter('out_videos/cam_blur.avi', cv2.VideoWriter_fourcc('M','J','P','G'), 30, (frame_width,frame_height))

# read until end of video
while(cap.isOpened()):
    # capture each frame of the video
    ret, frame = cap.read()
    if ret == True:
        # add gaussian blurring to frame
        frame = cv2.GaussianBlur(frame, (11, 11), 0)

        # save video frame
        out.write(frame)
        # display frame
        cv2.imshow('Video', frame)

        # press `q` to exit
        if cv2.waitKey(27) & 0xFF == ord('q'):
            break

# release VideoCapture()
cap.release()

# close all frames and video windows
cv2.destroyAllWindows()
In the above code block, we have cap = cv2.VideoCapture(0) on line 4. We have just inserted 0 instead of a video file name. And our python code is all set to capture and blur webcam feed. After running the code, you exit out by pressing the q button on your keyboard.
Now, let’s execute the python file.
python cam_blur.py
You must be seeing the webcam getting activated after a few seconds. The video will be blurrier as we are applying Gaussian blurring to the frames. In this case, also, you can try out different blurring methods and see how it affects real-time video blurring.
Summary and Conclusion
In this article you learnt how easy it is blurring an image using the OpenCV library. Specifically, you learnt:
- Blurring an image in computer Vision using different blurring functions in OpenCV.
- How to blur video frames using OpenCV?
- The blurring of webcam video feed using OpenCV.
Now, if you want to get your hands on extra resources, then you will find the following links useful.
- Module 2 of OpenCV: Computer Vision Projects with Python book.
- Wikipedia article: Kernel (image processing).
- Wikipedia article: Convolution.
- OpenCV image filtering tutorial.
If you have any thoughts or suggestions, then leave them in the comment section. I will try my best to address them.
You can contact me using the Contact section. You can also find me on LinkedIn, and X.

Really good and informative article.
Superb
Thank You.
Nicely done shovit!!
Thanks Abhilash.
Sharpen image online for free https://freetools.site/image-editors/sharpen
Can you write a article about blurring a region of interest with videos?
Sure Emir. Do you want a specific application like face blurring or something?
In case that is the requirement, I will try to make it a two part post. One for custom face detection, and another for face blurring after detection.