In this article, we will be fine tuning the Qwen 1.5 model for coding.
Nowadays, there are several chat based LLMs available online. Sometimes, the options are so vast, that choosing a model mostly falls upon personal preference and the task to be accomplished. However, most of the chat based models are fine tuned on a general SFT (Supervised Fine Tuning) dataset. The smaller chat based LLMs (or SLMs [Small Language Models]) do not perform so well on task specific objectives, like coding, out of the box. Fine tuning the base models according to the task is a much better way to extract the best out of them. In fact, in this article, we will do exactly that. We will use the base Qwen 1.5 0.5B model and fine tune it on a coding dataset.
A lot of questions arise here:
- Why choose the Qwen 1.5 0.5B model?
- Why not fine-tune a slightly larger model like Phi 1.5 with QLoRA?
- Most importantly, why not go big like others, and fine tune a 7 billion parameter model which we know will give better performance?
We will answer all of these questions in this article along with a discussion of the dataset that we use. On a side note, this article is like the tip of the iceberg in terms of dealing with LMs/LLMs/SLMs and fine tuning. We will cover much more in future articles. We won’t go into a detailed explanation of the coding here as it is very similar to some of the previous ones. Those articles will be linked for reference.
Without any further delay, let’s jump into the technical parts.
Why Choose the Qwen 1.5 05B Model for Coding Fine Tuning Task?
If you are working with LLMs, you may already have a few assumptions.
The original Qwen LLM was introduced by the Alibaba group. Qwen 1.5 is an improved version of the same model. There are several base and chat fine tuned models available according to the number of parameters for Qwen 1.5. Qwen 0.5B, Qwen 1.8B, Qwen 5B, Qwen 14B, Qwen 72B.
Among them, the Qwen 1.5 0.5B model is perhaps the most interesting. Its around 463 million parameters, however, is extremely good at many tasks. Although, we do not go into the numbers here, you can take a look at the benchmarks on the official page here.
So, this is the very first reason to choose the model. It contains less than 500 million parameters and can be easily trained on a consumer GPU (even less than 16 GB of VRAM).
Why not Fine Tune Phi 1.5 using QLoRA?
In short, fine-tuning Phi 1.5 using QLoRA (3 epochs) gave worse results for coding compared to full fine-tuning of the Qwen 1.5 0.5B model.
Of course, training the Phi 1.5 model for longer and with a higher rank will eventually beat the Qwen model, however, the training time is substantial as well. The same number of epochs for Phi 1.5 training (even with QLoRA) takes more than double the time compared to fine-tuning Qwen 0.5B.
Why not Go Big and Train a 7B LLM?
We have seen almost everybody do that and obtain excellent results. Here, we aim to train a much smaller model as the starting point for several future experiments with SLMs (Small Language Models).
The Coding Dataset
Let’s take a look at the coding dataset that we will use for fine tuning the Qwen model. It is called CodeAlpaca-20K and is available on Hugging Face. The dataset contains 20000 coding related instructions, inputs, and outputs very similar to the Stanford Alpaca dataset.
In case you want know about the Alpaca dataset format in detail, be sure to check the Instruction Tuning GPT2 on Alpaca Dataset article.
The dataset that we will use here contains Python, SQL, and JavaScript related prompts. They are advanced long coding questions. Some are conceptual questions, a few are coding questions, and some are output related prompts as well.
Overall, this will teach our model to learn the very basics of each of the coding languages rather than make it an advanced coder model.
Be sure to check the dataset on Hugging Face.
Directory Structure
Here is the directory structure of the entire project.
├── outputs
│   └── qwen_05b_code
│       ├── best_model
│       │   ├── added_tokens.json
│       │   ├── config.json
│       │   ├── generation_config.json
│       │   ├── merges.txt
│       │   ├── model.safetensors
│       │   ├── special_tokens_map.json
│       │   ├── tokenizer_config.json
│       │   └── vocab.json
│       └── logs
│           ├── checkpoint-20
│           ├── checkpoint-60
│           └── runs
├── inference.ipynb
├── qwen_05b_code.ipynb
└── requirements.txt
- We have a training and an inference notebook.
- The
outputsdirectory contains the best model and the training logs. - Finally, we have a requirements text file for easier installation of the dependencies.
All the training notebooks, the best trained model, and requirements text file are downloadable via the download section.
Download Code
Installing Dependencies
We need to install the following libraries along with the PyTorch framework for the code in this article.
- accelerate
- transformers
- trl
- datasets
- bitsandbytes
- peft
- tensorboard
You can install them using the requirements.txt file.
pip install -r requirements.txts
That’s all we need for the setup. Let’s now jump into the code.
Fine Tuning Qwen 1.5 for Coding
As we discussed earlier, we will not be covering the explanation of the code in detail. These previous articles cover different types of datasets, training configurations, training strategies, and models with extensive explanation:
- Instruction Tuning OPT-125M
- Instruction Tuning GPT2 on Alpaca Dataset
- Fine Tuning Phi 1.5 using QLoRA
All the training and inference shown here were carried out on a system with 10 GB RTX 3080 GPU, 10th generation i7 GPU, and 32 GB of RAM.
The following code resides in the qwen_05b_code.ipynb Jupyter notebook.
First, we have all the import statements that we will need along the way.
import os
import torch

from datasets import load_dataset
from transformers import (
    AutoModelForCausalLM,
    AutoTokenizer,
    TrainingArguments,
    pipeline,
    logging,
    BitsAndBytesConfig
)
from trl import SFTTrainer
from peft import LoraConfig
We import all that we need for the LoRA based Supervised Fine Tuning of the Qwen 1.5 0.5B model.
Training and Dataset Configuration
Next, we define the configurations that we need for training and creating the dataset.
batch_size = 2
num_workers = os.cpu_count()
epochs = 10
bf16 = True
fp16 = False
gradient_accumulation_steps = 256
context_length = 512
learning_rate = 0.0001
model_name = 'Qwen/Qwen1.5-0.5B'
out_dir = 'outputs/qwen_05b_code'
These include the:
- Batch size
- Number of workers for data loading
- Number of epochs to train for
- Whether to use BFloat16 or Float16 mixed precision
- The gradient accumulation steps
- The sequence length
- Learning rate for the optimizer
- The Hugging Face Qwen model repository tag
- And the output directory.
Loading the Preparing the Dataset
Here, we will load the dataset and split it into training and validation sets.
dataset = load_dataset('sahil2801/CodeAlpaca-20k')

full_dataset = dataset['train'].train_test_split(test_size=0.05, shuffle=True)
dataset_train = full_dataset['train']
dataset_valid = full_dataset['test']

print(dataset_train)
print(dataset_valid)
After splitting, there are 19020 training and 1002 validation samples.
Next, we need to write a preprocessing function that will process the samples as necessary for our SFT Trainer pipeline.
def preprocess_function(example):
    """
    Formatting function returning a list of samples (kind of necessary for SFT API).
    """
    text = f"### Instruction:\n{example['instruction']}\n\n### Input:\n{example['input']}\n\n### Response:\n{example['output']}"
    return text
That’s all we need for the dataset preparation.
Loading the Qwen 1.5 0.5B Model
Now, let’s load the Qwen model.
if bf16:
    model = AutoModelForCausalLM.from_pretrained(model_name).to(dtype=torch.bfloat16)
else:
    model = AutoModelForCausalLM.from_pretrained(model_name)

print(model)
# Total parameters and trainable parameters.
total_params = sum(p.numel() for p in model.parameters())
print(f"{total_params:,} total parameters.")
total_trainable_params = sum(
    p.numel() for p in model.parameters() if p.requires_grad)
print(f"{total_trainable_params:,} training parameters.")
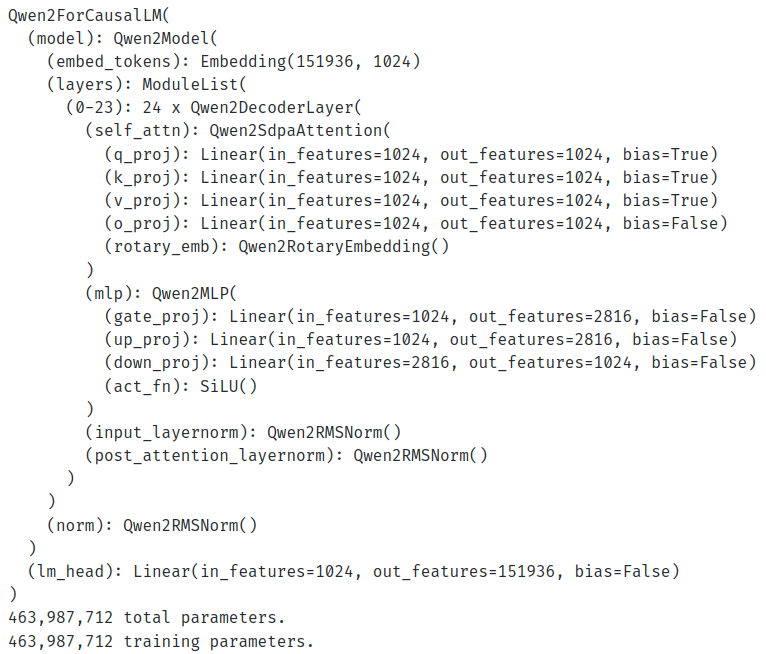
We load the model either in BF16 or FP16 mixed precision. Here are the model layers and the number of parameters.
Loading the Tokenizer
Loading the tokenizer is as simple as loading the model.
tokenizer = AutoTokenizer.from_pretrained(
    model_name,
    trust_remote_code=True,
    use_fast=False
)
Initializing the Training Arguments and Training the Model
Before training, we need to initialize the training arguments and the SFT Trainer pipeline.
training_args = TrainingArguments(
    output_dir=f"{out_dir}/logs",
    evaluation_strategy='epoch',
    weight_decay=0.01,
    load_best_model_at_end=True,
    per_device_train_batch_size=batch_size,
    per_device_eval_batch_size=batch_size,
    logging_strategy='epoch',
    save_strategy='epoch',
    num_train_epochs=epochs,
    save_total_limit=2,
    bf16=bf16,
    fp16=fp16,
    report_to='tensorboard',
    dataloader_num_workers=num_workers,
    gradient_accumulation_steps=gradient_accumulation_steps,
    learning_rate=learning_rate,
    lr_scheduler_type='constant',
)
trainer = SFTTrainer(
    model=model,
    train_dataset=dataset_train,
    eval_dataset=dataset_valid,
    max_seq_length=context_length,
    tokenizer=tokenizer,
    args=training_args,
    formatting_func=preprocess_function,
    packing=True
)
We can also visualize a few samples from the data loader using the following code.
dataloader = trainer.get_train_dataloader()
for i, sample in enumerate(dataloader):
    print(tokenizer.decode(sample['input_ids'][0]))
    print('#'*50)
    if i == 5:
        break
Here is the output.
 corners, a light shadow, and a maximum width of 500px.

### Input:


### Response:
.card {
    border-radius: 10px;
    box-shadow: 0 0 5px rgba(0, 0, 0, 0.2);
    max-width: 500px;
}<|endoftext|>### Instruction:
Write a code snippet to remove all white spaces from a given string in
JavaScript.

### Input:
" Hello World! "

### Response:
let outputString = "Hello World!";
outputString = outputString.replace(/\s/g, '');  // removes white spaces
console.log(outputString);<|endoftext|>### Instruction:
Generate a list of all even numbers between 20 and 40.

### Input:


### Response:
even_numbers = []
for num in range(20, 41):
  if num % 2 == 0:
    even_numbers.append(num)

print(even_numbers)

# Output: [20, 22, 24, 26, 28, 30, 32, 34, 36, 38, 40]<|endoftext|>### Instruction:
Generate a python code that takes a list of integers, prints out an array
that is all True if the values are in the input list and all False otherwise.

### Input:
list_of_numbers = [5, 7, 10, 2]
Now, we can start the training by calling the train method.
history = trainer.train()
After training, we save the best model to disk.
model.save_pretrained(f"{out_dir}/best_model")
tokenizer.save_pretrained(f"{out_dir}/best_model")
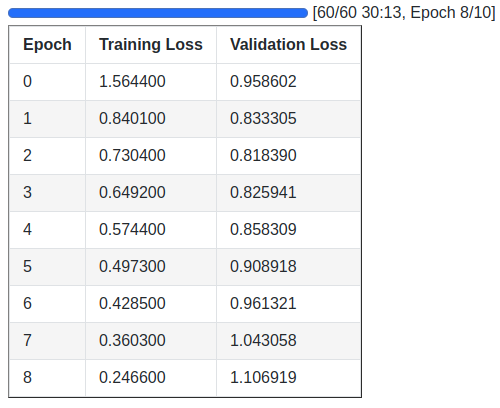
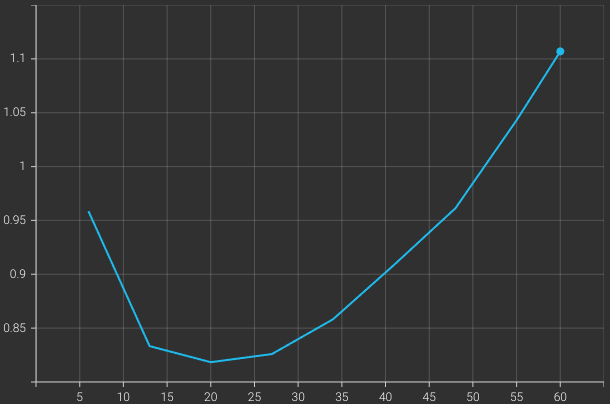
Following are the training logs and the validation loss graph.
We obtain the best model on epoch 3, which is the model we will use for text generation during inference.
Inference using the Trained Qwen Model
Let’s jump into the inference part. The code for inference resides in the inference.ipynb notebook.
The next three code blocks import the necessary modules, load the model & the tokenizer, and initialize the text generation pipeline.
from transformers import (
    AutoModelForCausalLM,
    logging,
    pipeline,
    AutoTokenizer
)
model = AutoModelForCausalLM.from_pretrained('outputs/qwen_05b_code/best_model/')
tokenizer = AutoTokenizer.from_pretrained('outputs/qwen_05b_code/best_model/')
pipe = pipeline(
    task='text-generation',
    model=model,
    tokenizer=tokenizer,
    max_length=512,
    device='cuda',
    eos_token_id=tokenizer.eos_token_id
)
Next, we initialize the prompt template and do a forward pass through the model.
prompt = """### Instruction:
Write Python code for merge sort.

### Input:


### Response:
"""

result = pipe(
    prompt
)
print(result[0]['generated_text'])
For the first one, we prompt it to write the code for merge sort in Python.
But how do we know that fine tuning the Qwen model on the coding dataset actually helped? Let’s compare that with the Qwen 1.5 0.5B chat model provided by the authors which is a general assistant model. In the output blocks, the first one shows the output from the code fine-tuned Qwen model and the second one shows the output from the general chat model.
# OUTPUT FROM CODE FINE-TUNED QWEN 1.5 MODEL.

def merge_sort(arr):
    if len(arr) > 1:
        mid = len(arr)//2
        left = arr[:mid]
        right = arr[mid:]

        merge_sort(left)
        merge_sort(right)

        i = j = k = 0
        while i < len(left) and j < len(right):
            if left[i] < right[j]:
                arr[k] = left[i]
                i+=1
            else:
                arr[k] = right[j]
                j+=1
            k+=1
        while i < len(left):
            arr[k] = left[i]
            i+=1
            k+=1
        while j < len(right):
            arr[k] = right[j]
            j+=1
            k+=1
# OUTPUT FROM DEFAULT QWEN 1.5 CHAT MODEL.

def merge_sort(arr):
    if len(arr) <= 1:
        return arr

    mid = len(arr) // 2
    left_half, right_half = merge_sort(arr[:mid]), arr[mid:]

    left_half.extend(left_half[:mid])
    right_half.extend(right_half[mid:])

    return merge(left_half, right_half)

def merge(left, right):
    result = []
    i = j = 0

    while i < len(left) and j < len(right):
        if left[i] > right[j]:
            result.append(left[i])
            i += 1
        else:
            result.append(right[j])
            j += 1

    while i < len(left):
        result.append(left[i])

    while j < len(right):
        result.append(right[j])

    return result
It looks like the merge sort code produced by the default Qwen chat model is incorrect. However, the model we fine-tuned produces the correct output.
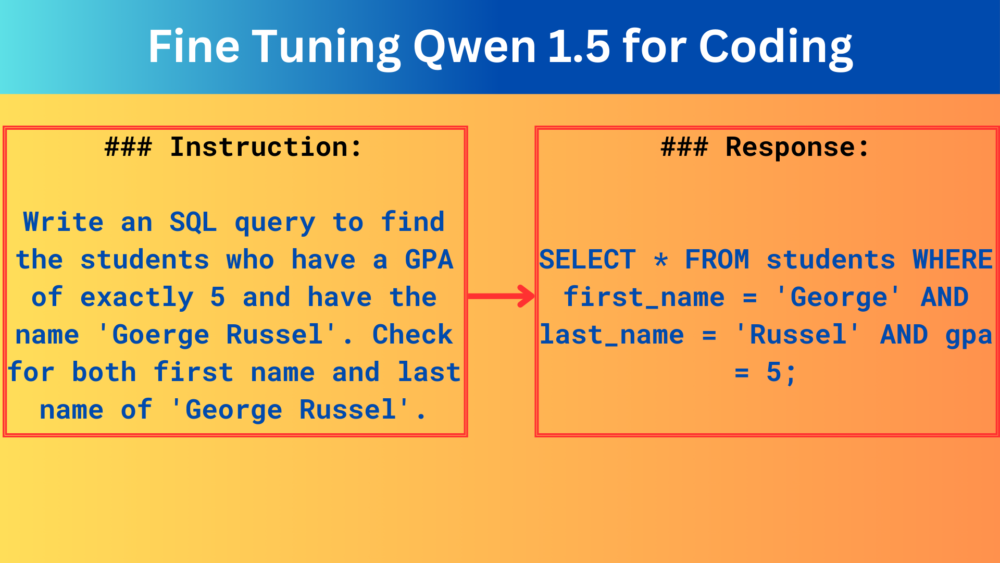
Let’s try an SQL coding example.
prompt = """### Instruction:
Write an SQL query to find the students who have a GPA of exactly 5 and have the name 'Goerge Russel'. Check for both first name and last name of 'George Russel'.

### Input:


### Response:
"""

result = pipe(
    prompt
)
print(result[0]['generated_text'])
It’s a simple example, however, contains mulitple conditions that may make things complicated for the models. Here are the outputs from both.
# OUTPUT FROM CODE FINE-TUNED QWEN 1.5 MODEL.

SELECT * FROM students WHERE first_name = 'George' AND last_name = 'Russel' AND gpa = 5;
# OUTPUT FROM DEFAULT QWEN 1.5 CHAT MODEL.

SELECT s.name, s.first_name, s.last_name
FROM students s
WHERE s.gPA = 5 AND s.first_name = 'George Russel';
Clearly, the default chat model gives us the wrong output and our coding fine-tuned Qwen 1.5 0.5B model gives the correct output.
This shows the power of Small Language Models if we can fine-tune them properly. Training such models on task specific datasets will be cheaper and we can create merges to create an expert model. We will cover such topics in future articles.
Further Reading
- Introduction to GPT-1 and GPT-2
- Getting Started with Grammar Correction using Hugging Face Transformers
- Spelling Correction using Hugging Face Transformers
- Text Generation with Transformers
- Word Level Text Generation using LSTM
- Character Level Text Generation using LSTM
Summary and Conclusion
In this article, we covered the fine tuning of the Qwen 1.5 0.5B model on a small coding dataset. Our aim was to show that fine tuning SLMs can also give us good results and we may not always need to train multi-billion parameter models. I hope that this article was worth your time.
If you have any doubts, thoughts, or suggestions, please leave them in the comment section. I will surely address them.
You can contact me using the Contact section. You can also find me on LinkedIn, and Twitter.





Hi thanks for this wonderful tutorial, i think download button doesn’t work, could you check it please? thank you
Hello. Sometimes ad blockers or DuckDuckGo cause issues with the download API. Can you please disable them and try downloading again? Let me know this does not solve the issue.