

In this tutorial, we will learn about edge detection using Structured Forests. It is also known as the Structured Edge detector. All in all, we will get hands-on with edge detection using structured forests with OpenCV.
Edge detection is a very important task in the field of computer vision. It is the very first step for many of the pure computer vision tasks, such as contour detection. Even when it comes to deep learning, the deeper layers first learn to recognize the edges before learning the complicated features of an image. So, we can say that edge detection is pretty important in the field of computer vision. And having good and efficient algorithms for edge detection in images is just as important.
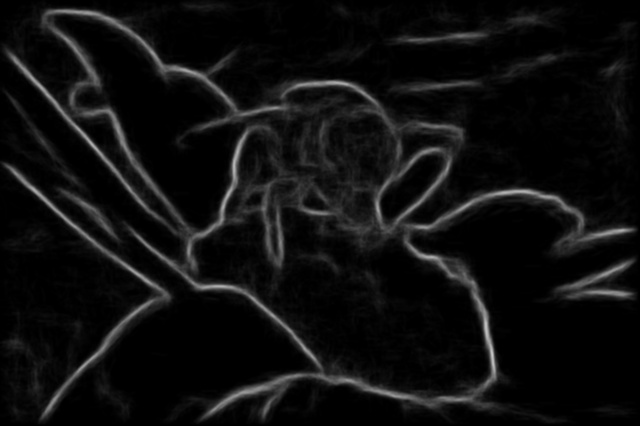
Figure 1 shows an example output after we apply Structured Edges (SE) detector to an image where a bee is sitting on a flower. After going through this tutorial, you will be able to apply and get similar results as the above.
There are already many effective edge detectors like Canny, Sobel, and Laplacian edge detectors. They why do we need another Structured edge detector.
The main claim is that it is fast and better at predicting edges for local masks. And also, it beats many state-of-the-art edge detectors.
Further into the article, we will get to know briefly about the paper. Also, we will get hands-on with coding for edge detection using Structured Forests with OpenCV.
So, what specifically will you be learning in this tutorial?
- Getting to know about the paper by Piotr Dollar and C. Lawrence Zitnick in brief. You can find the paper, Fast Edge Detection Using Structured Forests here.
- Getting hands-on with edge detection using Structured Forests with OpenCV.
- Comparing the Structured Forest edge detection results with Canny edge detector.
If you are new to edge detection in computer vision, then I highly recommend that you go through one of my previous posts. That is Edge Detection in Computer Vision using OpenCV. I hope that you will find it useful for getting started.
Now, let’s start with a brief about the Structured Edge detection paper a bit.
Fast Edge Detection using Structured Forests
The paper Fast Edge Detection Using Structured Forests by Piotr Dollar and C. Lawrence Zitnick was first published in 2014. It was a major milestone in edge detection as it used learning decision trees to map images and their labels, that is, the edges.
During the time of publication, it beat many state-of-the-art edge detectors and was also faster than the majority of them. It also obtained state-of-the-art edge detection results on the BSDS500 Segmentation dataset and NYU Depth dataset.
There are many technical details in the paper which we will not cover in this article. Instead, we will look at some of the high level and important aspects of the research.
Training Random Forests for Edge Detection
The authors tried to solve edge detection using learning algorithms. In particular, they trained random forests on the BSDS500 segmentation and NYU Depth datasets to obtain the results.
In fact, the final result is the ensemble of 8 different trees averaged over, which is really interesting. According to the authors, it helped in improving the results a lot.
While training, the models got input features as image and label pairs. The images were 32×32 patches and the labels were 16×16 segmentation masks.
To obtain good results, the authors had to consider a lot of different parameters while training the models. These include, forest splitting parameters, feature parameters like image and blurring, and the number of trees as well.
The standard variant of their model is SE (Structured Edge) detector. But they also trained other variants which improved results which we will see in the next section.
Variants of the SE (Structured Edge) Detector
With their standard SE detector, the authors tried to use sharpening (SH) and multi-scaling (MS) to enhance the results. In total, there are four different variants. They are SE, SE+MS, SE+SH, and SE+MS+SH, all with their own set of strengths and weaknesses.
Let’s take a look at the results of the variants of the structured edge detectors.
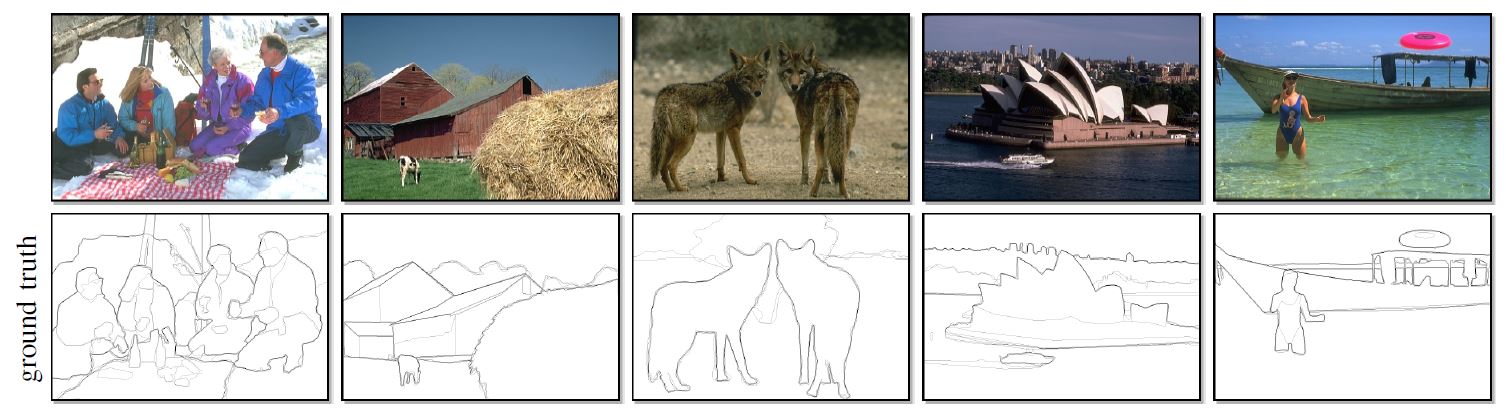
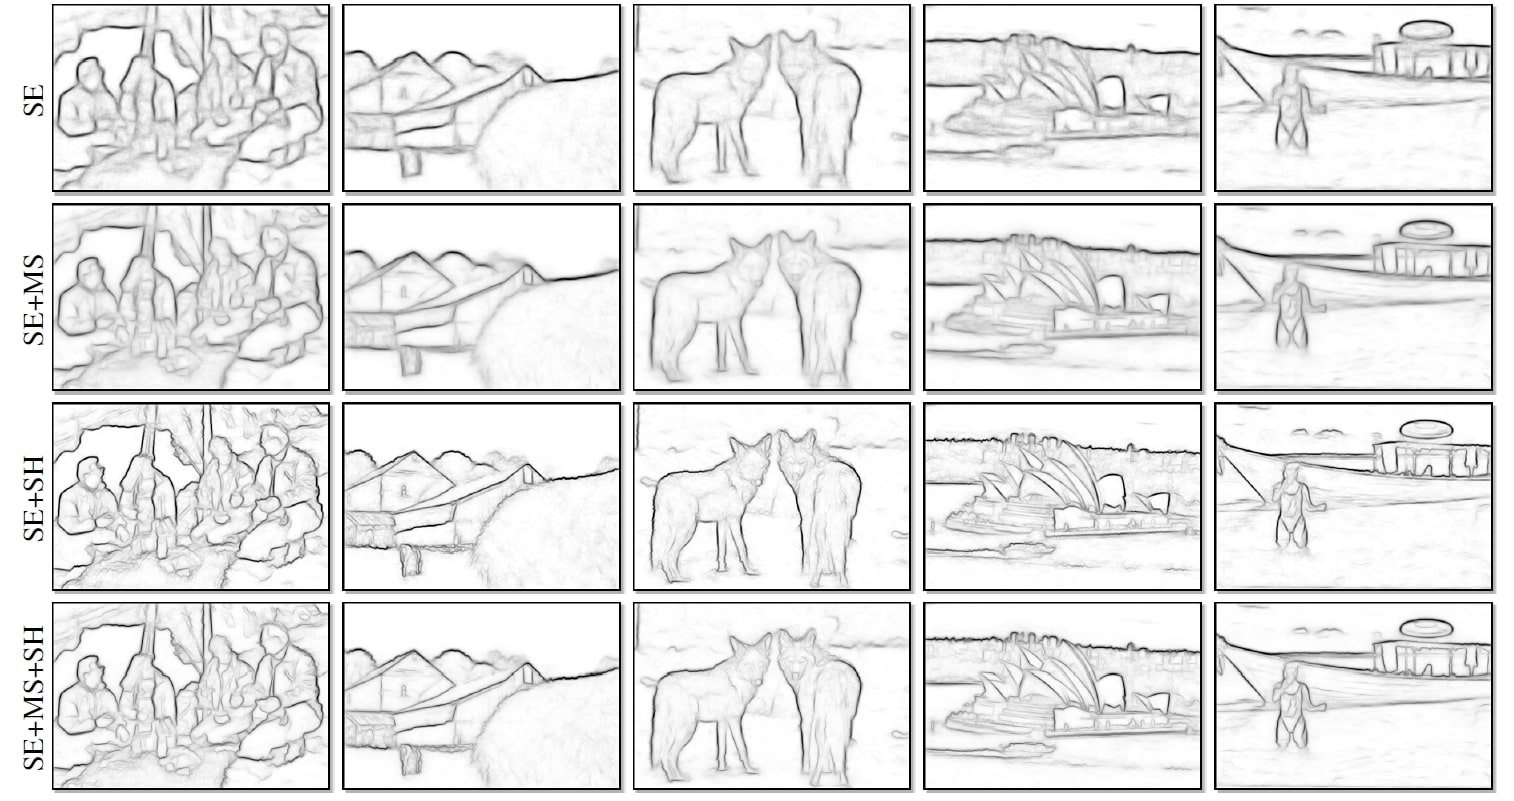
Figure 2 shows some of the images from the BSDS500 dataset and their ground-truth edges. Figure 3 shows the results of the variants of the structured edge detector on the BSDS500 dataset. We can clearly see the differences in the results when comparing them. Notably, SE+SH and SE+MS+SH produce the best results. But reaching there has also its demerits.
In SE+SH, we have to use the extra sharpening step. This gives better results for sure but the sharpening step also requires more computation time. Similarly, MS stand for multi-scaling. These few lines from the paper best describe this approach.
… we implement a multiscale version of our edge detector. Given an input image I, we run our structured edge detector on the original, half, and double resolution version of I and average the result of the three edge maps after resizing to the original image dimensions. Although somewhat inefficient, the approach noticeably improves edge quality.
Fast Edge Detection Using Structured Forests
Using multi-scaling gives better results for sure. But it also increases the run-time which might hurt its real-time expectations.
Results and Advantages
In this section, we will take a look at the results and some of the advantages as mentioned in the paper.

Figure 4 shows the results of the variants of SE detectors and a comparison with other edge detectors on the BSDS500 dataset. It is very clear that the methodology proposed by the authors in their paper proves to be superior to the previous methods. It beats all the other methods in terms of average precision and recall. And in terms of fixed contour threshold (ODS) and per image best threshold (OIS), it only falls short by a very small margin or is almost equivalent.
But what stands out most is the FPS. The new SE detectors are a lot faster than almost all of the previous models. Not only that, the simple SE detector achieves 30 FPS, which is real-time edge detection. Now, that is impressive.
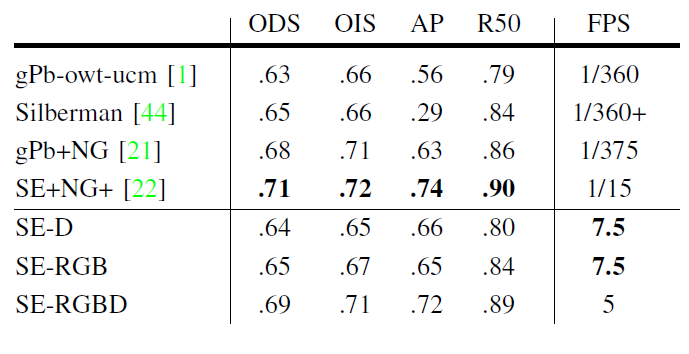
In figure 5, we can see the novel SE detector results on the NYUD dataset. This dataset is considerably challenging as we have to detect edges from depth map images. That being said, the new SE detector is behind the best model by only a small margin. And of course, it is faster than all other models.
So, a final look at the advantages.
- We have better edge detections using the new Structured Edge detector as proposed by Piotr Dollar and C. Lawrence Zitnick.
- Also, we have almost real-time detections which makes it suitable for many real-life applications. These can include video segmentation and object recognition tasks like pedestrian detection.
- The trained models really generalize very well. This means that we can use these pre-trained random forest models on new datasets without retraining.
If you are interested, you should surely go through the technical details in the paper. We will stop our discussion of the paper here. Further on, we will try to use Structured Edge detectors using Python and see whether we can actually get the benefits or not.
Directory Structure and Input Data
The following is the directory structure for this tutorial.
│   edge_image.py
│   edge_video.py
│
├───input
│       image_1.jpg
|       ...
│       video_1.mp4
│
├───model.yml
│       model.yml
│
└───outputs
- Directly inside the project folder, we have two Python files. The
edge_image.pyandedge_video.pycontain the code for edge detection in images and videos respectively. - The
inputfolder contains the input images and videos that we will use for edge detection. - Inside the
model.ymlfolder, we have a pre-trained model calledmodel.ymlwhich has already been trained for Structured Edge detection. We can use this model out of the box after loading it using OpenCV and the suitable modules. So, we need not train our own random forest models for this. - Finally, the
outputsfolder will contain the results after we execute the above two Python files.
The Input Data
You can use any input images and videos of your choice for this tutorial. However, I have chosen some images and videos which best demonstrate the capabilities of the Structured edge detector. These images and vidoes will help us compare the results when we will carry out edge detection with structured forests with OpenCV and the Canny edge detector.
You can download the zipped input file by clicking the button below.
After downloading the input files, just extract them inside your project directory to obtain the above directory structure.
The Trained Model
As discussed above, we need the trained model to implement edge detection using Structured Forests using OpenCV.
Download the trained model here.
You can download that trained model from here. You may notice that it is in the OpenCV’s extra module. There is a reason for that and we will come to it shortly. After downloading the model extract the data inside the project directory.
Libraries and Dependencies
There is just one more thing we need to tackle before getting into the coding part.
Currently, the Structured Forests edge detection algorithm is not a part of the stable OpenCV library, which is the opencv-python 4.5.1.48 at the time of writing. Instead, it is part of the opencv-contrib package.
So, before moving ahead, you need to install the opencv-contrib-python package from PyPi. I would strongly advise to create a new working environment for installing this package. Otherwise, it might cause conflicts with the stable version. You can install the opencv-contrib by using the following command.
pip install opencv-contrib-python
After doing the installation, you are all set. We can move ahead with the coding of edge detection using Structured Forests with OpenCV.
Code for Edge Detection using Structured Forests with OpenCV
Starting from this section, we will focus on the coding part of the tutorial. We will get into the details of both the code files while writing the code for each of them. As the name of the code files suggests, one is for carrying out edge detection using structured forests with OpenCV on images and other one is for edge detection in videos.
Also, while carrying edge detection with Structured Forests, we will be carrying out Canny edge detection simultaneously. This will help us compare what improvements Structured Forests edge detection provides us with.
So, let’s get started with the code.
Edge Detection using Structured Forests with OpenCV in Images
We will start with the edge detection in images. Before moving ahead, just make sure that you have installed the OpenCV contrib package.
Okay, all the code here will go into the edge_image.py Python file.
The following code block contains the imports of all the libraries and modules that we will need.
import argparse
import numpy as np
import cv2
We need argparse for parsing the command line arguments, numpy, and of course cv2 for edge detection.
The next code block contains the construction of the argument parser to parse the command line arguments.
parser = argparse.ArgumentParser()
parser.add_argument('-i', '--input', help='path to the input image',
                    required=True)
args = vars(parser.parse_args())
We have only one flag here, that is --input which will accept the path to the input image.
Reading and Preprocessing the Image
Now, it is time to read the image using the path provided as the command line argument. Before we can detect the edges using the Structured Forests edge detector and Canny edge detector, we have to preprocess the image a bit. Let’s see what those operations are.
image = cv2.imread(args['input'])
# keep a copy of the original image
orig_image = image.copy()
# convert to RGB image and convert to float32
image = cv2.cvtColor(image, cv2.COLOR_BGR2RGB)
image = image.astype(np.float32) / 255.0
# grayscale and blurring for canny edge detection
gray = cv2.cvtColor(orig_image, cv2.COLOR_BGR2GRAY)
blurred = cv2.GaussianBlur(gray, (5, 5), 0)
- After reading the image and keeping an original copy of it, we convert it into RGB color mode from the default BGR color mode (line 12).
- At line 13, we convert the pixel values into
float32data type and divide the pixels by 255.0 as well. This will ensure that all the pixels are normalized and are within the expected 0.0 to 1.0 range. - To carry our Canny edge detection, we need a grayscale image. This we are doing at line 15. Also, Canny edge detection is very sensitive to noise. For that reason, we need to reduce the noise a bit. We can achieve this using Gaussian blurring. We are applying Gaussian blurring to the grayscale image with a kernel size of 5×5 at line 16.
This is all the preprocessing we need before we can apply both the edge detectors to our image.
Detecting Edges and Saving the Results to Disk
As discussed, we will carry out both, Canny and Structured Forests edge detection.
# carry out Canny edge detection
canny = cv2.Canny(blurred, 50, 200)
# initialize the structured edge detector with the model
edge_detector = cv2.ximgproc.createStructuredEdgeDetection('model.yml/model.yml')
# detect the edges
edges = edge_detector.detectEdges(image)
At line 18, we are detecting edges using the Canny edge detector. This takes the blurred image and two threshold values. We will not go into the details of the Canny edge detector here. You can go through this edge detection article which goes into the details of several edge detection techniques and also has hands-on coding with OpenCV.
Now, coming to edge detection using Structured Forests. At line 20, we are initializing the edge detector with the model that we have downloaded. We have the ximgproc module and inside that we have the createStructuredEdgeDetection class. We initialize this by providing the path to the pre-trained model. The above step provides us with an edge_detector object. We use the object’s detectEdges() function to detect the edges using Structured Forests (line 22). The above step provides us with the image edges.
The final step is saving the results to disk.
# show and save the image edges
save_name = f"outputs/{args['input'].split('/')[-1].split('.')[0]}"
cv2.imshow('Structured forests', edges)
cv2.imshow('Canny', canny)
cv2.waitKey(0)
cv2.imwrite(f"{save_name}_forests.jpg", edges*255.0)
cv2.imwrite(f"{save_name}_canny.jpg", canny)
The save_name is a string variable which we will use to save the image to disk. First, we are visualizing the edge detection results on the screen and saving those images inside the outputs folder.
This marks the end of the coding part for edge detection using Structured Forests in images. We can now execute edge_image.py file and see the results.
Executing edge_image.py for Edge Detection in Images
We have three images inside the input folder. Let’s try and detect edges in image_1.jpg.
Open up your command line/terminal inside the project directory and execute the following command.
python edge_image.py --input input/image_1.jpg
The following are the results.
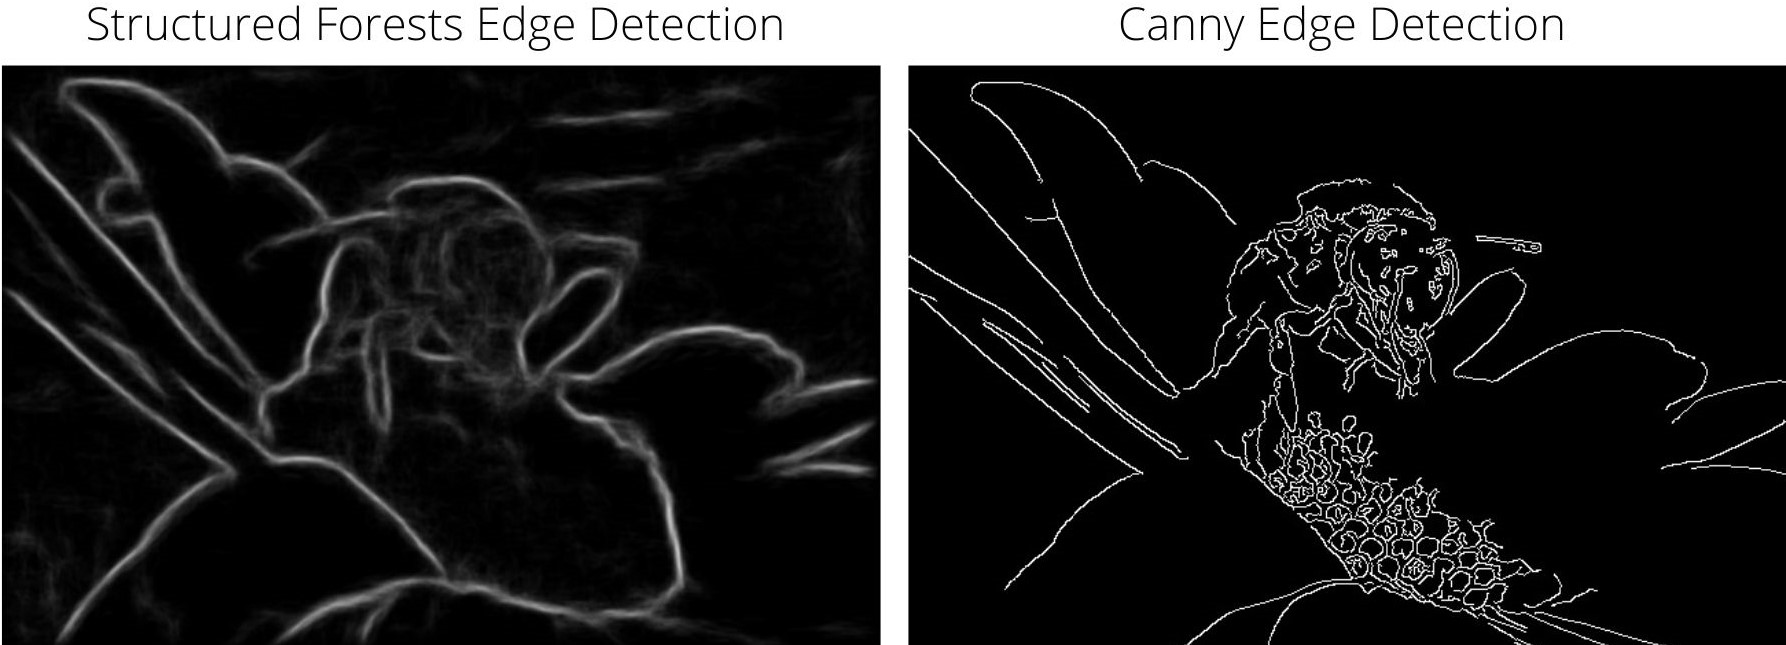
In figure 6, the left side image shows the results of Structured Forests edge detection and the right side image shows the results of Canny edge detection. Looking at the Structured Forests edge detection, the edges are really prominent in this case. One can clearly say that there is a bee sitting on a flower in the image. If you look carefully, you can see the wings of the bee as well. Coming to the Canny edge detection, the results are somewhat mixed. We are getting really crisp edges but they are missing at many places as well. These missing parts include some regions of the petals and almost all of the bee’s wings. Clearly, Structured edge detection is winning here.
Next up, let’s carry out edge detection on image_3.jpg.
python edge_image.py --input input/image_3.jpg

The above results show the real potential of edge detection using Structured Forests. Using Structured Forests, we can get all the important local edges in the image. This includes the sheep as well as the windmill. One windmill is completely visible by its edges and the other one is partially visible. But if you take a look at the Canny edge detection, then you will notice that none of the windmills are detected by their edges. This shows how useful Structured Forests can be for local edge detection.
There is one more image inside the input folder. I hope that you try that and some other images as well on your own.
Moving on, we will carry out edge detection in videos.
Edge Detection using Structured Forests with OpenCV in Videos
In this section, we will use Structured Forests to detect edges in videos. As with images, we will also carry out Canny edge detection for comparison purposes.
All of the code following from here onward will go into the edge_video.py file.
The following code block contains all the preliminary steps before we get into the edge detection part. These include the imports, the argument parser, reading the video frames, and initializing the VideoWriter() object for saving the videos later.
import argparse
import numpy as np
import cv2
import time

parser = argparse.ArgumentParser()
parser.add_argument('-i', '--input', help='path to the input video',
                    required=True)
args = vars(parser.parse_args())

cap = cv2.VideoCapture(args['input'])
# get the frame width and height
frame_width = int(cap.get(3))
frame_height = int(cap.get(4))
save_name = f"{args['input'].split('/')[-1].split('.')[0]}"
# define codec and create VideoWriter object
out1 = cv2.VideoWriter(f"outputs/{save_name}_forests.mp4",
                      cv2.VideoWriter_fourcc(*'mp4v'), 20,
                      (frame_width, frame_height))
out2 = cv2.VideoWriter(f"outputs/{save_name}_canny.mp4",
                      cv2.VideoWriter_fourcc(*'mp4v'), 20,
                      (frame_width, frame_height))
We are importing time so that we can calculate the FPS (Frames Per Second) for the Structured Forests edge detection. There is only one flag, that is --input for parsing the video file path from the command line argument.
Then we read the video file, get the frame width and height, and define a save_name string variable for saving the frames. We have two VideoWriter() objects, out1 and out2 for saving the Structured Forests edge detection video and the Canny edge detection video respectively.
Next, let’s initialize the Structured Edge detection object with the trained model.
# initialize the structured edge detector with the model
edge_detector = cv2.ximgproc.createStructuredEdgeDetection('model.yml/model.yml')

frame_count = 0 # to count total frames
total_fps = 0 # to get the final frames per second
After initializing the Structured Edge detection object at line 23, we are defining the frame_count and total_fps variables to calculating the FPS.
Looping Over the Video Frames and Detecting Edges
We have everything set to carry out edge detection using Structured Forests. Now, we have to loop over the video frames and keep on detecting the edges in the frames until no more frames are present.
It will be contained within a while loop which the following block of code shows.
# read video until end of frames
while cap.isOpened():
    ret, frame = cap.read()
    if ret == True:
        # keep a copy of the original frame
        orig_frame = frame.copy()
        # convert to RGB frame and convert to float32
        frame = cv2.cvtColor(frame, cv2.COLOR_BGR2RGB)
        # normalize to bring all pixel values between 0.0 and 1.0
        frame = frame.astype(np.float32) / 255.0
        # grayscale and blurring for canny edge detection
        gray = cv2.cvtColor(orig_frame, cv2.COLOR_BGR2GRAY)
        blurred = cv2.GaussianBlur(gray, (5, 5), 0)

        # carry out Canny edge detection
        canny = cv2.Canny(blurred, 50, 200)
        # start time counter before Structured Forests edge detection starts
        start_time = time.time()
        # detect the edges
        edges = edge_detector.detectEdges(frame)
        # end time after Structured Forests edge detection ends
        end_time = time.time()
        # get the fps
        fps = 1 / (end_time - start_time)
        # add fps to total fps
        total_fps += fps
        # increment frame count
        frame_count += 1

        # show and save the results
        cv2.imshow('Structured forests', edges)
        cv2.imshow('Canny', canny)
        # make the gray scale output into an output with 3 color channels
        forests_edges_3d = np.repeat(edges[:, :, np.newaxis], 3, axis=2)
        canny_edges_3d = np.repeat(canny[:, :, np.newaxis], 3, axis=2)
        out1.write((forests_edges_3d*255.0).astype(np.uint8))
        out2.write((canny_edges_3d).astype(np.uint8))
        if cv2.waitKey(1) & 0xFF == ord('q'):
            break

    else:
        break
- Till line 39, the code contains all the preprocessing steps for the frames before we can apply the edge detection algorithms.
- Line 42 carries out the Canny edge detection.
- At line 44, we start the time counter before detecting the edges using Structured Forests. We stop this counter at line 48. Then we calculate the
fps, thetotal_fps, and increment theframe_countcounter. - Lines 57 and 58, show the edge detection results on screen.
- Before we can save the edge detection results to disk, we have to do some more operations. Remember that the edge detections are all in grayscale format. Saving these as is will result in faulty videos being written to the disk. We need to append another color channel just for the sake of saving the videos to the disk properly. We do this at lines 60 and 61 where instead of 2 channels, the frames now contain 3 channels. But they will still appear black and white.
- Then we save the frames to disk and break out of the loop.
The final step is releasing all the VideoCapture() object and destroying all cv2 windows to free them from memory. Along with that, we will also calculate the average FPS of the Structured Edge detection.
# release VideoCapture()
cap.release()
# close all frames and video windows
cv2.destroyAllWindows()
# calculate and print the average FPS
avg_fps = total_fps / frame_count
print(f"Average FPS: {avg_fps:.3f}")
All of the code that we need for edge detection using Structured Forests with OpenCV in videos is complete. The only thing remaining is executing the edge_video.py and see how well the algorithm performs.
Executing edge_video.py for Edge Detection in Videos
We will use the video_1.mp4 file from the input folder. This contains a good mix of large objects (deer), trees, and shrubs which are present in close proximity. The results will give us a good idea how both, Structured Forest and Canny edge detection perform.
Type the following command to start the edge detection process.
python edge_video.py --input input/video_1.mp4
The following are the results.
The result is very evident from the above two video clips. All of the deer are very much distinguishable with the Structured Forests edge detection results. The local outlines of the edges are clearly visible. The outline of the trunk of large trees is also visible. This shows how useful Structured Forests edge detection can be for moving object detection. Also, the average FPS is 17 FPS on my i7 CPU. This shows that the edge detections are quite fast as well.
Analyzing the Canny edge detection results, we can see a lot of flickering of the shrubs’ edges that are detected. And later into the video, it is very hard to make out the deer from rest of the flickering edges. This clearly shows the limitations of Canny edge detection here.
Some Obervations
We saw that the Structured Forests edge detection can be quite superior when compared to previous edge detection methods. But most probably, the sharpening and multi-scaling steps are not yet implemented as mentioned in paper. Perhaps, when the module is moved to the main OpenCV repository, then we will get to use the full benefits of the Structured edge detections.
Summary and Conclusion
In this tutorial, you got to learn about edge detection using Structured Forests with the OpenCV library. You got hands-on knowledge of how to detect edges in images and videos using the Structured Forests module of the OpenCV contrib library. I hope that you found this article useful.
If you have any doubts, thoughts, or suggestion, then please leave them in the comment section. I will be happy to address them.
You can contact me using the Contact section. You can also find me on LinkedIn, and X.

I would like to ask if I want to train my own models, I need the image and also the the ground truth segmentations? Do you have some tools for generating my own ground truth data? Thank you!
Hi Simon. This is one of the best and free tools out there that I know of which covers a lot of annotation types. Hope this helps.
https://github.com/jsbroks/coco-annotator