
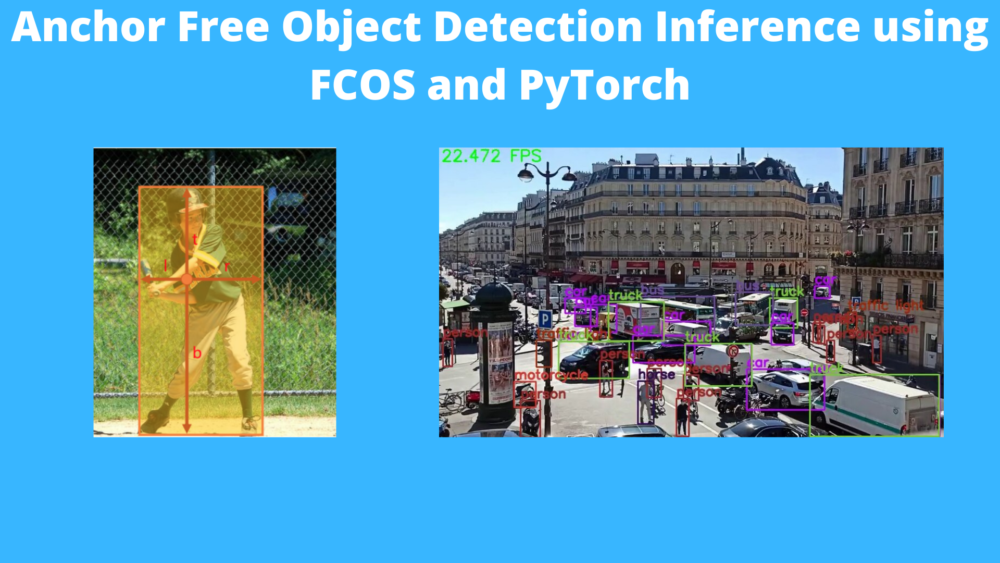
In the field of deep learning, anchor based object detectors are the most well known. Any popular two-stage or single-stage object detector is anchor based. Be it Faster RCNN, SSD multi-box detectors, or even YOLOs starting from V2 to V5. They are all anchor based object detectors. But in recent years, anchor free deep learning based object detectors are also coming up. Fully Connected One Stage Object Detection model, or, more commonly known as FCOS is one such anchor free object detection model. In this post, we will carry out anchor free object detection inference using FCOS with the PyTorch deep learning framework.
We will not go through the details of any anchor based or anchor free object detection models in this post. Although we will focus on some of the highlights of both and especially the results from the FCOS paper, we will reserve the details for another post.

We will cover the following topics in this post.
- We will start by listing out some of the most popular anchor based object detectors.
- Then we will discuss briefly the FCOS model and some of its highlights. This includes the results and comparison with other state-of-the-art object detectors.
- Next, we will move on to write the code for anchor free object detection inference using FCOS. For this, we will use the pretrained model from PyTorch.
- Finally, we will check out the image and video inference results.
Let’s get into the post now.
Some Well Known Anchor Based Object Detectors
We can easily divide the anchor based deep learning object detectors into two categories: two-stage detectors and single-stage detectors.
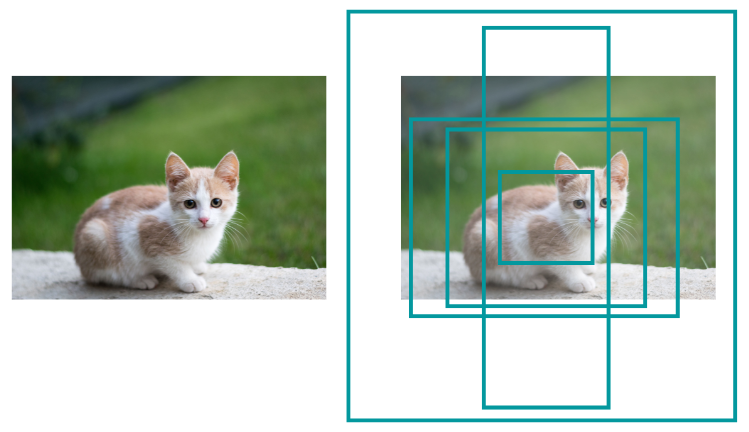
Every anchor based object detection model starts with thousands of candidate boxes called anchor boxes. These anchor boxes are of different aspect ratios so as to cover objects of different scales. As the model starts to learn through backpropagation, it predicts better offsets for the anchor boxes and learns to filter them out while keeping those boxes that overlap the highest with the ground truth boxes using IoU (Intersection over Union).
We will not dive any deeper into anchor boxes. But let’s list out some of the most popular anchor based object detection models.
- Faster RCNN is a two-stage deep learning object detector.
- Single Shot Multibox Detector is among the first real-time anchor-based single-stage detectors.
- YOLOv2 is the first model in the YOLO family to use anchor boxes.
- Then we have the YOLOv3 and YOLOv4 as well in the YOLO family which really push the boundary of real-time single-stage detectors.
- And YOLOv5 is a completely new family of YOLO models which perhaps set a really high benchmark in terms of mAP and FPS.
The above are only a few of the many famous anchor based object detectors. This is just to get an idea of how much energy and time has already been put into anchor based object detection models until now.
Anchor Free Object Detection Models and FCOS
In recent years, anchor free object detection methods are also coming up which simplify the object detection process to a good extent.
YOLOv1 was one of the very first anchor-free single-stage real-time object detectors. Newer models like FCOS (Fully Convolutional One-Stage Object Detection) and CenterNet among others provide much better accuracy.
In this post, we will briefly discuss the approach and results of FCOS and then move on to the inference part using the same.
FCOS (FCOS: Fully Convolutional One-Stage Object Detection)
FCOS by Tian et al. is an anchor-free and proposal-free deep learning based single-stage object detection model.
The FCOS model directly predicts a 4D vector (\(l, t, r, b\)) which encodes the location of a bounding box at each foreground pixel.
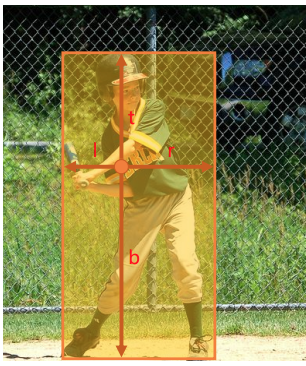
Here, \(l, t, r, b\) are the distances from the location to the four sides of the bounding box.
The following is the architecture of the FCOS model.
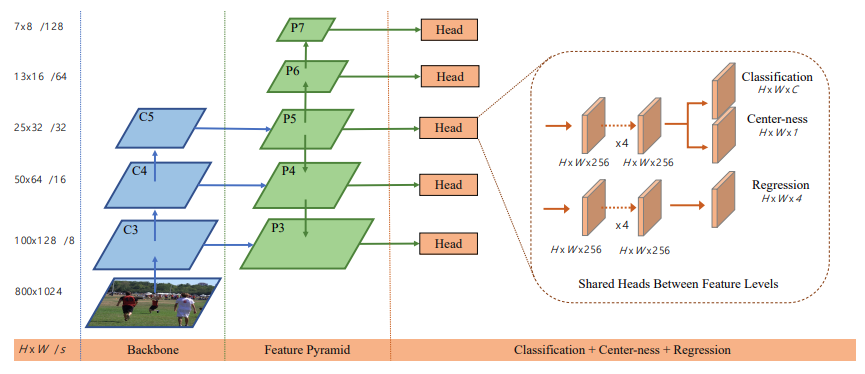
Taking inspiration from FPN (Feature Pyramid Network), FCOS detects different sizes of objects on different levels of feature maps. In figure 4, \(C_3, C_4, C_5\) define the different feature maps from the CNN backbone. And \(P_3\) to \(P_7\) are the five different levels of feature maps used for prediction.
FCOS Results and Comparison
From all the previous years of research on anchor based detection, it may seem that anchor free object detectors will not perform well. But FCOS is surprisingly good (as we will also see later on during inference). The following figure shows a table from the paper comparing the average precisions across different IoU thresholds for RetinaNet and FCOS

As we can see, FCOS seems to beat RetinaNet across all the IoU thresholds.
Not only that FCOS is ahead of many other state-of-the-art object detection models.
The above results are from Table 5 from the paper. It is clear that FCOS (even without improvements as released in later updates) is able to beat almost all the other deep learning models.
There are a lot of details to FCOS and to anchor free object detection in general. But we will not cover them here. We will stop the theoretical discussion of FCOS here. Instead, we will focus on the coding part for anchor free object detection inference using FCOS from here onward.
Directory Structure
The following is the directory structure of the files and folders for this mini-project.
├── input
│   ├── image_1.jpg
│   ├── image_2.jpg
│   ...
│   └── video_3.mp4
├── outputs
│   ├── image_1_05.jpg
│   ├── image_2_05.jpg
│   ...
│   └── video_3_05.mp4
├── coco_names.py
├── detect_image.py
├── detect_utils.py
├── detect_video.py
├── model.py
- The
inputdirectory contains all the images and videos that we will use for inference in this post. - The corresponding outputs will be stored in the
outputsdirectory. - And the Python code files are directly present inside the parent project directory. There are 5 Python files in total that we will discuss in the coding section further on.
You will get access to all the Python files along with the input images and videos while downloading the zip file for this post.
PyTorch Version
Please make sure that you have PyTorch version 1.11.0 or above as the pretrained FCOS model is available starting from this specific version. You can install/upgrade PyTorch according to your specific requirements from the official website.
Anchor Free Object Detection Inference using FCOS
Now, let’s move on to the coding part of the tutorial. From here onward, we run inference on images and videos using the anchor free FCOS object detection model. We will use the PyTorch pretrained model for this. This is going to be fun as we will analyze the results and check out how an anchor free model performs.
List Containing COCO Class Names
First of all, we will need all the class names from the COCO object detection dataset. As with all the other PyTorch pretrained object detection models, the FCOS model is also pretrained on the COCO dataset. So, we will need the class names to annotate the final resulting images/frames properly.
The coco_names.py Python file contains a single list with all the class names.
COCO_INSTANCE_CATEGORY_NAMES = [
    '__background__', 'person', 'bicycle', 'car', 'motorcycle', 'airplane', 'bus',
    'train', 'truck', 'boat', 'traffic light', 'fire hydrant', 'N/A', 'stop sign',
    'parking meter', 'bench', 'bird', 'cat', 'dog', 'horse', 'sheep', 'cow',
    'elephant', 'bear', 'zebra', 'giraffe', 'N/A', 'backpack', 'umbrella', 'N/A', 'N/A',
    'handbag', 'tie', 'suitcase', 'frisbee', 'skis', 'snowboard', 'sports ball',
    'kite', 'baseball bat', 'baseball glove', 'skateboard', 'surfboard', 'tennis racket',
    'bottle', 'N/A', 'wine glass', 'cup', 'fork', 'knife', 'spoon', 'bowl',
    'banana', 'apple', 'sandwich', 'orange', 'broccoli', 'carrot', 'hot dog', 'pizza',
    'donut', 'cake', 'chair', 'couch', 'potted plant', 'bed', 'N/A', 'dining table',
    'N/A', 'N/A', 'toilet', 'N/A', 'tv', 'laptop', 'mouse', 'remote', 'keyboard', 'cell phone',
    'microwave', 'oven', 'toaster', 'sink', 'refrigerator', 'N/A', 'book',
    'clock', 'vase', 'scissors', 'teddy bear', 'hair drier', 'toothbrush'
]
That’s all we need for this Python file. We just separate out all the class names to keep the other parts of the code clean.
Helper Functions for Detections
We will need to predict the bounding boxes for different images and videos. For that, we can simply write a function that we can execute when we want and it will give us the predicted bounding boxes, the class names, and the labels. We can also write a helper function for annotating the images and video frames with the bounding boxes and class names.
The above two functions will go into the detect_utils.py file.
import torchvision.transforms as transforms
import cv2
import numpy as np
import torch

from coco_names import COCO_INSTANCE_CATEGORY_NAMES as coco_names

np.random.seed(42)

# Create different colors for each class.
COLORS = np.random.uniform(0, 255, size=(len(coco_names), 3))

# Define the torchvision image transforms.
transform = transforms.Compose([
    transforms.ToTensor(),
])

def predict(image, model, device, detection_threshold):
    """
    Predict the output of an image after forward pass through
    the model and return the bounding boxes, class names, and
    class labels.
    """
    # Transform the image to tensor.
    image = transform(image).to(device)
    # Add a batch dimension.
    image = image.unsqueeze(0)
    # Get the predictions on the image.
    with torch.no_grad():
        outputs = model(image)

    # Get score for all the predicted objects.
    pred_scores = outputs[0]['scores'].detach().cpu().numpy()

    # Get all the predicted bounding boxes.
    pred_bboxes = outputs[0]['boxes'].detach().cpu().numpy()
    # Get boxes above the threshold score.
    boxes = pred_bboxes[pred_scores >= detection_threshold].astype(np.int32)
    labels = outputs[0]['labels'][:len(boxes)]
    # Get all the predicited class names.
    pred_classes = [coco_names[i] for i in labels.cpu().numpy()]

    return boxes, pred_classes, labels

def draw_boxes(boxes, classes, labels, image):
    """
    Draws the bounding box around a detected object.
    """
    for i, box in enumerate(boxes):
        color = COLORS[labels[i]]
        cv2.rectangle(
            image,
            (int(box[0]), int(box[1])),
            (int(box[2]), int(box[3])),
            color[::-1], 2
        )
        cv2.putText(image, classes[i], (int(box[0]), int(box[1]-5)),
                    cv2.FONT_HERSHEY_SIMPLEX, 0.8, color[::-1], 2,
                    lineType=cv2.LINE_AA)
    return image
The above code block contains the predict function which accepts the image, model, computing device, and the detection_threshold as the parameters. It prepares the image and forwards it through the model to return to us the final bounding boxes, the class label names, and the class numbers. The draw_boxes function accepts the predicted bounding boxes, the corresponding class names, labels, and the image and annotates the image with the bounding boxes and class name.
Along with the above functions, the Python file also contains a few other things. It creates a COLORS NumPy array that contains RGB tuple values for the COCO classes. Each class will use a different color during annotation, It also contains transform to covert an image to PyTorch tensor.
The FCOS Model
Next, we will create the FCOS model. This will be pretty simple as PyTorch already provides the pretrained model.
The model.py file contains the code for the same.
import torchvision

def get_model(device):
    # Load the model.
    model = torchvision.models.detection.fcos_resnet50_fpn(pretrained=True)
    # Load the model onto the computation device.
    model = model.eval().to(device)
    return model
We have a very simple get_model function that accepts the device as the parameter. We load the fcos_resnet50_fpn with the COCO pretrained weights from the torchvision library, load it into the computing device and return it.
Object Detection Inference using Anchor Free FCOS on Images
We have all the preprocessing code ready. Let’s write the script to pass an image through the FCOS model and carry out the inference.
For that, we will write the code in the detect_image.py script.
Let’s start with the imports and construct the argument parser.
import torch
import argparse
import cv2
import detect_utils
import numpy as np

from PIL import Image
from model import get_model

# Construct the argument parser.
parser = argparse.ArgumentParser()
parser.add_argument('-i', '--input', default='input/image_1.jpg',
                    help='path to input input image')
parser.add_argument('-t', '--threshold', default=0.5, type=float,
                    help='detection threshold')
args = vars(parser.parse_args())
We are importing our own detect_utils and model modules among others. We will need Image from PIL to read images.
In the argument parser, the --input flag accepts the path to the input image. And the --threshold flag accepts a float value between 0 and 1 to filter out any detections below this specific confidence threshold.
Read the Image and Forward Pass it Through the Model
Next, we will read the image, do the necessary preprocessing, and forward pass it through the model.
# Define the computation device.
device = torch.device('cuda' if torch.cuda.is_available() else 'cpu')
model = get_model(device)

# Read the image.
image = Image.open(args['input']).convert('RGB')
# Create a BGR copy of the image for annotation.
image_bgr = cv2.cvtColor(np.array(image), cv2.COLOR_RGB2BGR)
# Detect outputs.
with torch.no_grad():
    boxes, classes, labels = detect_utils.predict(image, model, device, args['threshold'])
# Draw bounding boxes.
image = detect_utils.draw_boxes(boxes, classes, labels, image_bgr)
save_name = f"{args['input'].split('/')[-1].split('.')[0]}_{''.join(str(args['threshold']).split('.'))}"
cv2.imshow('Image', image)
cv2.imwrite(f"outputs/{save_name}.jpg", image)
cv2.waitKey(0)
First, we define the computing device and the model. Then we read the image using Image in RGB format on line 22. We also create a copy of the image in BGR color format to use it for cv2 annotations later on line 24. The detections happen on line 27 and we annotate the image on line 29. Then we simply define a string to save the resulting image file to disk. Finally, we visualize the image.
Execute detect_image.py for Image Inference
Now, let’s run inference through two images from the input directory.
Note: All the image and video inference results that are shown here were run on a machine with 10GB RTX 3080 GPU, 10th generation i7 CPU, and 32 GB of RAM.
Run the following commands by opening the terminal/command line in the project’s parent directory.
Starting with the first image.
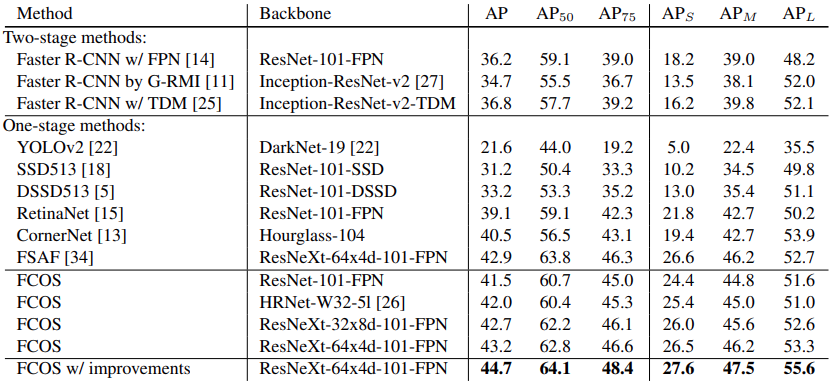
python detect_image.py --input input/image_1.jpg
If you are executing the model script for the first time, the pretrained FCOS model will be downloaded to disk. The local copy will be used for subsequent runs.
The following is the output.
The FCOS model is predicting all objects and the bounding boxes also look pretty tight. But it is detecting an extra horse that is not present in the image.
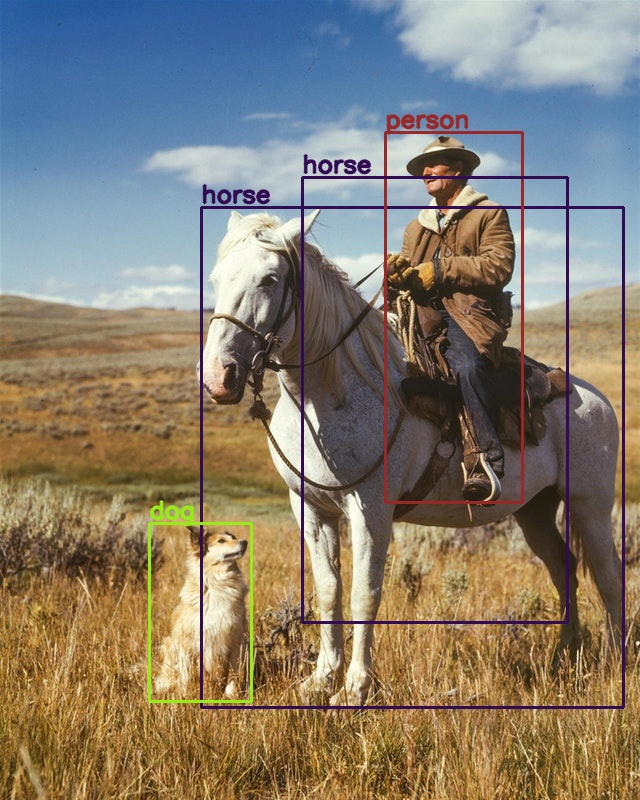
Let’s try out another image where similar types of objects are present close to each other.
python detect_image.py --input input/image_2.jpg
Interestingly, this time all the predictions are correct and there are no duplicate detections.
Object Detection Inference using Anchor Free FCOS on Videos
Now, we will write the script to carry out inference on videos. After writing the script, we will try out the model on three videos depicting three different scenarios.
- One where some objects are partially occluded.
- Another video where the objects are pretty close to each other and crowded as well.
- A final video, where the objects are really small (footage from a drone).
This code will go into the detect_video.py file.
The first few lines of the code contain the import statements and the argument parser which are very similar to the image inference script.
import cv2
import torch
import argparse
import time
import detect_utils

from model import get_model

# Construct the argument parser.
parser = argparse.ArgumentParser()
parser.add_argument('-i', '--input', default='input/video_1.mp4',
                    help='path to input video')
parser.add_argument('-t', '--threshold', default=0.5, type=float,
                    help='detection threshold')
args = vars(parser.parse_args())
Next, we have some preliminary code to prepare the data.
# Define the computation device.
device = torch.device('cuda' if torch.cuda.is_available() else 'cpu')
model = get_model(device)

cap = cv2.VideoCapture(args['input'])

if (cap.isOpened() == False):
    print('Error while trying to read video. Please check path again')

# Get the frame width and height.
frame_width = int(cap.get(3))
frame_height = int(cap.get(4))

save_name = f"{args['input'].split('/')[-1].split('.')[0]}_{''.join(str(args['threshold']).split('.'))}"
# Define codec and create VideoWriter object .
out = cv2.VideoWriter(f"outputs/{save_name}.mp4",
                      cv2.VideoWriter_fourcc(*'mp4v'), 30,
                      (frame_width, frame_height))

frame_count = 0 # To count total frames.
total_fps = 0 # To get the final frames per second.
After defining the model and computing device, we read the video file using OpenCV. We extract the original width and height of the video frames to create the VideoWriter object so that we can save the resulting video to disk later on. We also define the frame_count and total_fps variables to keep track of the total number of frames and total FPS (Frames Per Second).
Let’s write the while loop to loop through the video frames and detect the objects.
# Read until end of video.
while(cap.isOpened):
    # Capture each frame of the video.
    ret, frame = cap.read()
    if ret:
        frame_copy = frame.copy()
        frame_copy = cv2.cvtColor(frame_copy, cv2.COLOR_BGR2RGB)
        # Get the start time.
        start_time = time.time()
        with torch.no_grad():
            # Get predictions for the current frame.
            boxes, classes, labels = detect_utils.predict(
                frame, model,
                device, args['threshold']
            )

        # Draw boxes and show current frame on screen.
        image = detect_utils.draw_boxes(boxes, classes, labels, frame)

        # Get the end time.
        end_time = time.time()
        # Get the fps.
        fps = 1 / (end_time - start_time)
        # Add fps to total fps.
        total_fps += fps
        # Increment frame count.
        frame_count += 1
        # Write the FPS on the current frame.
        cv2.putText(image, f"{fps:.3f} FPS", (15, 30), cv2.FONT_HERSHEY_SIMPLEX,
                    1, (0, 255, 0), 2)
        # Convert from BGR to RGB color format.
        cv2.imshow('image', image)
        out.write(image)
        # Press `q` to exit.
        if cv2.waitKey(1) & 0xFF == ord('q'):
            break

    else:
        break

# Release VideoCapture().
cap.release()
# Close all frames and video windows.
cv2.destroyAllWindows()

# Calculate and print the average FPS.
avg_fps = total_fps / frame_count
print(f"Average FPS: {avg_fps:.3f}")
The detections happen on line 48 and we annotate the current frame on line 54. The rest are all post-processing code like calculating the FPS and annotating the frame with the current FPS.
After saving the current frame to disk, we visualize it on the screen.
In the end, we close all the VideoCapture objects and release the OpenCV frames from the memory.
Execute detect_video.py for Video Inference
As discussed earlier, we will run inference on three different videos.
Video Inference for Partially Occluded Objects
Let’s start with the first video.
python detect_video.py --input input/video_1.mp4
The following is the output from the terminal showing the FPS.
Average FPS: 23.051
As we can see, the FPS is not very good considering that it was run on an RTC 3080 GPU. Still, for now, let’s take a look at the results.
The results are very interesting. First of all, it is able to detect the car that is very off in the few initial frames. Along with that, it is able to detect some of the persons on the bus as well who are not at all clearly visible. These are really good results for an object detection model.
Video Inference for Crowded Objects
Next, let’s try a video where the objects are very crowded.
python detect_video.py --input input/video_2.mp4
These results are also quite impressive. The anchor free FCOS object detection model is able to detect a lof the objects. But we see a few misclassifications as well. For example, one of the persons was detected as a horse.
Video Inference for Small Objects
For the final inference, we will really throw a challenge at the FCOS model. We will provide it with drone footage where the objects are pretty small.
python detect_video.py --input input/video_3.mp4
The detections seem to suffer here. First of all, there is a huge detection of train around almost the entire frame. Although some of the cars are detected in the parking lot, there are wrong detections like potted_plant and cellphone. Obviously, this was a difficult video and the model has not been trained specifically on these types of objects. So, this is not all bad.
From the above experiments, we can conclude that the anchor free FCOS object detection model is pretty good. It is able to detect objects which are partially occluded and also objects in crowded environments. Although it is not very good at detecting small objects yet, that part is a bit expected.
Summary and Conclusion
In this post, we carried out inference using the anchor free FCOS object detection model using the PyTorch deep learning framework. After running several inferences on images and videos, we are now somewhat aware of the strengths and weaknesses of the model. Hopefully, this post was good learning for you.
If you have any doubts, thoughts, or suggestions, please leave them in the comment section. I will surely address them.
You can contact me using the Contact section. You can also find me on LinkedIn, and X.
