

In this article, we will get to know how to add noise to image data for data augmentation in deep learning. So, we will be adding noise to image data for deep learning image augmentation.
Noise in the data can seem problematic for deep learning and neural networks in particular. Some of the problems that noise poses for deep learning are:
- Noise can reduce the accuracy of neural networks.
- Noise can lead to less generalization power when testing on real-world data.
Real-world data is seldom clean. At least it is not as clean as the data that we train our deep learning models on. This is the main reason why many times deep neural network models perform poorly during testing.
This is the case until we can find a better way to employ noise in the data. What if we can use noise as a data augmentation technique in deep learning? In this article, we are going to try to do that exact same thing. We will be adding noise to input data and see how it augments the data.
Note: If you want to gain more background knowledge about noisy data in deep learning, then be sure to check this article, Adding Noise for Robust Deep Neural Network Models. In this article, you will find an in-depth discussion of how to use noisy data to build robust neural network models. You will also find the results of a few research papers which will further help you enhance your knowledge.
Do you want to learn how to denoise noisy images using denoising autoencoders? If yes, then click here to read the full article and get hands-on practical experience. The best part is that you will be working on a past Kaggle competition dataset.
How Will Adding Noise to Data Help Us in Deep Learning
We know that in deep learning, neural networks never harm from training on a huge amount of data. So, when we add noise to the input data, then we gain two functionalities:
- We get more data for our deep neural network to train on.
- We can train our neural network on noisy data which means that it will generalize well on noisy data as well.
I think that the above two reasons should be enough to try our hands-on adding noise to data for deep learning image augmentation.
What Kind of Noise Will We be Adding?
In this article, we will add three types of noise to the image data. Specifically, we will be dealing with:
- Gaussian noise.
- Salt and Pepper noise.
- Speckle Noise.
The Directory Structure
We have a very simple directory structure for this article. To save the sample noisy images, we have a Images directory. And all the code will be in the train_noise.py file.
│   add_noise.py
│
└───Images
What Datasets and Framework Will We be Using?
We will use three datasets in this article. They are MNIST, FashionMNIST, and CIFAR10 dataset. For loading the datasets, we will use the PyTorch deep learning framework.
There is a very important reason for choosing the PyTorch framework for loading the data. All data in PyTorch will be loaded as tensors from the respective PyTorch data loaders. So, when adding and dealing with noise, we will have to convert all the data again to tensors. This means that, after adding noise to the data, we can directly use the noisy data for training a neural network model. Although we will not be training any neural network models in this article, it is relatively easy after adding the noise as tensors.
Also, we will be using the save_image module from PyTorch to save the data. This facilitates easy saving of tensor type data as image files. If you want, you can save the whole dataset after adding noise as well.
Approach for Using the Different Datasets
We will be providing the name of the respective datasets as arguments parsers while running the python code. This will make it easier to manage everything inside the actual code file.
So, let’s start with writing the code.
Importing Modules and Libraries
The following are the libraries and modules that we will be using along the way.
from torchvision import datasets
from torch.utils.data import DataLoader
from torchvision.utils import save_image
from skimage.util import random_noise

import numpy as np
import torch
import matplotlib.pyplot as plt
import torchvision.transforms as transforms
import argparse
Some of the important ones are:
datasets: this will provide us with the PyTorch datasets like MNIST, FashionMNIST, and CIFAR10.DataLoader: we will use this to make iterable data loaders to read the data.random_noise: we will use therandom_noisemodule fromskimagelibrary to add noise to our image data.save_image: PyTorch provides this utility to easily save tensor data as images.transforms: helps us with the preprocessing and transformations of the images.argparse: to read the input from the command line and parse it.
Note: If you do not have scikit-image installed on your machine, then do install it before moving further. You can use the following command.
pip install scikit-image
Now, let’s define the argument parser for our program. Using the command line while running the program, we will provide the name of the dataset that we want to use. Based upon the dataset, all the functionalities in the python program will execute.
ap = argparse.ArgumentParser()
ap.add_argument(
    '-d', '--dataset', type=str,
    help='dataset to use'
)
args = vars(ap.parse_args())
So, we have just one argument parser for the dataset which is going to be a string. That string can either be mnist, or fashionmnist, or cifar10. For example, let’s say that we want to add noise to the MNIST images, then we will run the code as the following.
python add_noise.py --dataset mnist
We will be using a batch size of 4 while iterating through the dataset. Smaller batch size will suffice as we will not be training any neural network here. The following code block defines the batch size.
BATCH_SIZE = 4
Preparing the Dataset and the DataLoader
This section is going to be really important. Remember that while running the program, we can use any of the three datasets. MNIST and Fashion MNIST are grayscale images with a single channel. And CIFAR10 images are colored with three channels, that are, red, green, and blue (RGB). So, we will have to preprocess and transform the images accordingly. The following code block downloads and transforms the data according to the dataset provided in the command line.
if args['dataset'] == 'mnist' or args['dataset'] == 'fashionmnist':
    transform = transforms.Compose([
        transforms.ToTensor(),
        transforms.Normalize((0.5,), (0.5,)),
    ])
    if args['dataset'] == 'mnist':
        trainset = datasets.MNIST(
            root='./data',
            train=True,
            download=True,
            transform=transform
        )
        testset = datasets.MNIST(
            root='./data',
            train=False,
            download=True,
            transform=transform
        )
    elif args['dataset'] == 'fashionmnist':
        trainset = datasets.FashionMNIST(
            root='./data',
            train=True,
            download=True,
            transform=transform
        )
        testset = datasets.FashionMNIST(
            root='./data',
            train=False,
            download=True,
            transform=transform
        )
if args['dataset'] == 'cifar10':
    transform = transforms.Compose([
        transforms.ToTensor(),
        transforms.Normalize((0.5, 0.5, 0.5), (0.5, 0.5, 0.5)),
    ])
    trainset = datasets.CIFAR10(
        root='./data',
        train=True,
        download=True,
        transform=transform
    )
    testset = datasets.CIFAR10(
        root='./data',
        train=False,
        download=True,
        transform=transform
    )
Both MNIST and FashionMNIST images are grayscale images. So, the transformation steps for them can be the same. In the above code block, we are transforming the grayscale images starting from line 1 through line 5 inside the if block.
Then inside we have an if block and an elif block (lines 6 to 31) which check whether the dataset is MNIST or FashionMNIST. Based on that, we download the respective datasets and apply the transforms.
Starting from line 32, we check whether the dataset is CIFAR10. Then we preprocess the images differently as we have to normalize all the three channels in the images (line 35). Then starting from line 37 to line 48, we download the CIFAR10 training set and the test set.
For the iterable data loaders, we can use the same code for all the datasets. This is because we just need the trainset and the testset, and the batch size to prepare the data loaders irrespective of the dataset.
trainloader = torch.utils.data.DataLoader(
    trainset,
    batch_size=BATCH_SIZE,
    shuffle=True
)
testloader = torch.utils.data.DataLoader(
    testset,
    batch_size=BATCH_SIZE,
    shuffle=False
)
Defining the save_noisy_image Function
In this section, we will define a function save_noisy_image() which will save all the noisy images for us. We will get to the explanation after writing the code.
def save_noisy_image(img, name):
    if img.size(1) == 3:
        img = img.view(img.size(0), 3, 32, 32)
        save_image(img, name)
    else:
        img = img.view(img.size(0), 1, 28, 28)
        save_image(img, name)
The function takes two input parameters, one is the img tensor, and the a name string for saving the image.
At line 2 we are checking whether the image has 3 channels or not. If yes, then it must be the CIFAR10 image. All CIFAR10 images are 32×32 in size, so we reshape and save the images accordingly in lines 3 and 4.
At line 5, we have an else block that will execute only if the images are either MNIST or FashionMNIST. They are 28×28 size images. So, we again, reshape the images and save them.
Adding Noise to Image Data
Now, we will write three functions for adding three different types of noise to the images. We will add Gaussian noise, salt and pepper noise, and speckle noise to the image data. Let’s start with the Gaussian noise function.
Adding Gaussian Noise
The following function adds Gaussian noise to the images in a dataset.
def gaussian_noise():
    for data in trainloader:
        img, _ = data[0], data[1]
        gauss_img = torch.tensor(random_noise(img, mode='gaussian', mean=0, var=0.05, clip=True))
        save_noisy_image(gauss_img, f"Images/{args['dataset']}_gaussian.png")
        break
First, we iterate through the data loader and load a batch of images (lines 2 and 3). Note that we do not need the labels for adding noise to the data. However, in case you need to simultaneously train a neural network as well, then you will have to load the labels.
At line 4 we add Gaussian noise to our img tensor. For that we need to convert all of the data into a torch tensor using torch.tensor(). For adding Gaussian noise we need to provide mode as gaussian with a mean of 0 and var (variance) of 0.05. We also clip the values by giving clip=True. It is important to clip the values of the resulting gauss_img tensor. This will make all the values between 0.0 and 1.0 avoiding all weird artifacts in the images.
Finally, we save the image at line 5 by calling the save_noisy_img() function and passing the noisy image and name as the arguments. The name string is based on the dataset that we are using which we extract from the argument parser. We break after one iteration but you can continue if you want. You can save the noisy images as a DataFrame for later use as well.
Adding salt & pepper noise and speckle noise is going to be very similar to the above with only minor changes in the code.
Adding Salt and Pepper Noise
The following is the function to add salt & pepper noise to the images.
def salt_pepper_noise():
    for data in trainloader:
        img, _ = data[0], data[1]
        s_and_p = torch.tensor(random_noise(img, mode='s&p', salt_vs_pepper=0.5, clip=True))
        save_noisy_image(s_and_p, f"Images/{args['dataset']}_s&p.png")
        break
We need to change the mode argument to s&p for adding salt & pepper noise. The salt_vs_pepper argument value is 0.5. This means that the ratio of the salt to pepper noise is going to be equal. All the other steps are going to the same as above.
Adding Speckle Noise
Adding speckle noise is almost similar to adding Gaussian.
def speckle_noise():
    for data in trainloader:
        img, _ = data[0], data[1]
        speckle_noise = torch.tensor(random_noise(img, mode='speckle', mean=0, var=0.05, clip=True))
        save_noisy_image(speckle_noise, f"Images/{args['dataset']}_speckle.png")
        break
Just like Gaussian noise, we provide the mean and var arguments. However, the mode is speckle and we clip the values as usual. Then we save the images as well.
In the end, we call each of three functions before executing the code.
gaussian_noise()
salt_pepper_noise()
speckle_noise()
Running Our Code
This is the final step. Here we will have to run our python code from the command line. Execute the following commands in the command line from the respective directories where you have your code.
python add_noise.py --dataset mnist
python add_noise.py --dataset fashionmnist
python add_noise.py --dataset cifar10
We execute the code for the three datasets one after the other. After this, you should be having noisy images in your Images directory.
Now let’s take a look at the images that have been saved after adding the noise.
CIFAR10 Noisy Images
Let’s take a look at the CIFAR10 images.
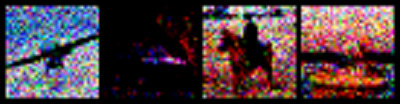
Gaussian Noise
The following image shows the CIFAR10 images after adding Gaussian noise.
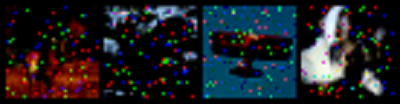
Salt and Pepper Noise
Image for CIFAR10 with salt & pepper noise.
Speckle Noise
CIFAR10 image with speckle noise.
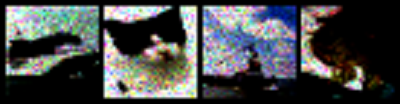
The above three images clearly show noise that has been added to the images. And if we change the arguments for the noise, then we can obtain even more noisy images.
FashionMNIST Noisy Images
Now, let’s look at the FashionMNIST noisy images.
Gaussian Noise
We can see that the Gaussian noise for the FashionMNIST images are on the objects only and not in the background.
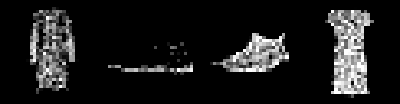
Salt & Pepper Noise
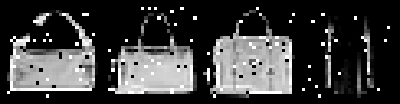
For the salt and pepper noise, we have a mixture of black and white noise with both on the objects as well as the background.
Speckle Noise
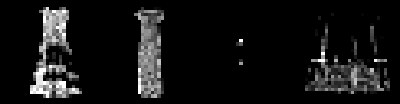
The speckle noise are very similar to the Gaussian noise. But we can see that the third image is totally black. Maybe tuning one of the noise parameters can avoid this.
MNIST Noisy Images
Finally, we can take a look at the Digit MNIST noisy images.
Gaussian Noise
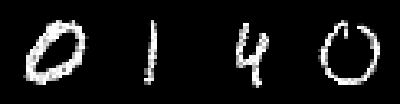
Salt & Pepper Noise

Speckle Noise

The results are good for the MNIST images. We do not have any missing images or weird artifacts above the images.
Adding Other Types of Noise to Image Data and Where to Move From Here
Scikit-Image makes it really easy to add many types of noise to the image data. Some other types of noise that you can add to images by changing the mode argument are:
mode= poissonmode= saltmode= pepper- You can read the official documentation to gain more knowledge.
You can see that augmenting images with noise can lead to a whole new dataset. In fact, you can add noise to the whole dataset and save the pixel values and the corresponding labels in a DataFrame. Now combined with the original dataset, you will have thousands of more images. For deep learning and training deep neural networks, this amount of data can be a huge advantage. You will be able to build really robust models with such a dataset.
If you want to get your hands on a few research papers, then you can read the following.
- An empirical study on the effects of different types of noise in image classification tasks, Gabriel B. Paranhos da Costa, Welinton A. Contato, Tiago S. Nazare, Jo ̃ao E. S. Batista Neto, Moacir Ponti.
- Deep networks for robust visual recognition, Yichuan Tang, Chris Eliasmith.
- Deep Convolutional Neural Networks and Noisy Images, Tiago S. Nazare, Gabriel B. Paranhos da Costa, Welinton A. Contato, and Moacir Ponti (2018).
Summary and Conclusion
I hope that you got to learn something useful from this article. You learned how to augment image data by adding noise to it. Also, you learned how to convert the noisy data directly to tensors so that you can directly use them in a training loop.
You can contact me using the Contact section. You can also find me on LinkedIn, and X.

Greetings ! Sovit Ranjan Rath
This is Fahad Najeeb, thanks for such a great article , as I am new to python and want to know how can we add noise to customer image dataset from our local directory , your detail reply will be highly appreciated
Hello Fahad. Thanks for the appreciation.
Adding noise to custom images is just as easy. You read an image with either OpenCV or PIL, and add the noise as per the steps given in this article. Probably, using OpenCV will work better. If I remember correctly, the noise is being added to a NumPy array. Also, if using OpenCV, don’t forget to convert your image from BGR to RGB format first.
I hope this helps.