

Creating an efficient and appealing visualization pipeline in deep learning can give proper insights into the model outputs. This is especially true for tasks such as object detection, image segmentation, and keypoint detection in deep learning. We heavily depend on the visualization outputs to know the correctness of our model and the code as well. Therefore, in this tutorial, we will know how to use PyTorch visualization utilities in a video inference pipeline.
In the previous post, we had a simple introduction to the PyTorch visualization pipeline. That showed us how effective it can be to visualize the outputs of deep learning based computer vision models. Some of the benefits of using the PyTorch visualization utilities during inference can be:
- We need not switch around data types a lot. We can work with the native PyTorch tensors most of the time.
- There is almost no use of
forloop in the code as the visualization utilities handle that internally.
The above two may not seem very compelling reasons to move to PyTorch visualization utilities right away. In fact, one should not. Therefore, in this tutorial, we will first see how easy it can be to use the PyTorch visualization utilities in an inference pipeline. Then we can take an informed decision.
Topics that we will cover in this tutorial.
- Using PyTorch visualization utilities in a video inference pipeline for:
- Object detection.
- Semantic segmentation.
- Instance segmentation.
- Keypoint detection.
- And finally, some advantages and disadvantages of using PyTorch visualization pipeline.

Directory Structure
The following is the directory structure we have for this project.
├── input
│   ├── video_1.mp4
│   ├── video_2.mp4
│   └── video_3.mp4
├── outputs
│   ├── inst_seg_video_1.mp4
│   ├── inst_seg_video_2.mp4
│   ├── ...
│   └── semantic_segmentation_video_1.mp4
├── detection.py
├── instance_segmentation.py
├── keypoints.py
├── semantic_segmentation.py
└── utils.py

3 directories, 21 files
- The
inputdirectory contains the videos that we will use for different tasks in the PyTorch visualization pipeline. - The
outputsdirectory will contain the inference outputs. - In the project directory root folder, we have 5 Python files. We will get into the details of these in their respective sections.
PyTorch Version
The code in this tutorial uses torch 1.11.0 and torchvision 0.12.0. If you need to install/update PyTorch, please refer to the official website. You can choose the method of installation as per your requirement and hardware configuration.
A Few General Notes
If You Are New to This Topic…
If you are new to PyTorch visualization utilities, then I highly recommend that you go through the previous post. This is because we will not be going into the explanation of the utilities in this post. Rather we will focus on how to use the PyTorch visualization utilities in a video inference pipeline. Even a general overview will help understand the code in this post.
Hardware Required
Although a GPU is not strictly necessary for this post, running some of the video inferences on the GPU can make them significantly faster.
PyTorch Visualization Utilities in Video Inference Pipeline
Let’s get started with the coding section of this tutorial.
First, we will go through all the helper functions that we need for proper visualization in this tutorial, then move over to the rest of the code.
Helper Functions for Visualizations
The helper functions that we will go through in this section are the most important part of this tutorial. They encapsulate all the visualizations for object detection, semantic segmentation, instance segmentation, and keypoint detection.
All the code in this section will go into the utils.py file.
Let’s start with importing the necessary libraries, setting the seed, and defining the image transforms.
import torch
import numpy as np
import torchvision.transforms as transforms

from torchvision.utils import (
    draw_bounding_boxes,
    draw_segmentation_masks,
    draw_keypoints
)

# Set NumPy seed.
np.random.seed(42)

transform = transforms.Compose([
        transforms.ToTensor(),
])
We import all the PyTorch visualization functions. They are:
draw_bounding_boxes: For drawing bounding boxes around objects.draw_segmentation_masks: To draw the segmentation masks on the objects.draw_keypoints: For drawing the keypoints and connecting lines on persons.
Apart from that, we also set the seed for NumPy and define the transform to covert an image into a float32 tensor.
Now, let’s go through each of the helper functions. They will be pretty easy to understand as each of them use the utility functions from torchvision.utils only.
Helper Function to Convert an Image to Tensor
def get_transformed_image(image):
    """
    Converts a NumPy array image to uint8 and float32 tensors.

    :param image: Input image in NumPy format.

    Returns:
        uint8_tensor: Image tensor of type uint8.
        float32_tensor: Batched image tensor of type float32.
    """
    image_transposed = np.transpose(image, [2, 0, 1])
    # Convert to uint8 tensor.
    uint8_tensor = torch.tensor(image_transposed, dtype=torch.uint8)
    # Convert to float32 tensor.
    float32_tensor = transform(image)
    float32_tensor = torch.unsqueeze(float32_tensor, 0)
    return uint8_tensor, float32_tensor
In the above code block, we have the get_transformed_image function. This accepts a NumPy array image as a parameter. Then it converts it into a uint8 tensor and float32 tensor as well. This is necessary because all the PyTorch visualization utilities annotate on an uint8 image tensor but for model predictions (inference) we need a float32 image tensor. So, we return image tensors for both data types.
Helper Function to Filter Out Detections for Object Detection
Now, we will write a helper function to filter out the object detection outputs based on a certain threshold.
The following is the code for filter_detections function.
def filter_detections(
    outputs, coco_names,
    detection_threshold=0.8
):
    """
    Returns the filtered outputs according to the threshold.

    :param outputs: Object detection/instance segmentation outputs.
    :param coco_names: List containing all the MS COCO class names.
    :param detection_threshold: Confidence threshold to filter out boxes

    Returns:
        boxes: The final filtered bounding boxes.
        pred_classes: Class name strings corresponding to the `boxes` detections.
    """
    pred_scores = outputs[0]['scores'].detach().cpu().numpy()
    pred_classes = [coco_names[i] for i in outputs[0]['labels'].cpu().numpy()]
    pred_bboxes = outputs[0]['boxes'].detach().cpu().numpy()
    boxes = pred_bboxes[pred_scores >= detection_threshold].astype(np.int32)
    pred_classes = pred_classes[:len(boxes)]
    labels = outputs[0]['labels'][:len(boxes)]
    return boxes, pred_classes, labels
The filter_detections function accepts the outputs from the model, the coco_names list containing the class names from the COCO dataset, and the detection_threshold as parameters. Next, the function filters out the bounding boxes (boxes), the predicted class names (pred_classes), and the class indices (labels) depending on the threshold. Finally, it returns the three.
Helper Function for Drawing Bounding Boxes for Object Detection Inference
Next, we will write a function to draw the bounding boxes around the detected objects. This helper function directly uses the draw_bounding_boxes function from torchvision.utils.
def draw_boxes(
    boxes, unint8_tensor, pred_classes,
    labels, colors, fill=False,
    is_instance=False
):
    """
    Annotates and image (tensor) with bounding boxes.

    :param boxes (List): List containing bounding boxes.
    :param uint8_tensor: An uint8 image tensor.
    :param pred_classes: Class name strings.
    :param labels: Class label indices.
    :param colors: List of tuple colors containing RGB values.
    :param fill: Whether to fill the bounding box with same color as that of box.
    :param is_instance: Whether it is instance segmentation output or not. If
          so, create as many random color as number of outputs.

    Returns:
        result_with_boxes: An uint8 tensor with bounding boxes annotated on it.
        plot_colors: List containing the exact RGB colors used to annotate the image.
    """
    if is_instance:
        plot_colors = colors=np.random.randint(0, 255, size=(len(boxes), 3))
        plot_colors = [tuple(color) for color in plot_colors]
    else:
        plot_colors = [colors[label] for label in labels]

    result_with_boxes = draw_bounding_boxes(
        image=unint8_tensor,
        boxes=torch.tensor(boxes), width=2,
        colors=plot_colors,
        labels=pred_classes,
        fill=fill
    )
    return result_with_boxes, plot_colors
Going over some important points in the above code:
- We can see an
is_instanceparameter that takes a boolean value. If this isTrue, then it means that the outputs are from a semantic segmentation model. This is important because in this case, we create theplot_colorlist randomly for each detected instance in the current frame. Just like we expect for instance segmentation. - If
is_instanceisFalse, then we create the same colors each time for the classes present in the MS COCO dataset.
After drawing the bounding boxes on the image tensor, we return the resulting image as well as the plot_colors list. We will further need this color list in case of instance segmentation to properly segment the detected objects.
There are many other ways to achieve what we intend to do here, and the above is just one of the ways. You are free to come up with other optimal ways as well.
Helper Function to Get the RGB Mask for Semantic Segmentation and Draw the Masks
The next helper function returns the segmentation maps in case of semantic segmentation outputs. This is pretty straightforward and just as we had in the previous post. The only difference is that it is now within a reusable function.
def get_rgb_mask(outputs):
    """
    Create and return RGB mask for segmentation.

    :param outputs (Tensor): The outputs tensor from a segmentation model.

    Returns:
        all_masks: An RGB mask.
    """
    num_classes = outputs['out'].shape[1]
    masks = outputs['out'][0].cpu()
    class_dim = 0 # 0 as it is a single image and not a batch.
    all_masks = masks.argmax(class_dim) == \
        torch.arange(num_classes)[:, None, None]
    return all_masks
The function accepts the outputs of the semantic segmentation model and returns the final RGB mask.
After obtaining masks, we will want to draw them on the original image. The following function helps us do that.
def draw_mask(uint8_tensor, all_masks, colors):
    """
    Draw semantic_segmentation mask on an image tensor.

    :param uint8_tensor: An image tensor of uint8 type.
    :param all_masks: The RGB mask to be overlayed on the image tensor.
    :param colors: List containing RGB color tuples corresponding to the dataset.

    Returns:
        seg_result: The final image tensor with RGB mask overlayed on it.
    """
    seg_result = draw_segmentation_masks(
        uint8_tensor,
        all_masks,
        colors=colors,
        alpha=0.5
    )
    return seg_result
Drawing Instance Segmentation
In the case of instance segmentation map, we also need to overlay the final RGB masks on the image after drawing the bounding boxes. Let’s do that using the following function.
def draw_instance_mask(outputs, uint8_tensor, colors, threshold):
    """
    Draws segmentatation map on an image tensor which has already been
    annotated with bounding boxes from the outputs of an instance segmentation
    model.

    :param outputs: Outputs of the instance segmentation model.
    :param uint8_tensor: The uint8 image tensor with bounding boxes
          annotated on it.
    :param colors: List containing RGB tuple colors.

    Returns:
        seg_result: The final segmented result with bounding boxes and RGB
            color masks.
    """
    # Get all the scores.
    scores = list(outputs[0]['scores'].detach().cpu().numpy())
    # Index of those scores which are above a certain threshold.
    thresholded_preds_inidices = [scores.index(i) for i in scores if i > threshold]
    thresholded_preds_count = len(thresholded_preds_inidices)
    masks = outputs[0]['masks']
    final_masks = masks > 0.5
    final_masks = final_masks.squeeze(1)
    # Discard masks for objects which are below threshold.
    final_masks = final_masks[:thresholded_preds_count]
    seg_result = draw_segmentation_masks(
        uint8_tensor,
        final_masks,
        colors=colors,
        alpha=0.8
    )
    return seg_result
Perhaps the important part here is the thresholding (filtering) of the outputs. We need to ensure that we filter out all the objects as we did in the case of bounding boxes for the instance segmentation frame/image. Else there may be more or fewer segmentation maps than the number of bounding boxes and the number of colors which may result in an error. The easiest way to ensure this is to give the same threshold value here as well as was in the case of bounding box filtering.
Helper Function to Draw Keypoints on Image
We have reached the final helper function here. Here, we will write the helper function to draw the keypoints and connect the skeletal line on a person’s body.
def draw_keypoints_on_image(
    outputs, uint8_tensor,
    connect_points, colors=(255, 0, 0), threshold=0.8
):
    """
    Draws keypoints and the skeletal lines on an image.

    :param outouts: Outputs of the keypoint detection model.
    :param uint8_tensor: Image tensor to draw keypoints on.
    :param connect_points: List containing tuple values for which keypoint
          to connect which one.
    :param colors: Color of keypoint circles.
    :param threshold: Detection threshold for filtering.
    """
    keypoints = outputs[0]['keypoints']
    scores = outputs[0]['scores']
    idx = torch.where(scores > threshold)
    keypoints = keypoints[idx]
    keypoint_result = draw_keypoints(
        image=uint8_tensor,
        keypoints=keypoints,
        connectivity=connect_points,
        colors=colors,
        radius=4,
        width=3
    )
    return keypoint_result
Again, this is essentially the same code as we had in the previous post for drawing the keypoints. The only important thing here is to pass the connect_points properly which is a list containing tuple values indicating which keypoint will be connected to which other keypoint.
The above covers all the helper functions that we need. In the next section, we will move on to the video inference using the helper functions.
Carrying Out Inference for Object Detection, Semantic Segmentation, Instance Segmentation, and Keypoint Detection
From this section onward, we will start with the inference part that will be using the PyTorch visualization utilities and the above helper functions in the inference pipeline.
We will cover the inference in the following order:
- Object detection (
detection.py). - Semantic segmentation (
semantic_segmentation.py). - Instance segmentation (
instance_segmentation.py). - Keypoint detection (
keypoints.py).
For all the next coding that we will cover, we will focus mostly on the important sections and skip a little bit of the explanation for parts such as reading and preparing the video frames.
Using PyTorch Visualization Utilities for Object Detection Inference
We will start with the object detection inference. All the code in this section will go into the detection.py file.
The following code block contains the initial imports and preparatory code.
import torch
import cv2
import argparse
import time
import numpy as np

from torchvision.models.detection import fasterrcnn_mobilenet_v3_large_fpn
from utils import get_transformed_image, filter_detections, draw_boxes

# Set NumPy seed.
np.random.seed(2020)

# construct the argument parser
parser = argparse.ArgumentParser()
parser.add_argument(
    '-i', '--input', default='input/video_1.mp4',
    help='path to input video'
)
parser.add_argument(
    '-t', '--threshold', default=0.5, type=float,
    help='detection threshold'
)
parser.add_argument(
    '-f', '--fill', action='store_true',
    help='whether to fill the bounding boxes with colors'
)
args = vars(parser.parse_args())

COCO_INSTANCE_CATEGORY_NAMES = [
    '__background__', 'person', 'bicycle', 'car', 'motorcycle', 'airplane', 'bus',
    'train', 'truck', 'boat', 'traffic light', 'fire hydrant', 'N/A', 'stop sign',
    'parking meter', 'bench', 'bird', 'cat', 'dog', 'horse', 'sheep', 'cow',
    'elephant', 'bear', 'zebra', 'giraffe', 'N/A', 'backpack', 'umbrella', 'N/A', 'N/A',
    'handbag', 'tie', 'suitcase', 'frisbee', 'skis', 'snowboard', 'sports ball',
    'kite', 'baseball bat', 'baseball glove', 'skateboard', 'surfboard', 'tennis racket',
    'bottle', 'N/A', 'wine glass', 'cup', 'fork', 'knife', 'spoon', 'bowl',
    'banana', 'apple', 'sandwich', 'orange', 'broccoli', 'carrot', 'hot dog', 'pizza',
    'donut', 'cake', 'chair', 'couch', 'potted plant', 'bed', 'N/A', 'dining table',
    'N/A', 'N/A', 'toilet', 'N/A', 'tv', 'laptop', 'mouse', 'remote', 'keyboard', 'cell phone',
    'microwave', 'oven', 'toaster', 'sink', 'refrigerator', 'N/A', 'book',
    'clock', 'vase', 'scissors', 'teddy bear', 'hair drier', 'toothbrush'
]

colors=np.random.randint(0, 255, size=(len(COCO_INSTANCE_CATEGORY_NAMES), 3))
colors = [tuple(color) for color in colors]

# define the computation device
device = torch.device('cuda' if torch.cuda.is_available() else 'cpu')
model = fasterrcnn_mobilenet_v3_large_fpn(pretrained=True)
model.eval().to(device)

cap = cv2.VideoCapture(args['input'])

if (cap.isOpened() == False):
    print('Error while trying to read video. Please check path again')

# Get the frame width and height.
frame_width = int(cap.get(3))
frame_height = int(cap.get(4))

save_name = f"{args['input'].split('/')[-1].split('.')[0]}_fill_{args['fill']}"
# Define codec and create VideoWriter object.
out = cv2.VideoWriter(f"outputs/object_detection_{save_name}.mp4",
                      cv2.VideoWriter_fourcc(*'mp4v'), 30,
                      (frame_width, frame_height))

frame_count = 0 # To count total frames.
total_fps = 0 # To get the final frames per second.
Let’s go over the points briefly.
- We are using the Faster RCNN MobileNetv3 Large FPN model for inference here.
- There are command line argument flags for input video, detection threshold, and whether to fill the bounding boxes with color or not.
- We also have a list containing the MS COCO class names.
- And the rest is the video preprocessing code.
Following this, we have the code to loop over the video frames, carry out the detection, and draw the bounding boxes on the image.
# Read until end of video.
while(cap.isOpened()):
    # Capture each frame of the video.
    ret, frame = cap.read()
    if ret == True:
        frame = cv2.cvtColor(frame, cv2.COLOR_BGR2RGB)
        uint8_frame, float32_frame = get_transformed_image(frame)
        # Get the start time.
        start_time = time.time()
        with torch.no_grad():
            # Get predictions for the current frame.
            outputs = model(float32_frame.to(device))
        # Get the end time
        end_time = time.time()

        # Get the filetered boxes, class names, and label indices.
        boxes, pred_classes, labels = filter_detections(
            outputs, COCO_INSTANCE_CATEGORY_NAMES,
            args['threshold']
        )

        # Draw boxes and show current frame on screen.
        result, _ = draw_boxes(
            boxes, uint8_frame, pred_classes,
            labels, colors, fill=args['fill']
        )

        # Get the fps.
        fps = 1 / (end_time - start_time)
        # Add fps to total fps.
        total_fps += fps
        # Increment frame count.
        frame_count += 1
        result = np.transpose(result, (1, 2, 0))
        result = np.ascontiguousarray(result, dtype=np.uint8)
        # Convert from BGR to RGB color format.
        result = cv2.cvtColor(result, cv2.COLOR_RGB2BGR)
        # Write the FPS on the current frame.
        cv2.putText(result, f"{fps:.3f} FPS", (15, 30), cv2.FONT_HERSHEY_SIMPLEX,
                    1, (0, 0, 255), 2, cv2.LINE_AA)
        cv2.imshow('Result', result)
        out.write(result)
        # press `q` to exit
        if cv2.waitKey(1) & 0xFF == ord('q'):
            break

    else:
        break

# release VideoCapture()
cap.release()
# close all frames and video windows
cv2.destroyAllWindows()

# calculate and print the average FPS
avg_fps = total_fps / frame_count
print(f"Average FPS: {avg_fps:.3f}")
The model inference happens on line 80 and the annotation of the bounding boxes happens from lines 91 to 94. Along with bounding boxes, we also annotate each frame with the FPS.
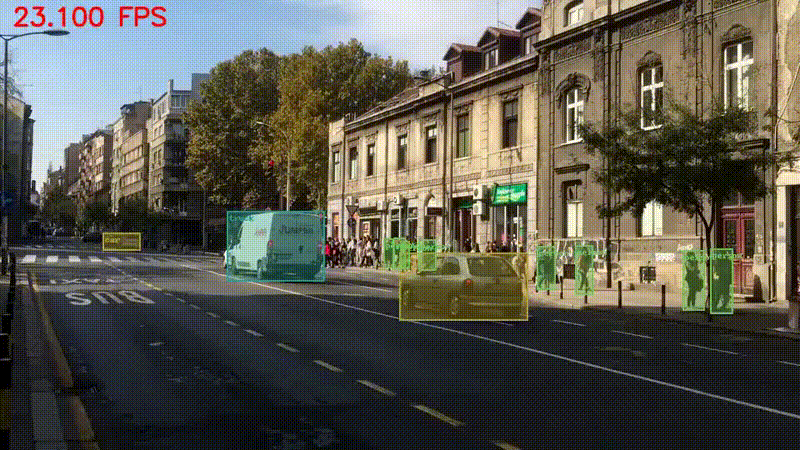
Let’s check out the result and visualization by executing the script. Run the following script from the project directory by executing the following command on the terminal/command line.
python detection.py --input input/video_1.mp4 --threshold 0.7
The following are the results with a threshold of 0.7.
We will not be analyzing the detection quality here as the main focus is the visualization pipeline. You can change the seed to get different colors for bounding boxes.
Now, the following script executes the same code with filled bounding boxes.
python detection.py --input input/video_1.mp4 --threshold 0.7 --fill
As you can see, the filled colors are as same as the corresponding bounding boxes.
Using PyTorch Visualization Utilities for Semantic Segmentation Inference
Moving on to inference and visualization for semantic segmentation. We will write the semantic segmentation inference code in the semantic_segmentation.py file.
First, the imports and the preprocessing for the video.
import torch
import cv2
import argparse
import time
import numpy as np

from torchvision.models.segmentation import fcn_resnet50
from utils import get_transformed_image, get_rgb_mask, draw_mask

# Set NumPy seed.
np.random.seed(2022)

# construct the argument parser
parser = argparse.ArgumentParser()
parser.add_argument(
    '-i', '--input', default='input/video_1.mp4',
    help='path to input video'
)
args = vars(parser.parse_args())

VOC_SEG_CLASSES = [
    '__background__', 'aeroplane', 'bicycle', 'bird', 'boat', 'bottle', 'bus',
    'car', 'cat', 'chair', 'cow', 'diningtable', 'dog', 'horse', 'motorbike',
    'person', 'pottedplant', 'sheep', 'sofa', 'train', 'tvmonitor'
]

LABEL_COLOR_MAP = [
    (0, 0, 0),  # background
    (128, 0, 0), # aeroplane
    (0, 128, 0), # bicycle
    (128, 128, 0), # bird
    (0, 0, 128), # boat
    (128, 0, 128), # bottle
    (0, 128, 128), # bus
    (128, 128, 128), # car
    (64, 0, 0), # cat
    (192, 0, 0), # chair
    (64, 128, 0), # cow
    (192, 128, 0), # dining table
    (64, 0, 128), # dog
    (192, 0, 128), # horse
    (64, 128, 128), # motorbike
    (192, 128, 128), # person
    (0, 64, 0), # potted plant
    (128, 64, 0), # sheep
    (0, 192, 0), # sofa
    (128, 192, 0), # train
    (0, 64, 128) # tv/monitor
]

# define the computation device
device = torch.device('cuda' if torch.cuda.is_available() else 'cpu')
model = fcn_resnet50(pretrained=True)
model.eval().to(device)

cap = cv2.VideoCapture(args['input'])

if (cap.isOpened() == False):
    print('Error while trying to read video. Please check path again')

# Get the frame width and height.
frame_width = int(cap.get(3))
frame_height = int(cap.get(4))

save_name = f"{args['input'].split('/')[-1].split('.')[0]}"
# Define codec and create VideoWriter object.
out = cv2.VideoWriter(f"outputs/semantic_segmentation_{save_name}.mp4",
                      cv2.VideoWriter_fourcc(*'mp4v'), 30,
                      (frame_width, frame_height))

frame_count = 0 # To count total frames.
total_fps = 0 # To get the final frames per second.
We are using the FCN ResNet50 model for inference here. Also, we define the PASCAL VOC classes (VOC_SEG_CLASSES) and the RGB color map for each class (LABEL_COLOR_MAP).
Next is the loop for inferencing on each frame.
# Read until end of video.
while(cap.isOpened()):
    # Capture each frame of the video.
    ret, frame = cap.read()
    if ret == True:
        frame = cv2.cvtColor(frame, cv2.COLOR_BGR2RGB)
        uint8_frame, float32_frame = get_transformed_image(frame)
        # Get the start time.
        start_time = time.time()
        with torch.no_grad():
            # Get predictions for the current frame.
            outputs = model(float32_frame.to(device))
        # Get the end time
        end_time = time.time()

        # Get the RGB mask.
        all_masks = get_rgb_mask(outputs)

        # Draw boxes and show current frame on screen.
        result = draw_mask(uint8_frame, all_masks, LABEL_COLOR_MAP)

        # Get the fps.
        fps = 1 / (end_time - start_time)
        # Add fps to total fps.
        total_fps += fps
        # Increment frame count.
        frame_count += 1
        result = np.transpose(result, (1, 2, 0))
        result = np.ascontiguousarray(result, dtype=np.uint8)
        # Convert from BGR to RGB color format.
        result = cv2.cvtColor(result, cv2.COLOR_RGB2BGR)
        # Write the FPS on the current frame.
        cv2.putText(result, f"{fps:.3f} FPS", (15, 30), cv2.FONT_HERSHEY_SIMPLEX,
                    1, (0, 0, 255), 2, cv2.LINE_AA)
        cv2.imshow('Result', result)
        out.write(result)
        # press `q` to exit
        if cv2.waitKey(1) & 0xFF == ord('q'):
            break

    else:
        break

# release VideoCapture()
cap.release()
# close all frames and video windows
cv2.destroyAllWindows()

# calculate and print the average FPS
avg_fps = total_fps / frame_count
print(f"Average FPS: {avg_fps:.3f}")
The forward pass through the model happens on line 84 and line 92 draws the RGB masks on the image.
Let’s check out the semantic segmentation on video 2 from the input directory.
python semantic_segmentation.py --input input/video_2.mp4
The following is the result.
All the classes like person, bus, and bike seem to be correctly segmented with their respective class color.
Using PyTorch Visualization Utilities for Instance Segmentation Inference
The instance segmentation inference will have two steps after the detection. First, we will draw the bounding boxes around the objects and then apply the RGB masks to each of the objects.
The instance_segmentation.py script will hold the code for instance segmentation.
import torch
import cv2
import argparse
import time
import numpy as np

from torchvision.models.detection import maskrcnn_resnet50_fpn
from utils import (
    get_transformed_image, filter_detections,
    draw_boxes, draw_instance_mask
)

# Set NumPy seed.
np.random.seed(2022)

# construct the argument parser
parser = argparse.ArgumentParser()
parser.add_argument(
    '-i', '--input', default='input/video_1.mp4',
    help='path to input video'
)
parser.add_argument(
    '-t', '--threshold', default=0.8, type=float,
    help='detection threshold'
)
args = vars(parser.parse_args())

COCO_INSTANCE_CATEGORY_NAMES = [
    '__background__', 'person', 'bicycle', 'car', 'motorcycle', 'airplane', 'bus',
    'train', 'truck', 'boat', 'traffic light', 'fire hydrant', 'N/A', 'stop sign',
    'parking meter', 'bench', 'bird', 'cat', 'dog', 'horse', 'sheep', 'cow',
    'elephant', 'bear', 'zebra', 'giraffe', 'N/A', 'backpack', 'umbrella', 'N/A', 'N/A',
    'handbag', 'tie', 'suitcase', 'frisbee', 'skis', 'snowboard', 'sports ball',
    'kite', 'baseball bat', 'baseball glove', 'skateboard', 'surfboard', 'tennis racket',
    'bottle', 'N/A', 'wine glass', 'cup', 'fork', 'knife', 'spoon', 'bowl',
    'banana', 'apple', 'sandwich', 'orange', 'broccoli', 'carrot', 'hot dog', 'pizza',
    'donut', 'cake', 'chair', 'couch', 'potted plant', 'bed', 'N/A', 'dining table',
    'N/A', 'N/A', 'toilet', 'N/A', 'tv', 'laptop', 'mouse', 'remote', 'keyboard', 'cell phone',
    'microwave', 'oven', 'toaster', 'sink', 'refrigerator', 'N/A', 'book',
    'clock', 'vase', 'scissors', 'teddy bear', 'hair drier', 'toothbrush'
]

colors=np.random.randint(0, 255, size=(len(COCO_INSTANCE_CATEGORY_NAMES), 3))
colors = [tuple(color) for color in colors]

# define the computation device
device = torch.device('cuda' if torch.cuda.is_available() else 'cpu')
model = maskrcnn_resnet50_fpn(pretrained=True)
model.eval().to(device)

cap = cv2.VideoCapture(args['input'])

if (cap.isOpened() == False):
    print('Error while trying to read video. Please check path again')

# Get the frame width and height.
frame_width = int(cap.get(3))
frame_height = int(cap.get(4))

save_name = f"{args['input'].split('/')[-1].split('.')[0]}"
# Define codec and create VideoWriter object.
out = cv2.VideoWriter(f"outputs/inst_seg_{save_name}.mp4",
                      cv2.VideoWriter_fourcc(*'mp4v'), 30,
                      (frame_width, frame_height))

frame_count = 0 # To count total frames.
total_fps = 0 # To get the final frames per second.
We are using the Mask RCNN ResNet50 FPN model for instance segmentation. One other thing to note here is that as the model has been trained on the MS COCO dataset, the class names here are the same as in the object detection case.
Now, the code for looping over the frames, predicting, and annotating the frames.
# Read until end of video.
while(cap.isOpened()):
    # Capture each frame of the video.
    ret, frame = cap.read()
    if ret == True:
        frame = cv2.cvtColor(frame, cv2.COLOR_BGR2RGB)
        uint8_frame, float32_frame = get_transformed_image(frame)
        # Get the start time.
        start_time = time.time()
        with torch.no_grad():
            # Get predictions for the current frame.
            outputs = model(float32_frame.to(device))
        # Get the end time
        end_time = time.time()

        # Get the filetered boxes, class names, and label indices.
        boxes, pred_classes, labels = filter_detections(
            outputs, COCO_INSTANCE_CATEGORY_NAMES,
            args['threshold']
        )

        # Draw boxes and show current frame on screen.
        result, plot_colors = draw_boxes(
            boxes, uint8_frame, pred_classes,
            labels, colors, is_instance=True
        )

        # Draw the segmentation map.
        result = draw_instance_mask(outputs, result, plot_colors, args['threshold'])

        # Get the fps.
        fps = 1 / (end_time - start_time)
        # Add fps to total fps.
        total_fps += fps
        # Increment frame count.
        frame_count += 1
        result = np.transpose(result, (1, 2, 0))
        result = np.ascontiguousarray(result, dtype=np.uint8)
        # Convert from BGR to RGB color format.
        result = cv2.cvtColor(result, cv2.COLOR_RGB2BGR)
        # Write the FPS on the current frame.
        cv2.putText(result, f"{fps:.3f} FPS", (15, 30), cv2.FONT_HERSHEY_SIMPLEX,
                    1, (0, 0, 255), 2, cv2.LINE_AA)
        cv2.imshow('Result', result)
        out.write(result)
        # press `q` to exit
        if cv2.waitKey(1) & 0xFF == ord('q'):
            break

    else:
        break

# release VideoCapture()
cap.release()
# close all frames and video windows
cv2.destroyAllWindows()

# calculate and print the average FPS
avg_fps = total_fps / frame_count
print(f"Average FPS: {avg_fps:.3f}")
The model predicts on each frame on line 79. Then we draw the bounding boxes around the detected objects on line 90 and the masks on line 96.
Let’s execute the script.
python instance_segmentation.py --input input/video_2.mp4
The outputs of instance segmentation will look a bit weird and maybe even a bit funny. The reason is that in each frame, the colors will be randomized and along with that every detected instance will have a different color.
As expected, the colors get randomized on each frame and also each instance regardless of the class has a different color.
Using PyTorch Visualization Utilities for Keypoint Detection Inference
We have reached the final section of inference. We will now carry out inference and visualization for person keypoint detection.
The keypoints.py file will contain the code for keypoint detection.
import torch
import cv2
import argparse
import time
import numpy as np

from torchvision.models.detection import keypointrcnn_resnet50_fpn
from utils import get_transformed_image, draw_keypoints_on_image

# Set NumPy seed.
np.random.seed(2022)

# construct the argument parser
parser = argparse.ArgumentParser()
parser.add_argument(
    '-i', '--input', default='input/video_1.mp4',
    help='path to input video'
)
parser.add_argument(
    '-t', '--threshold', default=0.8, type=float,
    help='detection threshold'
)
args = vars(parser.parse_args())

COCO_KEYPOINTS = [
    "nose", "left_eye", "right_eye", "left_ear", "right_ear",
    "left_shoulder", "right_shoulder", "left_elbow", "right_elbow",
    "left_wrist", "right_wrist", "left_hip", "right_hip",
    "left_knee", "right_knee", "left_ankle", "right_ankle",
]

CONNECT_POINTS = [
    (0, 1), (0, 2), (1, 3), (2, 4), (0, 5), (0, 6), (5, 7), (6, 8),
    (7, 9), (8, 10), (5, 11), (6, 12), (11, 13), (12, 14), (13, 15), (14, 16)
]

# define the computation device
device = torch.device('cuda' if torch.cuda.is_available() else 'cpu')
model = keypointrcnn_resnet50_fpn(pretrained=True)
model.eval().to(device)

cap = cv2.VideoCapture(args['input'])

if (cap.isOpened() == False):
    print('Error while trying to read video. Please check path again')

# Get the frame width and height.
frame_width = int(cap.get(3))
frame_height = int(cap.get(4))

save_name = f"{args['input'].split('/')[-1].split('.')[0]}"
# Define codec and create VideoWriter object.
out = cv2.VideoWriter(f"outputs/keypoints_{save_name}.mp4",
                      cv2.VideoWriter_fourcc(*'mp4v'), 30,
                      (frame_width, frame_height))

frame_count = 0 # To count total frames.
total_fps = 0 # To get the final frames per second.
We are using the Keypoint RCNN ResNet50 model here. The COCO_KEYPOINTS contains all the body parts for which keypoints are detected. Although, this list is not used in the code. The CONNECT_POINTS is a list of tuples containing all the index values from the COCO_KEYPOINTS indicating which keypoint will be connected to which one when drawing the skeletal lines.
# Read until end of video.
while(cap.isOpened()):
    # Capture each frame of the video.
    ret, frame = cap.read()
    if ret == True:
        frame = cv2.cvtColor(frame, cv2.COLOR_BGR2RGB)
        uint8_frame, float32_frame = get_transformed_image(frame)
        # Get the start time.
        start_time = time.time()
        with torch.no_grad():
            # Get predictions for the current frame.
            outputs = model(float32_frame.to(device))
        # Get the end time
        end_time = time.time()

        # Get the keypoint annotated result.
        result = draw_keypoints_on_image(
            outputs, uint8_frame,
            CONNECT_POINTS,
            threshold=args['threshold']
        )

        # Get the fps.
        fps = 1 / (end_time - start_time)
        # Add fps to total fps.
        total_fps += fps
        # Increment frame count.
        frame_count += 1
        result = np.transpose(result, (1, 2, 0))
        result = np.ascontiguousarray(result, dtype=np.uint8)
        # Convert from BGR to RGB color format.
        result = cv2.cvtColor(result, cv2.COLOR_RGB2BGR)
        # Write the FPS on the current frame.
        cv2.putText(result, f"{fps:.3f} FPS", (15, 30), cv2.FONT_HERSHEY_SIMPLEX,
                    1, (0, 0, 255), 2, cv2.LINE_AA)
        cv2.imshow('Result', result)
        out.write(result)
        # press `q` to exit
        if cv2.waitKey(1) & 0xFF == ord('q'):
            break

    else:
        break

# release VideoCapture()
cap.release()
# close all frames and video windows
cv2.destroyAllWindows()

# calculate and print the average FPS
avg_fps = total_fps / frame_count
print(f"Average FPS: {avg_fps:.3f}")
After inference, the drawing of the keypoints and connecting the skeletal lines happen on line 75.
We can execute the script using the following command.
python keypoints.py --input input/video_3.mp4 --threshold 0.9
The following is the output.
We can see a bit of mismatch in the connected keypoints, especially when two persons are very close to each other. Other than that, the predictions look good.
Advantages and Drawbacks of Using PyTorch Visualization Utilities
After using the utilities to such an extent, let’s list out some of the advantages and drawbacks of using them.
One obvious advantage is that we were able to avoid a lot of boiler plate code and for loops. That saves a good amount of coding time.
But one big disadvantage is that we will not be able to customize the visualizations to a good extent. For example, right now, it’s not possible to have different colors for each of the skeletal lines.
Summary and Conclusion
In this tutorial, we learned how to use the PyTorch visualization utilities in a video inference pipeline for object detection, image segmentation, and keypoint detection. Along with that, we also listed out a few advantages and drawbacks. I hope that this tutorial was helpful to you.
If you have any doubts, thoughts, or suggestions, please leave them in the comment section. I will surely address them.
You can contact me using the Contact section. You can also find me on LinkedIn, and X.

very tidy and compact explaination, good tutorial , thanks
Thank you Dom.