
In the last week’s tutorial, we discussed the HOG Feature Descriptor. We also learned how to do image classification using HOG features and SVM Linear Classifier. In this tutorial, we will learn how to detect persons using HOG features for person detection. The best part is, we do not need to train our own SVM classifier and object detector. OpenCV already has an implementation of a person detector model. The OpenCV module name is HOGDescriptor_getDefaultPeopleDetector(). It is trained using the Linear SVM machine learning classifier, just as we discussed in the last tutorial.
The OpenCV HOG Person Detection Technique
Let’s learn about the OpenCV Person Detector in a little bit more detail.
The OpenCV People Detector is based on the original HOG paper by Dalal and Triggs (Histograms of Oriented Gradients for Human Detection). If you wish to learn about the steps involved as described in the paper, then you can take a look at my previous article.
In the paper, the authors say that they trained a Linear SVM model on the MIT pedestrian dataset and the INRIA dataset containing images of humans. So, most probably, the OpenCV version of the people detector uses the same datasets as well.
As OpenCV already has a person detector model in its library, our work becomes much easier. We can focus on the real deal here. We will focus on using the OpenCV person detector model on our own test images and videos. More specifically, we will use some person images and videos and see how to get higher accuracy prediction using the people detector.
To give you just a hint of what to expect from this tutorial by the end, here is an example output.
I hope that you feel motivated enough to follow this tutorial till the end.
The Catch with the OpenCV People Detector
Before we move on to the implementation part of this tutorial, there are some things we need to clear up.
Although the OpenCV people detector works pretty well, but it does not work well most of the time. What I mean to say is that it does work well out of the box. Most of the time we need to tune a lot of hyperparameters to get the best results.
Now, tuning hyperparameters in computer vision and machine learning is a common deal. Then why discuss it here? This is because tuning these hyperparameters to get the best results makes the detector much more computationally expensive.
You may ask, how much is computationally expensive? Because we can deal with some computation time. After all high inference times in machine learning and computer vision are a common scenario most of the time. Well, you can expect the following number for predictions:
- On images:
- Without hyperparameter tuning, detection occurs in milliseconds.
- With hyperparameter tuning, you can expect an additional 2 seconds delay. That’s a lot.
- On videos;
- Without hyperparameter tuning, you can expect almost real-time prediction (30-35 frames per second).
- With hyperparameter tuning, we may drop to 5-6 frames per second. No more real-time prediction.
The above numbers may sound a bit too far-fetched, but they are true. And these numbers come from a fairly powerful processor. An i7 8th gen processor to be precise. You we will get to experience all these in this tutorial.
So, the trade-off between accuracy and speed for using the detector is pretty drastic. Still, we will try our best to get almost-real time predictions on videos with pretty high accuracy.
Which Hyperparameters Make the Most Impact?
In this section, we will discuss which hyperparameters have the most impact on the accuracy/speed trade-off.
For using the OpenCV people detector, we need to use the getDefaultPeopleDetector() function. For getting the detection predictions on an image, we need the detectMultiScale() function. Things will become clearer when we start coding. So, bear with me for now.
You can find all the hyperparameters of detectMultiScale() in the original documentation. Among those, the most impactful ones are:
winStridepaddingscale
But the documentation does not provide any useful information about the hyperparameters and how they impact accuracy and performance. All the above parameters are optional and have default values. But the problem is that these default values do not work very well most of the time.
I will try to explain the functionality as briefly and usefully as possible.
winStride
If you work with computer vision and deep learning, then you may be well aware of the stride that is used in convolution kernels.
This winStride also works in pretty much the same way. It defines a step size for the detector window to move in the horizontal and vertical directions. The smaller the step size, the more important and fine-grained details we will be able to capture.
The following image shows an image with a 1×1 stride.
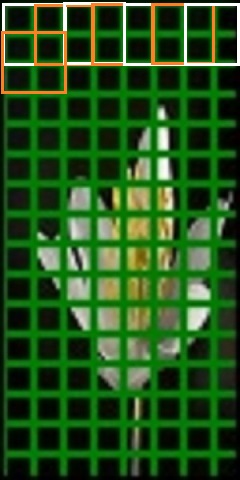
We need to remember that winStride is one of the most impactful hyperparameters. Using a smaller winStride will give really good results, but the run time also goes up tremendously. So, we have to find the just-right value for the speed-accuracy trade-off.
padding
The padding parameters are used to pad the sliding window detector in the horizontal and vertical direction. The padding values indicate the number of pixels to pad the sliding window.
scale
The scale hyperparameter defines the factor by which the image is resized at each layer of an image pyramid.
The following is an example of an image pyramid.
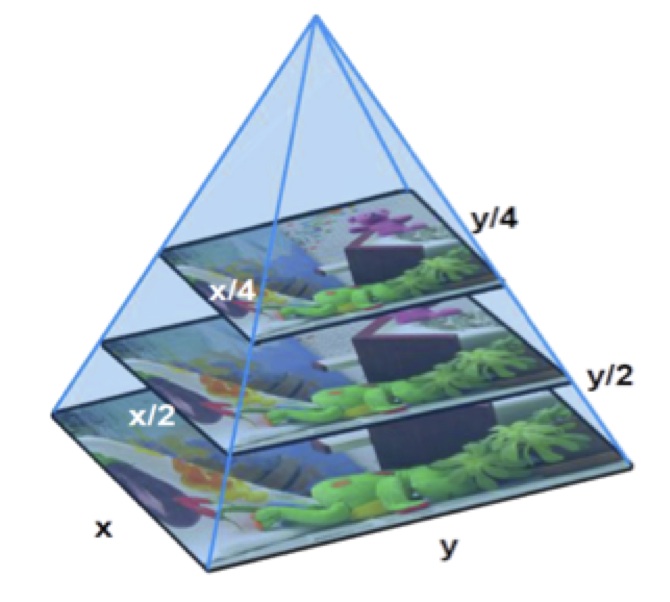
A smaller scale parameter will influence the number of layers in the image pyramid. A smaller value will yield better results but will be too much computationally expensive as well.
The above are the most impactful parameters in the detectMultiScale() function, We did not cover all the hyperparameters. You can find a more detailed explanation of all the hyperparameters in this post by Adrian Rosebrock.
I hope that now you have a somewhat clear idea of the HOG hyperparameters that we will be using.
In the next section, we will focus on the coding part of this tutorial.
Person Detection using OpenCV HOG
We will focus on two things during coding our way through this tutorial:
- We will write a python script to accurately detect persons in images.
- Then we will write another script to detect persons in videos. We will tune the above-mentioned hyperparameters and try to get the best results that we can.
The Project Structure
Before starting to write the code, let’s take a look at the project directory structure. This is one part that I always emphasize, as this can make our work much easier.
├───input
        people1.jpg
        people2.jpg
        people3.jpg
        video1.mp4
        video2.mp4
        video3.mp4
        video4.mp4
├───outputs
│   └───frames
└───src
        hog_detector.py
        hog_detector_vid.py
We have three main folders, input, src, and outputs.
- Inside the
inputfolder are all the images and videos that we will be using. I have taken those from pixabay. srcfolder contains the two python scripts,hog_detector.pyandhog_detector_vid.py. We will know more about the scripts when we start to write the code.outputsfolder will save all the output images and videos for later analysis of the results. There is also aframefolder inside that will save the individual frames of the resulting output videos.
You can use the same input images and videos as this tutorial. If you want to do that, you can download them from here.
Person Detection in Images using OpenCV HOG with High Accuracy
We will start with detecting persons in images and then move into the video part.
All the code in this part will go into the hog_detector.py file.
Let’s start with importing the modules and libraries. We need only three.
'''
USAGE:
python hog_detector.py
'''

import cv2
import glob as glob
import os
We need the OpenCV library, glob for getting all the image paths, and os to get the image names.
Initialize the OpenCV HOGDescriptor
Before we can use the OpenCV HOG module, we need to initialize it. In the OpenCV library, it goes by the name of HOGDescriptor(). After initializing, we also need to set the SVM detector and getDefaultPeopleDetector(). This ensures that we can use the HOG Descriptor to detect people in different images and videos.
hog = cv2.HOGDescriptor()
hog.setSVMDetector(cv2.HOGDescriptor_getDefaultPeopleDetector())
In the above code block, line 1 initializes the OpenCV HOGDescriptor(). Line 2 sets the SVM detector and getDefaultPeopleDetector() so that we can detect people in images.
Detecting People in the Images
First, we will get all the image paths using the glob module. Then we will loop over the paths and keep on detecting the people in the images until there are no more images left. This approach is appropriate in this case, as we have only three images. You may need to change it when you have more images.
This is going to be a bigger code block. It is a continuous code with two for loops and therefore we need the code in an entire block. We will get to the explanation part of the code after writing the code.
image_paths = glob.glob('../input/*.jpg')
for image_path in image_paths:
    image_name = image_path.split(os.path.sep)[-1]
    image = cv2.imread(image_path)

    # keep a minimum image size for accurate predictions
    if image.shape[1] < 400: # if image width < 400
        (height, width) = image.shape[:2]
        ratio = width / float(width) # find the width to height ratio
        image = cv2.resize(image, (400, width*ratio)) # resize the image according to the width to height ratio

    img_gray = cv2.cvtColor(image, cv2.COLOR_BGR2GRAY)

    rects, weights = hog.detectMultiScale(img_gray, winStride=(2, 2), padding=(10, 10), scale=1.02)

    for i, (x, y, w, h) in enumerate(rects):
        if weights[i] < 0.13:
            continue
        elif weights[i] < 0.3 and weights[i] > 0.13:
            cv2.rectangle(image, (x, y), (x+w, y+h), (0, 0, 255), 2)
        if weights[i] < 0.7 and weights[i] > 0.3:
            cv2.rectangle(image, (x, y), (x+w, y+h), (50, 122, 255), 2)
        if weights[i] > 0.7:
            cv2.rectangle(image, (x, y), (x+w, y+h), (0, 255, 0), 2)

    cv2.putText(image, 'High confidence', (10, 15), cv2.FONT_HERSHEY_SIMPLEX, 0.7, (0, 255, 0), 2)
    cv2.putText(image, 'Moderate confidence', (10, 35), cv2.FONT_HERSHEY_SIMPLEX, 0.7, (50, 122, 255), 2)
    cv2.putText(image, 'Low confidence', (10, 55), cv2.FONT_HERSHEY_SIMPLEX, 0.7, (0, 0, 255), 2)

    cv2.imshow('HOG detection', image)
    cv2.imwrite(f"../outputs/{image_name}", image)
    cv2.waitKey(0)
Explanation of the Above Code Block
- On line 1, we use
globto get all the image paths asimage_paths. - From line 2, we start to iterate over all the
image_paths. - On lines 3 and 4, we get the image name using the
osmodule. Then we read the image usingcv2.imread()function. - From lines 7 to 10, we check if the image width is less than 400 pixels. If so, we resize the image height and width. This is to ensure the image dimensions are large enough to carry out accurate predictions.
- Then at line 12, we convert the image to grayscale.
- On line 14, we detect people in the image using the detectMultiScale() function. The only required argument for this function is the image (img_gray in our case). All the others are optional arguments that we have discussed above. But we need those optional arguments for the accurate detection of people in the images.
- This returns two attributes, one is rects and the other is weights. The
rectscontain all the bounding box coordinates in the form of top-leftx, andycoordinates, and the width and the height. Theweightscontains the confidence scores as a list. This gives us an idea of how confident the algorithm is of the corresponding bounding box finding a person.
- We have
winStride=(2, 2),padding=(10, 10),scale=1.02. - Using these arguments for detection makes the program much more computationally expensive. But not using the arguments leads to very poor results.
- I have chosen the above argument values, as they gave the best results with the minimum increase in runtime.
- This returns two attributes, one is rects and the other is weights. The
- From lines 16 to 24, we draw the bounding box according to the different confidence values. For high confidence, we draw green boxes, orange boxes for moderate confidence, and red boxes for low confidence.
- Then we put the text on the image according to the box colors. Finally, we show and write the resulting image to disk.
Executing the hog_detector.py File
Before executing, you may take note of one thing. You can choose some other ranges for choosing the confidence of the weights. I chose the ones that gave the best results. Below 0.13 gave a lot of false positives, so I ignored any below that. And there is a reason to go below 0.5 as well. We will get to know it while analyzing the results.
Execute the file while being within the src folder in the terminal.
python hog_detector.py
Let’s take a look at the results.

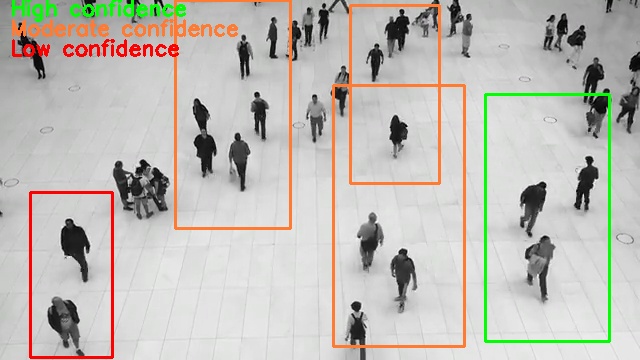
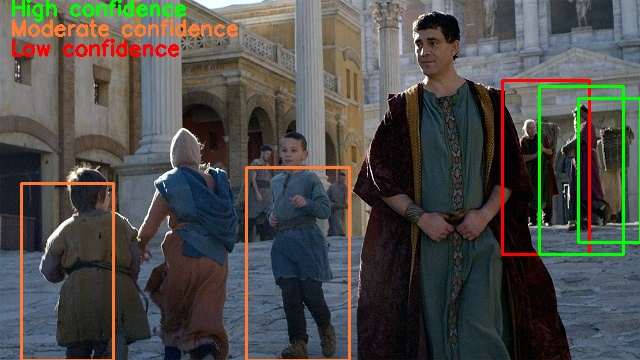
In figure 4. you can see that there are 5 detections with high confidence (greater than 0.7). And there are 3 detections with moderate confidence and 1 detection with low confidence. If we have not gone as low as 0.13, then we would have missed all these detections.
Now, let’s analyze the other results as well.
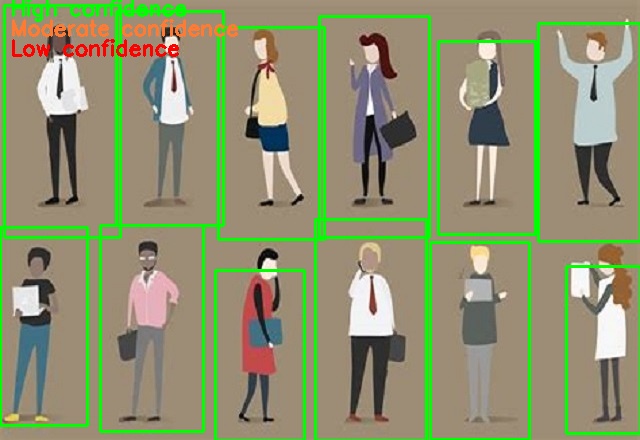
In figure 5, we have two predictions with moderate confidence and 1 prediction with low confidence. But the algorithm missed the obvious prediction of the person close to the camera. This is one of the drawbacks of the HOG People Detector. Most of the time it will miss the detections which are too close to the camera.
In figure 6, all the detections have taken place with high confidence.
So, going as low as 0.13 gives us some predictions that we would have otherwise missed. Also, using the optional arguments helped us in getting those detections.
Note: But keep in mind that you will not always get True Positive predictions with such low confidence values. Sometimes you will get False Positives as well. This means that the algorithm will detect bounding boxes when actually there is no person. We will see such False Positive cases in the video detection case.
Detecting Persons in Videos with OpenCV HOG Descriptor and People Detector
In this section, we will write the code to detect people in videos using the HOG People Detector. The code in this section will go into the hog_detector_vid.py file.
We will start by importing the modules and constructing the argument parser.
'''
USAGE:
python hog_detector_vid.py --input ../input/video1.mp4 --output ../outputs/video1_slow.mp4 --speed slow
python hog_detector_vid.py --input ../input/video1.mp4 --output ../outputs/video1_fast.mp4 --speed fast
'''

import cv2
import time
import argparse
import os
We need the time module to calculate the FPS (Frames Per Second) of the algorithm.
Now, the argument parser.
# construct the argument parser and parse the command line arguments
parser = argparse.ArgumentParser()
parser.add_argument('-i', '--input', default='../input/video1.mp4',
                    help='path to the inout video file')
parser.add_argument('-o', '--output', required=True, help='path to save the output video file')
parser.add_argument('-s', '--speed', default='yes', choices=['fast', 'slow'],
                    help='whether to use fast or slow detector')
args = vars(parser.parse_args())
We have three command line arguments for the argument parser:
--inputis the input path to the video file.--outputis the path to save the resulting video file.--speeddetermines whether we want to apply the highly accurate but slow algorithm or the moderately accurate but fairly fast algorithm. We have two choices for this,fastandslow. We will get into the details when we encounter the corresponding coding part.
Initializing the People Detector and Preparing the Video Setups
The following code block initializes the HOG descriptor and the people detector.
hog = cv2.HOGDescriptor()
hog.setSVMDetector(cv2.HOGDescriptor_getDefaultPeopleDetector())
cap = cv2.VideoCapture(args['input'])

if (cap.isOpened() == False):
    print('Error while trying to open video. Please check again...')
On line 3, we are reading the video file. Line 5 prints an error message if we cannot open the video file.
Next, we will set up the appropriate frame width and height. We will also define the codec for the VideoWriter(). This will define the output format of the video file.
# get the frame width and height
frame_width = int(cap.get(3))
frame_height = int(cap.get(4))

# keep a minimum frame size for accurate predictions
if frame_width < 400: # if image width < 400
        frame_width = 400
        ratio = frame_width / float(frame_width) # find the width to height ratio
        frame_height = int(frame_width * ratio)

# define codec and create VideoWriter object
out = cv2.VideoWriter(args['output'], cv2.VideoWriter_fourcc(*'mp4v'), 30, (frame_width,frame_height))

frame_count = 0
total_fps = 0
Lines 14 and 15, define the frame_count and total_fps variables. These will help us to calculate the average FPS of the algorithm over the total frames in the video.
Predicting Over the Video Frames
This section will have a large while loop for looping over all the video frames. For continuity, I will be writing the prediction code in a single code block.
# read until end of video
while(cap.isOpened()):
    # capture each frame of the video
    ret, frame = cap.read()
    if ret == True:
        start_time = time.time()

        frame = cv2.resize(frame, (frame_width, frame_height))

        img_gray = cv2.cvtColor(frame, cv2.COLOR_BGR2GRAY)
        if args['speed'] == 'fast':
            rects, weights = hog.detectMultiScale(img_gray, padding=(4, 4), scale=1.02)
        elif args['speed'] == 'slow':
            rects, weights = hog.detectMultiScale(img_gray, winStride=(4, 4), padding=(4, 4), scale=1.02)

        for i, (x, y, w, h) in enumerate(rects):
            if weights[i] < 0.13:
                continue
            elif weights[i] < 0.3 and weights[i] > 0.13:
                cv2.rectangle(frame, (x, y), (x+w, y+h), (0, 0, 255), 2)
            if weights[i] < 0.7 and weights[i] > 0.3:
                cv2.rectangle(frame, (x, y), (x+w, y+h), (50, 122, 255), 2)
            if weights[i] > 0.7:
                cv2.rectangle(frame, (x, y), (x+w, y+h), (0, 255, 0), 2)

        cv2.putText(frame, 'High confidence', (10, 15), cv2.FONT_HERSHEY_SIMPLEX, 0.7, (0, 255, 0), 2)
        cv2.putText(frame, 'Moderate confidence', (10, 35), cv2.FONT_HERSHEY_SIMPLEX, 0.7, (50, 122, 255), 2)
        cv2.putText(frame, 'Low confidence', (10, 55), cv2.FONT_HERSHEY_SIMPLEX, 0.7, (0, 0, 255), 2)

        frame_write_name = args['input'].split('/')[-1].split('.')[0]
        cv2.imwrite(f"../outputs/frames/{args['speed']}_{frame_write_name}_{frame_count}.jpg", frame)

        # Measure elapsed time for detections
        end_time = time.time()
        fps = 1 / (end_time - start_time)
        # print(f"{fps:.3f} FPS")
        # add to total FPS
        total_fps += fps
        # add to total number of frames
        frame_count += 1
        cv2.imshow("Preview", frame)
        out.write(frame)

        # press `q` to exit
        wait_time = max(1, int(fps/4))
        if cv2.waitKey(wait_time) & 0xFF == ord('q'):
            break

    else:
        break
Explanation of the Above Code Block
- Starting from line 4. we try to capture each frame. If we have a frame, then we carry on further. At line 6, we get the start time.
- Line 8, resizes the frame according to the above-defined frame width and height. Line 9, converts the frame into grayscale.
- From lines 11 to 14, we decide whether we want to apply fast detection or slow detection. This is based on the
speedcommand line argument.- For fast detection, we do not use any
winStrideargument. We only use thepaddingandscaleargument. - For slow but very accurate detection, we define the
winStrideargument with a value of (4, 4). We also pass thepaddingandscaleargument.
- For fast detection, we do not use any
- From lines 16 to 28, we draw the detection boxes for different ranges of the confidence score. This is the same as we did in the case of images.
- On line 30, we define a name to save the frame as a
.jpgimage according to the speed of the detection algorithm. Line 31 saves the frame inside theoutputs/framesfolder. We will later use these frames to analyze whether the slow detection was actually useful or not. - At line 35, we calculate the FPS. Line 37 adds the
fpsto thetotal_fpsand line 39 increments theframe_countcounter. - Lines 40 and 41, show and save the frame as
.mp4file respectively. - Line 44 defines a
wait_timefor the frame that we use at line 45. Finally, we break out of the loop.
Calculate the Average FPS and Close All Video Windows
Finally, we just need to calculate the average FPS and close all the video frame windows.
avg_fps = total_fps / frame_count
print(f"Average FPS: {avg_fps:.3f}" )

# release VideoCapture()
cap.release()

# close all frames and video windows
cv2.destroyAllWindows()
Executing the hog_detector_vid.py File and Analyzing the Results
We will perform the detection on just one video file from the input folder. You should try out the other video files on your own as well. We will run the predictions on the video1.mp4 file twice. Once with fast detection, and again with slow detection. Then we will analyze the resulting detection videos and the frames as well.
Note: The output clips that you will see here will all seem to be running fine as they are saved with 30 frames per second encoding. What matters is the FPS that we get during real-time detection. That is, the FPS while we perform prediction when executing the code. So, to experience the effects of fast and slow algorithms you will have to execute the code on your computer.
Running the “Fast” Detection Algorithm
Running the detection with the fast algorithm.
python hog_detector_vid.py --input ../input/video1.mp4 --output ../outputs/video1_fast.mp4 --speed fast
We get around 16 FPS average while using the fast detection algorithm. The following is the saved clip.
The detection results are pretty good. But we can see that the people who are too close to the edges are not being detected. This is one of the drawbacks of the HOG people detector. Not only that, many times it may not be able to detect those who are in a sitting position as well. Also, you can see that there is a lot of flickering in the detection. The detection boxes are appearing and disappearing. This is another drawback of the HOG people detector. Still, considering the 16 FPS on a CPU, we are getting good results
Running the “Slow” Detection Algorithm
Now, we will run the slow detection algorithm. For that, we will pass the --speed command line argument value as slow
python hog_detector_vid.py --input ../input/video1.mp4 --output ../outputs/video1_slow.mp4 --speed slow
I got an average of 5.4 FPS while running the slow detection code. Let’s see the saved video clip for getting a better look at the predictions.
Maybe we see a lot more predictions in this case. But we cannot say anything for sure due to the speed. Remember that we save also saved each frame of the prediction videos to disk. Maybe analyzing those frames will give us a better idea of whether the slow detection algorithm is really beneficial or not.
Analyzing the “Slow” and “Fast” Algorithm Frames
Let’s analyze the same frame timing photos from both, the fast and the slow algorithm.
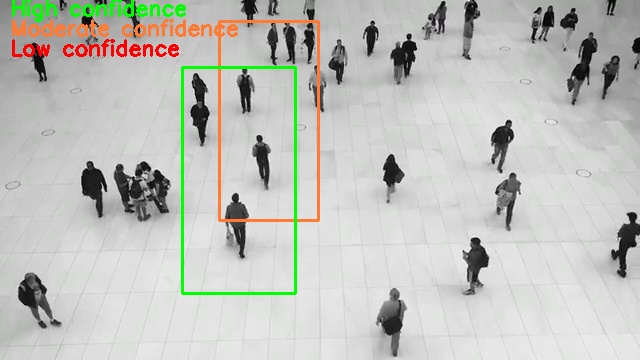
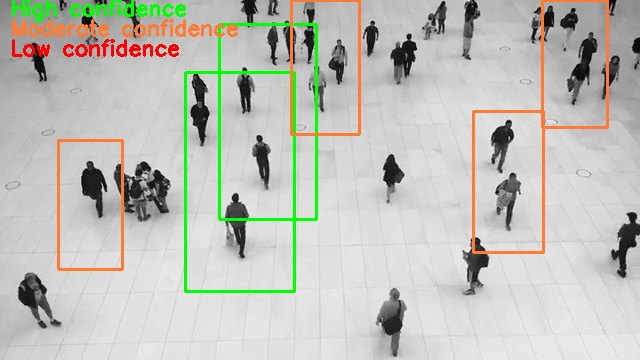
Figure 7 shows frame number 14 from the fast detection algorithm. You can see that there are only two detections in this case. While figure 8, with the slow detection, detects 6 boxes. It looks like, the slow detection algorithm is actually more accurate than the fast detection algorithm. But the computation time is very high as well. There are some obvious drawbacks which we will come to in the next section.
Drawbacks of HOG People Detector
Although we can tune the HOG people detector to detect people with great accuracy in videos there are some obvious drawbacks. The following are some of them.
- HOG people detector cannot detect people who are too close or too far away from the edges of the screen. That is those people who are far away or closer to the camera.
- HOG detector finds it difficult to detect people who are sitting on a bench or chair. Maybe the dataset did not contain those instances.
- Also, there are a lot of false-positive detections in the videos. Maybe tuning the weight range (confidence) will help avoid those cases.
- We can make HOG very accurate to predict people in videos by tuning the hyperparameters. But that makes the HOG detector computationally very expensive.
- Many times the HOG detector detects a group of people as a single detection.
- There is no way to run the HOG detector using Python language on a GPU/CUDA device (graphics card) for faster detection. Although I think that there is a way to run it on CUDA for the C++ code.
The best and most modern solution to the above drawbacks is the use of deep learning and neural networks for object detection. We can run some of them on CUDA devices and get much better accuracy than HOG with almost real-time predictions. These include the SSD (Single Shot Detector) and the YOLO (You Look Only Once) versions of deep learning object detectors. We will be covering deep learning object detection very soon on DebuggerCafe.
Summary and Conclusion
In this tutorial, you learned how to carry out very accurate people detection using the HOG people detector in images. You also learned how to create a fast but fairly accurate and a slow but very accurate algorithm by tuning the HOG hyperparameters. I hope that you learned something new from this tutorial.
If you have any doubts, thoughts, or suggestions, then leave them in the comment section. I will surely address them.
You can contact me using the Contact section. You can also find me on LinkedIn, and X.

Absolutely fantastic tutorials. Food for thought. Can this be taken to another level and can be taken for any other object detection. Please guide. Thank you.
I am really glad that you liked it.
HOG feature descriptors can be trained on new datasets for object detection. For example, you can train them on trees to detect trees, cars to detect cars on the road. But in my opinion, if you want to do large scale and serious object detection, then go with deep learning based object detection. And I will be putting out a tutorial on custom object detection using HOG soon.
Thank you saheb…
Can i get the code for video option?
Hello. All the code is available in the post here. Even for the video one. If it is anything else that you are looking for, can you please elaborate?
Thanks for this wonderful tutorial. I would line to know how parameters tuning of cell size, block size, orientation bin and image size correlate with winStride, padding
and scale used in this tutorial. Also, I would like to know if you have made tutorial on custom object detection using HOG as promised.
Hello Oluwaseyi. In the tutorial, we choose either to fast or slow algorithm based on the command line argument. In the slow setup, we pass an extra winStride argument with (4, 4) stride which is less than the default value and helpful at detecting more people. And as of now, I have not written the custom object detection blog post using HOG. Hopefully, I will be able to do that in the near future.