
TensorFlow, developed by Google Brain is an open source computational library. It is mainly used for large scale machine learning computations like training neural networks. And if you are someone who is currently learning machine learning and wants to get started with TensorFlow, then this post is perfect for you. This is a total beginner’s guide to TensorFlow covering the very basics of it.
Whenever the term TensorFlow flows into a discussion, suddenly the mindset of most people shifts totally towards Machine Learning or more specifically Deep Learning. But in reality, TensorFlow is an open-source software library for numerical computations. And in this post, you will get to know the underlying computational flow of TensorFlow. Also, how to do basic computations.
The Basic Principle
The computations in TensorFlow are done using data flow graphs. You first define a graph in Python for computation. Then TensorFlow will run the graph using C++ codes. But Wait!! What are graphs? Well, in its simplest form, a TensorFlow graph can be something like the following,
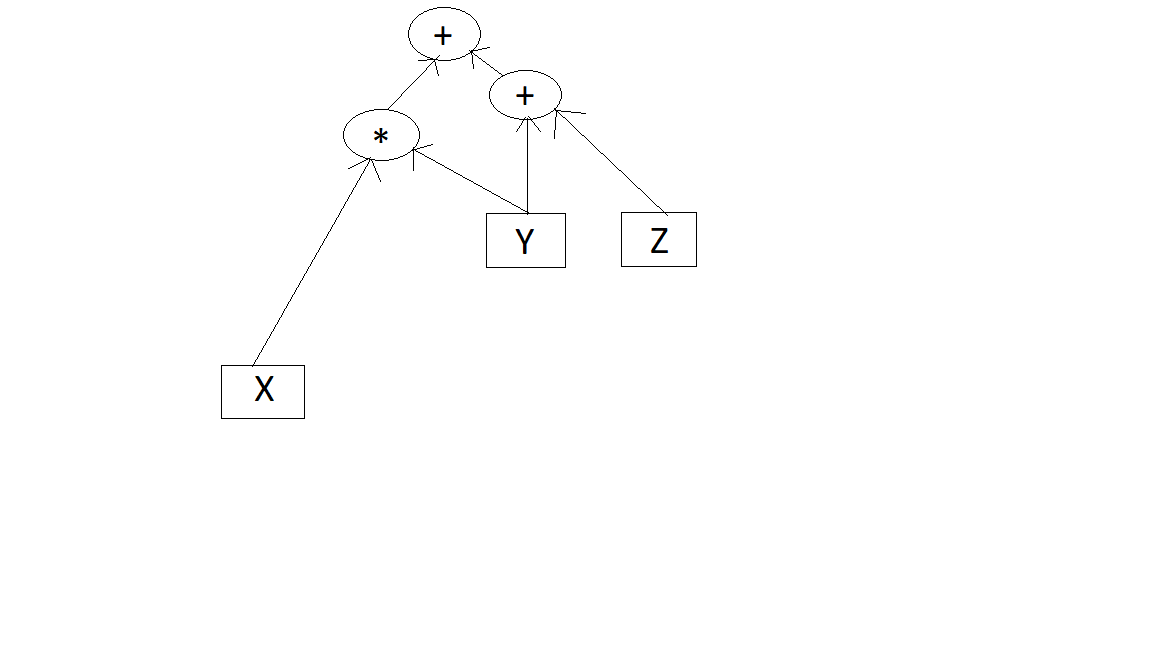
The above diagram may not be something mind-bending, but that is how TensorFlow will compute the function, f(X, Y) = X*Y + Y + Z.
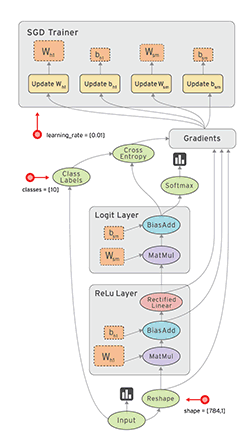
If you really want to get a view of how something actually works under the hood, then the following is from TensorFlow website itself.
Perhaps the best thing about all these is that TensorFlow supports parallel computation. You can break the graph into parts and run them individually on multiple CPUs and GPUs. This can make training a model much faster than the traditional method when using a single CPU or GPU.
Installing TensorFlow
Now you will get to experience the usage of TensorFlow hands on. We will cover the installation of TensorFlow along with simple computations to get you acquainted with the flow of the graphs.
Before getting started, I highly recommend that you check one of my previous articles, Data Science Environment Setup. This will help you install all the required packages and software. Also, I would suggest that you directly work from your Anaconda Terminal, which will make your work much easier.
Okay, now assuming that everything is ready, type the following on your anaconda terminal to activate the virtual environment:
conda activate your_env_name
Next to install TensorFlow on your system:
conda install tensorflow
And if you want to install GPU supported TensorFlow (you should if you really want to see some productive results, but obviously not mandatory), then type the following:
conda install tensorflow-gpu
Installing the GPU version of TensorFlow is not required for most, especially if you are just getting started with Neural Networks. But when you will want to train some complex networks, then the difference between the two versions is observable.
Next, ensure that TensorFlow is installed correctly:
python
After the Python shell gets activated:
>>>import tensorflow as tf
>>>print(tf.__version__)
You should get to see the version that is installed on your computer.
Doing Some Simple Computations
Now it is time to get really practical here. In this section you will be defining variables, creating TensorFlow sessions and evaluating the results. You should start your Jupyter Notebook for this part. If you have not installed it, then you can refer to this article, Data Science Environment Setup.
You can follow along:
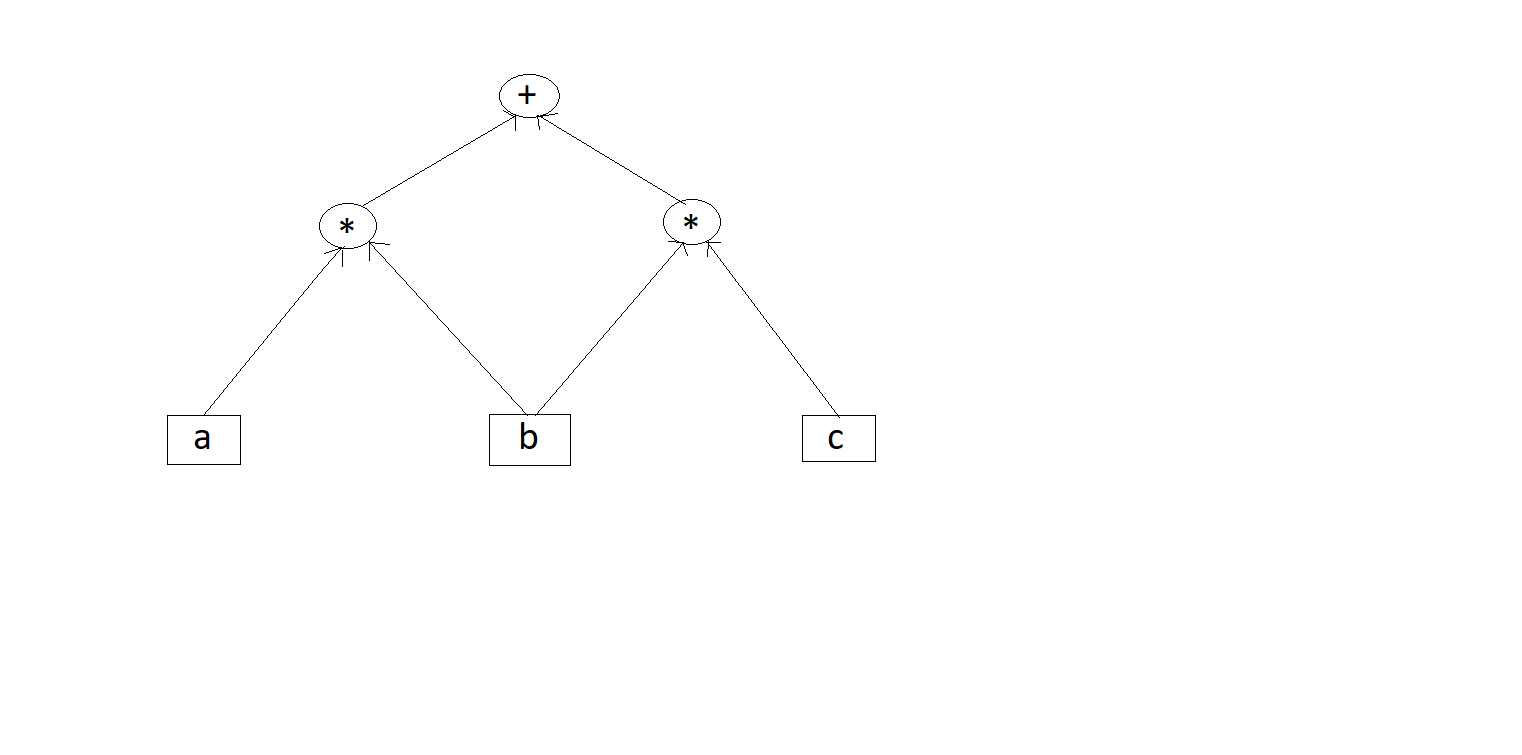
import tensorflow as tf

a = tf.Variable(9, name='a')
b = tf.Variable(3, name='b')
c = tf.Variable(2, name='c')
res = a*b + b*c
So, what does the above code do? The fact is, pretty much nothing. But one important thing to note here is that it creates the following computation graph:
Now you may ask, what next? How to actually compute the above expression? For that, we have to create a new TensorFlow Session. A TensorFlow session will initialize all the variables declared in the program above and res
sess = tf.Session()
sess.run(a.initializer)
sess.run(b.initializer)
sess.run(c.initializer)
result = sess.run(res)
print(result)
sess.close()
When you execute the code, you should be getting 33 as the result. Closing the session is also very important and you have to do it manually.
Actually, you can make the above block of code a bit cleaner by using withglobal_variables_initializer()
init = tf.global_variables_initializer()

with tf.Session() as sess:
    init.run()
    result = res.eval()
    print(result)
You must have observed that we have again called a run() function inside the block. That’s because global_variables_initializer()run()
End Note
That’s it for this post. You have covered the basics of TensorFlow computation. If you want you can always search and do some more from all the resources that are available. Still, I think that the best place to start would be the official TensorFlow website. If you have found any discrepancy either in the concepts or code of this article, please feel free to reach out and let me know. Please share the article and leave a thumbs up as well. And yes, you can follow me on Twitter to get regular updates about new articles.
