
This is going to be a follow-up article to the last one. In this article, we will take an incremental approach and carry out image-to-texture generation for 3D meshes. Generating 3D meshes from images is just the starting point. We can, of course, export such shapes/meshes to the appropriate software (e.g., Blender). However, applying texture on top of the meshes completes the entire pipeline. This is what we are going to cover in its entirety here.
In this last article, we covered image to 3D mesh generation using Hunyuan3D 2.0 model. Taking a step further to add the texture on top of it requires an additional model. That is a 3D inpainting pipeline using the Hunyuan3D 2.0 model. We are still keeping the detection grounding using Qwen3-VL and background removal using BiRefNet for the best results.
We will cover the following in the image-to-texture generation process:
- Setting up the environment for the image-to-texture pipeline, Qwen3-VL, BiRefNet.
- Exploring the directory structure.
- Covering the codebase for image-to-texture generation for 3D meshes.
- Discussing future optimizations.
Note: This is going to be a simple pipeline without any memory optimizations. We are just getting started with getting up and running the entire pipeline. This asks for a hefty VRAM requirement that we will discuss further in the article. In future articles, we will optimize and improve the entire process.
Workflow Pipeline for Image-to-Texture for 3D Meshes
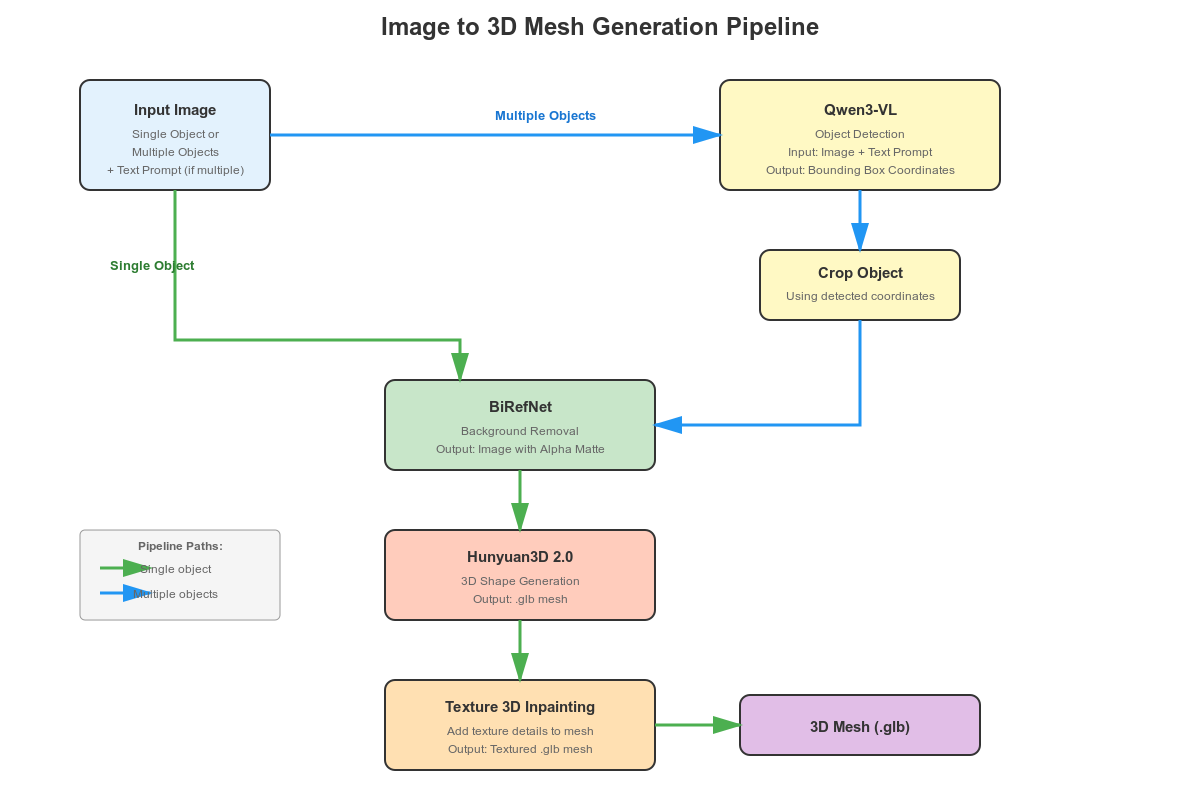
The pipeline will remain similar to the previous image-to-3D mesh generation workflow with one additional component.
- If the user uploads an image with a single object, then we pass it through BiRefNet for background removal. The cleaned image is fed to the Hunyuan3D 2.0 model for mesh generation. This generated 3D mesh, along with the image, goes into the Hunyuan texture generation pipeline for creating the final textured 3D object.
- If users upload an image with multiple objects, we allow them to type the name of the object they want to convert to textured 3D. The original image, along with the prompt, goes into Qwen3-VL for object detection. We crop the detected object and pass it through BiRefNet for background removal, and feed the generated mesh and cropped image to the texture generation pipeline.
The Hunyaun3D texture generation pipeline is the additional component here.
Project Directory Structure
Let’s take a look at the project directory structure before installing the dependencies.
.
├── BiRefNet
│   ├── evaluation
│   ├── models
│   ├── __pycache__
│   ├── tutorials
│   ├── config.py
│   ├── dataset.py
│   ├── eval_existingOnes.py
│   ├── gen_best_ep.py
│   ├── image_proc.py
│   ├── inference.py
│   ├── __init__.py
│   ├── LICENSE
│   ├── loss.py
│   ├── make_a_copy.sh
│   ├── README.md
│   ├── requirements.txt
│   ├── rm_cache.sh
│   ├── sub.sh
│   ├── test.sh
│   ├── train.py
│   ├── train.sh
│   ├── train_test.sh
│   └── utils.py
├── birefnet_weights
│   └── BiRefNet-general-epoch_244.pth
├── build_setup
│   ├── Hunyuan3D-2
│   └── nvdiffrast
├── input
│   ├── image_1.jpg
│   ...
│   └── image_9.jpg
├── outputs
│   └── image_6_mesh_tex.glb
├── hunyuan3d_final_req.txt
├── image_to_texture.py
├── README.md
├── setup.bat
└── setup.sh
- The
BiRefNetis the cloned BiRefNet repository. We will use this to import the utilities for background removal. Thebirefnet_weightsdirectory contains the pretrained weights. - The
build_setupdirectory contains the cloned Hunyaun3D 2.0 directory for installation. We will go through the steps in the next section. - Input images for inference and the resulting 3D textured files are present in the
inputandoutputsdirectores respectively. image_to_texture.pyis the runnable file containing all the code.- Finally,
setup.shis a script file containing most of the installation steps, automating almost 90% of the setup process.
The code file, setup file, and the input images are available for download as a zip file from the downloads section. Please follow the rest of the installation process to run the code locally.
Download Code
Set up and Dependencies
Let’s install the necessary components to run our image-to-texture for 3D meshes pipeline.
We need the following:
- PyTorch as the base framework
- Qwen3-VL for object detection and grounding
- BiRefNet for background removal
- The entire Hunyuan3D stack for 3D mesh and texture generation
However, there is one caveat here. Instead of installing the official Hunyaun3D 2.0 library, we are going with a Hunyaun3D fork by Jonathan Clark. When experimenting with the official repository with Gradio application, I found that after the 3D mesh generation, the pipeline was always stuck at the texture generation process infinitely. Upon examining the issues, I found that there is a deadlock issue with the original code. Jonathan Cark seems to have solved it in his fork while making the pipeline much faster.
Let’s cover the installation steps.
First, create a new environment with Python 3.10. The Python 3.10 is a hard requirement here to install the custom inpainting and rasterizer component.
Second, install PyTorch 2.8 with CUDA. I tested the code with PyTorch 2.8. This will probably also work with any of the latest version.
Third, run setup.sh to install all the requirements.
sh setup.sh
This will create the build_setup directory to clone and install the correct Hunyaun3D repository. It will install the components along with the optimizations for faster 3D inpainting. Furthermore, it will clone the BiRefNet repository and install the requirements as well.
Fourth, run the hunyuan3d_final_req.txt to install the rest of the requirements with pinned versions.
pip install -r hunyuan3d_final_req.txt
In the end, create a birefnet_weights directory in the parent project directory, download the weights, and copy them into the directory.
This concludes all the setup that we need for image-to-texture generation for 3D meshes.
Code Walkthrough for Image-to-Texture Generation for 3D Meshes
Let’s jump into the code without any delay. Most of the code remains similar to what we covered in the image to 3D mesh article. The additional components include the new texture generation model and a few other optimizations from the new Hunyuan3D GitHub code that we are using.
All the code for this resides in the image_to_texture.py file.
Imports, Setting the Computation Device, Seed, and Output Directory
The following code block imports all the necessary modules that we need along the way.
import sys

sys.path.append('BiRefNet')

from image_proc import refine_foreground
from models.birefnet import BiRefNet
from utils import check_state_dict

import torch
import ast
import os
import cv2
import gradio as gr

from transformers import Qwen3VLForConditionalGeneration, AutoProcessor
from hy3dgen.shapegen import (
    Hunyuan3DDiTFlowMatchingPipeline,
    FaceReducer,
    FloaterRemover,
    DegenerateFaceRemover,
    MeshlibCleaner
)
from hy3dgen.texgen import Hunyuan3DPaintPipeline
from PIL import Image
from torchvision import transforms
- We add the cloned
BiRefNetdirectory to the Python path so that we can import the modules that we need. Qwen3VLForConditionalGenerationandAutoProcessorare for loading the Qwen3-VL model and processor, respectively.- For loading the 3D mesh/shape generation, we are importing the
Hunyuan3DDiTFlowMatchingPipelineclass. Along with that, we are also importing a few classes that will be later used for optimizing the generated shape. - The
Hunyuan3DPaintPipelineis for loading the Hunyuan3D texture generation model.
The next code block creates the output directory, sets the computation device, the number of inference steps, and the seed.
device = 'cuda' if torch.cuda.is_available() else 'cpu'

outdir = 'outputs'
os.makedirs(outdir, exist_ok=True)

num_inference_steps = 50
seed = 42
Loading the Models
Let’s load all the models that we need along the way.
# Load Qwen3-VL.
model_id = 'Qwen/Qwen3-VL-2B-Instruct'
qwen_model = Qwen3VLForConditionalGeneration.from_pretrained(
    model_id,
    dtype=torch.bfloat16,
    # attn_implementation='flash_attention_2',
    device_map=device
    # device_map='cpu'
)
qwen_processor = AutoProcessor.from_pretrained(model_id)

# Load the Hunyuan3D model.
pipeline_shape = Hunyuan3DDiTFlowMatchingPipeline.from_pretrained(
    'tencent/Hunyuan3D-2mini',
    subfolder='hunyuan3d-dit-v2-mini',
    use_safetensors=True,
    device='cuda'
)

# Load the Hunyuan3D texture model.
pipeline_texture = Hunyuan3DPaintPipeline.from_pretrained(
    'tencent/Hunyuan3D-2',
    device='cuda',
    # device='cpu'
)

# Load the BiRefNet model.
# model_name = 'BiRefNet_HR'
model_name = 'BiRefNet'
birefnet = BiRefNet(bb_pretrained=False)
state_dict = torch.load(
    'birefnet_weights/BiRefNet-general-epoch_244.pth',
    map_location=device
    # map_location='cpu'
)
state_dict = check_state_dict(state_dict)
birefnet.load_state_dict(state_dict)
# Load Model.
torch.set_float32_matmul_precision(['high', 'highest'][0])
birefnet.to(device)
birefnet.eval()
print('BiRefNet is ready to use.')
birefnet.half()

# BiRefNet image transforms.
transform_image = transforms.Compose([
    transforms.Resize((1024, 1024) if '_HR' not in model_name else (2048, 2048)),
    transforms.ToTensor(),
    transforms.Normalize([0.485, 0.456, 0.406], [0.229, 0.224, 0.225])
])
This time, additionally, we have the texture generation model, pipeline_texture.
Note that in the above code, we load all the models onto the GPU. This demands just above 28GB VRAM. In case you want to run everything under 24GB VRAM, you can load the BiRefNet and Qwen3-VL model onto the CPU. This will save around 6GB of VRAM at the expense of a bit slower object detection and background removal.
Helper Functions
We have a few helper functions that remain entirely similar to the previous article.
The first is for object detection using Qwen3-VL.
def qwen_object_boxes(model, processor, image_path, prompt):
    """Use Qwen3-VL to generate bounding boxes for natural-language prompts."""
    messages = [{
        'role': 'user',
        'content': [
            {'type': 'image', 'image': image_path},
            {'type': 'text', 'text': prompt},
        ],
    }]

    inputs = processor.apply_chat_template(
        messages,
        tokenize=True,
        add_generation_prompt=True,
        return_dict=True,
        return_tensors='pt'
    ).to(model.device)

    generated = model.generate(**inputs, max_new_tokens=4096)
    trimmed = [out[len(inp):] for inp, out in zip(inputs.input_ids, generated)]
    decoded = processor.batch_decode(trimmed, skip_special_tokens=True)[0]

    # Parse Qwen output.
    json_str = decoded[8:-3] if decoded.startswith('```json') else decoded
    detections = ast.literal_eval(json_str)
    return detections
Next, we have a helper function for cropping the detected object.
def crop_dets(image_path, detections):
    """
    Crop the detection area of objects.
    """
    image_bgr = cv2.imread(image_path)
    image_rgb = cv2.cvtColor(image_bgr, cv2.COLOR_BGR2RGB)
    h, w, _ = image_bgr.shape

    print(f"Detections: {detections}")

    # Prepare bboxes in pixel coordinates (xyxy format).
    bboxes = []
    for det in detections:
        box = det['bbox_2d']
        x1 = int(box[0] / 1000 * w)
        y1 = int(box[1] / 1000 * h)
        x2 = int(box[2] / 1000 * w)
        y2 = int(box[3] / 1000 * h)
        bboxes.append([x1, y1, x2, y2])

        crop = image_rgb[y1:y2, x1:x2]

    # Return RGB image.
    return crop[..., ::-1]
The third is for removing the background using BiRefNet.
def remove_bg(image_path):
    """Feed image to BiRefNet for background removal."""
    image = Image.open(image_path)
    input_images = transform_image(image).unsqueeze(0).to(device)
    input_images = input_images.half()
    # Prediction
    with torch.no_grad():
        preds = birefnet(input_images)[-1].sigmoid().cpu()
    pred = preds[0].squeeze()
    pred_pil = transforms.ToPILImage()(pred)
    pred_pil = pred_pil.resize(image.size)
    image_masked = refine_foreground(image, pred_pil)
    image_masked.putalpha(pred_pil)

    return image_masked
The fourth helper function combines everything and runs the image to 3D texture generation pipeline.
def image_to_3d(text, image_path):
    fix_holes = False

    cropped_image = None
    detections = None

    # Detect and crop object(s) if user provides prompt.
    if len(text) > 0:
        prompt = f"Locate every instance that belongs to the following categories: {text}. Report bbox coordinates in JSON format."

        # Qwen3-VL gets boxes.
        detections = qwen_object_boxes(qwen_model, qwen_processor, image_path, prompt)
        print(f"Qwen3-VL detections: {len(detections)} objects")

        cropped_image = crop_dets(image_path, detections)

        cv2.imwrite('cropped_image.png', cropped_image)

        image_masked = remove_bg('cropped_image.png')
        image_masked.save('removed_bg.png')

    if cropped_image is not None: # Feed cropped image if user provides object prompt.
        mesh = pipeline_shape(
            image='removed_bg.png',
            num_inference_steps=num_inference_steps,
            generator=torch.manual_seed(seed)
        )[0]
    # Else pass the original image via BiRefBet,
    else:
        image_masked = remove_bg(image_path)
        image_masked.save('removed_bg.png')
        mesh = pipeline_shape(
            image='removed_bg.png',
            num_inference_steps=num_inference_steps,
            generator=torch.manual_seed(seed)
        )[0]

    mesh = FloaterRemover()(mesh)
    mesh = DegenerateFaceRemover()(mesh)
    if fix_holes:
        mesh = MeshlibCleaner()(mesh)
    mesh = FaceReducer()(mesh)

    mesh_texture = pipeline_texture(mesh, Image.open('removed_bg.png'))

    image_name = image_path.split(os.path.sep)[-1].split('.')[0]
    save_path = os.path.join(outdir, image_name+'_mesh_tex.glb')
    mesh_texture.export(save_path)

    return save_path
The pipeline remains simple.
- If the user passes an image with multiple objects (starting line 155) and a prompt along with that, it passes through Qwen3-VL for object detection. We crop the detected object, remove the background using BiRefNet, and pass it through the 3D mesh generation pipeline (starting line 169).
- If the user does not provide a prompt, we pass the image directly through BiRefNet and carry out the rest of the operations.
In both cases, a bunch of optimizations happen after the 3D mesh generation. These include removing floating shapes, removing malformed triangles, fixing holes (if fix_holes is True), and reducing the number of polygons in the final mesh.
After obtaining the optimized mesh, we pass it through the 3D texture generation pipeline, along with the refined background image.
After saving the final 3D shape with texture, we return the path.
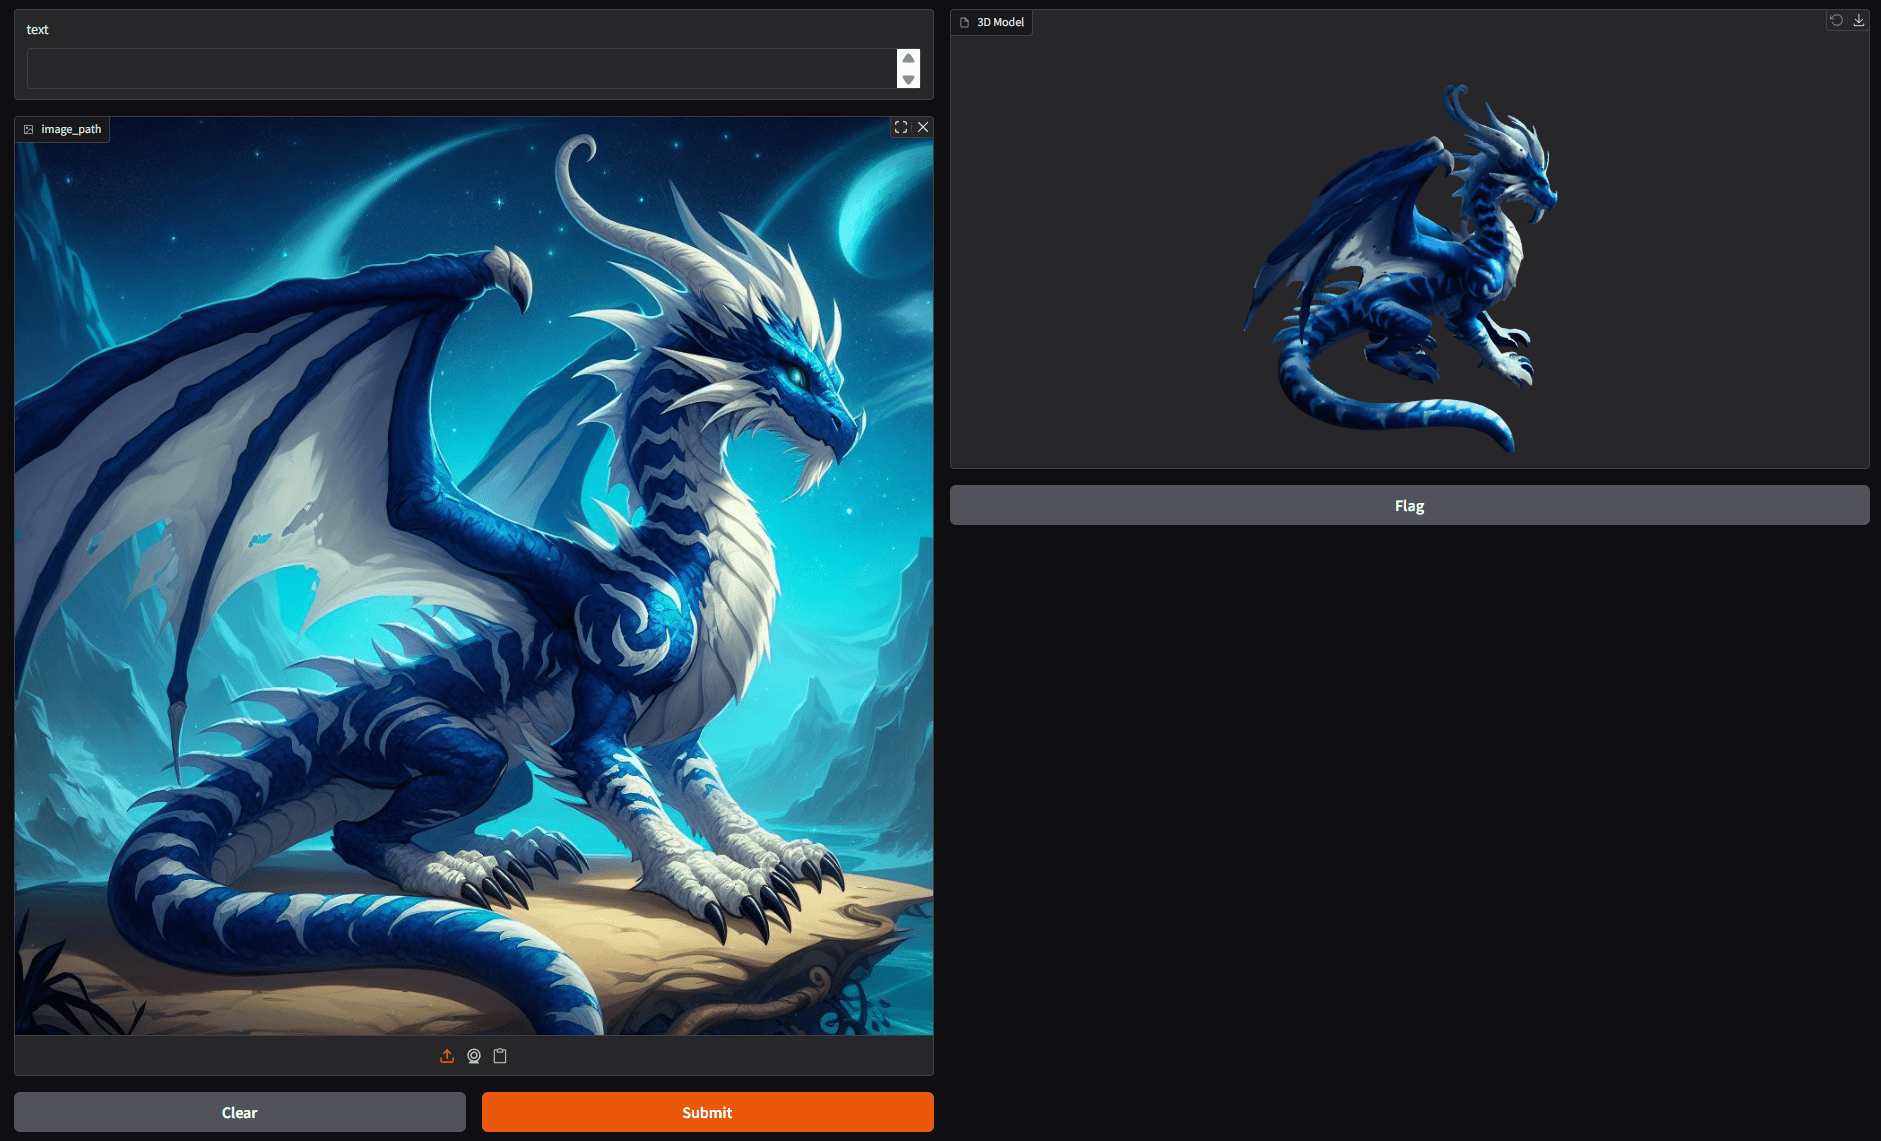
Launching the Gradio Application
Finally, we create the Gradio interface to launch the application.
gr.Interface(
    fn=image_to_3d,
    outputs=gr.Model3D(
        label='3D Model'
    ),
    inputs=[gr.Text(), gr.Image(type='filepath')]
).launch(share=True)
Inference Results
Let’s check some results from our image-to-texture generation pipeline in this section.
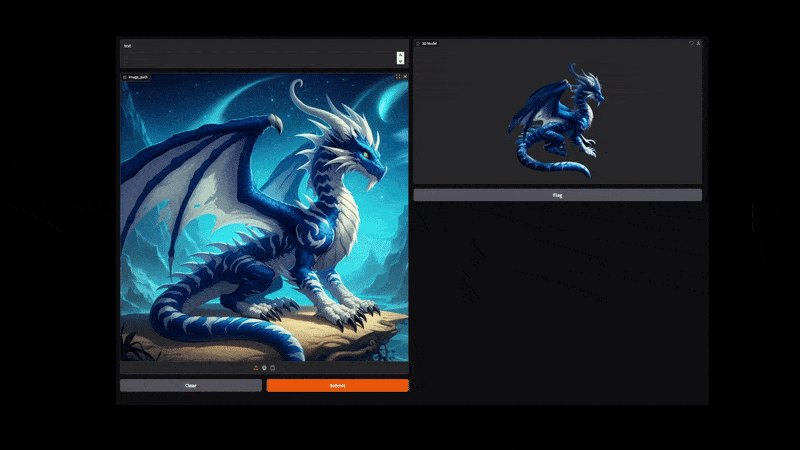
The following video shows the process of converting the image of a dragon to a 3D shape with texture.
It has a lot of minute details and thin lines that our pipeline was able to capture properly.
The next video shows the conversion of a porcelain structure into a 3D shape.
The background removal process is helping create a clean 3D structure with texture. The texture generation pipeline is also capturing the inner details of the porcelain structure impressively well.
The final result shows an image with a cluttered background, where we provide a prompt for the object to generate the 3D textured shape for.
In this one, we ask the Qwen3-VL model to detect the cupcake at the centre. Next, the pipeline generates the 3D shape for that object only.
You can play around with your images and see how the pipeline performs.
Further Improvements
Right now, our pipeline is quite straightforward, and we can carry out a lot of improvements going forward.
- The VRAM usage is very high at the moment. The next step should be to decrease the VRAM footprint.
- When there are multiple objects in an image, there should be an option to generate a 3D textured shape for multiple objects. That would enhance the productivity to a great extent.
We will try to tackle these issues in one of our future articles.
Summary and Conclusion
In this article, we carried out an incremental approach on top of 3D shape generation. We covered image-to-texture generation for 3D meshes and shapes. Starting from the setup, the code explanation, to the inference experiments, we covered a lot of ground. We also discussed some potential improvements that we can carry out in the future.
If you have any questions, thoughts, or suggestions, please leave them in the comment section. I will surely address them.
You can contact me using the Contact section. You can also find me on LinkedIn, and X.

Great tutorial on image-to-texture generation for 3D meshes! The combination of Hunyuan3D 2.0 with Qwen3-VL and BiRefNet creates a powerful pipeline. For those interested in a simpler approach to convert images directly to printable 3D files without the heavy VRAM requirements, ImageToSTL (https://imagetostl.io) offers an AI-powered solution that works in the browser. Thanks for sharing this detailed technical breakdown!
Thanks.
The image-to-texture pipeline you described is exactly what I’ve been looking for — especially the part about seamless UV mapping. I usually preprocess my source images using Photoshop AI tools to enhance detail before generating textures, which gives noticeably better results.