

In the last three articles, we covered the basics of building an image-to-3D codebase. Starting from image-to-3D meshes, followed by inpainting and texturing, to optimizing the pipeline, we covered a lot. This article goes back to the basics. Here, will cover two important aspects. The first is the Hunyuan3D 2.0 paper explanation, and the second will cover the creation of a Docker image that can be used as a Runpod template for even smoother execution.

In the last article, we noted that setting up the full image-to-3D pipeline for 3D mesh and texturing can be time-consuming. Furthermore, the requirement of 20GB VRAM makes it difficult to run it locally on many consumer GPUs. So, a containerized solution for Runpod is a natural extension.
We will cover the following points in particular for the Hunyuan3D 2.0 paper explanation and creating the Runpod Docker image:
- What was the motivation behind Hunyuan3D 2.0?
- What is Hunyuan3D’s architecture?
- How does it perform against other models?
- How do we create a Docker Image that can be used as a Runpod template?
Hunyuan3D 2.0 – Paper Explanation
The Hunyuan3D 2.0 model was introduced by researchers from Tencent in the technical report – Hunyuan3D 2.0: Scaling Diffusion Models for High Resolution Textured 3D Assets Generation.
They aptly describe it as a large-scale image-to-textured 3D asset creation system.
The Hunyuan3D 2.0 includes three primary contributions:
- Hunyaun3D-DiT – a large-scale shape generation model
- Hunyuan3D-Paint – a large-scale texture synthesis model
- Hunyuan3D-Studio – a production platform for the creation of 3D assets
Motivation Behind Hunyuan3D 2.0
The Hunyuan3D 2.0 team recognizes that creating 3D assets is difficult and time-consuming. Yet, they are an essential part of gaming, animation, movies, and other sections of the entertainment industry. Additionally, open source image-to-textured 3D assets generation technology can have a massive positive impact on the education industry as well.
However, a single open-source ecosystem does not exist that can take care of the entire workflow – i.e., starting from an image, creating the 3D mesh, and texturing the 3D mesh to obtain the final 3D asset. The manual process is time-consuming. It requires sketching, digital modeling, 3D texture mapping, and expertise in content creation software.
This leads to a simple yet ambitious motivation behind Hunyuan3D 2.0 – creating a large image-to-3D assets ecosystem, similar to what we have today for text-to-image, embodied by Stable Diffusion.

The Architecture of Hunyuan3D 2.0
The Hunyuan3D 2.0 model/pipeline follows a two-stage architecture.
Stage 1 – Shape Generation
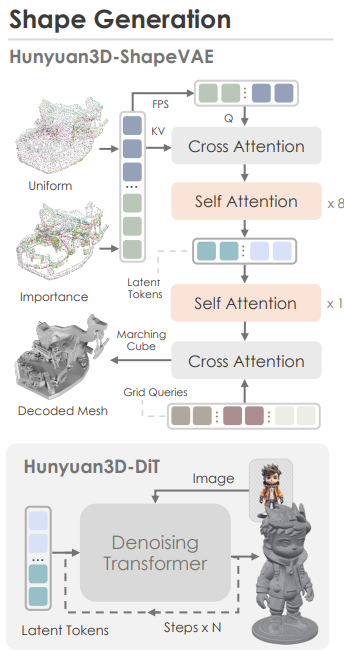
This stage consists of two models. The ShapeVAE model and a Hunyuan3D-DiT model. Combined, they form an image-to-3D mesh generation pipeline.
The shape generation pipeline consists of the following steps:
- The Hunyuan3D-Shape VAE compresses the shape of a 3D asset polygon mesh into latent tokens.
- Then the Hunyuan3D-DiT model is trained on these latent tokens from the ShapeVAE to predict object token sequences. The model also takes in the user-input image simultaneously, which helps it to predict accurate object token sequences.
- These predicted tokens go into a VAE decoder to obtain the final 3D polygon mesh.
The following is the overall architecture of the Hunyuan3D-ShapeVAE.
Here are some of the architectural decisions of the above:
- Input: mesh => point samples + normals
- Output: latent token sequence
- Core ideas:
- importance sampling on edges & corners
- variational token length
- SDF (Signed Distance Function) reconstruction using marching cubes
The following diagram shows the overall architecture of the Hunyuan3D-DiT model.

It follows the workflow below:
- Predicts object token sequences from the input image and latent tokens from the ShapeVAE.
- It uses:
- Dual stream and single stream transformer architecture
- DINOv2 Giant as the image encoder
- Background removal for the input image
- Flow matching objective for training
Stage 2 – Texturing (Inpainting)
The second stage involves generating a texture map from the above 3D mesh and an input image. The Hunyuan3D-Paint model achieves this.
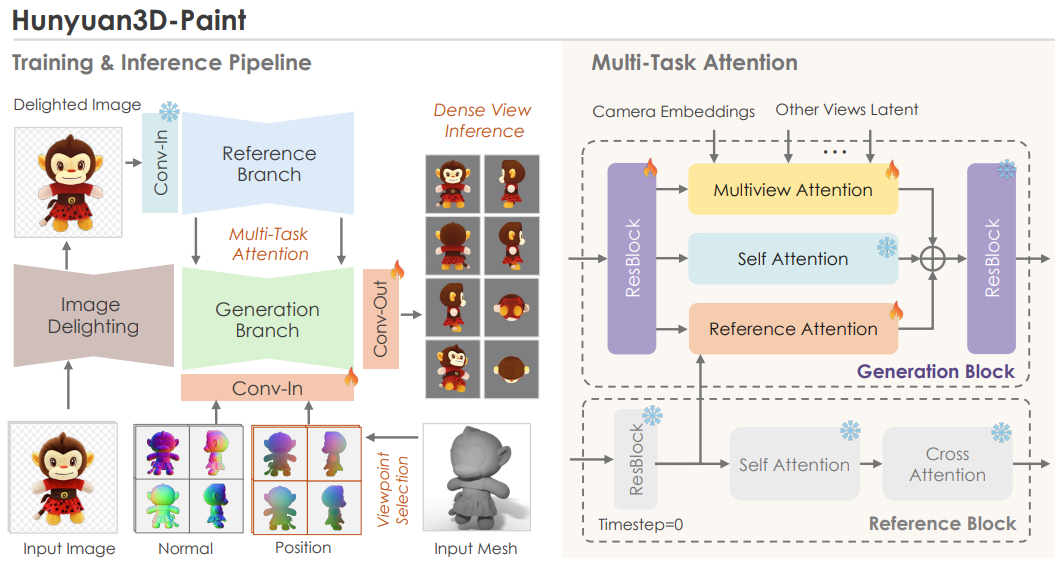
As we can see in the above figure, the inpainting stage consists of three sub-stages:
- Preprocessing: This begins with image delighting that removes lighting and shadows from the image for more consistent visuals. Next, a view selection strategy. The aim here is to select the minimum number of viewpoints needed to cover the largest possible area of the UV map. However, one question arises here: “Where do we get multiple views from?“
- Multiview generation via double-stream image conditioning reference net: This is one of the most important components in Hunyuan3D’s texture pipeline. The goal is to generate multiple views of the object that remain consistent with the input image while still respecting the underlying 3D geometry. The double-stream reference-net ensures that high-frequency details from the original image are preserved across all generated viewpoints. These multi-view images are then used for texture baking, allowing the model to accurately cover the entire 3D mesh with a coherent and detail-rich texture.
- Texture baking: The final step is texture baking on the 3D mesh. For this, all the multi-view images are unwrapped into a texture map. Any missing regions are inpainted, producing a high-resolution texture map that fully covers the 3D model.
How Does Hunyuan3D 2.0 Perform Against Other Models?
The authors perform benchmarks for the following:
- 3D Shape Generation
- Texture Map Synthesis
- Textured 3D Asset Generation
Here, we will cover the evaluations and results at a high level. It is highly recommended to go through the technical report’s section 5 to know about the results in detail.
3D Shape Generation Evaluation
This is basically evaluating the Hunyuan3D-ShapeVAE for 3D reconstruction and Hunyuan3D-DiT for image to 3D mesh generation. Here are the visual results from the technical report.
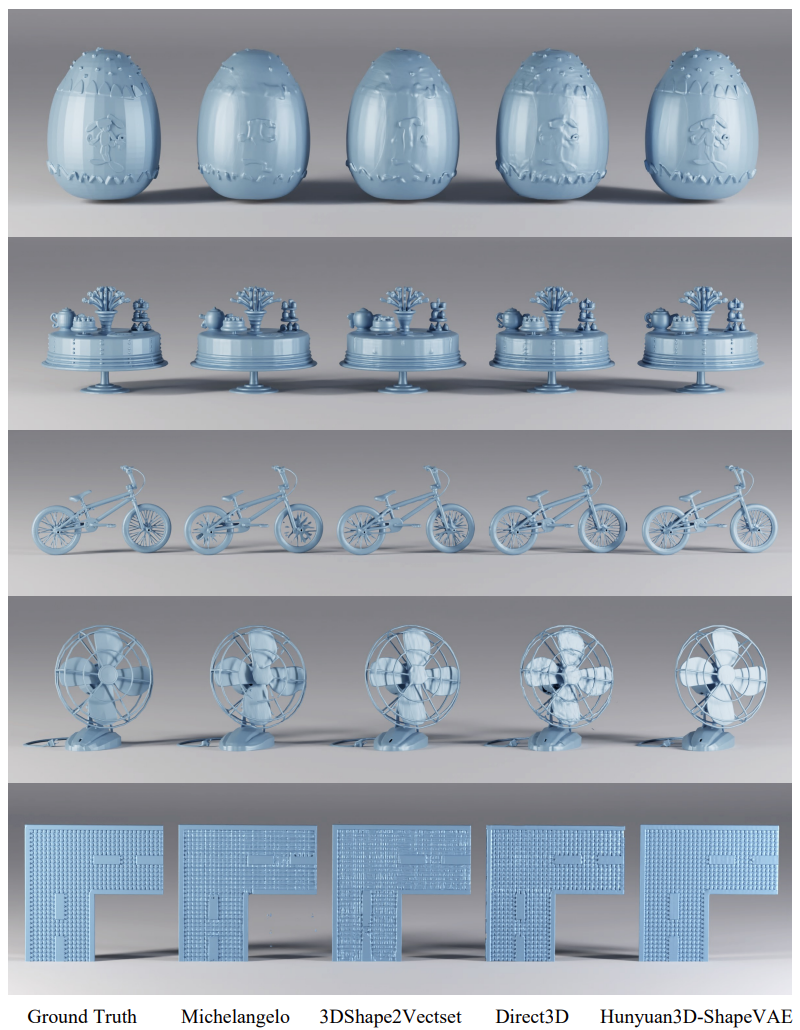
We can see that the Hunyuan3D-ShapeVAE reconstructs the 3D mesh with more fine-grained details compared to the other methods.
The following figure shows the benchmarks of Hunyuan3D-DiT for image-to-3D mesh construction along with visual results.

Texture Map Synthesis Evaluation
Here, the texture map synthesis is evaluated (not the end-to-end image-to-3D texture asset).
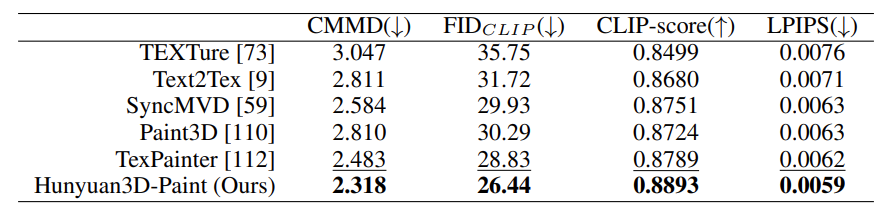
As we can see, the texture synthesis pipeline of Hunyuan3D-Paint beats all other models.
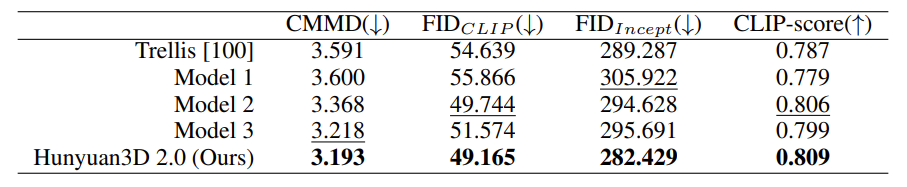
Textured 3D Assets Generation
This evaluation covers the end-to-end workflow, from an input image to generating a textured 3D asset.

The above figure shows that the Hunyuan3D-Paint pipeline produces the highest quality 3D assets conforming to the text.
Here are the numerical comparisons.
The technical report covers many other aspects of the entire pipeline in extreme detail. Going through it would be helpful in understanding those concepts.
Building a Docker Image for Runpod Template
Going further, we will jump into the practical aspect of creating a Runpod Docker image and publishing it as a template.
The codebase is part of the image_to_3d GitHub repository. It contains the instructions to set it up locally, and also a link to the public Runpod Docker template that can be directly used to spin up an instance.
However, here, we will go through the code in the Dockerfile as well.
Code Directory Structure
Here is how the directory structure looks after cloning the repository.
└── image_to_3d
    ├── birefnet_weights
    │   └── BiRefNet-general-epoch_244.pth
    ├── Dockerfile
    ├── hunyuan3d_final_req.txt
    ├── image_to_texture.py
    ├── input
    │   ├── image_1.jpg
    │   ...
    │   └── image_7.jpg
    ├── LICENSE
    ├── NOTES.md
    ├── README.md
    ├── run.sh
    └── setup.sh
- One additional folder in the above tree structure is the
birefnet_weights. It has to contain the BiRefNet weights, which will be part of the Docker image. - Other than that, we will mostly focus on the contents of the
Dockerfile.
Download Code
You can either clone the latest GitHub repository or download the stable zip file version provided with this article (downloading the stable version is recommended).
git clone https://github.com/sovit-123/image_to_3d.git
Or:
If you wish to build the Dockerfile locally, create the birefnet_weights directory, download the weights, and put the weights in the directory after cloning/downloading the codebase.
Creating the Runpod Dockerfile for Image-to-3D
The following is the entire content of the Dockerfile.
FROM runpod/pytorch:2.1.0-py3.10-cuda11.8.0-devel-ubuntu22.04

# Set environment variables
ENV PYTHONUNBUFFERED=1

WORKDIR /workspace

# Copy your files
COPY setup.sh /workspace/setup.sh
COPY image_to_texture.py /workspace/image_to_texture.py
COPY hunyuan3d_final_req.txt /workspace/hunyuan3d_final_req.txt
COPY birefnet_weights /workspace/birefnet_weights
COPY run.sh /workspace/run.sh

RUN chmod +x /workspace/setup.sh

# Create the HF cache directory
RUN mkdir -p /workspace/huggingface

# Create venv, install PyTorch 2.7.1
RUN python3.10 -m venv /workspace/venv && \
    /bin/bash -c "export HF_HOME=/workspace/huggingface && \
    export TRANSFORMERS_CACHE=/workspace/huggingface/transformers && \
    export HF_DATASETS_CACHE=/workspace/huggingface/datasets && \
    source /workspace/venv/bin/activate && \
    pip install --no-cache-dir torch==2.7.1 torchvision==0.22.1 torchaudio==2.7.1 --index-url https://download.pytorch.org/whl/cu118"

# Set environment variables for runtime
ENV HF_HOME=/workspace/huggingface
ENV TRANSFORMERS_CACHE=/workspace/huggingface/transformers
ENV HF_DATASETS_CACHE=/workspace/huggingface/datasets

# Also add them to venv activation script so they're always set
RUN echo 'export HF_HOME=/workspace/huggingface' >> /workspace/venv/bin/activate && \
    echo 'export TRANSFORMERS_CACHE=/workspace/huggingface/transformers' >> /workspace/venv/bin/activate && \
    echo 'export HF_DATASETS_CACHE=/workspace/huggingface/datasets' >> /workspace/venv/bin/activate
We start with a Runpod base image that has PyTorch 2.1.0 with Python 3.10 and CUDA 11.8. The primary reason for this is the availability of Python 3.10, which is a hard requirement to set up everything correctly. Furthermore, the base image already handles exposing certain TCP and HTTP ports which help with running Jupyter Lab and SSH commands.
Then we copy all the necessary files and folders that are going to be part of the image. These include:
- The setup file,
setup.sh - The
image_to_texture.pyfile, which is the primary executable file hunyuan3d_final_req.txtwhich contains certain pinned requirements that are necessary- The entirety of
birefnet_weightsdirectory - And the
run.shfile, which we will execute after launching a Runpod pod
We ensure that all the Hugging Face models are downloaded to the /workspace/huggingface directory so that they do not get deleted when we exit the pod.
Furthermore, we create a new environment, make the current directory as HF_HOME for model download and install PyTorch 2.7.1 with CUDA 11.8.
If you wish you can build the Docker image on your own, publish it, and add it as a template to Runpod. However, it might take a long time to build as the entire image will be more than 10GB.
In case you do not want to do so, I have already created a public template on Runpod that we will launch in the next section.
Launching the Runpod Template for Image-to-3D
You can click here to directly use the Runpod template.
Next, choose a GPU with 24GB VRAM. Community clouds are cheaper, and you can choose an RTX 4090 to launch the pod.
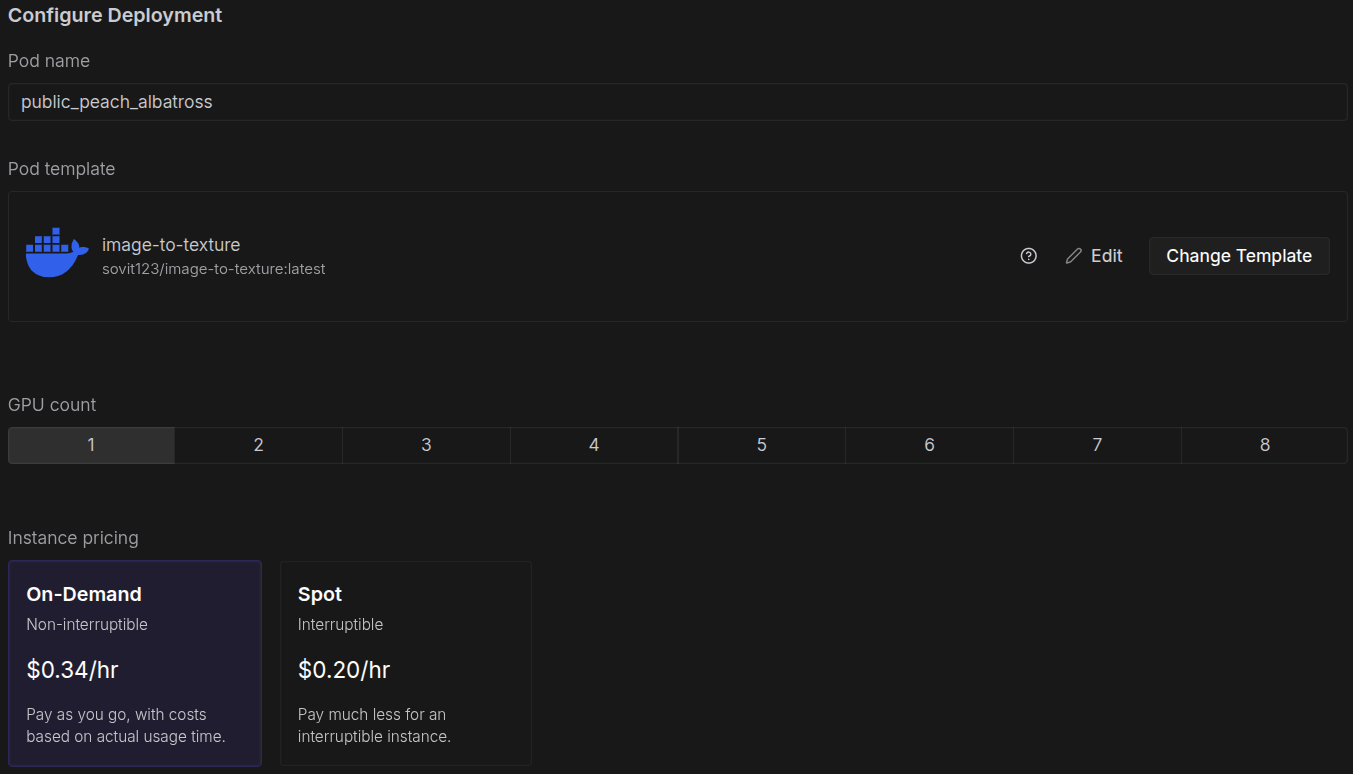
No configuration is necessary here; we can directly launch the pod. After the pod setup is complete, you should see a Jupyter Lab link at port 8888. You can click that, open a terminal, activate the virtual environment, and run the startup file.

source venv/bin/activate
sh run.sh
You can SSH into the system if you are comfortable with a terminal-based system.
After the rest of the setup is complete, you should see a public Gradio link at the bottom of the terminal. Clicking that will launch the image-to-3D UI.
You can upload your images and start playing around. If you with to know how the entire pipeline works, visit the image-to-3D with texture and optimizations article.
Summary and Conclusion
In this article, we covered two important aspects of the Hunyuan3D 2.0 model and pipeline. The first is the discussion of the technical report, and the second is creating a Runpod Docker Image for seamless execution on cloud GPUs. Going forward, we will take this project even further.
If you have any questions, thoughts, or suggestions, please leave them in the comment section. I will surely address them.
You can contact me using the Contact section. You can also find me on LinkedIn, and X.
