

In this article, we will combine the object detection of Qwen3-VL with the segmentation capability of SAM2. Qwen3-VL excels in some of the most complex computer vision tasks, such as object detection. And SAM2 is good at segmenting a wide variety of objects. The experiments in this article will allow us to explore the grounding of Qwen3-VL detection with SAM2.
The process will allow us to detect and segment objects with natural language in images and videos. Furthermore, we can explore to what extent we can push the natural language detection and segmentation using Qwen3-VL and SAM2 when the complexities of the images increase.
In short, we are creating an automated detection and segmentation pipeline using Qwen3-VL and SAM2 with natural language prompts.
What are we going to explore in this article:
- Setting up the system for Qwen3-VL and SAM2 grounding detection and segmentation.
- Exploring the directory structure of the project.
- Running experiments on various images.
Setting Up the System for Qwen-3 VL Grounding for SAM2
Primarily, we need three components:
- SAM2
- PyTorch
- Latest version of Transformers for using Qwen3-VL model
Installing PyTorch
We are installing the latest version of PyTorch at the time of writing the article.
pip3 install torch torchvision --index-url https://download.pytorch.org/whl/cu126
Installing SAM2
Clone the SAM2 repository and enter the directory.
git clone https://github.com/facebookresearch/sam2.git

cd sam2
Install the library from source.
pip install -e .
Install Transformers
We are installing Transformers version 4.57.1, which is the latest version at the time of writing.
pip install transformers==4.57.1
Directory Structure
Let’s take a look at the complete directory structure for the project.
├── checkpoints
│   ├── sam2.1_hiera_base_plus.pt
│   ├── sam2.1_hiera_large.pt
│   └── sam2.1_hiera_tiny.pt
├── input
│   ├── image_1.jpg
│   ├── image_2.jpg
│   └── image_3.jpg
├── outputs
│   ├── image_1.jpg
│   ├── image_2.jpg
│   └── image_3.jpg
└── qwen3_vl_sam2.py
- The
qwen3_vl_sam2.pyis the primary code file containing the executable code. - The
checkpointsdirectory contains the SAM2.1 checkpoints. - Finally, the
inputandoutputsdirectories contain the images that we will use for experiments and the corresponding output images.
All input data and the executable script are available for download in the download section.
Download Code
Downloading the SAM2 Checkpoints
You will need to download the SAM2.1 checkpoints from the official repository to run the script. After downloading, place them in the checkpoints directory.
Code Explanation for Grounding Qwen3-VL Detection with SAM2
Now, let’s dive into the code and understand how we are combining Qwen3-VL’s detection capabilities with SAM2’s segmentation power.
If you wish to know more about the capabilities of Qwen3-VL, you will surely find these two articles helpful:
- Image to HTML using Qwen3-VL
- Fine-tuning Qwen3-VL for better image to HTML code performance
All the code is present in qwen3_vl_sam2.py file.
Imports and Argument Parsing
We start by importing all the necessary libraries.
import torch
import ast
import os
import cv2
import argparse
import numpy as np
import matplotlib.pyplot as plt

from transformers import Qwen3VLForConditionalGeneration, AutoProcessor
from sam2.build_sam import build_sam2
from sam2.sam2_image_predictor import SAM2ImagePredictor
Qwen3VLForConditionalGenerationandAutoProcessorfor loading the Qwen3-VL model and its processor.build_sam2andSAM2ImagePredictorfrom the SAM2 library for segmentation.- Other necessary libraries like OpenCV, NumPy, and Matplotlib.
parser = argparse.ArgumentParser()
parser.add_argument('--input', required=True)
parser.add_argument('--object', required=True)
parser.add_argument(
    '--sam2-checkpoint',
    default='checkpoints/sam2.1_hiera_base_plus.pt',
    help='Path to SAM2 checkpoint'
)
parser.add_argument(
    '--sam2-config',
    default='configs/sam2.1/sam2.1_hiera_b+.yaml',
    help='Path to SAM2 config file'
)
args = parser.parse_args()
We have four command line arguments here:
--input: Accepts the path to the input image.--object: This is the object that we want to detect and segment. It can be a single object or multiple objects separated by a comma (e.g., “dog” or “dog, cat”).--sam2-checkpoint: The path to the SAM2 checkpoint.--sam2-config: The SAM2 config file path corresponding to the checkpoint. We need not provide the absolute path. As we have already installed the SAM2 library, we just need the provide the path asconfigs/sam2.1/sam2.1_hiera_t.yamlwhich is part of the SAM2 repository.
Loading the Models
The next code block loads the Qwen3-VL and the SAM2 models.
device = 'cuda' if torch.cuda.is_available() else 'cpu'
out_dir = 'outputs'
os.makedirs(out_dir, exist_ok=True)

# Load Qwen3-VL.
model_id = 'Qwen/Qwen3-VL-4B-Instruct'
model = Qwen3VLForConditionalGeneration.from_pretrained(
    model_id,
    dtype=torch.bfloat16,
    attn_implementation='flash_attention_2',
    device_map='auto',
)
processor = AutoProcessor.from_pretrained(model_id)

# Load official SAM2 model.
sam2_model = build_sam2(args.sam2_config, args.sam2_checkpoint, device=device)
sam2_predictor = SAM2ImagePredictor(sam2_model)
We are using the 4B Qwen3-VL model here. It can easily run with even an 8GB VRAM GPU. For the SAM2 model, we have the option to choose it via the command line.
Qwen3-VL Object Detection Function
The following is the primary function for object detection using Qwen3-VL.
def qwen_object_boxes(model, processor, image_path, prompt):
    """Use Qwen3-VL to generate bounding boxes for natural-language prompts."""
    messages = [{
        'role': 'user',
        'content': [
            {'type': 'image', 'image': image_path},
            {'type': 'text', 'text': prompt},
        ],
    }]

    inputs = processor.apply_chat_template(
        messages,
        tokenize=True,
        add_generation_prompt=True,
        return_dict=True,
        return_tensors='pt'
    ).to(model.device)

    generated = model.generate(**inputs, max_new_tokens=4096)
    trimmed = [out[len(inp):] for inp, out in zip(inputs.input_ids, generated)]
    decoded = processor.batch_decode(trimmed, skip_special_tokens=True)[0]

    # Parse Qwen output.
    json_str = decoded[8:-3] if decoded.startswith('```json') else decoded
    detections = ast.literal_eval(json_str)
    return detections
Here’s what happens:
- We create a message in chat format containing both the image and our natural language prompt asking for object detection.
- The processor applies the chat template and tokenizes the input for the model.
- Qwen3-VL generates bounding box predictions in JSON format for the requested objects.
- We parse the JSON output to extract the detection results, which include bounding box coordinates and labels.
SAM2 Segmentation Function
The next function accepts the image path, the detections from Qwen3-VL and segments the objects based on the bounding boxes.
def qwen_sam2_segmentation(image_path, detections, alpha=1.0):
    """Feed Qwen's boxes into official SAM2 for segmentation."""
    image_bgr = cv2.imread(image_path)
    image_rgb = cv2.cvtColor(image_bgr, cv2.COLOR_BGR2RGB)
    h, w, _ = image_bgr.shape

    print(f"Detections: {detections}")

    # Set image for SAM2 predictor.
    sam2_predictor.set_image(image_rgb)

    # Prepare bboxes in pixel coordinates (xyxy format).
    bboxes = []
    for det in detections:
        box = det['bbox_2d']
        x1 = int(box[0] / 1000 * w)
        y1 = int(box[1] / 1000 * h)
        x2 = int(box[2] / 1000 * w)
        y2 = int(box[3] / 1000 * h)
        bboxes.append([x1, y1, x2, y2])

    # Convert to numpy array.
    bboxes_np = np.array(bboxes)

    # Run SAM2 prediction with bounding box prompts.
    masks, scores, logits = sam2_predictor.predict(
        point_coords=None,
        point_labels=None,
        box=bboxes_np,
        multimask_output=False,
    )

    print(f"Generated {len(masks)} masks with shape {masks.shape}")

    # Visualize results.
    overlay = image_bgr.copy()
    annotated = image_bgr.copy()

    # Generate random color.
    color = np.random.randint(0, 255, size=(len(detections), 3,), dtype=np.uint8).tolist()

    for i in range(len(bboxes)):
        # Get the mask and convert to boolean.
        if masks.ndim == 3:
            # Shape is (num_masks, H, W). When a single object is segmented.
            binary_mask = masks[i].astype(bool)
        elif masks.ndim == 4:
            # Shape is (num_masks, 1, H, W). When multiple objects are segmented.
            binary_mask = masks[i, 0].astype(bool)
        else:
            binary_mask = masks.astype(bool)

        # Apply mask overlay.
        overlay[binary_mask] = (overlay[binary_mask] * (1 - alpha) +
                                np.array(color[i]) * alpha).astype(np.uint8)

    # Blend annotated image with overlay.
    blended = cv2.addWeighted(annotated, 0.5, overlay, 0.5, 0)

    for i in range(len(bboxes)):
        # Draw bounding box.
        x1, y1, x2, y2 = bboxes[i]
        cv2.rectangle(
            blended,
            (x1, y1),
            (x2, y2),
            color[i],
            2,
            cv2.LINE_AA
        )

        # Add label.
        label = detections[i]['label']
        cv2.putText(
            blended,
            label,
            (x1, max(y1 - 10, 0)),
            cv2.FONT_HERSHEY_SIMPLEX,
            0.7,
            color[i],
            2,
            cv2.LINE_AA
        )

    return blended
First, we load the image and prepare it for processing. We convert from BGR to RGB format since SAM2 expects RGB images. Then we set the image in the SAM2 predictor.
Qwen3-VL returns bounding boxes in normalized coordinates (0-1000 range). We convert these to pixel coordinates by scaling them according to the image dimensions. The bounding boxes are in xyxy format, which SAM2 expects.
We feed the bounding boxes from Qwen3-VL into SAM2 as prompts. SAM2 uses these boxes to generate precise segmentation masks for each detected object. We set multimask_output=False to get a single mask per object.
For visualization, we create colored overlays for each segmentation mask. Each object gets a random color, and we blend the mask with the original image using the alpha parameter.
Finally, we draw bounding boxes and labels on the annotated image.
The Main Execution
The main execution and a visualization of the result put everything together.
def show(image_bgr):
    plt.figure(figsize=(12, 8))
    plt.imshow(cv2.cvtColor(image_bgr, cv2.COLOR_BGR2RGB))
    plt.axis('off')
    plt.tight_layout()
    plt.show()

# Main execution.
image_path = args.input
prompt = f"Locate every instance that belongs to the following categories: {args.object}. Report bbox coordinates in JSON format."

# Qwen3-VL gets boxes.
detections = qwen_object_boxes(model, processor, image_path, prompt)
print(f"Qwen3-VL detections: {len(detections)} objects")

# SAM2 refines with segmentation.
result_img = qwen_sam2_segmentation(image_path, detections)
show(result_img)

# Save.
image_name = image_path.split(os.path.sep)[-1]
out_dir = 'outputs'
os.makedirs(out_dir, exist_ok=True)
num_exps = len(os.listdir(out_dir))
exp_dir = os.path.join(out_dir, f"exp_{str(num_exps+1)}")
os.makedirs(exp_dir)
out_file = os.path.join(exp_dir, image_name)
cv2.imwrite(out_file, result_img)
# Save file with prompt.
with open(os.path.join(exp_dir, 'prompt.txt'), 'w') as f:
    f.writelines(args.object)
print(f"Saved segmentation result to {out_file}")
We create a natural language prompt asking Qwen3-VL to locate objects in the specified categories. Qwen3-VL detects the objects and returns bounding boxes. SAM2 uses these boxes to generate precise segmentation masks. We visualize and save the final result.
Inference Experiments
Let’s carry out some inference experiments for grounding Qwen3-VL detection with SAM2.
By default, the SAM2 Base Plus model is used, and we will stick to that. The largest model will consume more VRAM, and along with the Qwen3-VL model, there are chances of OOM error with less than 12GB VRAM.
All the following experiments were run on a system with an RTX 3080 10GB GPU.
Starting with an extremely simple example.
python qwen3_vl_sam2.py --object "cat" --input input/image_1.jpg
Here we are detecting and segmenting cats in an image.
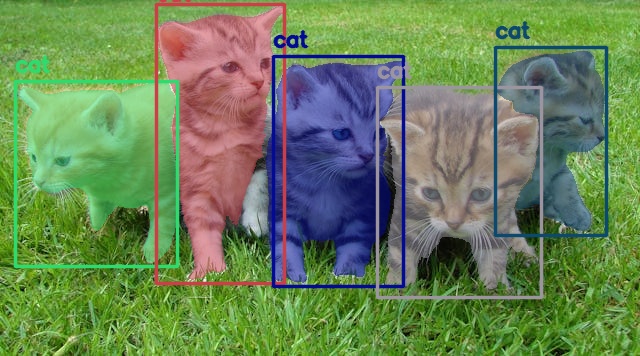
It was a simple use case, and both models performed well here.
Let’s check how well our pipeline works for smaller objects.
python qwen3_vl_sam2.py --object "person" --input input/image_2.jpg
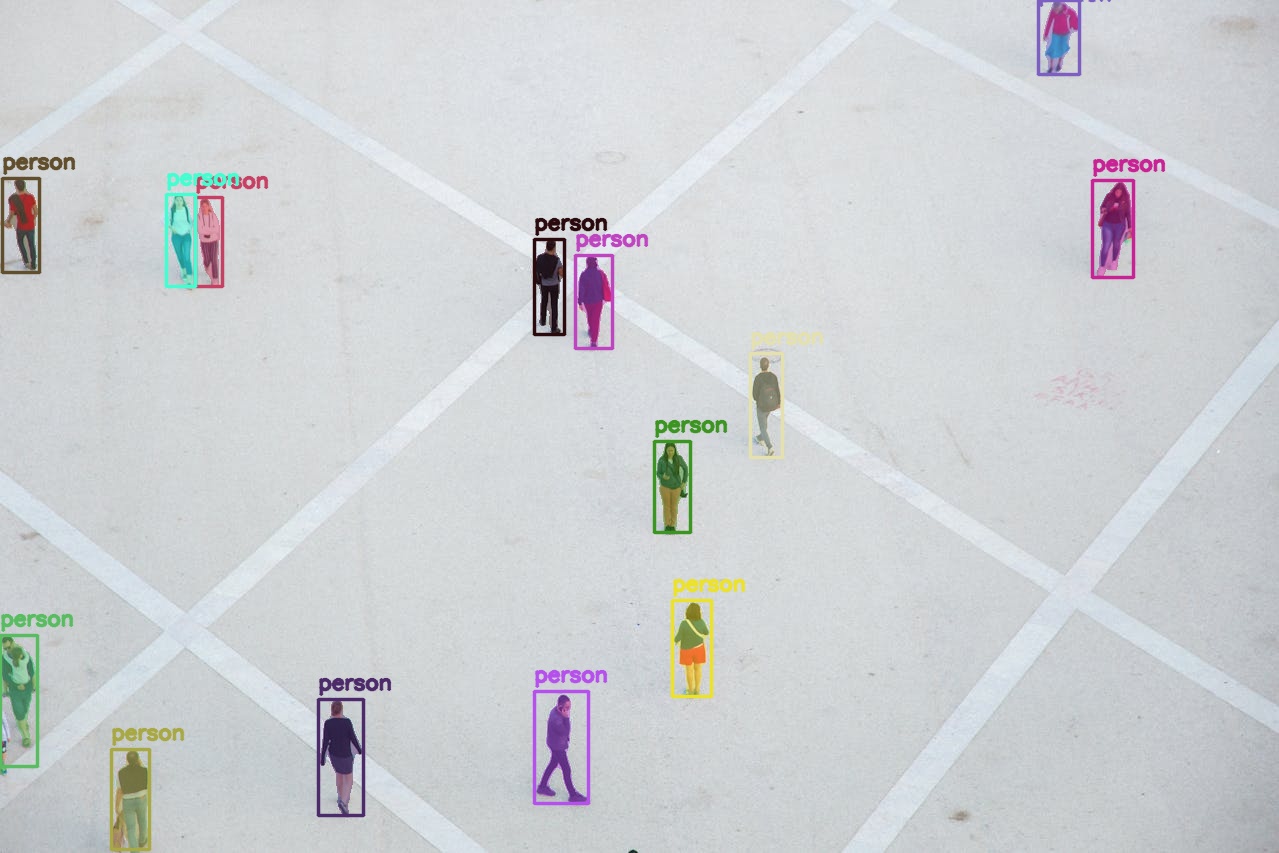
Here we are asking the Qwen3-VL to detect all persons from a top view and then SAM2 segments them. Interestingly, Qwen3-VL does not miss a single person, and the segmentation is accurate as well.
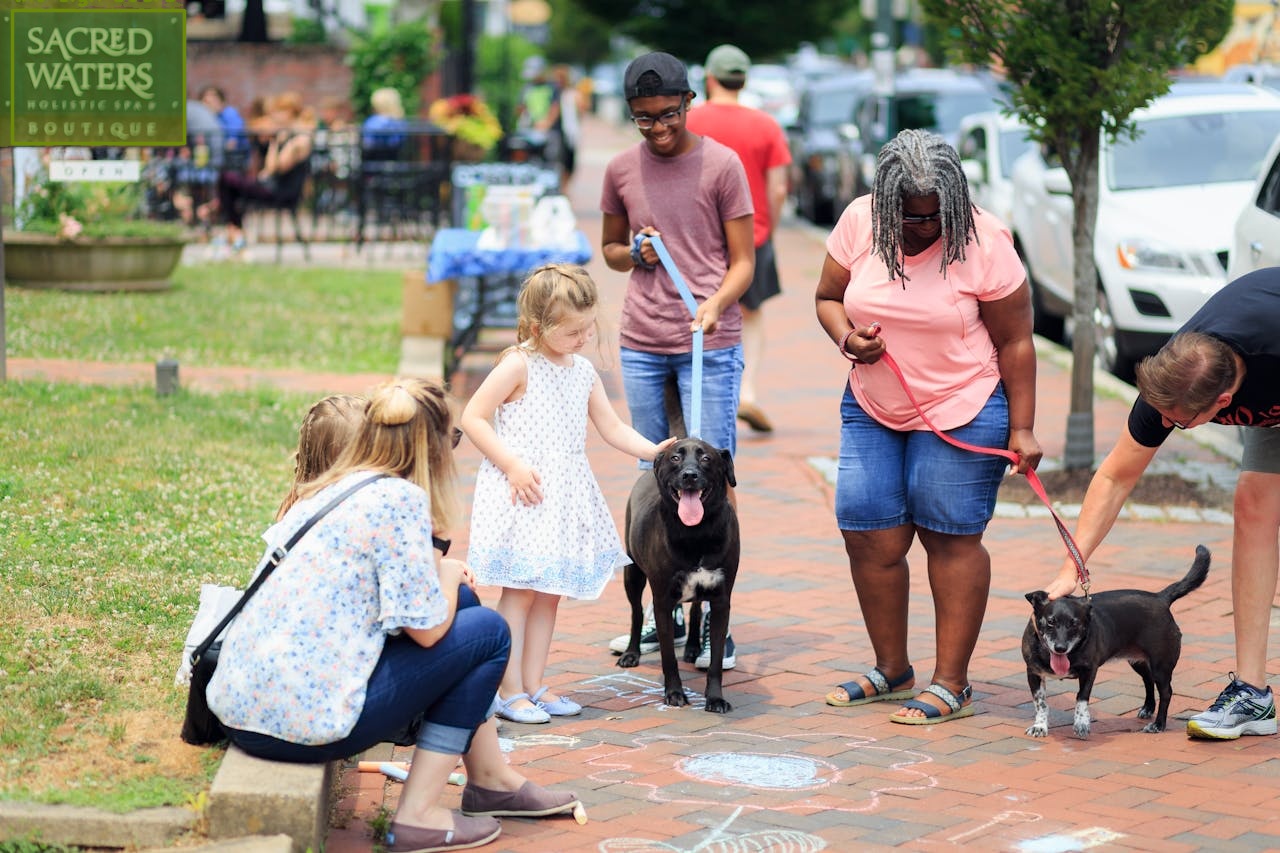
Next, we have a more complex use case where we ask the model to detect two different object instances.
python qwen3_vl_sam2.py --object "person, dog" --input input/image_3.jpg
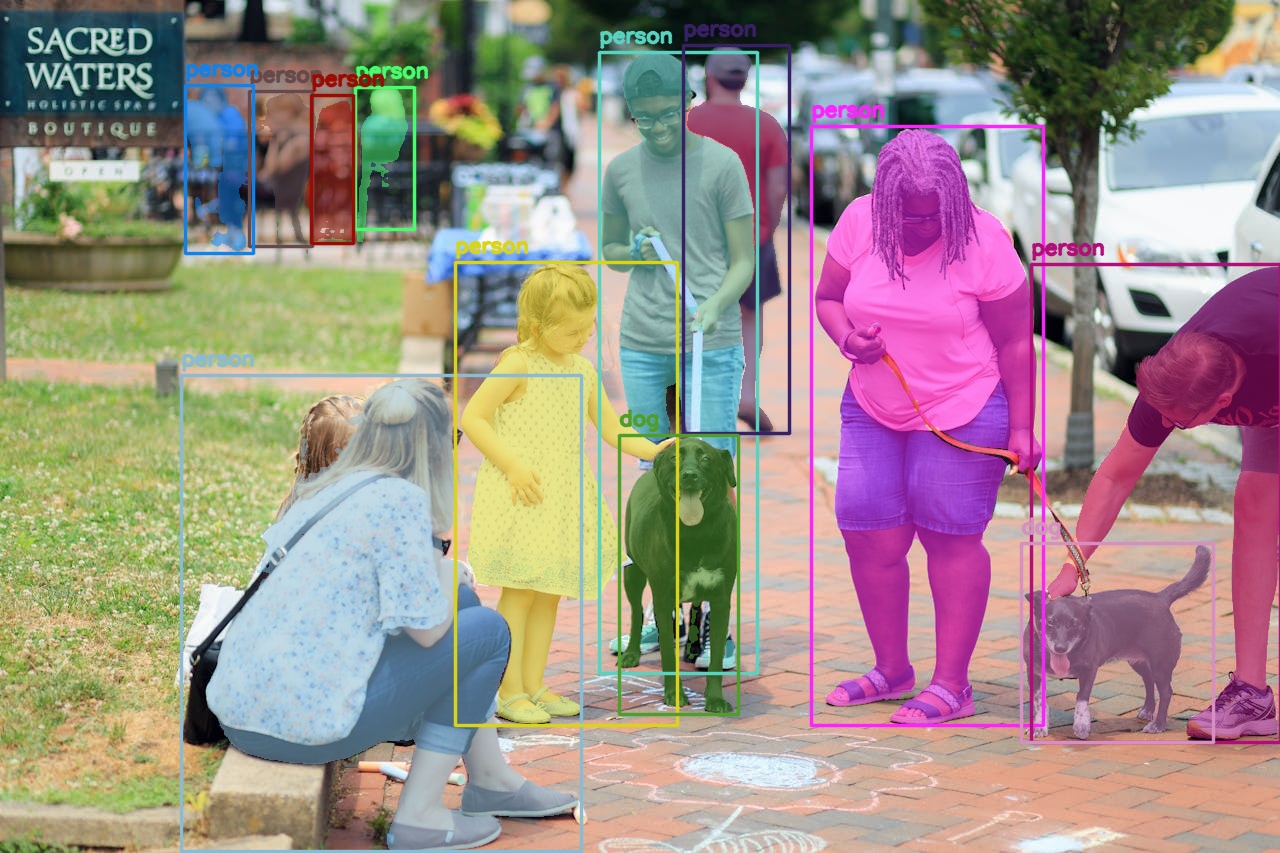
The results are impressive. First, the Qwen3-VL is able to detect all instances of person and dog, even the ones in the background that are blurry. Second, the SAM2 model segmented them quite well. The segmentation maps of the people in the back are not so clear, although that is expected.
Next, we have a selective detection among many similar objects.
python qwen3_vl_sam2.py --object "man in the red shirt" --input input/image_2.jpg
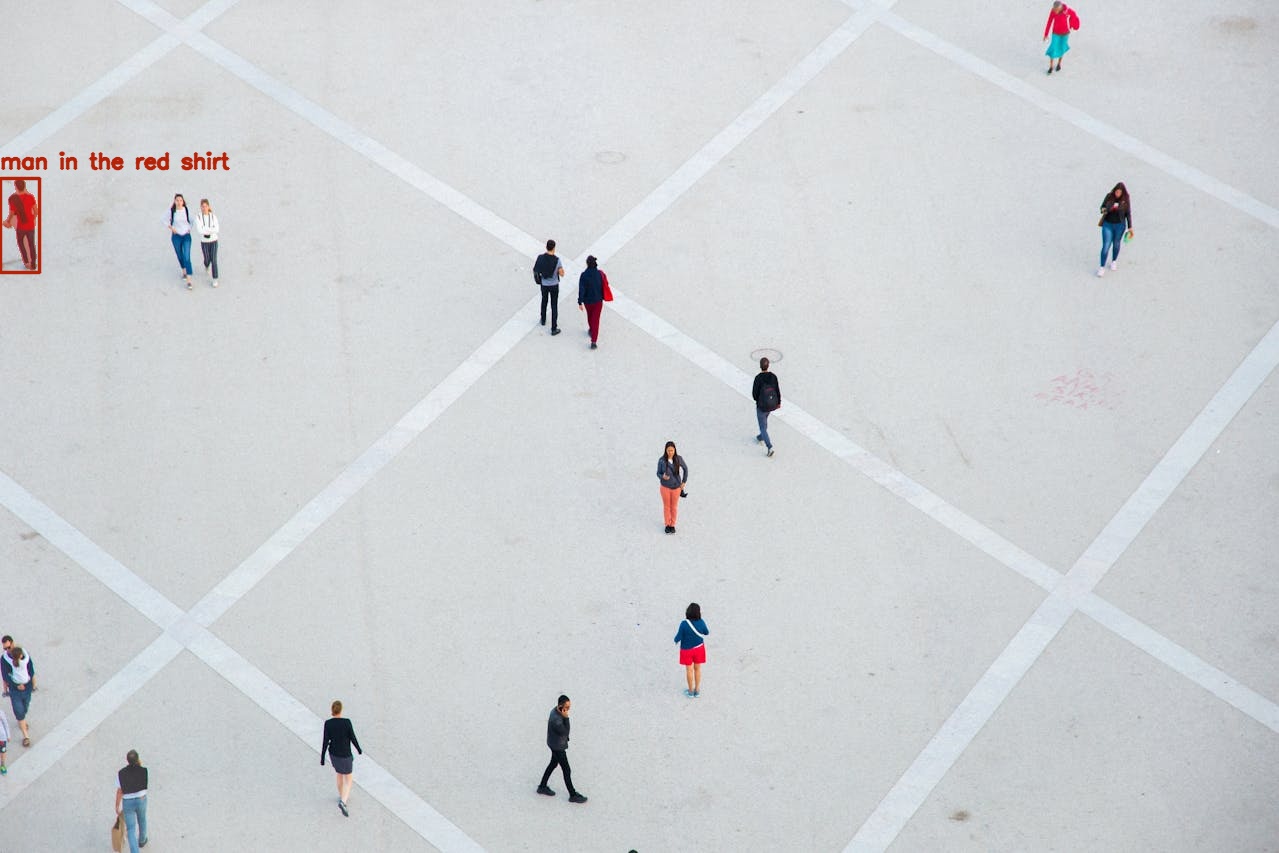
We asked the models to detect and segment the man in the red shirt, and we got that exactly. Quite impressive.
Let’s see the results of another spatial-scenario-based instance.
python qwen3_vl_sam2.py --object "the sign board" --input input/image_3.jpg
As expected, the models are able to detect and segment the sign board.
The following experiment judges the color recognition capability of the Qwen3-VL model.
python qwen3_vl_sam2.py --object "the blue tape, compass" --input input/image_4.jpg
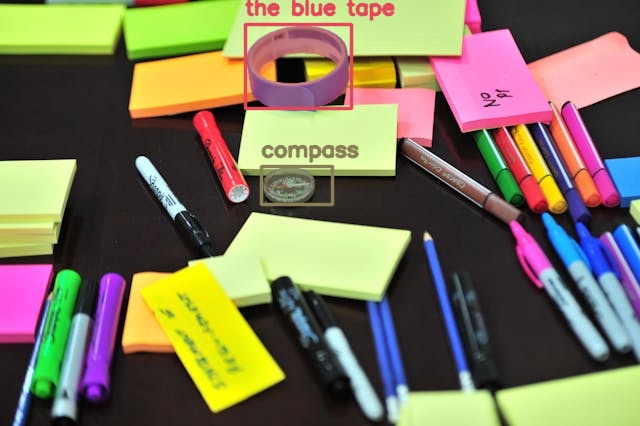
We asked it to detect the blue tape and the compass, and it was able to do that.
For the final experiment, let’s check how well the Qwen-3VL is able to detect partially hidden objects and its spatial awareness.
python qwen3_vl_sam2.py --object "person behind the window" --input input/image_5.jpg
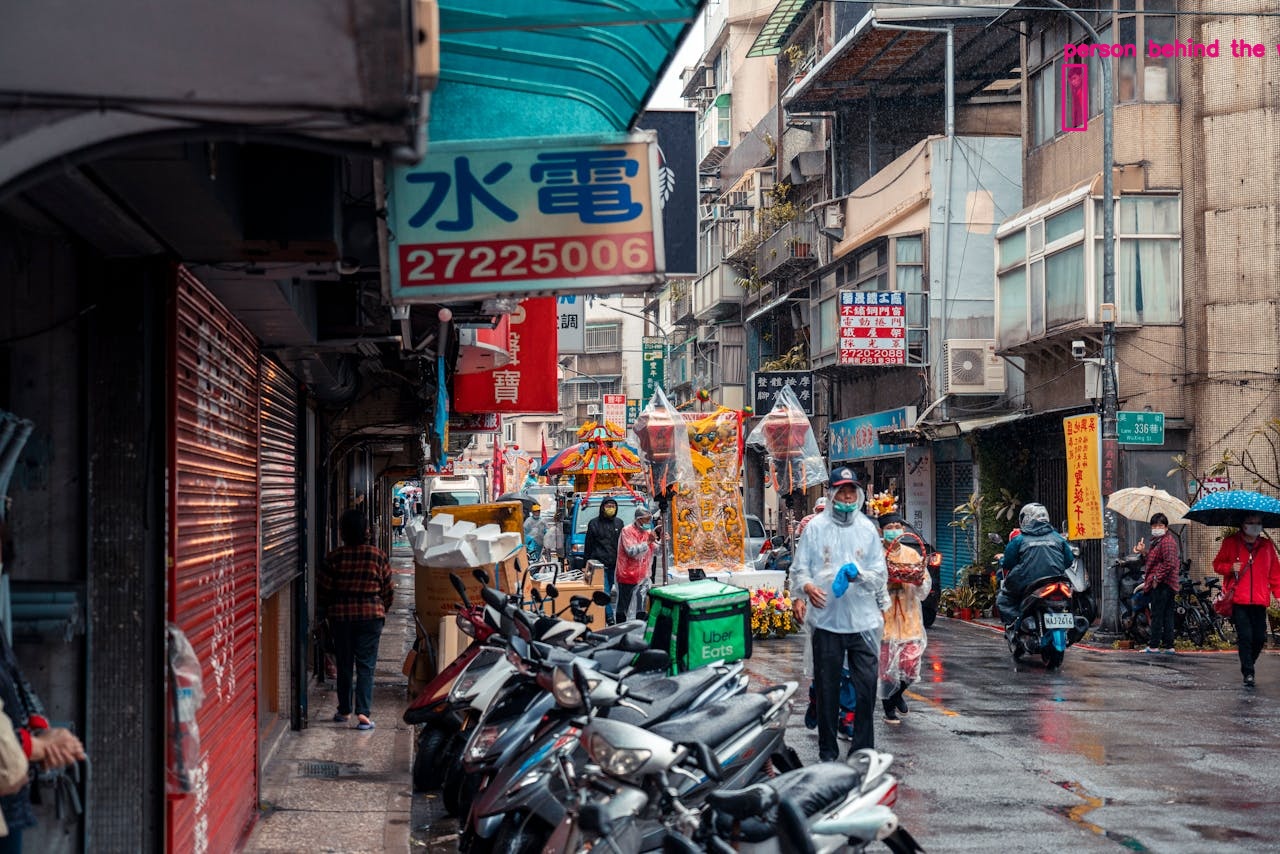
Quite impressive. The Qwen3-VL first detects the person behind the window, and the SAM2 model properly segments it.
Further Improvements
We can take this project much further.
- Experimenting with a smaller Qwen3-VL and SAM2 model to make the pipeline faster.
- Adding an extra step to segment out the masked object and feeding that to a 2D to 3D model, which can be imported to any 3D software (e.g., Blender)
- Experimenting with videos. Although for this, quite a lot of optimization will be needed to make it fast.
We will try to tackle some of the above projects in future posts.
Summary and Conclusion
In this article, we tackled the problem of grounding the Qwen3-VL detection with SAM2 segmentation. We could see that the results are impressive, and both models perform well. We also discussed some future improvements that we can carry out further.
If you have any questions, thoughts, or suggestions, please leave them in the comment section. I will surely address them.
You can contact me using the Contact section. You can also find me on LinkedIn, and X.
