
In this tutorial, you will get to learn two different approaches to building deep learning architectures for multi-label classification using PyTorch.
This tutorial is a continuation of the previous tutorial. In that tutorial, we discussed all the theoretical approaches to multi-label classification using deep learning and neural networks. In this article, we will have complete hands-on experience of those approaches using a small dummy dataset.
So, in this tutorial, we will try to build deep learning architectures for multi-label classification using PyTorch.
Let’s see, what will we be learning specifically in this tutorial?
- What are the different multi-label dataset scenarios?
- Using Scikit-Learn’s
make_multilabel_classificationto replicate multi-label classification data. We will use this dummy dataset for training our deep learning neural network models. - Getting into the coding part, we will train two deep learning models. One is a multi-head deep learning model with binary classifier heads. Another one is a multi-head model for multiple category classification.
Do not worry if some things do no make sense till now. We will get to learn everything in detail further on.
Note: I highly recommend that you go through the previous tutorial before going further. You will get to know the different types of datasets that we can have for multi-label classification. Along with that, you will also learn what kind of deep learning models we can build to deal with those datasets. By the end of that article, you should have a good theoretical knowledge of different deep learning architectures for multi-label classification.
Different Dataset Types that We can have for Multi-Label Classification
In this section, we will go over the types of datasets that we can have in the case of multi-label classification. We will keep this section brief as you can already find a detailed explanation in the previous tutorial.
The first case is when we have multiple labels for a single feature row and each label can have a binary value. For example, if there are 5 labels, then each of them can have a value of either 0 or 1.
The second case is when each of the multiple labels have multiple categories as well. In that case, if we consider numerical encoding, then each label can have a value of 0, 1, or 2. This is when we consider that each label can have 3 categories.
To handle the above two cases, we need a slightly different neural network architecture for each of them. Although both the deep learning models will be multi-head classifiers only. But one will be multi-head binary classifier. The other one will be a multi-head multi-category classifier deep learning model.
But how will we get the dataset for this tutorial to train two deep learning models?
Replicating Multi-Label Dataset using Scikit-Learn
We will use the make_multilabel_classification function from Scikit-Learn to create our multi-label dummy dataset. This will make our work way easier to experiment with the two deep learning models that we will be learning about. We will get into all the details a bit later when we start coding. Before that, let’s take a look at some of the major dependencies for this tutorial.
Frameworks, Libraries, and Dependencies for the Tutorial
- First of all, of course, is PyTorch. As far as I know, any version starting from 1.4 to 1.7 (the latest while writing this tutorial) should be fine. Although all my code is using PyTorch version 1.6.
- Scikit-Learn version 0.23.1.
The above are the two major dependencies for this tutorial. Along the way, if you find that you are missing anything library, feel free to install them.
Now, let’s move ahead and see how to structure our directory for this small experiment and project.
Directory Strucutre
│   dataset.py
│   inference_multi_head_binary.py
│   inference_multi_head_multi_category.py
│   loss_functions.py
│   models.py
│   train_multi_head_binary.py
│   train_multi_head_multi_category.py
|
├───outputs
│       multi_head_binary.pth
│       multi_head_binary_loss.png
│       multi_head_multi_category.pth
│       multi_head_multi_category_loss.png
Create a project directory and name it appropriately as you wish.
- Directly inside the project folder, we have 7 Python files. These may look like too many but are actually really easy to follow. We will get into the details of each of these Python files while writing the code for them.
- Then we have another
outputsfolder inside the project folder. This will contain all the files that will be generated while training our deep learning models. This includes the loss plot graphs and the trained PyTorch models.
The above is all we need for the project directory structure. Now, we can jump into the coding part of this tutorial.
Deep Learning Architectures for Multi-Label Classification using PyTorch
From this section onward, we will start to write the code for this tutorial.
We will start with preparing our dataset code.
Preparing the Dummy Dataset for Multi-Label Classification
As discussed before, we will use the make_multilabel_classification function from Scikit-Learn to create our dataset. You can read more about it here.
All the code here will go into the dataset.py Python file.
Let’s first import all the modules that we need.
from sklearn.datasets import make_multilabel_classification
from torch.utils.data import Dataset

import torch
- First, we are importing
make_multilabel_classificationfromsklearn.datasets. This will help us create our dummy multi-label dataset. - We are also importing
torchandDatasetfromtorch.utils.data. This will help us create our dataset classes.
Function to Create the Multi-Label Dataset
Now, we will write a simple function to that will create our multi-label dataset.
We will create a dataset that will contain 10000 samples (data points), 5 classes, and 2 categories.
The following code block contains the make_dataset() function.
def make_dataset():
    x, y = make_multilabel_classification(
        n_samples=10000, n_features=12, n_classes=5, n_labels=2, random_state=1
    )

    # use 9900 samples for training
    x_train = x[:9900]
    y_train = y[:9900]

    # use 100 samples for testing
    x_test = x[-100:]
    y_test = y[-100:]

    return x_train, y_train, x_test, y_test
- From lines 6 to 8, we prepare the multi-label dataset. We pass a few arguments to the
make_multilabel_classification()function which are pretty self-explanatory. We are creating 10000 data points or samples and each sample has 12 features (12 columns for the features). Then we haven_classes=5which are the total number of labels for each data point. Then_labels=2indicates that the classes will have two categories. They are either 0 or 1. This function returns the features and labels which we capture asxandy. - Starting from line 10 to 16, we split 9900 samples into the training set and 100 samples into the test set.
- Finally, we return all our training and test data.
The following snippet shows how our multi-label dataset actually looks like.
[5. 4. 1. 6. 3. 1. 3. 9. 3. 1. 9. 2.] 	             [1 1 0 1 1]
[ 4.  5.  3. 10.  3.  2.  8.  3.  5.  4.  1.  3.] 	 [0 1 0 0 1]
[ 4.  0.  3.  4.  4.  3.  8.  1.  1.  5. 12.  0.] 	 [0 1 0 0 1]
[1. 3. 2. 9. 7. 2. 4. 9. 7. 5. 3. 4.] 	             [1 1 0 1 0]
[ 1.  4.  5.  9.  2.  2.  4.  9. 10.  3.  2.  1.] 	 [1 1 0 0 0]
In the above snippet, each row contains 12 feature columns and 5 label columns. And each label column is having the value as either 0 or 1. This is a very simple dataset but enough to get started with the coding concepts and neural network architectures.
Dataset Class for Multi-Head Binary Classification
Here, we will write the PyTorch dataset classes. This will create our dataset for a multi-head classification neural network. And each of the head will be a binary classifier.
Let’s write the code for the binary dataset class.
# `BinaryDataset()` class for multi-head binary classification model
class BinaryDataset(Dataset):
    def __init__(self, x, y):
        self.x = x
        self.y = y

    def __len__(self):
        return len(self.x)

    def __getitem__(self, index):
        features = self.x[index, :]
        labels = self.y[index, :]

        # we have 12 feature columns
        features = torch.tensor(features, dtype=torch.float32)
        # there are 5 classes and each class can have a binary value ...
        # ... either 0 or 1
        label1 = torch.tensor(labels[0], dtype=torch.float32)
        label2 = torch.tensor(labels[1], dtype=torch.float32)
        label3 = torch.tensor(labels[2], dtype=torch.float32)
        label4 = torch.tensor(labels[3], dtype=torch.float32)
        label5 = torch.tensor(labels[4], dtype=torch.float32)

        return {
            'features': features,
            'label1': label1,
            'label2': label2,
            'label3': label3,
            'label4': label4,
            'label5': label5,
        }
The steps are quite simple.
- The
__init__()function receives the features and labels first. - The
__getitem__()function starts from line 28. We extract thefeaturesandlabelsof all the columns based on the currentindex. This we do at line 29 and 30. - At line 33, we convert the
featuresinto tensors of typefloat32. - The next few steps are a bit important. We know that we have five labels for each row of features. And each of the labels can have two values either 0 or 1. So, starting from line 36 to 40, we extract each label value from the
labelsby accessing the index positions (from index 0 to index 4). Then we convert them into tensors of data typefloat32. We name these aslable1, …,label5. - Finally, we return the features and all the five labels in the form of a dictionary.
The above dataset is for a multi-head binary classifier. This means that the deep learning model will have multiple output/classification heads but each head is a binary classifier.
Dataset Class for Multi-Head Multi-Category Classification
Now, we will write a dataset class for multi-head deep learning model that will classify between multiple categories. But note that the dataset that we have only has the categories as 0 and 1. So, we will make changes accordingly to account for that.
The following code block contains the dataset class code.
# `MultiCategoryDataset()` for multi-head multi-category (2 or more) model
class MultiCategoryDataset(Dataset):
    def __init__(self, x, y):
        self.x = x
        self.y = y

    def __len__(self):
        return len(self.x)

    def __getitem__(self, index):
        features = self.x[index, :]
        labels = self.y[index, :]

        features = torch.tensor(features, dtype=torch.float32)
        label1 = torch.tensor(labels[0], dtype=torch.long)
        label2 = torch.tensor(labels[1], dtype=torch.long)
        label3 = torch.tensor(labels[2], dtype=torch.long)
        label4 = torch.tensor(labels[3], dtype=torch.long)
        label5 = torch.tensor(labels[4], dtype=torch.long)

        return {
            'features': features,
            'label1': label1,
            'label2': label2,
            'label3': label3,
            'label4': label4,
            'label5': label5,
        }
Now, if you observe, our MultiCategoryDataset() is almost the same as the binary dataset class. The only difference is in the datatype of our labels. Instead of float32 we are changing the data type to long. This is because of how we are going to build our multi-head multi-category deep learning classifier and also due to the loss function that we will use. For now, just keep this difference in mind.
This completes our dataset code. Next, we will move on to writing the code for preparing our deep learning models.
Multi-Label Classification Deep Learning Models
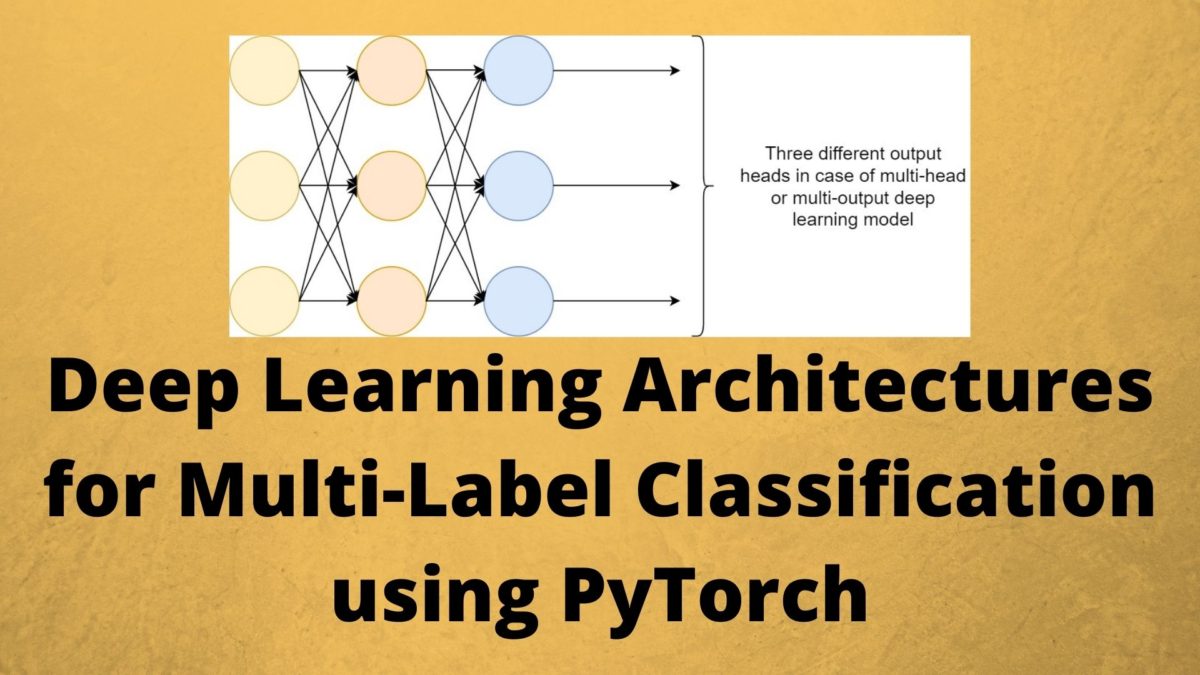
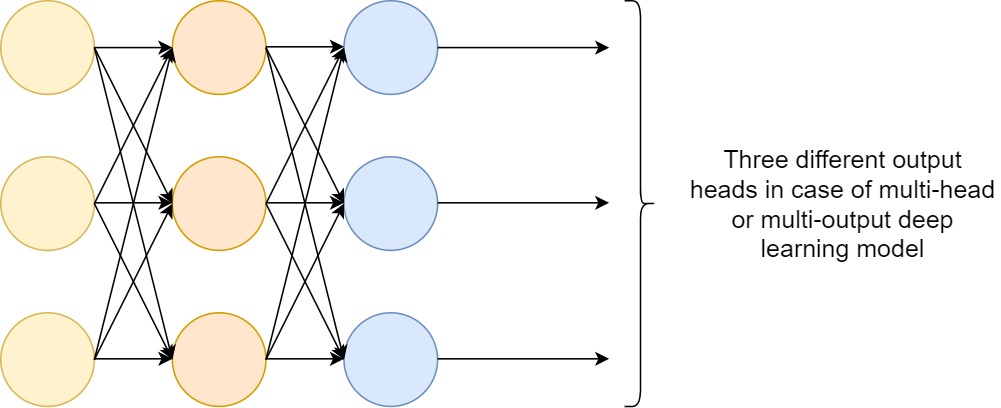
In this section, we will build two deep learning models. One is a multi-head binary classification model. And another one is a multi-head multi-category classification model.

The above figure (Figure 2) shows a multi-head binary classification deep learning model where the output layers have 1 output feature (for binary classification).
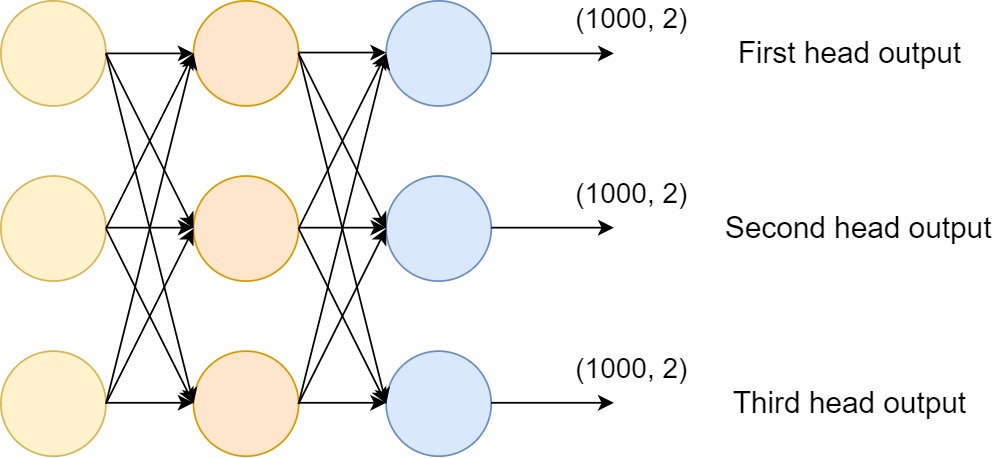
In figure 3, the image shows a multi-label multi-category deep learning model. We can use such a model when we have to classify the labels into more than one category (2 or more). So, such deep learning models generally have 2 or more output features in their classification layers (output heads).
Both the models are going to have a very simple architecture. Our main aim here is to know how to build a model for multi-label classification and then dive into complex things in future tutorials.
We will write the model code in the models.py Python file.
Multi-Head Binary Classification Deep Learning Model
We will start with the multi-head binary classification deep learning model.
Let’s start with importing the modules for the models.py file.
import torch.nn as nn
import torch.nn.functional as F
The above are the only two imports that we need to build out neural networks using PyTorch.
The following code block contains the code for multi-head binary classification deep learning model. We will call it MultiHeadBinaryModel().
class MultiHeadBinaryModel(nn.Module):
    def __init__(self):
        super(MultiHeadBinaryModel, self).__init__()
        self.fc1 = nn.Linear(12, 32) # 12 is the number of features
        self.fc2 = nn.Linear(32, 64)
        self.fc3 = nn.Linear(64, 128)
        self.fc4 = nn.Linear(128, 256)

        # we will treat each head as a binary classifier ...
        # ... so the output features will be 1
        self.out1 = nn.Linear(256, 1)
        self.out2 = nn.Linear(256, 1)
        self.out3 = nn.Linear(256, 1)
        self.out4 = nn.Linear(256, 1)
        self.out5 = nn.Linear(256, 1)

    def forward(self, x):
        x = F.relu(self.fc1(x))
        x = F.relu(self.fc2(x))
        x = F.relu(self.fc3(x))
        x = F.relu(self.fc4(x))

        # each binary classifier head will have its own output
        out1 = F.sigmoid(self.out1(x))
        out2 = F.sigmoid(self.out2(x))
        out3 = F.sigmoid(self.out3(x))
        out4 = F.sigmoid(self.out4(x))
        out5 = F.sigmoid(self.out5(x))

        return out1, out2, out3, out4, out5
- In the
__init__()function (from line 4) we define all the neural network layers for our deep learning model. Our deep learning model consists of linear layers only. - First, we have four linear layers from
self.fc1toself.fc4. These consist of the input and intermediate layers. Forself.fc1we have 12 input features which correspond to the 12 feature columns in each row. Theself.fc4layer has 256 output features. - Coming to the classification heads starting from line 13. We have 5 classification heads for each of the labels. And each output/classification head has 1 output feature corresponding to binary classification.
- The
forward()function starts from line 19. First, we pass the data through the four fully connected layers. We apply ReLU activation function to all those layers. - Then starting from line 26 we have the 5 outputs from each of the classification heads. Each will output a sigmoid value between 0 and 1.
- Finally, we return all 5 outputs.
In the above deep learning model, we have 1 output feature for each of the classification head. We will have to choose our loss function for this accordingly which we will see later on.
Multi-Head Multi-Category Deep Learning Model for Multi-Label Classification
Now, let’s move on to write the code for creating our multi-head multi-category deep learning model.
We will write this deep learning model class in the same models.py Python file. There will only be minor differences in comparison to the model that we have coded above.
The following code block contains the MultiHeadMultiCategory() model class.
class MultiHeadMultiCategory(nn.Module):
    def __init__(self):
        super(MultiHeadMultiCategory, self).__init__()
        self.fc1 = nn.Linear(12, 32) # 12 is the number of features
        self.fc2 = nn.Linear(32, 64)
        self.fc3 = nn.Linear(64, 128)
        self.fc4 = nn.Linear(128, 256)

        # we will treat each head as a multi-category classifier ...
        # ... so the output features will be 2 (0 and 1)
        self.out1 = nn.Linear(256, 2)
        self.out2 = nn.Linear(256, 2)
        self.out3 = nn.Linear(256, 2)
        self.out4 = nn.Linear(256, 2)
        self.out5 = nn.Linear(256, 2)

    def forward(self, x):
        x = F.relu(self.fc1(x))
        x = F.relu(self.fc2(x))
        x = F.relu(self.fc3(x))
        x = F.relu(self.fc4(x))

        out1 = F.sigmoid(self.out1(x))
        out2 = F.sigmoid(self.out2(x))
        out3 = F.sigmoid(self.out3(x))
        out4 = F.sigmoid(self.out4(x))
        out5 = F.sigmoid(self.out5(x))

        return out1, out2, out3, out4, out5
- The things that we want to focus on here are lines 43 to 47. The output heads have output features of 2. This means that the final outputs will have two sigmoid outputs.
- Out of the two sigmoid output values, we will choose that index position which will have the higher value.
- For this, we will also have to choose our loss function accordingly.
Everything else in this multi-category deep learning model is same as the binary classification deep learning model. Even the number of features in the intermediate linear layers are the same.
This concludes our creating deep learning models. Next, we will move onto writing the code for the loss functions.
Loss Functions for Multi-Head Deep Learning Models
By now, we have two multi-head deep learning models. And each of them have different number of output features in their classification layers. So, one definite loss function won’t work for both of them. We will have to write two different loss functions, one for each of them.
Simply speaking, one loss function will consist of Binary Cross-Entropy Loss and the other one will be Cross-Entropy Loss. By now, you might have guessed which loss function will be used for which deep learning model.
Let’s get into the code now.
We will write the loss function code in loss_functions.py Python file.
Binary Cross-Entropy Loss Function for Multi-Head Binary Classifier
For the multi-head binary classification deep learning model, we will use the Binary Cross-Entropy loss function. This is because we have only one output feature in the classification heads in this model. It is going to be a single sigmoid activation value. Therefore, the loss function is also Binary Cross-Entropy.
The following code block contains the loss function for the multi-head binary classification deep learning model.
import torch.nn as nn

# custom loss function for multi-head binary classification
def binary_loss_fn(outputs, targets):
    o1, o2, o3, o4, o5 = outputs
    t1, t2, t3, t4, t5 = targets
    l1 = nn.BCELoss()(o1, t1)
    l2 = nn.BCELoss()(o2, t2)
    l3 = nn.BCELoss()(o3, t3)
    l4 = nn.BCELoss()(o4, t4)
    l5 = nn.BCELoss()(o5, t5)

    return (l1 + l2 + l3 + l4 + l5) / 5
- We have the
binary_loss_fn()which accepts two tuples as parameters,outputsandtargets. - At lines 5 and 6, we extract the individual output and target (correct label) values from
outputsandtargetsrespectively. - Starting from line 7 till 11, we calculate 5 different loss values using the
BCELoss()for each of the five output and target pairs. - Finally, we average over the loss values and return the final value.
That’s it, we just need to calculate the loss values separately, get the average, and return the final loss value.
Cross-Entropy Loss for Multi-Head Multi-Category Classifier
Moving on the next loss function for the multi-head multi-category deep learning model.
This is going to almost similar. The following code block contains the code.
# custom loss function for multi-head multi-category classification
def multi_category_loss_fn(outputs, targets):
    o1, o2, o3, o4, o5 = outputs
    t1, t2, t3, t4, t5 = targets
    l1 = nn.CrossEntropyLoss()(o1, t1)
    l2 = nn.CrossEntropyLoss()(o2, t2)
    l3 = nn.CrossEntropyLoss()(o3, t3)
    l4 = nn.CrossEntropyLoss()(o4, t4)
    l5 = nn.CrossEntropyLoss()(o5, t5)

    return (l1 + l2 + l3 + l4 + l5) / 5
As we have two output features in the classification head for the multi-head multi-category deep learning model, we cannot use the BCELoss() any more. The classification heads will be outputting two sigmoid values now. Therefore, we are using CrossEntropyLoss() to calculate the loss values for the output and target pairs.
Everything else is same as the previous loss function.
Training Code for Multi-Head Binary Classification Deep Learning Model
Now, we will be writing the code to train our multi-head binary classification deep learning model.
The code in this part will go into the train_multi_head_binary.py Python file.
The following code block includes the import statements for all the modules that we need.
from dataset import make_dataset, BinaryDataset
from torch.utils.data import DataLoader
from loss_functions import binary_loss_fn as loss_fn
from models import MultiHeadBinaryModel
from tqdm import tqdm

import torch.optim as optim
import torch.nn as nn
import torch
import matplotlib.pyplot as plt
import matplotlib

matplotlib.style.use('ggplot')
Along with all the framework and library modules, we are also importing the modules and functions that we have written. This includes the make_dataset() function, the BinaryDataset class, our loss function, and the deep learning model.
Prepare the Training Data and Initialize the Model
We can just call the make_dataset() function to get the x_train and y_train NumPy arrays. After that, we can prepare the training dataset and the training data loaders.
# prepare the dataset
x_train, y_train, _, _ = make_dataset()
# print some info
print(f"[INFO]: Number of training samples: {x_train.shape[0]}")
print(f"[INFO]: Number of training features: {x_train.shape[1]}")

# train dataset
train_dataset = BinaryDataset(x_train, y_train)
# train data loader
train_dataloader = DataLoader(train_dataset, shuffle=True, batch_size=1024)

# initialize the model
model = MultiHeadBinaryModel()
- At line 2, we are ignoring the
x_testandy_testNumPy arrays as we will not be using them in this script. - Then we are preparing the
train_datasetandtrain_dataloaderwith a batch size of 1024. Such a large batch size actually won’t require much memory as our dataset is quite simple with only 12 columns per sample. Still, if you get Out Of Memory error, just reduce the batch size a bit. - At line 26, we are initializing the multi-head binary classifier.
The Training Function
The training function is going to be very simple and just like any other classification code using PyTorch.
# training function
def train(model, dataloader, optimizer, loss_fn, train_dataset, device):
    model.train()
    counter = 0
    train_running_loss = 0.0
    for i, data in tqdm(enumerate(dataloader), total=int(len(train_dataset)/dataloader.batch_size)):
        counter += 1

        # extract the features and labels
        features = data['features'].to(device)
        target1 = data['label1'].to(device)
        target2 = data['label2'].to(device)
        target3 = data['label3'].to(device)
        target4 = data['label4'].to(device)
        target5 = data['label5'].to(device)

        # zero-out the optimizer gradients
        optimizer.zero_grad()

        outputs = model(features)
        targets = (target1, target2, target3, target4, target5)
        loss = loss_fn(outputs, targets)
        train_running_loss += loss.item()

        # backpropagation
        loss.backward()
        # update optimizer parameters
        optimizer.step()

    train_loss = train_running_loss / counter
    return train_loss
- The
train()function accepts the model, the training data loader, the optimizer, the loss function, the training dataset, and the computation device as parameters. - First, we get the model into training mode and define the
counterandtrain_running_lossvariables. - From line 32, we iterate over the data loader.
- First, we increment the
counterto keep track of the batch number. - From lines 36 to 41, we extract the features and each of the 5 targets and load them onto the computation device.
- At line 46, we pass the features to the deep learning model and get the
outputs. - Line 47 combines all the target values into a single tuple called
targets. - At line 48, we calculate the loss value for the current batch by passing the
outputsandtargetsto the loss function. - After that, we increment the
train_running_loss, carry out backpropagation, and update the optimizer parameters. - Finally, we calculate the loss value for the current epoch and return it.
That is all we need for the training function.
Set the Learning Parameters and Start the Training
The following are the learning parameters that we will use.
# learning parameters
optimizer = optim.Adam(params=model.parameters(), lr=0.001)
device = torch.device('cuda' if torch.cuda.is_available() else 'cpu')
epochs = 100
# load the model on to the computation device
model.to(device)
- We are using the Adam optimizer with a learning rate of 0.001.
- Then we are defining our computation device. You can easily train this code on a CPU as well. There will be no issues while training.
- We will be training the deep learning model for 100 epochs.
- Finally, we are loading the deep learning model onto the computation device.
The following code block consists of the training loop.
# start the training
train_loss = []
for epoch in range(epochs):
    print(f"Epoch {epoch+1} of {epochs}")
    train_epoch_loss = train(
        model, train_dataloader, optimizer, loss_fn, train_dataset, device
    )
    train_loss.append(train_epoch_loss)
    print(f"Train Loss: {train_epoch_loss:.4f}")

torch.save(model.state_dict(), 'outputs/multi_head_binary.pth')
We have a train_loss list to store all the epoch-wise loss values. After the training completes we are saving the trained model on to the disk in the outputs folder.
The final step is to plot the loss line graph using the train_loss list. The following code block does that.
# plot and save the train loss graph
plt.figure(figsize=(10, 7))
plt.plot(train_loss, color='orange', label='train loss')
plt.xlabel('Epochs')
plt.ylabel('Loss')
plt.legend()
plt.savefig('outputs/multi_head_binary_loss.png')
plt.show()
This completes our training code for training the multi-head binary classifier on the multi-label dataset.
Training Code for Multi-Head Multi-Category Deep Learning Model
We have completed the training code for multi-head binary classifier model. Now, we will write the code for multi-head multi-category deep learning model.
The code here will be almost similar to the code for the multi-head binary classification model. We need to change a few import statements, the dataset class, and the deep learning model.
We will write this code in the train_multi_head_multi_category.py Python file.
The following are the imports that we need.
from dataset import make_dataset, MultiCategoryDataset
from torch.utils.data import DataLoader
from loss_functions import multi_category_loss_fn as loss_fn
from models import MultiHeadMultiCategory
from tqdm import tqdm

import torch.optim as optim
import torch.nn as nn
import torch
import matplotlib.pyplot as plt
import matplotlib

matplotlib.style.use('ggplot')
We are importing the MultiCategoryDataset class, the multi_category_loss_fn, and the MultiHeadMultiCategory deep learning model.
Preparing the Dataset and the Model
# prepare the dataset
x_train, y_train, _, _ = make_dataset()
# print some info
print(f"[INFO]: Number of training samples: {x_train.shape[0]}")
print(f"[INFO]: Number of training features: {x_train.shape[1]}")

# train dataset
train_dataset = MultiCategoryDataset(x_train, y_train)
# train data loader
train_dataloader = DataLoader(train_dataset, shuffle=True, batch_size=1024)

# initialize the model
model = MultiHeadMultiCategory()
We are using the MultiCategoryDataset class to prepare the training dataset. Also, we are initializing the model using MultiHeadMultiCategory().
The Training Function
The training function is going to be completely similar to what we have written for multi-head binary classifier.
# training function
def train(model, dataloader, optimizer, loss_fn, train_dataset, device):
    model.train()
    counter = 0
    train_running_loss = 0.0
    for i, data in tqdm(enumerate(dataloader), total=int(len(train_dataset)/dataloader.batch_size)):
        counter += 1

        # extract the features and labels
        features = data['features'].to(device)
        target1 = data['label1'].to(device)
        target2 = data['label2'].to(device)
        target3 = data['label3'].to(device)
        target4 = data['label4'].to(device)
        target5 = data['label5'].to(device)

        # zero-out the optimizer gradients
        optimizer.zero_grad()

        outputs = model(features)
        targets = (target1, target2, target3, target4, target5)
        loss = loss_fn(outputs, targets)
        train_running_loss += loss.item()

        # backpropagation
        loss.backward()
        # update optimizer parameters
        optimizer.step()

    train_loss = train_running_loss / counter
    return train_loss
Learning Parameters and Training Loop
The following code block contains the learning parameters and the training loop.
# learning parameters
optimizer = optim.Adam(params=model.parameters(), lr=0.001)
device = torch.device('cuda' if torch.cuda.is_available() else 'cpu')
epochs = 100
# load the model on to the computation device
model.to(device)

# start the training
train_loss = []
for epoch in range(epochs):
    print(f"Epoch {epoch+1} of {epochs}")
    train_epoch_loss = train(
        model, train_dataloader, optimizer, loss_fn, train_dataset, device
    )
    train_loss.append(train_epoch_loss)
    print(f"Train Loss: {train_epoch_loss:.4f}")

torch.save(model.state_dict(), 'outputs/multi_head_multi_category.pth')

# plot and save the train loss graph
plt.figure(figsize=(10, 7))
plt.plot(train_loss, color='orange', label='train loss')
plt.xlabel('Epochs')
plt.ylabel('Loss')
plt.legend()
plt.savefig('outputs/multi_head_multi_category_loss.png')
plt.show()
The training parameters are also the same. The only things that are different are the final names that we are saving the trained deep learning model and the loss plot to the disk with.
This marks the end of writing all the training code that we need. Starting from the next section, we will write the code for testing our trained models.
Testing the Trained Multi-Head Binary Classification Model
As our training code is now complete, let’s write the code to test the trained models. And while testing, we will neither plot any graphs this time nor will we calculate the loss values.
As we are learning how to use multi-head deep learning models for multi-label classification, we will know how to get the labels out of such a model.
We will start with the multi-head binary classification model.
This code will go into the inference_multi_head_binary.py file.
The following are the modules that we need to import.
from dataset import make_dataset, BinaryDataset
from torch.utils.data import DataLoader
from models import MultiHeadBinaryModel

import torch

device = torch.device('cuda' if torch.cuda.is_available() else 'cpu')
Along with the imports, we are also setting our computation device.
Prepare the Dataset and the Model
We only need the test dataset NumPy arrays this time.
_, _, x_test, y_test = make_dataset()
# print some info
print(f"[INFO]: Number of test samples: {x_test.shape[0]}")
print(f"[INFO]: Number of test features: {x_test.shape[1]}")

test_dataset = BinaryDataset(x_test, y_test)
test_dataloader = DataLoader(test_dataset, shuffle=False, batch_size=1)
We are ignoring the training NumPy arrays as we do not need them while testing. For the test data loader, we are using a batch size of 1.
The following code block prepares the deep learning model by initializing the model and loading the pre-trained weights.
# prepare the trained model
model = MultiHeadBinaryModel()
model.load_state_dict(torch.load('outputs/multi_head_binary.pth'))
model.to(device)
model.eval()
We are also putting the model into evaluation mode.
The Test Loop
We will use a simple for loop to iterate over the test data loader and predict the outputs.
First, we will write the code, then we will get into the details and explanation.
for i, test_sample in enumerate(test_dataloader):
    print(f"SAMPLE {i}")
    # extract the features and labels
    features = test_sample['features'].to(device)
    target1 = test_sample['label1'].to(device)
    target2 = test_sample['label2'].to(device)
    target3 = test_sample['label3'].to(device)
    target4 = test_sample['label4'].to(device)
    target5 = test_sample['label5'].to(device)

    outputs = model(features)

    # get all the labels
    all_labels = []
    for out in outputs:
        if out >= 0.5:
            all_labels.append(1)
        else:
            all_labels.append(0)

    targets = (target1, target2, target3, target4, target5)

    # get all the targets in int format from tensor format
    all_targets = []
    for target in targets:
        all_targets.append(int(target.squeeze(0).detach().cpu()))

    print(f"ALL PREDICTIONS: {all_labels}")
    print(f"GROUND TRUTHS: {all_targets}")
- First, we are extracting all the features and ground truth targets that we will use later.
- At line 30, we are getting the outputs by feeding the features to the model.
- Starting from line 33 to 38, we are checking whether the sigmoid output value is greater than 0.5 or less than 0.5. If it is greater than 0.5, then we are appending 1 as the label to
all_labels, else, we are appending 0 as the label. - At line 40, we are storing all the targets as a tuple for easier printing on the console. Then from line 43 to 45, we are converting each target from tensor format to integer format.
- Finally, we are printing all the predicted and ground truth labels.
Basically, we will manually check which labels are correctly predicted and which are not. It is a not at all a good practice. But for learning purposes and knowing about different multi-label deep learning classification architecture, it is fine. It will give us a good idea of how each label is getting predicted.
Testing the Trained Multi-head Multi-Category Classification Model
This is the final coding part. We will write the code to test our trained multi-head multi-category deep learning model.
It will be somewhat similar to the previous test code only.
We will write all this code in the inference_multi_head_multi_category.py file.
I am writing the code starting from the import statements till the preparation and loading of the trained weights in the following code block. This is because the code for this is very similar to the binary classification code.
from dataset import make_dataset, MultiCategoryDataset
from torch.utils.data import DataLoader
from models import MultiHeadMultiCategory

import torch
import numpy as np

device = torch.device('cuda' if torch.cuda.is_available() else 'cpu')

_, _, x_test, y_test = make_dataset()
# print some info
print(f"[INFO]: Number of test samples: {x_test.shape[0]}")
print(f"[INFO]: Number of test features: {x_test.shape[1]}")

test_dataset = MultiCategoryDataset(x_test, y_test)
test_dataloader = DataLoader(test_dataset, shuffle=False, batch_size=1)

# prepare the trained model
model = MultiHeadMultiCategory()
model.load_state_dict(torch.load('outputs/multi_head_multi_category.pth'))
model.to(device)
model.eval()
The only difference are in the dataset class and the deep learning model architecture class.
The Test Loop
The following code block contains the test loop for the model and data loader.
for i, test_sample in enumerate(test_dataloader):
    print(f"SAMPLE {i}")
    # extract the features and labels
    features = test_sample['features'].to(device)
    target1 = test_sample['label1'].to(device)
    target2 = test_sample['label2'].to(device)
    target3 = test_sample['label3'].to(device)
    target4 = test_sample['label4'].to(device)
    target5 = test_sample['label5'].to(device)

    outputs = model(features)

    # get all the output labels
    # whichever is bigger of the two values, we will consider that index position
    all_labels = []
    for out in outputs:
        all_labels.append(int(np.argmax(out.detach().cpu())))

    targets = (target1, target2, target3, target4, target5)
    # get all the targets in int format from tensor format
    all_targets = []
    for target in targets:
        all_targets.append(int(target.squeeze(0).detach().cpu()))

    print(f"ALL PREDICTIONS: {all_labels}")
    print(f"GROUND TRUTHS: {all_targets}")
- We are getting the outputs at line 33.
- Now, coming to line 37 till 39. In the
forloop we check which of the two sigmoid values are bigger. We have two output values for each data point as the output features in the model heads are two. Whichever sigmoid value is larger, we are considering that index position and appending that to theall_labelslist. If you have done MNIST, CIFAR10, or even FahsionMNIST image classification using neural network, then you might be seeing some similarity here. - After that, we convert the targets from tensors to integers as we did in the previous section for binary classification.
- Finally, we are printing the targets and the predicted labels.
All the code that we need ends here. Now, the only thing that remains is training, analysis, and running the inference code for testing.
Training and Testing Multi-Head Binary Classification Deep Learning Model
We are all set to start training our deep learning models. We will start with the multi-head binary classification model.
You can open up your command line/terminal and cd into the project directory. From there type the following command to train the deep learning model.
python train_multi_head_binary.py
You should see output similar to the following on the terminal.
[INFO]: Number of training samples: 9900
[INFO]: Number of training features: 12
Epoch 1 of 100
10it [00:01,  8.80it/s]
Train Loss: 0.6213
Epoch 2 of 100
10it [00:00, 28.09it/s]
Train Loss: 0.5644
...
Epoch 100 of 100
10it [00:00, 26.18it/s]
Train Loss: 0.5612
The 100 epochs training should finish pretty quickly (mostly within 2-3 minutes), irrespective of whether you are using a GPU or the CPU.
The loss by the end of the training is 0.5612. Let’s take a look at the loss plot that has been saved to the disk.

In figure 4 we can clearly see that the loss curve flattens out pretty quickly, that is, within 15 epochs. But till the end of the training, the loss values do not increase. There can be a few reasons. First of all, our dataset is very simple. Maybe we do not need a model with 4 hidden layers. Also tweaking the learning rate a bit might also help. But our main focus here is the output of the multi-label classifications. So, let’s run the test code and see the outputs.
Type the following command on your terminal for running the test code.
python inference_multi_head_binary.py
You should see the following output.
[INFO]: Number of test samples: 100
[INFO]: Number of test features: 12
SAMPLE 0
ALL PREDICTIONS: [1, 1, 0, 0, 0]
GROUND TRUTHS: [1, 1, 0, 0, 0]
SAMPLE 1
ALL PREDICTIONS: [1, 1, 0, 0, 0]
GROUND TRUTHS: [1, 1, 0, 0, 0]
SAMPLE 2
ALL PREDICTIONS: [1, 1, 0, 0, 0]
GROUND TRUTHS: [1, 1, 0, 1, 1]
...
SAMPLE 98
ALL PREDICTIONS: [1, 1, 0, 0, 0]
GROUND TRUTHS: [1, 0, 0, 1, 0]
SAMPLE 99
ALL PREDICTIONS: [1, 1, 0, 0, 0]
GROUND TRUTHS: [0, 0, 0, 0, 1]
With this we can easily see what labels our model is predicting. The model is doing just ok for the most part. It is able to predict the labels somewhat correctly but not all of them are correct. In fact, we can see many of the labels are wrong.
Now, we know that the loss did not decrease much, so our model has not learned very well. This may be the issue because of simple binary classification. Let’s train our multi-head multi-category classifier and see how it performs.
Training and Testing Multi-Head Multi-Category Classification Deep Learning Model
Hopefully, our multi-head multi-category deep learning model will perform better. In this model, we are using 2 output features instead of 1, and therefore, the loss function is also Cross Entropy loss.
The following is the command to train the model.
python train_multi_head_multi_category.py
You will see output similar to the following.
[INFO]: Number of training samples: 9900
[INFO]: Number of training features: 12
Epoch 1 of 100
10it [00:00, 15.45it/s]
Train Loss: 0.6604
Epoch 2 of 100
10it [00:00, 26.60it/s]
Train Loss: 0.5892
...
Epoch 100 of 100
10it [00:00, 24.76it/s]
Train Loss: 0.4229
By the end of 100 epochs, our model has reached a loss of 0.4229 which is much better than the binary classification model!
The following is the loss plot after training for 100 epochs.
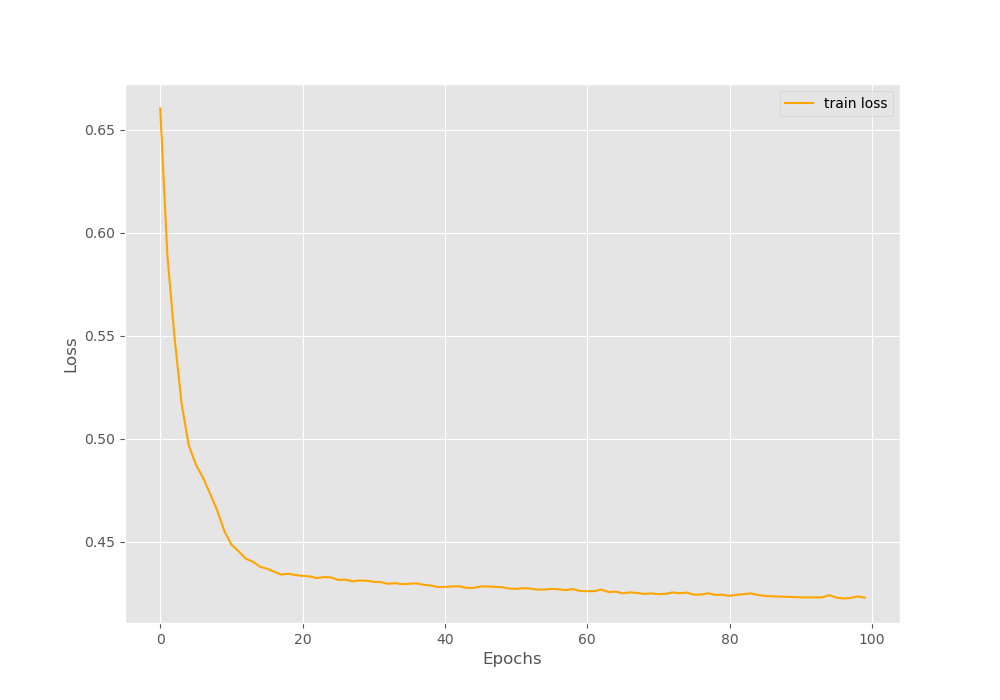
Figure 5 shows that the loss was decreasing till the end of 100 epochs as well. Maybe even more training would have helped the model. Looks like our model is performing well.
Hopefully, the testing of the model will also show similar results.
Type the following command to run the test code.
python inference_multi_head_multi_category.py
[INFO]: Number of test samples: 100
[INFO]: Number of test features: 12
SAMPLE 0
ALL PREDICTIONS: [1, 0, 0, 0, 0]
GROUND TRUTHS: [1, 1, 0, 0, 0]
SAMPLE 1
ALL PREDICTIONS: [0, 1, 0, 0, 0]
GROUND TRUTHS: [1, 1, 0, 0, 0]
SAMPLE 2
ALL PREDICTIONS: [1, 1, 0, 1, 0]
GROUND TRUTHS: [1, 1, 0, 1, 1]
...
SAMPLE 98
ALL PREDICTIONS: [1, 0, 0, 1, 0]
GROUND TRUTHS: [1, 0, 0, 1, 0]
SAMPLE 99
ALL PREDICTIONS: [0, 0, 0, 0, 1]
GROUND TRUTHS: [0, 0, 0, 0, 1]
We can see that the predicted labels are very similar to the ground truth labels. Our model has learned the features of the dataset well. And it is almost very clear that training the model for more epochs will surely help the model learn even better.
From the above results, it seems that using a deep learning model with multi-category output features with Cross Entropy loss is performing better than a binary classifier with Binary Cross Entropy loss. Maybe next time, whenever you see even a binary classification problem, you can use a multi-category deep learning classifier with Cross Entropy Loss and that will perform better. Still, it depends many other factors as well.
Summary and Conclusion
In this article, you learned how to deal with multi-label datasets using deep learning and neural networks. We saw how to use a multi-head binary classifier model as well as a multi-head multi-category classifier. You also got to learn how to change the output heads according to the data along with the loss functions. I hope that you both enjoyed and learned something new from this tutorial.
If you have any suggestions, doubts, or thoughts, then please leave them in the comment section. I will be happy to address them.
You can contact me using the Contact section. You can also find me on LinkedIn, and Twitter.

Hello.
First of all thanks a lot for this model and all the explanation.
I’m trying to apply your model to a Toxicity Comment classifier but for some reason I’m not being able to train the model correctly. It always returns 0 for all labels.
The data structure that its fed into the model is the same as yours.
I have 6 labels instead of 5 like yours, which should be the same logic applied.
Did you apply this model to a project like this? How can I feed into the model a tensor with shape [1024, 150, 300] – batch, features & embedding size.
Thanks a lot once again.
Hello Francisco. It’s quite nice that you are trying to adapt the model for NLP. But I mostly work with vision, and it will be a bit difficult to answer your question right now. I think it will help you a lot if you can ask someone who constantly works with NLP. I hope you understand.
Hello, thank you for such great post, I have similar problem, but with 23 labels and I don’t want to write program in out1, out2, …. out23 way, the problem that when I try to convert your code into list of outs out[0], out[1] … out[22] the problem occure with device: “Expected all tensors to be on the same device, but found at least two devices, cpu and cuda:0! (when checking argument for argument mat1 in method wrapper_addmm)” Could you please show hoe to convert this code into the list view for any number of the outputs? Thank you.
Hello Suleyman.
I think your model and data are on different devices. Maybe you have your model on the GPU and the data is still on the CPU. Can you check that?
Thanks for the tutorials. Very useful
# made the following changes to train_multi_head_binary.py and inference_multi_head_binary.py
# targets = (target1, target2, target3, target4, target5)
targets = ( target1.unsqueeze(1),
target2.unsqueeze(1),
target3.unsqueeze(1),
target4.unsqueeze(1),
target5.unsqueeze(1)
)
Hi James. Are you modifying this for calculating accuracy?
Hi! Thank you for the insightful post,
I’m trying to implement Multi-Head Binary Classification for my dataset. I have over 100 unique labels, and I use a pretrained model. So do I have to define the head classifier one by one like your code above? or is it possible to use for loop? but I have no idea what the code looks like if using “for loop”. could you maybe give me some clues, sovit?
Hello Lain.
To use a for loop, in models.py from start a for loop in the __init__() method where the heads are initialized self.out.
You can use a for loop similarly in the forward() method.
Hi Sovit, if I want to use weighted loss for multi-head binary classification, how should the loss function be? If I have 50 classes, what size of weights should I provide? Do I also need to create weights for the negative class?
Try to use weight for each class in each head. If it is a binary head, provide the appropriate weight for the positive and negative classes. This should work.
Would it be a problem if I only provide weights for the positive class? Have you ever written about the usage of weights in loss for multi-head binary cases that I can use as a reference?
You may try. However, I have not tried it before. Please let me know how it works in case you try it.
I may try to write a blog post on it.
I used the following loss function, but I didn’t find any significant difference in the metrics I obtained (F1 Score) when I used the loss function with weights compared to using the loss function without weights. Is there something wrong with this code? The size of the outputs is (100, 64, 1), and the size of the weights is (100,). I have 100 classes.
def binary_loss_fn(outputs, targets, weights):
n_outputs = len(outputs)
n_targets = len(targets)
n_weights = len(weights)
assert n_outputs == n_targets == n_weights, “Number of outputs and targets must be the same”
loss_sum = 0
for i in range(n_outputs):
output = outputs[i]
target = targets[i]
weight = weights[i]
loss = nn.BCELoss()(output, target) * weight
loss_sum += loss
return loss_sum / n_outputs
Hello Dara. You will only be able to see significant improvement if the dataset classes are truly imbalanced. But I guess you are still seeing some improvement at least, am I right?
My dataset classes are truly imbalanced. And yeah Sovit, you’re right, I’m still seeing some improvement, but it’s just 0.006 :’)
Do you have any ideas to improve the model’s performance?
Hello Dara. Creating a new thread here.
Can you please share some more details about the learning rate, model, etc?
Sure, here is my code
https://bit.ly/Multiheadbinary
Thank you. I will need time to review it.
Your willingness to help is truly invaluable and your assistance would mean a lot to me. Thank you sincerely, Sovit.
Thank you. I am just trying help my readers.
Hello, Dara. Creating a new thread here.
I took a look at your code. Here is what I interpreted. It seems like you are assigning weights in a multi-class fashion instead of multi-label fashion.
I may be wrong here. But what I want to ensure is that for each class, take that particular class as positive and assign the weight and take all other as negative classes.
So, in the loss, you will have to run a for loop (100 times for your dataset) with a weight tensor with a single value for each of the classes. I think that will improve the result.
EDIT:
I saw that you are already doing what I told. In that case, can you please try using BCEWithLogitsLoss instead of BCELoss. This should be more stable numerically. Here, you do not pass the output through an activation layer and provide the logits directly to the loss function. This blog post may help. Please take a look => https://medium.com/@zergtant/use-weighted-loss-function-to-solve-imbalanced-data-classification-problems-749237f38b75
Oo, i see, okay, thank you so much, Sovit. I’ll try it
Welcome.