
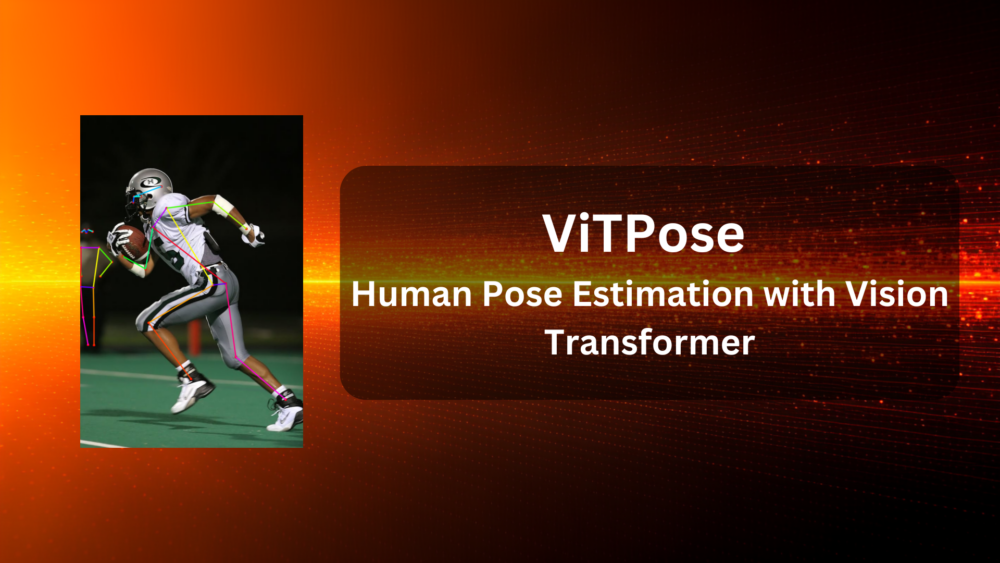
Recent breakthroughs in Vision Transformer (ViT) are leading to ViT-based human pose estimation models. One such model is ViTPose. In this article, we will explore the ViTPose model for human pose estimation.
CNNs primarily rule the pose estimation field in computer vision. As such, exploring a Vision Transformer based model for human pose estimation is quite important for the advancement of the field. Exploring the ViTPose model architecture and pretraining strategy will lead to a lot of insights.
What will we cover in this article?
- What is ViTPose?
- What architecture and approach does ViTPose follow?
- How to carry out image and video inference using ViTPose?
- What are the limitations of the model and its pipeline?
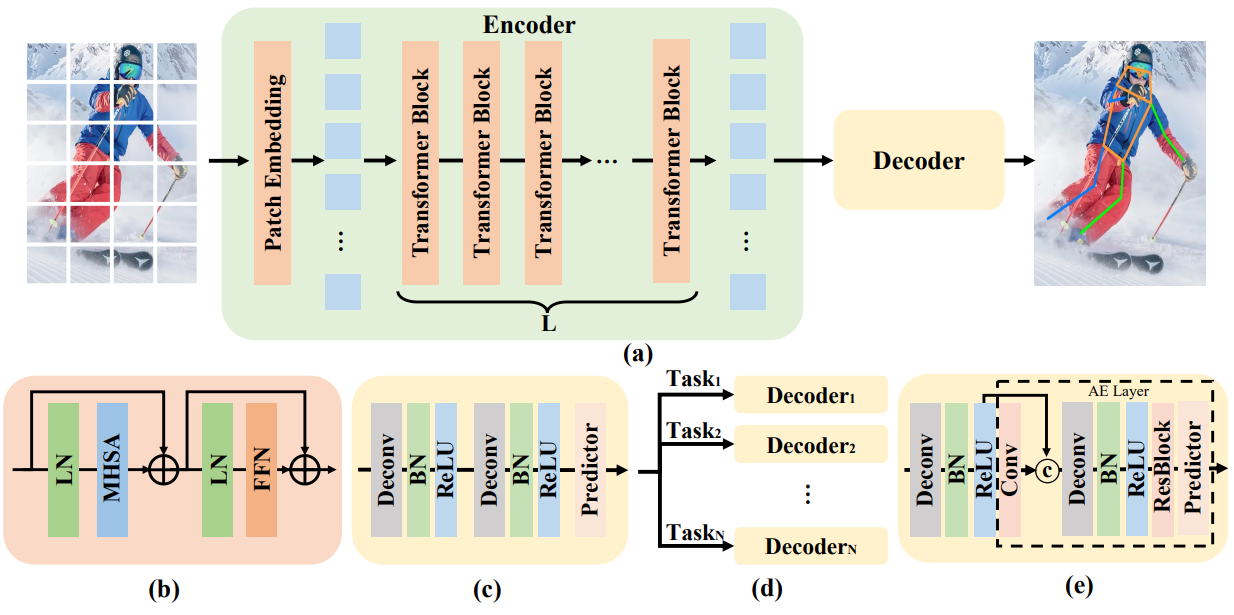
The Architecture of ViTPose and VitPose++
Here, we will discuss the architecture of two models, ViTPose and ViTPose++.
The ViTPose model was introduced in the ViTPose: Simple Vision Transformer Baselines for HumanPose Estimation paper by Yufei Xu, Jing Zhang, Qiming Zhang, Dacheng Tao. Later, the ViTPose++ model was introduced in the ViTPose++: Vision Transformer for Generic Body Pose Estimation by the same authors.
We will cover both architectures here.
ViTPose
The ViTPose model consists of a Vision Transformer encoder, and either a classic or a simple decoder.

The above figure also shows task based decoders (e). We will come to that later.
The authors wanted to keep the architecture simple, so, they used a plain vision transformer without any bells and whistles. This, as usual, gives us the features of any input image. Next, we feed it to either the classic or simple decoder which predicts the keypoints for human pose estimation.
The Classic Decoder
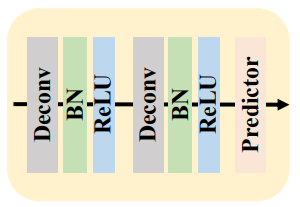
It consists of two blocks of Deconvolution-BatchNorm-ReLU. Finally, a 1×1 convolutional layer predicts the localization heatmaps for the keypoints. Each of the deconvolution layers upsamples the features by 2x. For the MS COCO dataset, it detects 17 keypoints.
The Simple Decoder
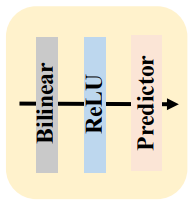
As the vision transformer backbone provides strong features, the authors try a simple decoder as well. They use 4x bilinear upsampling, followed by ReLU, and a final 3×3 convolutional layer. Because of the strong backbone features, this is competitive with the classic decoder.
As the backbone is a plain vision transformer and the decoders follow simple architecture, the authors were able to scale the models easily. They could switch between ViT-B, ViT-L, ViT-H, and even ViTAE-G which consists of 1B parameters.
Pretraining of ViTPose
As we can interpret from above, the architecture itself is not the magic here. It is the dataset and pretraining strategies.
- Instead of ImageNet, the authors pretrained the backbones on human crops of MS COCO and AI Challenger data, both of which are human pose estimation datasets. They used MAE (Masked Autoencoder) where 75% of the patches are randomly masked and the model has to reconstruct the masked patches. During fine-tuning for pose estimation, the backbone is initialized with the MAE pretrained weights. This leads to better initialization compared to ImageNet pretraining.
- The authors also experiment with resolution flexibility, different types of attention, and full fine-tuning vs freezing MHSA and FFN (Feed Forward Network) modules.
There are many other details regarding the speed, resolution, benchmarks, and ablation studies in the paper. I recommend giving the paper a read to fully grasp the concept of ViTPose.
ViTPose++
ViTPose++ was the next iteration of the model. This extended the architecture with two major updates:
- Training on multiple datasets such as human and animal keypoints for generic keypoint detection.
- A Mixture-of-Experts (MoE) approach in the backbone for sharing knowledge between different datasets.
- Task based decoder to deal with multiple datasets.
The MoE in the backbone became critical for dealing with different body poses, dealing with human and animal keypoints, and distinct appearances. Furthermore, the task based decoder becomes criticial during inference on animal and human poses. As humans and animals can have different number of keypoints, understanding this also becomes crucial during inference. As such, the ViTPose++ model was trained on the following datasets:
- MS COCO: Human pose estimation containing 17 keypoints.
- COCO-W (COCO Whole Body): The same images as MS COCO but with additional keypoints for face, feet, and hands, leading to 133 keypoints.
- MPII: Human pose estimation with 16 keypoints.
- AIC (AI Challenger): Human pose estimation with 14 keypoints for shoulder, elbow, wrist, hip, knee, ankle, and head.
- AP-10K: Animal keypoint estimation with 54 different animal categories.
- AP-36K: Animal keypoint estimation with 30 different animal categories.
Other than the above, OCHuman was used for evaluation only. Furthermore, the models were later fine-tuned on the InterHand2.6M dataset to check transferability to hand keypoint estimation.
I recommend giving both papers a read to understand the models, methodologies, and benchmarks better. Further in the article, we will carry out inference experiments.
Directory Structure
Following is the directory structure that we maintain for the inference experiments.
├── input
│   ├── image_1.jpg
│   ├── video_1.mp4
│   ├── video_2.mp4
│   └── video_3.mp4
├── outputs
│   ├── video_1.mp4
│   ├── video_2.mp4
│   └── video_3.mp4
├── image_inference.ipynb
├── README.md
└── video_inference.py
- The
inputandoutputsdirectories contain the input data for experiments and the results respectively. - We have one Jupyter Notebook for image inference and a Python script for running inference on videos.
Download Code
All the input data and code files are available via the download section.
Installing Dependencies
We need to install a few major frameworks and libraries.
pip install torch torchvision torchaudio

pip install transformers

pip install matplotlib opencv-python
This brings us to the end of all the setup that we need to do.
Pose Estimation using ViTPose
We will start with the Jupyter Notebook which contains the code for image inference. This will help us get the hang of the pipeline and then we will move to video inference.
ViTPose Image Inference
All the code in the following sub-sections is present in the image_inference.ipynb Jupyter Notebook.
Imports
Let’s start with the import statements.
import torch
import numpy as np
import matplotlib.pyplot as plt
import cv2
import matplotlib

from PIL import Image

from transformers import (
    AutoProcessor,
    RTDetrForObjectDetection,
    VitPoseForPoseEstimation,
)
We import the RTDetrForObjectDetection class from transformers. This will help us load the RT-DETR model for object detection. ViTPose is a top-down model, meaning it accepts crops of detected human images and processes them for keypoint estimation. It does not contain a detector head itself. This is one of the drawbacks of the model.
Set the Compute Device and Read the Image
We will use CUDA if available otherwise, we will use CPU. Along with that, we read the image for inference.
device = 'cuda' if torch.cuda.is_available() else 'cpu'

image = Image.open('input/image_1.jpg')
plt.imshow(image)
plt.axis('off')
plt.show()
Following is the image.
Load the Object Detection Model and Helper Function for Detection
Now, we will load the RT-DETR object detection model and define a helper function for detection.
# Load object detection model.
person_image_processor = AutoProcessor.from_pretrained('PekingU/rtdetr_r50vd_coco_o365')
person_model = RTDetrForObjectDetection.from_pretrained(
    'PekingU/rtdetr_r50vd_coco_o365',
    device_map=device
)

def detect_objects(image):
    """
    :param image: Image in PIL image format.

    Returns:
        person_boxes: Bboxes of persons in [x, y, w, h] format.
    """
    inputs = person_image_processor(
        images=image, return_tensors='pt'
    ).to(device)

    with torch.no_grad():
        outputs = person_model(**inputs)

    target_sizes = torch.tensor([(image.height, image.width)])

    results = person_image_processor.post_process_object_detection(
        outputs, target_sizes=target_sizes, threshold=0.3
    )

    # Extract the first result, as we can pass multiple images at a time.
    result = results[0]

    # In COCO dataset, humans labels have index 0.
    person_boxes_xyxy = result['boxes'][result['labels'] == 0]
    person_boxes_xyxy = person_boxes_xyxy.cpu().numpy()

    # Convert boxes from (x1, y1, x2, y2) to (x1, y1, w, h) format.
    person_boxes = person_boxes_xyxy.copy()
    person_boxes[:, 2] = person_boxes[:, 2] - person_boxes[:, 0]
    person_boxes[:, 3] = person_boxes[:, 3] - person_boxes[:, 1]
    print(person_boxes)

    return person_boxes
The detect_objects function accepts an image in PIL Image format. Then it processes it using the RT-DETR image processor and propagates it through the model. As we are carrying out human pose estimation here, we discard all detections other than persons, indexed 0. It has drawbacks as well. The model detects 79 other classes if they are present. This adds up to latency. Using a simple person detector would make the inference faster.
Finally, the function converts the bounding boxes from (xmin, ymin, xmax, ymax) to (xmin, ymin, width, height) format and returns the results.
Loading ViTPose Model and Helper Function
The next code blocks loads the ViTPose model and defines the helper function for the forward pass.
# Load ViTPose model.
image_processor = AutoProcessor.from_pretrained(
    'usyd-community/vitpose-base-simple'
)
model = VitPoseForPoseEstimation.from_pretrained(
    'usyd-community/vitpose-base-simple', device_map=device
)

def detect_pose(image, person_boxes):
    """
    :param image: Image in PIL image format.
    :param person_bboxes: Batched person boxes in [[x, y, w, h], ...] format.
    """
    inputs = image_processor(
        image, boxes=[person_boxes], return_tensors='pt'
    ).to(device)

    with torch.no_grad():
        outputs = model(**inputs)

    pose_results = image_processor.post_process_pose_estimation(
        outputs, boxes=[person_boxes]
    )
    image_pose_result = pose_results[0]

    print(image_pose_result)

    return image_pose_result
Here, we are loading the ViTPose base model with the simple decoder, hence, the name vitpose-base-simple.
The detect_pose function accepts the image in PIL format and the batched lists of bounding boxes of the detected persons. The ViTPose image processor processes both, the image and the boxes. Then we carry the forward pass and apply post processing to get the final results.
Detecting the Person and Carrying Out Pose Estimation
We just need to call the above functions with the correct arguments to carry out pose estimation.
bboxes = detect_objects(image)
image_pose_result = detect_pose(image, bboxes)
This is how the processed keypoint results look like.
[{'keypoints': tensor([[153.4705, 255.6327],
        [155.2591, 239.2415],
        [155.1221, 239.0368],
        [174.0532, 239.6201],
        [233.1174, 210.8382],
        [248.1761, 272.3109],
        [209.8787, 327.9704],
        [382.1495, 254.0411],
        [188.7489, 446.8465],
        [476.0375, 331.8938],
        [124.9601, 410.1974],
        [381.2399, 492.1115],
        [417.8311, 488.2391],
        [197.9209, 600.3510],
        [446.0930, 698.2394],
        [318.3506, 761.6322],
        [588.0345, 820.4767]]), 'scores': tensor([0.7639, 0.7476, 0.6793, 0.8779, 0.6814, 0.9280, 0.7452, 0.9129, 0.9302,
        0.9398, 0.7560, 0.7871, 0.6811, 0.9874, 0.9644, 0.8854, 0.8639]), 'labels': tensor([ 0,  1,  2,  3,  4,  5,  6,  7,  8,  9, 10, 11, 12, 13, 14, 15, 16]), 'bbox': tensor([358.2573, 536.7146, 360.8099, 540.4514])}, {'keypoints': tensor([[ 19.3639, 342.5414],
        [ 25.6351, 334.8659],
        [ 14.9270, 334.3252],
        [ 37.8917, 339.9770],
        [  6.9799, 340.1212],
        [ 55.3605, 385.9426],
        [  4.1932, 385.3824],
        [ 92.4627, 426.9088],
        [  2.2930, 434.5884],
        [ 59.8596, 467.0472],
        [  5.1384, 466.3274],
        [ 39.2511, 499.7095],
        [  3.4850, 497.2410],
        [ 41.4547, 584.3143],
        [ 10.1949, 584.0645],
        [ 41.6129, 664.9502],
        [ 24.5571, 663.1198]]), 'scores': tensor([0.9128, 0.8930, 0.8951, 0.8646, 0.8448, 0.8784, 0.8975, 0.9290, 0.6272,
        0.6956, 0.3021, 0.7503, 0.7516, 0.7535, 0.6354, 0.7427, 0.6099]), 'labels': tensor([ 0,  1,  2,  3,  4,  5,  6,  7,  8,  9, 10, 11, 12, 13, 14, 15, 16]), 'bbox': tensor([ 52.1382, 499.1862,  52.9098, 500.5483])}]
We have a list that contains dictionaries for keypoints, scores, labels, and the bounding boxes for each person.
We can also use the ViTPose model configuration to analyze which keypoint from the above corresponds to which body part.
# Print results in more human-readable format.
for i, person_pose in enumerate(image_pose_result):
    print(f'Person #{i}')
    for keypoint, label, score in zip(
        person_pose['keypoints'], person_pose['labels'], person_pose['scores']
    ):
        keypoint_name = model.config.id2label[label.item()]
        x, y = keypoint
        print(f' - {keypoint_name}: x={x.item():.2f}, y={y.item():.2f}, score={score.item():.2f}')
For drawing the skeletal map of the persons, we need to define which keypoint edges will connect with each other. Also, we define a helper function to overlay the skeletal map on the persons.
edges = [
    (0, 1), (0, 2), (2, 4), (1, 3), (6, 8), (8, 10),
    (5, 7), (7, 9), (5, 11), (11, 13), (13, 15), (6, 12),
    (12, 14), (14, 16), (5, 6), (11, 12)
]

def draw_keypoints(outputs, image):
    """
    :param outputs: Outputs from the keypoint detector.
    :param image: Image in PIL Image format.

    Returns:
        image: Annotated image Numpy array format.
    """
    image = cv2.cvtColor(np.array(image), cv2.COLOR_RGB2BGR)
    # the `outputs` is list which in-turn contains the dictionaries
    for i, pose_result in enumerate(outputs):
        keypoints = pose_result['keypoints'].cpu().detach().numpy()
        # proceed to draw the lines if the confidence score is above 0.9
        keypoints = keypoints[:, :].reshape(-1, 2)
        for p in range(keypoints.shape[0]):
            # draw the keypoints
            cv2.circle(image, (int(keypoints[p, 0]), int(keypoints[p, 1])),
                        3, (0, 0, 255), thickness=-1, lineType=cv2.FILLED)
            # uncomment the following lines if you want to put keypoint number
            # cv2.putText(image, f'{p}', (int(keypoints[p, 0]+10), int(keypoints[p, 1]-5)),
            #             cv2.FONT_HERSHEY_SIMPLEX, 0.5, (0, 0, 0), 1)
        for ie, e in enumerate(edges):
            # get different colors for the edges
            rgb = matplotlib.colors.hsv_to_rgb([
                ie/float(len(edges)), 1.0, 1.0
            ])
            rgb = rgb*255
            # join the keypoint pairs to draw the skeletal structure
            cv2.line(image, (int(keypoints[e, 0][0]), int(keypoints[e, 1][0])),
                    (int(keypoints[e, 0][1]), int(keypoints[e, 1][1])),
                    tuple(rgb), 2, lineType=cv2.LINE_AA)
    return image
Finally, we call the function and visualize the results.
result = draw_keypoints(image_pose_result, image)

plt.imshow(result[..., ::-1])
plt.axis('off')
plt.show()
Following is the result that we get.
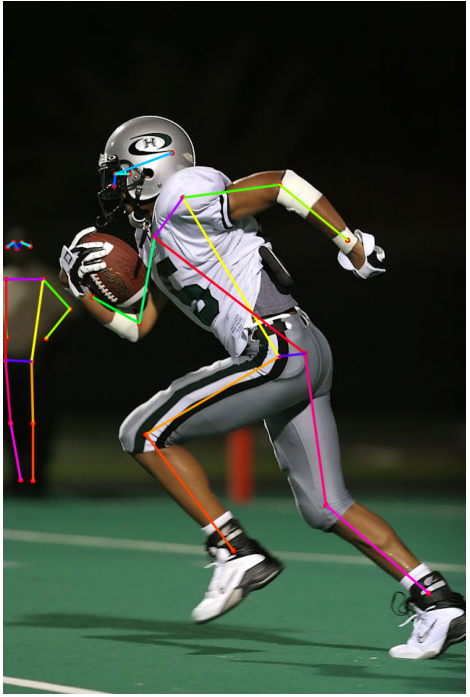
The results are good. In fact, both the detector and the ViTPose model are performing well here. The RT-DETR model is able to detect the person at the far end even though he appears blurry. And the pose estimation model is able to detect the pose correctly as well. The ViTPose model detects the pose correctly for the athlete as well, even though the stance is quite difficult.
ViTPose Video Inference
Next, we will carry out pose estimation in videos. This is going to be straightforward as we need to combine everything that we did for images and just loop through the video frames.
The code for this is present in the video_inference.py file.
Imports and Defining Argument Parser
The following code block imports all the necessary libraries and defines the argument parser.
import torch
import numpy as np
import cv2
import matplotlib
import argparse
import os
import time

from PIL import Image

from transformers import (
    AutoProcessor,
    RTDetrForObjectDetection,
    VitPoseForPoseEstimation,
)

parser = argparse.ArgumentParser()
parser.add_argument(
    '--input',
    default='input/video_1.mp4',
    help='path to the input video'
)
parser.add_argument(
    '--det-conf',
    dest='det_conf',
    default=0.3,
    type=float,
    help='detection confidence threshold'
)
parser.add_argument(
    '--pose-model',
    dest='pose_model',
    choices=[
        'usyd-community/vitpose-base',
        'usyd-community/vitpose-base-simple',
        'usyd-community/vitpose-base-coco-aic-mpii',
        'usyd-community/vitpose-plus-small',
        'usyd-community/vitpose-plus-base',
        'usyd-community/vitpose-plus-large',
        'usyd-community/vitpose-plus-huge'
    ],
    default='usyd-community/vitpose-base'
)
args = parser.parse_args()
We provide the choice for all the ViTPose models available on Hugging Face via the --model command line argument. These include the ViTPose and ViTPose++ models.
Loading the Video and Models
Let’s load the video from the command line argument, and load both models as well.
OUT_DIR = 'outputs'
os.makedirs(OUT_DIR, exist_ok=True)

device = 'cuda' if torch.cuda.is_available() else 'cpu'

cap = cv2.VideoCapture(args.input)
frame_width = int(cap.get(3))
frame_height = int(cap.get(4))
video_fps = int(cap.get(5))

save_name = args.input.split(os.path.sep)[-1].split('.')[0]
# Define codec and create VideoWriter object.
out = cv2.VideoWriter(
    f'{OUT_DIR}/{save_name}.mp4',
    cv2.VideoWriter_fourcc(*'mp4v'),
    video_fps,
    (frame_width, frame_height)
)

# Load detector.
person_image_processor = AutoProcessor.from_pretrained(
    'PekingU/rtdetr_r50vd_coco_o365'
)
person_model = RTDetrForObjectDetection.from_pretrained(
    'PekingU/rtdetr_r50vd_coco_o365', device_map=device
)

# Load ViTPose.
print(f"Pose Model: {args.pose_model}")
image_processor = AutoProcessor.from_pretrained(args.pose_model)
model = VitPoseForPoseEstimation.from_pretrained(args.pose_model, device_map=device)
Helper Functions for Person Detection, Pose Estimation, and Drawing Keypoints
There are slight modifications to person detection and pose estimation models this time.
edges = [
    (0, 1), (0, 2), (2, 4), (1, 3), (6, 8), (8, 10),
    (5, 7), (7, 9), (5, 11), (11, 13), (13, 15), (6, 12),
    (12, 14), (14, 16), (5, 6), (11, 12)
]

def detect_objects(image):
    """
    :param image: Image in PIL image format.

    Returns:
        person_boxes: Bboxes of persons in [x, y, w, h] format.
    """
    det_time_start = time.time()

    inputs = person_image_processor(
        images=image, return_tensors='pt'
    ).to(device)

    with torch.no_grad():
        outputs = person_model(**inputs)

    target_sizes = torch.tensor([(image.height, image.width)])

    results = person_image_processor.post_process_object_detection(
        outputs, target_sizes=target_sizes, threshold=args.det_conf
    )

    det_time_end = time.time()

    det_fps = 1 / (det_time_end-det_time_start)

    # Extract the first result, as we can pass multiple images at a time.
    result = results[0]

    # In COCO dataset, humans labels have index 0.
    person_boxes_xyxy = result['boxes'][result['labels'] == 0]
    person_boxes_xyxy = person_boxes_xyxy.cpu().numpy()

    # Convert boxes from (x1, y1, x2, y2) to (x1, y1, w, h) format.
    person_boxes = person_boxes_xyxy.copy()
    person_boxes[:, 2] = person_boxes[:, 2] - person_boxes[:, 0]
    person_boxes[:, 3] = person_boxes[:, 3] - person_boxes[:, 1]

    return person_boxes, det_fps

def detect_pose(image, person_boxes):
    """
    :param image: Image in PIL image format.
    :param person_bboxes: Batched person boxes in [[x, y, w, h], ...] format.
    """
    pose_time_start = time.time()

    inputs = image_processor(
        image, boxes=[person_boxes], return_tensors='pt'
    ).to(device)

    dataset_index = torch.tensor([0], device=device) # must be a tensor of shape (batch_size,)

    if len(person_boxes) != 0:
        if 'plus' in args.pose_model:
            with torch.no_grad():
                outputs = model(**inputs, dataset_index=dataset_index)
        else:
            with torch.no_grad():
                outputs = model(**inputs)

        pose_results = image_processor.post_process_pose_estimation(
            outputs, boxes=[person_boxes]
        )

    pose_time_end = time.time()

    pose_fps = 1 / (pose_time_end-pose_time_start)

    if len(person_boxes) == 0:
        return [], pose_fps

    image_pose_result = pose_results[0]

    return image_pose_result, pose_fps

def draw_keypoints(outputs, image):
    """
    :param outputs: Outputs from the keypoint detector.
    :param image: Image in PIL Image format.

    Returns:
        image: Annotated image Numpy array format.
    """
    image = cv2.cvtColor(np.array(image), cv2.COLOR_RGB2BGR)
    # the `outputs` is list which in-turn contains the dictionaries
    for i, pose_result in enumerate(outputs):
        keypoints = pose_result['keypoints'].cpu().detach().numpy()
        # proceed to draw the lines if the confidence score is above 0.9
        keypoints = keypoints[:, :].reshape(-1, 2)
        for p in range(keypoints.shape[0]):
            # draw the keypoints
            cv2.circle(image, (int(keypoints[p, 0]), int(keypoints[p, 1])),
                        3, (0, 0, 255), thickness=-1, lineType=cv2.FILLED)
            # uncomment the following lines if you want to put keypoint number
            # cv2.putText(image, f'{p}', (int(keypoints[p, 0]+10), int(keypoints[p, 1]-5)),
            #             cv2.FONT_HERSHEY_SIMPLEX, 0.5, (0, 0, 0), 1)
        for ie, e in enumerate(edges):
            # get different colors for the edges
            rgb = matplotlib.colors.hsv_to_rgb([
                ie/float(len(edges)), 1.0, 1.0
            ])
            rgb = rgb*255
            # join the keypoint pairs to draw the skeletal structure
            cv2.line(image, (int(keypoints[e, 0][0]), int(keypoints[e, 1][0])),
                    (int(keypoints[e, 0][1]), int(keypoints[e, 1][1])),
                    tuple(rgb), 2, lineType=cv2.LINE_AA)
    return image
In both functions, detect_objects and detect_pose we calculate the forward pass time. This helps us keep track of the FPS for each model.
Furthermore, in detect_pose, we have a separate call to the forward pass when using the ViTPose++ models (lines 136 to 138). As the ViTPose++ models are trained on multiple datasets, we need to provide the dataset index which is a batched tensor. This requires an additional dataset_index to be passed during the forward pass. The call for the ViTPose remains the same. As we are using the models trained on the MS COCO dataset for human pose estimation, the index is 0. You can check all the dataset indices here. Furthermore, we also carry out a check if no persons are detected in a frame, then return an empty list with the FPS. This avoids unnecessary empty list errors.
Loop Over Video Frames to Carry Out Inference
Next, we loop over the video frames to carry out inference.
frame_count = 0 # To count total frames.
total_fps = 0 # To get the final frames per second.

while cap.isOpened():
    ret, frame = cap.read()

    if ret:
        frame_rgb = cv2.cvtColor(frame, cv2.COLOR_BGR2RGB)

        image = Image.fromarray(frame_rgb)

        start_time = time.time()

        bboxes, det_fps = detect_objects(image=image)
        image_pose_result, pose_fps = detect_pose(image=image, person_boxes=bboxes)

        result = draw_keypoints(image_pose_result, image)

        end_time = time.time()

        forward_pass_time = end_time - start_time

        # Get the current fps.
        fps = 1 / (forward_pass_time)
        # Add `fps` to `total_fps`.
        total_fps += fps
        # Increment frame count.
        frame_count += 1

        cv2.putText(
            result,
            f"FPS: {fps:0.1f} | Pose FPS: {pose_fps:0.1f} | Detection FPS: {det_fps:0.1f}",
            (15, 25),
            fontFace=cv2.FONT_HERSHEY_SIMPLEX,
            fontScale=1.0,
            color=(0, 0, 255),
            thickness=2,
            lineType=cv2.LINE_AA,
        )

        out.write(result)

        cv2.imshow('Prediction', result)
        # Press `q` to exit
        if cv2.waitKey(1) & 0xFF == ord('q'):
            break
    else:
        break

 # Release VideoCapture().
cap.release()
# Close all frames and video windows.
cv2.destroyAllWindows()

avg_fps = total_fps/frame_count
print(f"Average FPS: {avg_fps}")
The person detection and pose estimation functions return the respective FPS. We annotate that along with the total FPS of the entire pipeline on the video frame.
Let’s run some inference. All experiments were carried out on a machine with 10GB RTX 3080, 10th generation i7, and 32GB of RAM.
For the first experiment, we are using the default model, which is vitpose-base.
python video_inference.py --input input/video_1.mp4
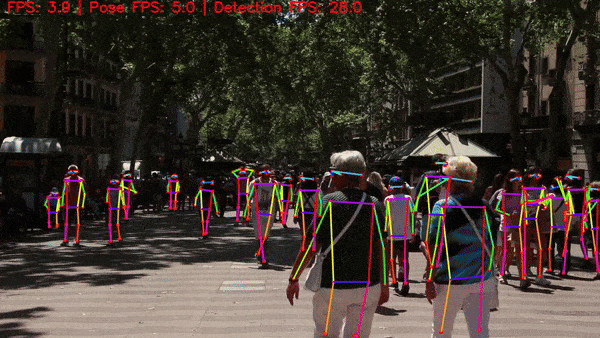
Following is the result.
For this video, we got 10 FPS on average. However, we can see how the pose estimation FPS fluctuates between 8 and 30 FPS depending on the number of persons for which the pose has to be detected.
Coming to the quality of the results, the pose estimations look quite stable here, even when the hands and legs of the persons are partially occluded. There is fluctuation when the person is completely hidden. The pose model can correctly detect the poses even for the persons who are at the far back. However, we have to give credit to the RT-DETR model as well for detecting them.
Let’s try another challenging video.
python video_inference.py --input input/video_2.mp4 --det-conf 0.7
Here we use a higher detection confidence score of 0.7, otherwise, the model was detecting some of the cones as persons.
This is a challenging scene. One side of the bikers is almost always occluded. Thanks to the strong pretrained backbone, the pose model is able to predict the points in most scenes. However, we can see flickering as well.
Try with the other pose models, especially the ViTPose++ models using the --model argument. There is a high chance that the larger models will perform better.
Key Takeaways
- The ViTPose model is an advancement in human pose estimation. It provides good estimations for partially occluded persons as well.
- However, it only does pose estimation following a top-down approach. The authors also point this out in the paper. A unified architecture with detection, tracking, and pose estimation will improve both, the speed and accuracy.
Summary and Conclusion
In this article, we covered the ViTPose and ViTPose++ models. We started with the essential components of the architecture and then moved to inference. We carried both, image and video inference while analyzing the strengths and weaknesses. I hope this article was worth your time.
If you have any questions, thoughts, or suggestion, please leave them in the comment section. I will surely address them.
You can contact me using the Contact section. You can also find me on LinkedIn, and X.

1 thought on “ViTPose – Human Pose Estimation with Vision Transformer”