
In continuation of the previous article, this week, we will cover training the Gemma 3n model for audio transcription and translation. Gemma 3n models, although multimodal, are not adept at transcribing German audio. Furthermore, even after fine-tuning Gemma 3n for transcription, the model cannot correctly translate those into English. That’s what we are targeting here. To teach the Gemma 3n model to transcribe and translate German audio samples, end-to-end.
Our tech stack will use a mix of Hugging Face libraries, Unsloth, and Together for the German to English translation dataset creation.
What will we cover while training Gemma 3n for transcription and translation:
- Discussing the dataset in brief.
- Setting up the environment.
- Preparing the dataset for transcription and translation training. How do we create the German to English translation data for fine-tuning the model?
- Training, inference, and gradio demo.
The German Transcription Dataset
We will use the same dataset from Hugging Face that we used in the last article for fine-tuning Gemma 3n for German audio transcription.
The dataset is available on Hugging Face and it contains around 12000 samples. I recommend going through the previous article to know a bit more about the dataset.
The Project Directory Structure
Let’s take a look at the project directory structure before jumping into the coding part.
├── gemma-3n-finetuned
├── outputs
├── gemma3n_e2b_german_translate_finetune.ipynb
├── german_to_english.csv
├── requirements.txt
├── app.py
└── german_to_english_translate.ipynb
- The
gemma-3n-finetunedandoutputsdirectories contain the final and intermediate model outputs from training. - The
gemma3n_e2b_german_translate_finetune.ipynbis the Jupyter Notebook containing the code for training the model for transcription and translation. - In the
german_to_english_translate.ipynbJupyter Notebook, we have the code to create the translation dataset. The final translation samples are present in thegerman_to_english.csvfile. - The
app.pyPython file contains the Gradio application that we will create after training the model.
All the Jupyter Notebooks, trained adapter weights, and the requirements file are available via the download section.
Download Code
Installing the Dependencies
Just as we discussed in the previous post, we need to install the correct versions of all libraries for the training and inference to work correctly.
When working locally, you can install Unsloth first using the folliwing following command:
pip install unsloth unsloth-zoo
The above will install the latest versions of Unsloth and Unsloth Zoo, which should work, almost always. If you face issues, pin the installation to the following versions, which were used for the codebase in this article.
unsloth==2025.8.1
unsloth-zoo==2025.8.1
Next, install the rest of the libraries.
pip install -r requirements.txt
The above will also install the Together SDK that we need for creating the ground truth translation data.
Creating the Ground Truth German to English Translation Data
The very first step is creating the ground truth data for German to English translation. Without this, we cannot teach the model both transcription and translation.
For this, we will use the Together Serverless API service. The linked article also discusses free credits, free models, and making API calls for text and image generation, along with the setup steps.
For creating the translation dataset, we will make API calls to the Meta-Llama-3.1-8B-Instruct-Turbo model. In case you are short on credits and cannot create the dataset, the downloadable codebase already comes bundled with the CSV file.
The code for this is present in the german_to_english.ipynb Jupyter Notebook. Let’s go through the code briefly, as it is pretty much self-explanatory.
Import Statements and Initializing the Together Client
Let’s import all the libraries that we need and initialize the Together AI client.
from together import Together
from dotenv import load_dotenv
from datasets import load_dataset
from tqdm.auto import tqdm

import time
import pandas as pd

load_dotenv()

client = Together()
Before executing the above code, make sure to create a .env file and add your Together API key with the variable TOGETHER_API_KEY.
Function to Define the Prompt and Get Response
The following function accepts the German transcription from the dataset along with the message and returns the response.
def get_response(message):
    response = client.chat.completions.create(
        model='meta-llama/Meta-Llama-3.1-8B-Instruct-Turbo',
        messages=[
          {
            'role': 'user',
            'content': message
          }
        ]
    )

    return response.choices[0].message.content
Loading the Dataset and Making the API Calls
Let’s load the dataset, create lists to store the data, and make the API calls.
dataset = load_dataset('kadirnar/Emilia-DE-B000000')

german_sentences = []
english_sentences = []
sample_ids = []

for i, data in tqdm(enumerate(dataset['train']), total=len(dataset['train'])):
    # if i == 3:
    #     break
    text  = data['text']
    sample_id = data['_id']

    message = (
        'Translate this sentence from German to English. Give no other text:\n'
        f'German: {text}\n'
        f'English: '
    )

    response = get_response(message)

    german_sentences.append(text)
    english_sentences.append(response)
    sample_ids.append(sample_id)

    time.sleep(2)
We have a sleep time of 2 seconds between each API call to avoid rate limit issues. The entire process took around 12 hours, along with a credit cost of around $2.
Larger models like Llama 70B will give better translation results, but will be much slower in response and will also be costlier.
Save the Results in a CSV File
Finally, we save the results in a CSV file.
df = pd.DataFrame(columns=['_id', 'german', 'english'])

df['_id'] = sample_ids
df['german'] = german_sentences
df['english'] = english_sentences

df.to_csv('german_to_english.csv', index=False)
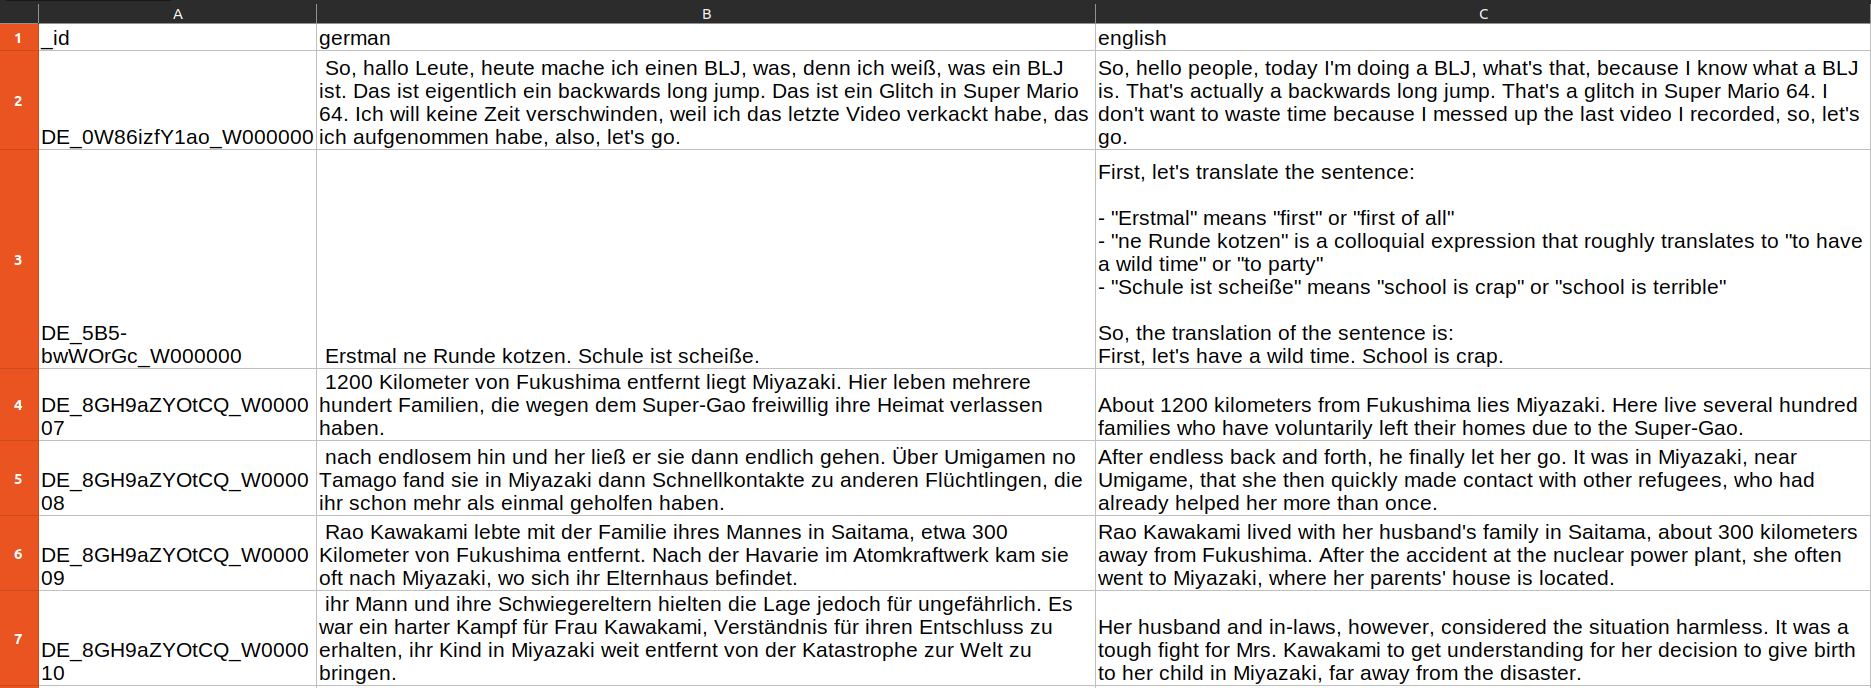
We also save the IDs in the _id column that we can use as the index column later.
Training Gemma 3n for German Audio Transcription and Translation
Let’s move over to the primary objective of this article: training the Gemma 3n model for transcription and translation.
The code is present in the gemma3n_e2b_german_translate_finetune.ipynb Jupyter Notebook. The first few cells contain the code for the installation of libraries in case you are running on Colab or Kaggle. We are skipping them here.
The code will remain mostly similar to the previous article, with changes mostly to the dataset preparation steps. So, we will keep the code discussion of the other parts brief.
Importing the Necessary Libraries for Training
The following code cell contains all the necessary imports.
from unsloth import FastModel
from huggingface_hub import snapshot_download
from datasets import load_dataset, Audio
from IPython.display import Audio, display
from transformers import WhisperProcessor
from evaluate import load
from trl import SFTTrainer, SFTConfig
from transformers import TextStreamer
from functools import partial

import torch
import pandas as pd

# Because of FailOnRecompileLimitHit: recompile_limit reached with one_graph=True
# Solution found here => https://github.com/huggingface/transformers/issues/39427
torch._dynamo.config.cache_size_limit = 32
On RTX GPUs, we may face torch._dynamo.exc.FailOnRecompileLimitHit. The last line of code in the above code block handles that.
Loading the Model
Next, we load the Gemma 3n E2B model in 4-bit quantized format.
model, processor = FastModel.from_pretrained(
    model_name='unsloth/gemma-3n-E2B-it-unsloth-bnb-4bit',
    dtype=None,
    max_seq_length=1024,
    load_in_4bit=True,
    full_finetuning=False
)
Preparing the Dataset
Loading and preparing the dataset for transcription and translation training is the core of this article. We will tackle this next.
# Load dataset.
dataset = load_dataset('kadirnar/Emilia-DE-B000000', split='train')

# Divide into train and test split.
train_samples = 11500
train_dataset = dataset.select(range(train_samples))
test_dataset = dataset.select(range(train_samples, len(dataset)))
Just like in the previous article, we divide it into a training set containing 11500 samples and the rest for testing.
The next step involves creating the data formatting function.
def format_intersection_data(samples: dict, df: pd.DataFrame) -> dict[str, list]:
    """Format intersection dataset to match expected message format"""
    formatted_samples = {'messages': []}
    for idx in range(len(samples['audio'])):
        # Extract audio and text data from HF dataset.
        audio = samples['audio'][idx]['array']
        label = str(samples['text'][idx])

        # Extract translation data from the CSV.
        _id = str(samples['_id'][idx])
        eng_data = df.loc[_id, 'english']
        # de_data = df.loc[_id, 'german']
        # print('Orig german: ', label)
        # print('DF german: ', de_data)
        # print('DF english: ', eng_data)

        content_assistant_text = (
            f'GERMAN TRANSCRIPTION: {label}\n'
            f'ENGLISH TRANSLATION: {eng_data}'
        )

        message = [
            {
                'role': 'system',
                'content': [
                    {
                        'type': 'text',
                        'text': 'You are an assistant that transcribes and translates speech accurately.',
                    }
                ],
            },
            {
                'role': 'user',
                'content': [
                    {'type': 'audio', 'audio': audio},
                    {'type': 'text', 'text': 'Please transcribe this audio and then translate from German to English.'}
                ]
            },
            {
                'role': 'assistant',
                'content':[{'type': 'text', 'text': content_assistant_text}]
            }
        ]

        # print(message)

        formatted_samples['messages'].append(message)
    return formatted_samples
In this case, along with the German transcription text, we also pass the English translated text to the assistant. This is what the model will predict. We have also carefully tuned the system and user prompts so that the model knows the task clearly.
Let’s load the CSV file and map the datasets to the above formatting function.
df = pd.read_csv('german_to_english.csv')
df = df.set_index('_id')

train_dataset = train_dataset.map(
    partial(format_intersection_data, df=df),
    batched=True,
    batch_size=4,
    num_proc=8
)

test_dataset = test_dataset.map(
    partial(format_intersection_data, df=df),
    batched=True,
    batch_size=4,
    num_proc=8
)
This is what the samples look like after they are formatted for model training.
<bos><bos><start_of_turn>user
You are an assistant that transcribes and translates speech accurately.


<start_of_audio><audio_soft_token><audio_soft_token><audio_soft_token><audio_soft_token>
<audio_soft_token><audio_soft_token><audio_soft_token><audio_soft_token><audio_soft_token>
<audio_soft_token><audio_soft_token><audio_soft_token><audio_soft_token><audio_soft_token>
<audio_soft_token><audio_soft_token><audio_soft_token><audio_soft_token><audio_soft_token>
<audio_soft_token><audio_soft_token><audio_soft_token><audio_soft_token><audio_soft_token>
<audio_soft_token><audio_soft_token><audio_soft_token><audio_soft_token><audio_soft_token>
<audio_soft_token><audio_soft_token><audio_soft_token><audio_soft_token><audio_soft_token>
<audio_soft_token><audio_soft_token><audio_soft_token><audio_soft_token><audio_soft_token>
<audio_soft_token><audio_soft_token><audio_soft_token><audio_soft_token><audio_soft_token>
<audio_soft_token><audio_soft_token><audio_soft_token><audio_soft_token><audio_soft_token>
<audio_soft_token><audio_soft_token><audio_soft_token><audio_soft_token><audio_soft_token>
<audio_soft_token><audio_soft_token><audio_soft_token><audio_soft_token><audio_soft_token>
<audio_soft_token><audio_soft_token><audio_soft_token><audio_soft_token><audio_soft_token>
<audio_soft_token><audio_soft_token><audio_soft_token><audio_soft_token><audio_soft_token>
<audio_soft_token><audio_soft_token><audio_soft_token><audio_soft_token><audio_soft_token>
<audio_soft_token><audio_soft_token><audio_soft_token><audio_soft_token><audio_soft_token>
<audio_soft_token><audio_soft_token><audio_soft_token><audio_soft_token><audio_soft_token>
<audio_soft_token><audio_soft_token><audio_soft_token><audio_soft_token><audio_soft_token>
<audio_soft_token><audio_soft_token><audio_soft_token><audio_soft_token><audio_soft_token>
<audio_soft_token><audio_soft_token><audio_soft_token><audio_soft_token><audio_soft_token>
<audio_soft_token><audio_soft_token><audio_soft_token><audio_soft_token><audio_soft_token>
<audio_soft_token><audio_soft_token><audio_soft_token><audio_soft_token><audio_soft_token>
<audio_soft_token><audio_soft_token><audio_soft_token><audio_soft_token><audio_soft_token>
<audio_soft_token><audio_soft_token><audio_soft_token><audio_soft_token><audio_soft_token>
<audio_soft_token><audio_soft_token><audio_soft_token><audio_soft_token><audio_soft_token>
<audio_soft_token><audio_soft_token><audio_soft_token><audio_soft_token><audio_soft_token>
<audio_soft_token><audio_soft_token><audio_soft_token><audio_soft_token><audio_soft_token>
<audio_soft_token><audio_soft_token><audio_soft_token><audio_soft_token><audio_soft_token>
<audio_soft_token><audio_soft_token><audio_soft_token><audio_soft_token><audio_soft_token>
<audio_soft_token><audio_soft_token><audio_soft_token><audio_soft_token><audio_soft_token>
<audio_soft_token><audio_soft_token><audio_soft_token><audio_soft_token><audio_soft_token>
<audio_soft_token><audio_soft_token><audio_soft_token><audio_soft_token><audio_soft_token>
<audio_soft_token><audio_soft_token><audio_soft_token><audio_soft_token><audio_soft_token>
<audio_soft_token><audio_soft_token><audio_soft_token><audio_soft_token><audio_soft_token>
<audio_soft_token><audio_soft_token><audio_soft_token><audio_soft_token><audio_soft_token>
<audio_soft_token><audio_soft_token><audio_soft_token><audio_soft_token><audio_soft_token>
<audio_soft_token><audio_soft_token><audio_soft_token><audio_soft_token><audio_soft_token>
<audio_soft_token><audio_soft_token><audio_soft_token><audio_soft_token><end_of_audio>

Please transcribe this audio and then translate from German to English.<end_of_turn>
<start_of_turn>model
GERMAN TRANSCRIPTION:  Das dritte Gate, da ist das vierte Gate. Da ist das Joban Eerie, da muss ich hin.
ENGLISH TRANSLATION: The third gate, that is the fourth gate. That is the Joban Eerie, I must go there.
<end_of_turn><pad><pad><pad><pad><pad><pad><pad><pad><pad><pad><pad><pad><pad><pad><pad><pad><pad><pad>
<pad><pad><pad><pad><pad><pad><pad><pad><pad><pad><pad><pad><pad><pad><pad><pad><pad><pad><pad><pad><pad>
<pad><pad><pad><pad><pad><pad><pad><pad><pad><pad><pad><pad><pad><pad><pad><pad><pad><pad><pad><pad><pad>
<pad><pad><pad><pad><pad><pad><pad><pad><pad>
The entire audio array gets converted to <audio_soft_token>. The user prompt follows it, and then the assistant’s response.
The final step of data preparation is the collation function for managing the text and audio batches.
def collate_fn(examples):
    texts = []
    audios = []

    for example in examples:
        # Apply chat template to get text
        text = processor.apply_chat_template(
            example['messages'], tokenize=False, add_generation_prompt=False
        ).strip()
        texts.append(text)

        # Extract audios
        audios.append(example['audio']['array'])

    # Tokenize the texts and process the images
    batch = processor(
        text=texts, audio=audios, return_tensors='pt', padding=True
    )

    # The labels are the input_ids, and we mask the padding tokens in the loss computation
    labels = batch['input_ids'].clone()

    # Use Gemma3n specific token masking
    labels[labels == processor.tokenizer.pad_token_id] = -100
    if hasattr(processor.tokenizer, 'image_token_id'):
        labels[labels == processor.tokenizer.image_token_id] = -100
    if hasattr(processor.tokenizer, 'audio_token_id'):
        labels[labels == processor.tokenizer.audio_token_id] = -100
    if hasattr(processor.tokenizer, 'boi_token_id'):
        labels[labels == processor.tokenizer.boi_token_id] = -100
    if hasattr(processor.tokenizer, 'eoi_token_id'):
        labels[labels == processor.tokenizer.eoi_token_id] = -100


    batch['labels'] = labels
    return batch
This ends all the data preparation steps we need for training the Gemma 3n model for transcription and translation.
Preparing the Model, SFTTrainer, and SFTConfig for Training Gemma 3n for Transcription and Translation
We will be fine-tuning both the text and audio layers of the Gemma 3n E2B model using QLoRA training methodology.
model = FastModel.get_peft_model(
    model,
    finetune_vision_layers=False,
    finetune_language_layers=True,
    finetune_attention_modules=True,
    finetune_mlp_modules=True,
    r=8,
    lora_alpha=16,
    lora_dropout=0,
    bias='none',
    random_state=3407,
    use_rslora=False,
    loftq_config=None,
    target_modules=[
        'q_proj', 'k_proj', 'v_proj', 'o_proj',
        'gate_proj', 'up_proj', 'down_proj',

        # Audio layers
        'post', 'linear_start', 'linear_end',
        'embedding_projection',
    ],
    modules_to_save=[
        'lm_head',
        'embed_tokens',
        'embed_audio',
    ],
)
We need to initialize the SFTTrainer class with the correct configurations.
trainer = SFTTrainer(
    model=model,
    train_dataset=train_dataset,
    eval_dataset=test_dataset,
    processing_class=processor.tokenizer,
    data_collator=collate_fn,
    args=SFTConfig(
        per_device_train_batch_size=4,
        gradient_accumulation_steps=1,
        # Use reentrant checkpointing.
        gradient_checkpointing_kwargs={'use_reentrant': False},
        warmup_ratio=0.1,
        # max_steps=10,
        num_train_epochs=1,
        learning_rate=5e-5,
        logging_steps=200,
        eval_strategy='steps',
        eval_steps=500,
        save_strategy='steps',
        save_steps=500,
        optim='adamw_8bit',
        weight_decay=0.01,
        lr_scheduler_type='cosine',
        seed=3407,
        output_dir='outputs',
        report_to='none',
        save_total_limit=2,
        load_best_model_at_end=True,
        metric_for_best_model='eval_loss',

        # For audio finetuning.
        remove_unused_columns=False,
        dataset_text_field='',
        dataset_kwargs={'skip_prepare_dataset': True},
        dataset_num_proc=8,
        max_length=1024,
    )
)
We will be training the model for just one epoch, which should be enough to get started.
Finally, let’s start the training.
The entire training and inference was done on a system with a 10GB RTX 3080 GPU, 32GB RAM, and 10th generation i7 CPU.
trainer_stats = trainer.train()
Here is a sample of the logs.
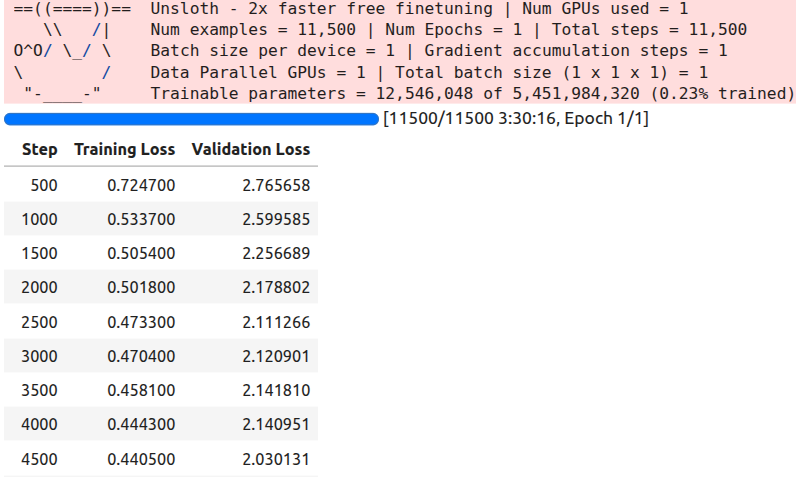
The training took around 3 hours and 30 minutes to complete.
Inference Using the Trained Model
Before going into the inference part, please go through the inference section of the previous article. We discuss the issues with the Gemma 3 Processor that Unsloth has and how to rectify them.
The rest of the inference part remains similar.
# Loading the saved model.
from unsloth import FastModel
from transformers import AutoProcessor

processor = AutoProcessor.from_pretrained('google/gemma-3n-E2B-it')

model, _ = FastModel.from_pretrained(
    model_name='gemma-3n-finetuned',
    max_seq_length=512,
    load_in_4bit=True,
    dtype=torch.bfloat16
)

def do_gemma_3n_inference(messages, max_new_tokens=128):
    _ = model.generate(
        **processor.apply_chat_template(
            messages,
            add_generation_prompt=True, # Must add for generation
            tokenize=True,
            return_dict=True,
            return_tensors='pt',
            truncation=False
        ).to('cuda', dtype=torch.bfloat16),
        max_new_tokens=max_new_tokens,
        do_sample=False,
        streamer=TextStreamer(processor, skip_prompt=True),
    )

messages = [
    {
        'role': 'system',
        'content': [
            {
                'type': 'text',
                'text': 'You are an assistant that transcribes and translates speech accurately.',
            }
        ],
    },
    {
        'role': 'user',
        'content': [
            {'type': 'audio', 'audio': test_dataset[-1]['audio']['array']},
            {'type': 'text', 'text': 'Please transcribe this audio and translate to English. Give both, the trancription and the translation'}
        ]
    }
]

do_gemma_3n_inference(messages, max_new_tokens=256)
We use the last sample from the test set and get the following result.
Transcription: Und ich hab so auf ein Stück Papier geschrieben. Ich hab viele Blockaden und kannst du mir helfen, diese Blockaden aufzulösen?
Translation: And I wrote it down on a piece of paper. I have many blockages and can you help me to resolve these blockages?<end_of_turn>
The model gives both the transcription and the translation. Checking with Google Translate, the answer looks pretty accurate.
At this moment, we have a good model that can transcribe German audio and translate it to English. Let’s move on to create an interactive Gradio application where we can upload audio files and carry out the entire process with a single click.
Creating a Gradio Application for Gemma 3n Transcription and Translation
The code for this is present in the app.py script.
The codebase also comes with convert_to_wav.ipynb Jupyter Notebook. This converts all the test samples in the dataset to .wav audio files so that we can easily upload and check the results in the app. Running the notebook will store all the audio files in the test_wav_files directory.
Let’s import the packages, load the model and processor, and define the inference function.
Imports:
import gradio as gr
import torch
import librosa
import numpy as np
import glob

from unsloth import FastModel
from transformers import AutoProcessor, TextIteratorStreamer
from threading import Thread
Load model and processor:
TARGET_SAMPLING_RATE = 16000

print("Loading model and processor...")

processor = AutoProcessor.from_pretrained('google/gemma-3n-E2B-it')

model, _ = FastModel.from_pretrained(
    model_name='gemma-3n-finetuned',
    max_seq_length=512,
    load_in_4bit=True,
    dtype=torch.bfloat16,
)
print("Model and processor loaded successfully.")
Inference function:
def transcribe_and_translate(audio_input):
    """
    This function takes audio data from the Gradio component, processes it,
    and then streams the model's transcription and translation back to the UI.
    """
    if audio_input is None:
        yield "Error: Please upload or record a German audio file first."
        return

    sample_rate, audio_array = audio_input

    if audio_array.ndim > 1:
        audio_array = audio_array.mean(axis=1)

    audio_array = audio_array.astype(np.float32)

    if sample_rate != TARGET_SAMPLING_RATE:
        audio_array = librosa.resample(
            y=audio_array,
            orig_sr=sample_rate,
            target_sr=TARGET_SAMPLING_RATE
        )

    messages = [
        {
            'role': 'system',
            'content': [
                {
                    'type': 'text',
                    'text': 'You are an assistant that transcribes and translates speech accurately.',
                }
            ],
        },
        {
            'role': 'user',
            'content': [
                {'type': 'audio', 'audio': audio_array},
                {'type': 'text', 'text': 'Please transcribe this audio and translate it to English. Give both, the transcription and the translation.'}
            ]
        }
    ]

    inputs = processor.apply_chat_template(
        messages,
        add_generation_prompt=True,
        tokenize=True,
        return_dict=True,
        return_tensors='pt'
    ).to('cuda', dtype=torch.bfloat16)

    streamer = TextIteratorStreamer(processor, skip_prompt=True, skip_special_tokens=True)

    generation_kwargs = dict(
        **inputs,
        streamer=streamer,
        max_new_tokens=1024,
        do_sample=False,
    )
    thread = Thread(target=model.generate, kwargs=generation_kwargs)
    thread.start()

    output_text = ""
    for new_text in streamer:
        output_text += new_text
        yield output_text
We also grab all the .wav file from the directory so that we do not need to upload them every time. And finally, create and launch the app.
# Grab all wav files in the directory
example_audios = glob.glob('test_wav_files/*.wav')
example_list = [ for audio in example_audios]
with gr.Blocks(theme=gr.themes.Soft()) as demo:
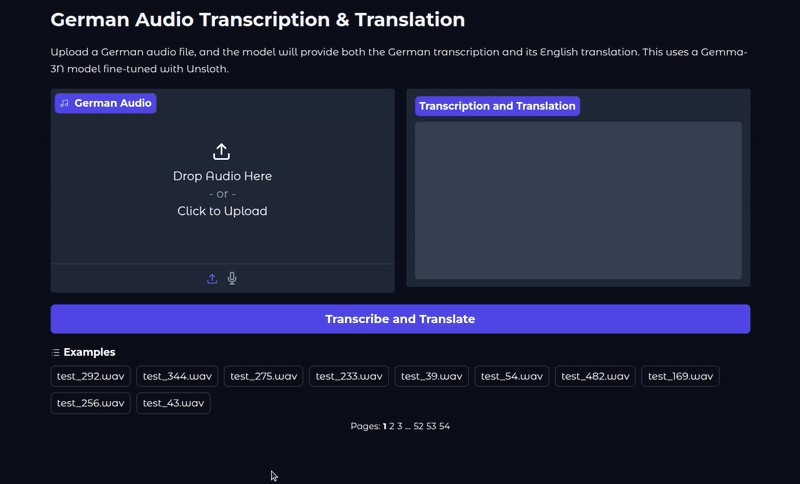
gr.Markdown(
"""
# German Audio Transcription & Translation
Upload a German audio file, and the model will provide both the German transcription and its English translation.
This uses a Gemma-3N model fine-tuned with Unsloth.
"""
)
with gr.Row():
audio_input = gr.Audio(sources=["upload", "microphone"], type="numpy", label="German Audio")
text_output = gr.Textbox(label="Transcription and Translation", lines=10, interactive=False)
submit_btn = gr.Button("Transcribe and Translate", variant="primary")
submit_btn.click(
fn=transcribe_and_translate,
inputs=audio_input,
outputs=text_output
)
gr.Examples(
examples=example_list,
inputs=audio_input,
outputs=text_output,
fn=transcribe_and_translate,
cache_examples=False
)
if __name__ == "__main__":
demo.launch(share=True)
We can launch the app via the following command.
python app.py
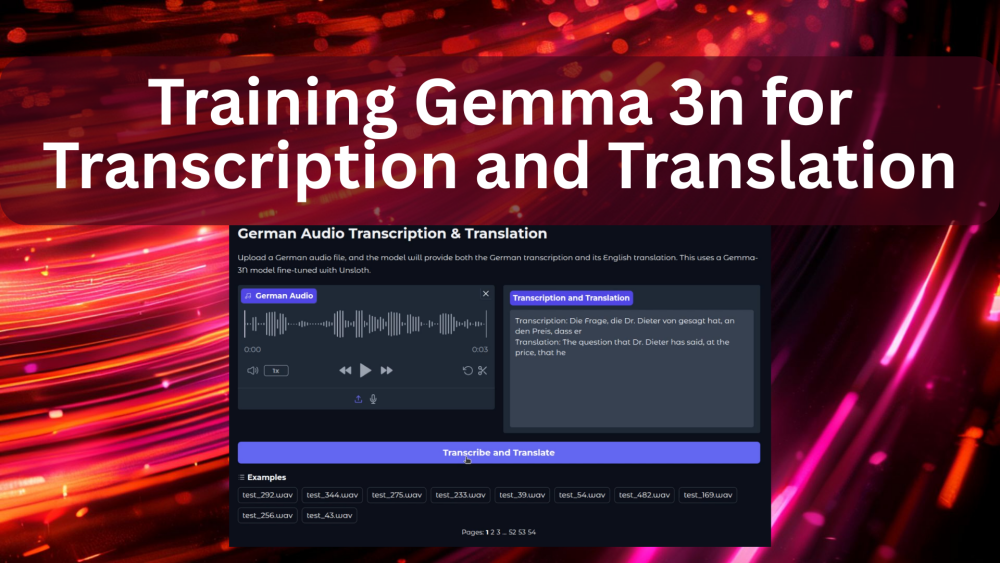
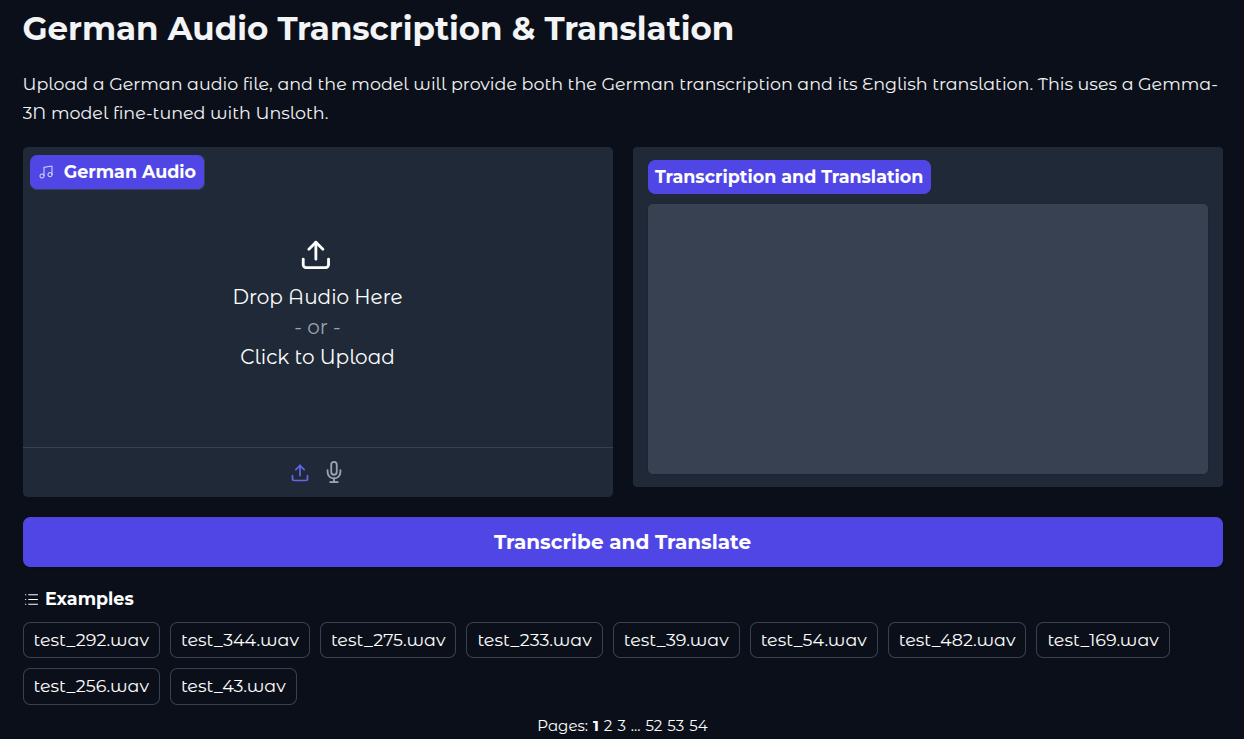
This is what the UI looks like.
The following video shows the Gemma 3n transcription and translation application in action.
Key Takeaways
Although we trained a good model for transcription and translation, we are missing one core component here: a standard evaluation framework.
The evaluation code is present in the gemma3n_e2b_finetuned_eval.ipynb Jupyter Notebook. Running this gives a WER of 49.16%.
However, it is difficult to evaluate this model in a standard way while calculating WER (Word Error Rate). This is because the model does not always follow the format we have defined in the format_intersection_data. So, the final WER is not representative of the real number.
This brings another point into discussion. Training small models for complex tasks requires more data, and often, they need to be fully trained so that they can follow all instructions clearly. The instruction format changing during inference can be one of many drawbacks of QLoRA training.
Summary and Conclusion
In this article, we trained the Gemma 3n E2B model for German audio transcription and translation to English. Starting from the preparation of the translation data, the fine-tuning, to creating a Gradio application, we covered a lot. We also discussed some of the challenges of evaluating our model.
If you have any questions, thoughts, or suggestions, please leave them in the comment section. I will surely address them.
You can contact me using the Contact section. You can also find me on LinkedIn, and X.
