
SAM (Segment Anything Model) 3 is the latest iteration in the SAM family. It builds upon the success of the SAM 2 model, but with major improvements. It now supports PCS (Promptable Concept Segmentation) and can accept text prompts from users. Furthermore, SAM 3 is now a unified model that includes a detector, a tracker, and a segmentation model. In this article, we will shortly cover the paper explanation of SAM 3 along with the SAM 3 inference.
The SAM series has been pioneering models in the world of computer vision. Starting from healthcare to automotive tasks, they now power a range of industries. In this article, we will see what makes SAM 3 even better.
We will cover the following topics in SAM 3:
- Why SAM 3?
- What changes in SAM 3 compared to SAM 2?
- What is the architecture of SAM 3?
- How was the dataset curated for SAM 3?
- Inference using SAM 3.
Note: The paper explanation will not be exhaustive. We will cover some of the most important aspects briefly, making it easier to skim through.
Why SAM 3?
SAM 3 was introduced in the paper – SAM 3: Segment Anything with Concepts by authors from Meta.
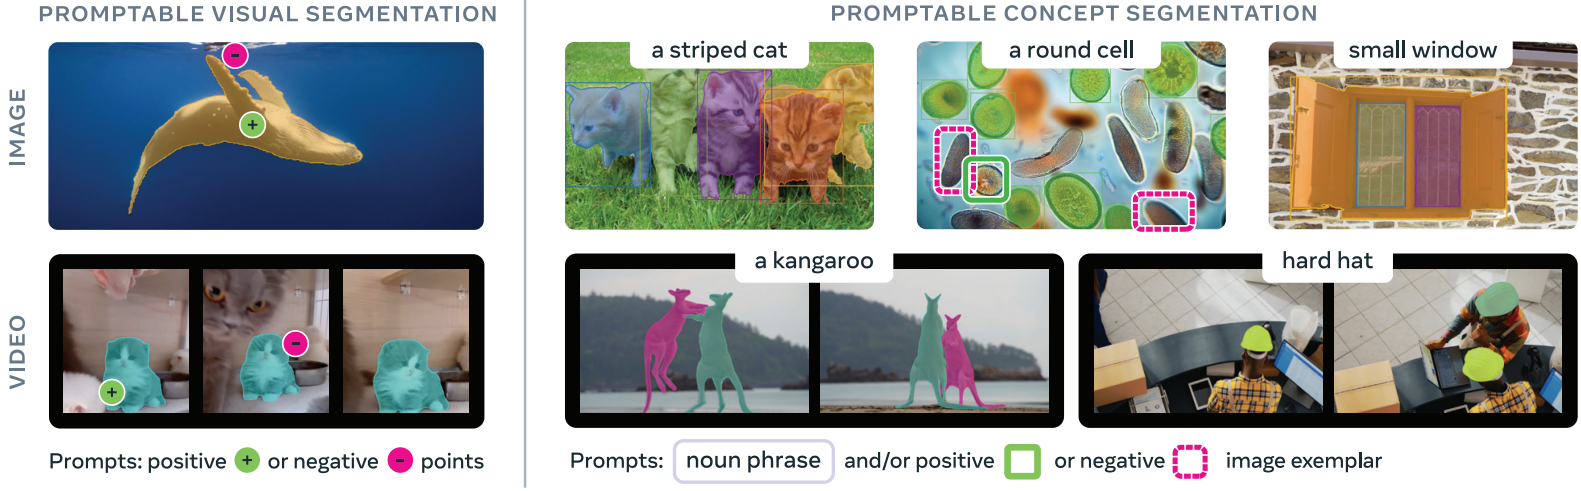
The primary motivation behind creating SAM 3 was to move beyond “segment one object per prompt”. Given a single prompt, be it text, box, point, or a mask, SAM 3 can find and segment all instances of the object belonging to the same category. The authors term this as Promtable Concept Segmentation (PCS).
In practice, SAM 3:
- Supports open-vocabulary concept prompts, allowing users to segment all objects matching a noun phrase (e.g., “all red cars”).
- Accepts text prompts and image exemplars, making it more flexible than point-based or box-based prompting.
- Unifies detection, segmentation, and tracking into a single model.
- Introduces a large, curated dataset and benchmark to train and evaluate concept-level segmentation.
Compared to previous iterations, SAM 3 significantly improves segmentation accuracy and robustness, especially in open-vocabulary and multi-instance scenarios.
What Changes in SAM 3 Compared to SAM 2?
SAM 3 brings several fundamental changes compared to SAM 2. Here are the most important ones.
Promptable Concept Segmentation (PCS)
SAM 2 focused on interactive segmentation, accepting bounding boxes, point coordinates, and masks from users. SAM 3 moves beyond, accepting text-based prompts along with interactive prompts. This enables concept-level understanding of an image. Furthermore, unlike SAM 2, SAM 3 can detect, segment, and track all objects belonging to the same category based on the prompt.
Unified Architecture
SAM 3 is not just a segmentation model anymore. It integrates a detection model (DETR-based), a segmentation model (Maskformer-based), and a tracker.
Presence Token and Presence Head
There will be instances when an object based on a text input might not be present in an image or video. In such cases, the noun phrase or prompt should never reach the detector for recognition and localization. The presence token and presence head handle that. SAM 3 adds a global presence head that predicts whether a prompted concept exists in the image at all. This decouples recognition from localization and improves robustness in difficult or negative cases.
SAM 3 Architecture
The authors put it aptly: “SAM 3 is a generalization of SAM 2, supporting the new PCS task as well as the PVS task”.
However, there are some major architectural changes as well to SAM 3. SAM 3 contains a perception encoder that acts as a common backbone for detection and tracking.

Here, we discuss the core components of the SAM 3 model.
Perception Encoder
This is a shared backbone between the detector and tracker. It also has the task of aligning the vision and language parts of the prompt. First, it encodes the images and then aligns them with the text prompts.
Prompt Condition Detector
The detector of SAM 3 follows the DETR model paradigm, using a transformer-based, query-driven decoder.
The DETR-style decoder outputs object queries that feed into MaskFormer-style instance segmentation heads, and the model also includes a binary semantic segmentation head that predicts pixel-level membership for the prompted concept.
Tracker and Memory Bank for Video
The tracker and memory back essentially remain the same as SAM 2.
For video inputs, SAM 3 maintains a memory of object appearances and propagates masks across frames, periodically re-aligning with detector outputs to prevent drift.
How Was the Dataset Curated for SAM 3?
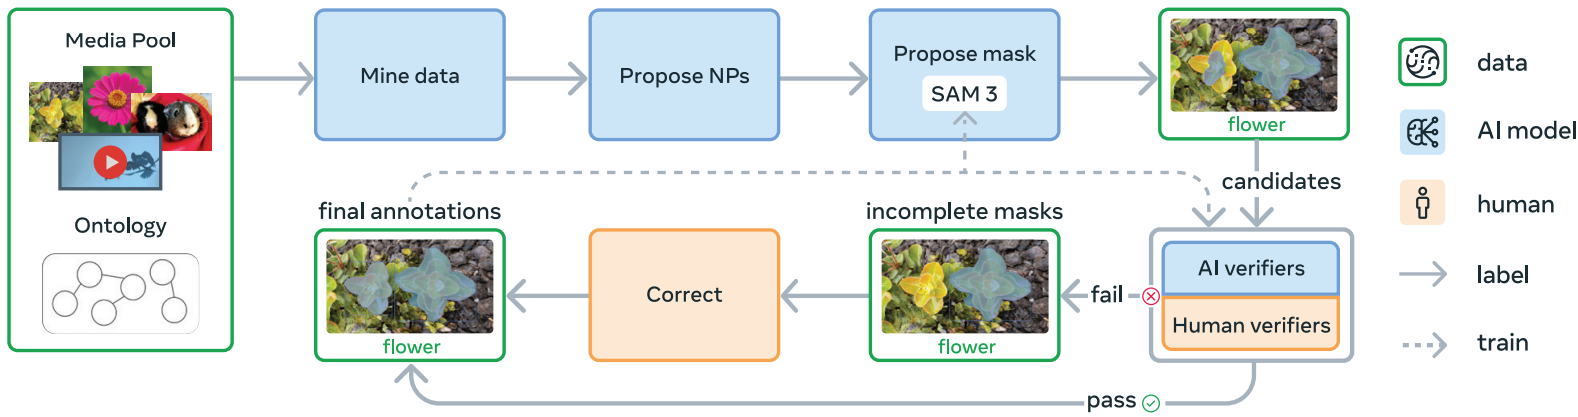
The datasets and data engine are perhaps the most important aspects of the SAM 3 ecosystem. The data engine now employs a human + model in the loop process to create the Segment Anything – Concepts (SA-Co) dataset.
Here is a concise explanation of the data engine.
Step 1 – Initial Human Annotation
Images and videos are paired with noun phrases, and SAM 2 generates candidate masks. Humans verify mask quality and exhaustiveness.
Step 2 – AI Assisted Verification
The accepted/rejected labels from humans from step 1 are used to train an AI verifier. Essentially, the SAM 3 team trained a Llama 3.2 model here.
The trained model does mask quality verification and exhaustivity checks. Further, the Llama model is also trained to filter hard negative noun phrases.
Step 3 – Dataset Scaling and Domain Specific Collection
Next, the dataset is expanded with domain specific concepts using the AI models. Furthermore, the authors expand the dataset by mining concepts from an ontology based on Wikidata. This enables long-tail and fine-grained concepts.
Step 4 – Expansion to Video Dataset
The pipeline is extended to video datasets. This includes creating spatio-temporal mask (masklets) annotations using a mature SAM 3 model, and verification is done by humans.
Finally, SA-Co consists of three different datasets:
- SA-Co/HQ: millions of high-quality annotated images with millions of unique noun phrases.
- SA-Co/SYN: large-scale synthetic annotations used to expand coverage.
- SA-Co/VIDEO: tens of thousands of annotated videos with concept-level labels.
I highly recommend going through the paper if you wish to get a detailed understanding of SAM 3. In the next section, we will move to inference using SAM 3.
Inference Using SAM 3
In this section, we will cover a minimal codebase for inference using SAM 3 for images and videos.
We will cover:
- Setting up the environment for SAM 3.
- SAM 3 inference on images.
- SAM 3 inference on videos.
Directory Structure
Let’s take a look at the project directory structure once.
.
├── build_sam3
│   └── sam3
├── input
│   ├── image_1.jpg
│   ...
│   └── video_2.mp4
├── NOTES.md
├── outputs
│   ├── video_1_3sec_20251214_192510
│   ├── video_1_3sec_20251214_192755
│   └── video_2_3sec_20251214_200715
├── requirements.txt
├── requirements_win.txt
├── sam3_image.py
├── sam3_video.py
├── setup.bat
├── setup.sh
└── utils.py
- The
sam3_image.pyandsam3_video.pyare the primary scripts for image and video inference. Theutils.pyfile contains minimal helper functions. - The
inputandoutputsdirectories contain the inference data and results, respectively. - We have different setup files and requirement files for both Ubuntu and Windows for easier installation of requirements.
- The
build_setupdirectory gets automatically created when we run the setup.
You can download the zip file that comes with the article if you wish to run inference locally. All the Python files, setup files, and input data are provided in the zip file.
Download Code
Set Up and Requirements Installation for SAM 3 Inference
After downloading and extracting the zip file, you can run the following to set everything up.
- Make sure that you create a virtual environment with Python 3.12. Anaconda/Miniconda is recommended.
- Install PyTorch with CUDA support. The code for this article was tested with PyTorch 2.9.1 with CUDA 13.0 support.
pip3 install torch torchvision --index-url https://download.pytorch.org/whl/cu130
- If you are using Ubuntu OS, run the following:
sh setup.sh
- If you are using Windows OS, run the following:
.\setup.bat
Everything should get installed automatically. You might be occasionally asked to input password for system level installations.
SAM 3 Image Inference
Let’s jump into the SAM 3 image inference code.
The code is present in sam3_image.py file.
Import Statements and Argument Parser
The following code block contains the imports and the argument parsers needed.
import matplotlib.pyplot as plt
import argparse
import os

from PIL import Image
from sam3.model_builder import build_sam3_image_model
from sam3.model.sam3_image_processor import Sam3Processor
from utils import overlay_masks
from pathlib import Path
from datetime import datetime


def parse_arguments():
    parser = argparse.ArgumentParser(
        description='Process an image with SAM3 using a text prompt.'
    )
    parser.add_argument(
        '--image-path',
        dest='image_path',
        type=str,
        help='Path to the input image',
        default='input/image_1.jpg'
    )
    parser.add_argument(
        '--prompt',
        dest='prompt',
        type=str,
        help='Text prompt for segmentation',
        default='cat'
    )
    parser.add_argument(
        '--visualize',
        dest='visualize',
        action='store_true',
        help='Visualize the result'
    )
    return parser.parse_args()

os.makedirs('outputs', exist_ok=True)
We are importing build_sam3_image_model function to load the SAM 3 model and Sam3Processor to later initialize the SAM 3 image processor.
We also import overlay_masks from the utils module that helps us overlay the segmentation mask on top of the input image.
Apart from that, we are defining argument parsers for input images, the text prompt for the object that we want to segment, and whether or not we want to visualize the final result.
Functions to Load Model, Process Image & Run Inference, and Save Results
The following code block contains three functions.
def load_model():
    """Load the SAM3 image model and processor."""
    model = build_sam3_image_model()
    processor = Sam3Processor(model)
    return model, processor


def process_image(processor, image_path, prompt):
    """
    Process an image with SAM3 using a text prompt.

    Args:
        processor: Sam3Processor instance
        image_path: Path to the input image
        prompt: Text prompt for segmentation

    Returns:
        tuple: (original_image, result_image, masks, boxes, scores)
    """
    # Load the image
    image = Image.open(image_path)

    # Set image and get inference state
    inference_state = processor.set_image(image)

    # Prompt the model with text
    output = processor.set_text_prompt(state=inference_state, prompt=prompt)

    # Get the masks, bounding boxes, and scores
    masks = output['masks']
    boxes = output['boxes']
    scores = output['scores']

    # Create overlay visualization
    result = overlay_masks(image, masks)

    return image, result, masks, boxes, scores


def save_result(result_image, input_image_path, output_base_dir='outputs'):
    """
    Save the result image to outputs/image_name_datetime/result.png

    Args:
        result_image: PIL Image to save
        input_image_path: Path to the input image (used to determine output directory name)
        output_base_dir: Base directory for outputs (default: 'outputs')

    Returns:
        str: Path where the result was saved
    """
    # Get the image name without extension
    image_name = Path(input_image_path).stem

    # Get current timestamp
    timestamp = datetime.now().strftime("%Y%m%d_%H%M%S")

    # Create output directory: outputs/image_name_datetime/
    output_dir = Path(output_base_dir) / f"{image_name}_{timestamp}"
    output_dir.mkdir(parents=True, exist_ok=True)

    # Save result
    output_path = output_dir / "result.png"
    result_image.save(output_path)

    print(f"Result saved to: {output_path}")
    return str(output_path)
The load_model function loads the SAM 3 model and processor.
The process_image function accepts the processor, input image path, and text prompt as parameters.
It reads the image, sets the text prompt with the processors, and carries out the forward pass. We extract the masks and use the overlay_masks function to obtain the final result.
The save_result function saves the resulting image in a timestamped directory.
Main Function
The main function combines everything and manages the execution flow.
def main():
    """Main execution function."""
    args = parse_arguments()

    # Configuration
    input_image_path = args.image_path
    prompt = args.prompt

    # Load model
    print("Loading SAM3 model...")
    model, processor = load_model()

    # Process image
    print(f"Processing image: {input_image_path}")
    print(f"Prompt: '{prompt}'")
    image, result, masks, boxes, scores = process_image(processor, input_image_path, prompt)

    # Save result
    output_path = save_result(result, input_image_path)

    # Display result
    if args.visualize:
        plt.figure(figsize=(10, 8))
        plt.imshow(result)
        plt.axis('off')
        plt.title(f"SAM3 Segmentation - Prompt: '{prompt}'")
        plt.tight_layout()
        plt.show()

    print(f"Found {masks.shape[0]} masks")
    print(f"Scores: {scores}")


if __name__ == '__main__':
    main()
Before running the code for the first time, ensure that you have been granted access to SAM 3 on Hugging Face and have logged in to Hugging Face hub via CLI.
Let’s run inference on an image.
python sam3_image.py --image-path input/image_1.jpg --prompt "cat"
The following is the result.
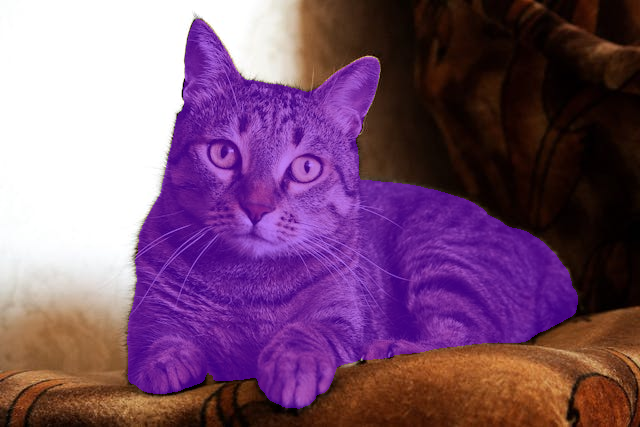
The result looks good when a single object is present.
Let’s try another image.
python sam3_image.py --image-path input/image_2.jpg --prompt "dogs"
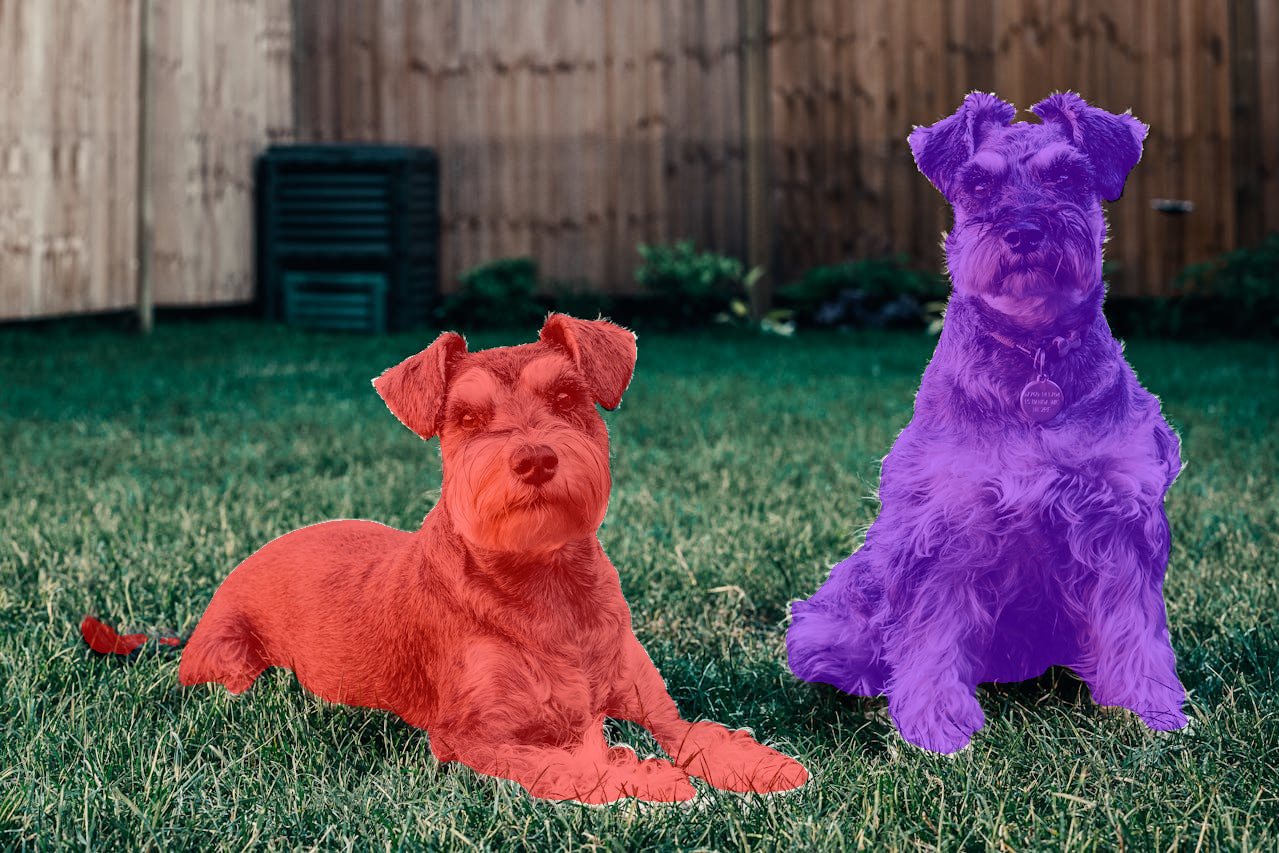
The model is able to successfully segment multiple objects belonging to the same category as well.
SAM 3 Video Inference
Now, let’s move on to the video inference part.
All the code for video inference using SAM 3 is present in the sam3_video.py file.
Imports and Argument Parser
import glob
import os
import cv2
import matplotlib.pyplot as plt
import argparse

from pathlib import Path
from datetime import datetime
from sam3.model_builder import build_sam3_video_predictor
from sam3.visualization_utils import (
    prepare_masks_for_visualization,
    visualize_formatted_frame_output,
    save_masklet_video
)
from utils import propagate_in_video

def parse_arguments():
    parser = argparse.ArgumentParser(
        description='Process a video with SAM3 using a text prompt.'
    )
    parser.add_argument(
        '--video-path',
        dest='video_path',
        type=str,
        help='Path to video file (.mp4) or directory containing JPEG frames',
        default='input/video_1.mp4'
    )
    parser.add_argument(
        '--prompt',
        dest='prompt',
        type=str,
        help='Text prompt for segmentation',
        default='cat'
    )
    parser.add_argument(
        '--frame-idx',
        dest='frame_idx',
        type=int,
        default=0,
        help='Frame index to add the prompt (default: 0)'
    )
    parser.add_argument(
        '--visualize',
        dest='visualize',
        action='store_true',
        help='Visualize the result'
    )
    return parser.parse_args()


os.makedirs('outputs', exist_ok=True)
This time, we import the build_sam3_video_predictor function to load the SAM 3 model for video inference. Also, we import functions for preparing the masks for visualization after inference, formatting the output, and saving the resulting video from visualization_utils.
The command line arguments remain almost the same, with one small change. We have an additional --frame-idx argument, which tells the pipeline which frame to select for initial segmentation.
Functions for Loading Model, Loading Video Frames, Inference, and Propagation
The following code contains all the essential functions for video inference.
def load_model():
    """Load the SAM3 video predictor model."""
    video_predictor = build_sam3_video_predictor(async_loading_frames=True)
    return video_predictor


def load_video_frames(video_path):
    """
    Load video frames for visualization.

    Args:
        video_path: Path to video file (.mp4) or directory containing JPEG frames

    Returns:
        list: List of video frames (numpy arrays in RGB format) or list of frame paths
    """
    # Load "video_frames_for_vis" for visualization purposes (they are not used by the model).
    if isinstance(video_path, str) and video_path.endswith(".mp4"):
        cap = cv2.VideoCapture(video_path)
        video_frames_for_vis = []
        while True:
            ret, frame = cap.read()
            if not ret:
                break
            video_frames_for_vis.append(cv2.cvtColor(frame, cv2.COLOR_BGR2RGB))
        cap.release()
    else:
        video_frames_for_vis = glob.glob(os.path.join(video_path, "*.jpg"))
        try:
            # integer sort instead of string sort (so that e.g. "2.jpg" is before "11.jpg").
            video_frames_for_vis.sort(
                key=lambda p: int(os.path.splitext(os.path.basename(p))[0])
            )
        except ValueError:
            # fallback to lexicographic sort if the format is not "<frame_index>.jpg".
            print(
                f'frame names are not in "<frame_index>.jpg" format: {video_frames_for_vis[:5]=}, '
                f"falling back to lexicographic sort."
            )
            video_frames_for_vis.sort()

    return video_frames_for_vis


def process_video(video_predictor, video_path, prompt, frame_idx=0):
    """
    Process a video with SAM3 using a text prompt.

    Args:
        video_predictor: SAM3 video predictor instance
        video_path: Path to the video file or frame directory
        prompt: Text prompt for segmentation
        frame_idx: Frame index to add the prompt (default: 0)

    Returns:
        tuple: (session_id, initial_outputs, outputs_per_frame)
    """
    # Read video for retrieving framerate.
    video = cv2.VideoCapture(video_path)
    video_fps = video.get(cv2.CAP_PROP_FPS)
    video.release()

    # Start a session.
    response = video_predictor.handle_request(
        request=dict(
            type='start_session',
            resource_path=video_path
        )
    )
    session_id = response['session_id']

    # Add text prompt on specified frame.
    response = video_predictor.handle_request(
        request=dict(
            type='add_prompt',
            session_id=session_id,
            frame_index=frame_idx,
            text=prompt
        )
    )
    initial_outputs = response['outputs']

    # Propagate the outputs from frame 0 to the end of the video.
    print(f"Propagating masks through video... {video_fps=}")
    outputs_per_frame = propagate_in_video(video_predictor, session_id)

    return session_id, initial_outputs, outputs_per_frame, video_fps


def save_result(video_frames, outputs_per_frame, input_video_path,
                output_base_dir='outputs', alpha=0.5, fps=10):
    """
    Save the result video to outputs/video_name_datetime/result.mp4

    Args:
        video_frames: List of video frames
        outputs_per_frame: Per-frame segmentation outputs
        input_video_path: Path to the input video (used to determine output directory name)
        output_base_dir: Base directory for outputs (default: 'outputs')
        alpha: Transparency of mask overlay (default: 0.5)
        fps: Frames per second for output video (default: 10)

    Returns:
        str: Path where the result was saved
    """
    # Get the video name without extension.
    video_name = Path(input_video_path).stem

    # Get current timestamp.
    timestamp = datetime.now().strftime("%Y%m%d_%H%M%S")

    # Create output directory: outputs/video_name_datetime/
    output_dir = Path(output_base_dir) / f"{video_name}_{timestamp}"
    output_dir.mkdir(parents=True, exist_ok=True)

    # Save result video.
    output_path = output_dir / "result.mp4"

    save_masklet_video(
        video_frames,
        outputs_per_frame,
        out_path=str(output_path),
        alpha=alpha,
        fps=fps,
    )

    print(f"Result saved to: {output_path}")
    return str(output_path)
In the above code block, the load_video_frames function loads the frames only for visualization purposes.
The processing of frames for inference happens in the process_video function using the video_predictor.handle_request method (line 115). This loads all the frames into GPU memory. This also starts the current session.
We obtain a session ID from that run and call the method again to add the prompt along with the frame index (line 124).
Next, we obtain the initial results and propagate them through the rest of the video.
Finally, we save the results using the save_result function. We use the save_masklet_video function from the SAM 3 visualization utilities.
The Main Function
The following is the main function.
def main():
    """Main execution function."""
    # Configuration
    args = parse_arguments()
    video_path = args.video_path
    prompt = args.prompt
    frame_idx = args.frame_idx
    fps = 10
    alpha = 0.5
    vis_frame_stride = 1

    # Load model.
    print("Loading SAM3 video predictor...")
    video_predictor = load_model()

    # Load video frames for visualization.
    print(f"Loading video frames from: {video_path}")
    video_frames = load_video_frames(video_path)
    print(f"Loaded {len(video_frames)} frames")

    # Process video.
    print(f"Processing video with prompt: '{prompt}' on frame {frame_idx}")
    session_id, initial_outputs, outputs_per_frame, video_fps = process_video(
        video_predictor, video_path, prompt, frame_idx
    )

    print(f"Generated outputs for {len(outputs_per_frame)} frames")

    # Save result.
    output_path = save_result(
        video_frames,
        outputs_per_frame,
        video_path,
        alpha=alpha,
        fps=video_fps
    )

    print(f"Video processing complete!")
    print(f"Session ID: {session_id}")

    # Optional: Visualize specific frames.
    plt.close('all')
    if args.visualize:
        outputs_per_frame = prepare_masks_for_visualization(outputs_per_frame)
        for frame_idx in range(0, len(outputs_per_frame), vis_frame_stride):
            visualize_formatted_frame_output(
                frame_idx,
                video_frames,
            outputs_list=[outputs_per_frame],
            titles=['SAM 3 Dense Tracking outputs'],
            figsize=(6, 4),
        )


if __name__ == '__main__':
    main()
The above function combines everything and runs the video inference.
Video Inference Execution
There are a few things to keep in mind while carrying out video inference using SAM 3.
With a 10GB GPU, ~10 seconds of 480p video can be processed. With an 8GB GPU, ~3 seconds of 480p video. We will also be enabling expandable GPU segments so that we can process videos without issues; otherwise, we may sometimes face an OOM error even though GPU memory is available.
The input directory contains several videos of different lengths. Here, we are experimenting with a 3-second video.
First, we enable expandable segment.
export PYTORCH_ALLOC_CONF=expandable_segments:True
Second, run the inference.
python sam3_video.py --video-path input/video_1_3sec.mp4 --prompt "cat"
The following is the result.
The model is able to segment the cat accurately in all frames.
Summary and Conclusion
In this article, we covered a brief paper explanation of SAM 3, along with simple image and video inference. We can do much more. We are yet to cover visual prompts like boxes, points, and masks. In one of the future articles, we will cover them along with a proper UI for a better user experience.
If you have any questions, thoughts, or suggestions, please leave them in the comment section. I will surely address them.
You can contact me using the Contact section. You can also find me on LinkedIn, and X.

1 thought on “SAM 3 Inference and Paper Explanation”