As computer vision and deep learning engineers, we often fine-tune semantic segmentation models for various tasks. For this, PyTorch provides several models pretrained on the COCO dataset. The smallest model available on Torchvision platform is LRASPP MobileNetV3 model with 3.2 million parameters. But what if we want to go smaller? We can do it, but we will need to pretrain it as well. This article is all about tackling this issue at hand. We will modify the LRASPP architecture to create a semantic segmentation model with MobileNetV3 Small backbone. Not only that, we will be pretraining the semantic segmentation model on the COCO dataset as well.

By the end of this article, you will have a comprehensive idea of creating smaller yet performant semantic segmentation models and the method to pretrain them as well.
What are we going to cover while pretraining the semantic segmentation model on the COCO dataset?
- How do we modify the official Torchvision LRASPP segmentation model code to switch it with a backbone of our choice?
- How do we modify the official semantic segmentation pretraining scripts from Torchvision?
- What is the process to run inference on images and videos after pretraining the segmentation model on the COCO dataset?
Why Do We Need Pretraining A Semantic Segmentation Model on the COCO Dataset?
The aim of this article is two-fold:
- Create a small semantic segmentation model (around 1.1 million in parameters) for resource-constrained devices.
- However, such small models also need pretraining before we can fine-tune them for downstream tasks. For this reason, we will need to pretrain the model on a large semantic segmentation dataset first before the fine-tuning stage.
Do we need to convert the COCO dataset into a semantic segmentation dataset from its original detection or instance segmentation dataset? No, as we will be using the official Torchvision scripts for pretraining, the data loader handles converting the masks from the JSON annotations files. We just need to download the original COCO dataset and point the training script to the correct directory.
What Process will we follow for Pretraining the Semantic Segmentation Model on the COCO Dataset?
- First, we will download the official COCO dataset.
- Next, we will set up the code directory and check the folder structure.
- Then we will go through the new semantic segmentation model file on how to create a small and performant custom LRASPP model.
- Finally, we will start the pretraining process.
Download the COCO Dataset
You can download the COCO dataset from here on Kaggle. After downloading and extracting its content, you should see the following directory structure.
coco2017/
├── annotations
│   ├── captions_train2017.json
│   ├── captions_val2017.json
│   ├── instances_train2017.json
│   ├── instances_val2017.json
│   ├── person_keypoints_train2017.json
│   └── person_keypoints_val2017.json
├── test2017 [40670 entries exceeds filelimit, not opening dir]
├── train2017 [118287 entries exceeds filelimit, not opening dir]
└── val2017 [5000 entries exceeds filelimit, not opening dir]
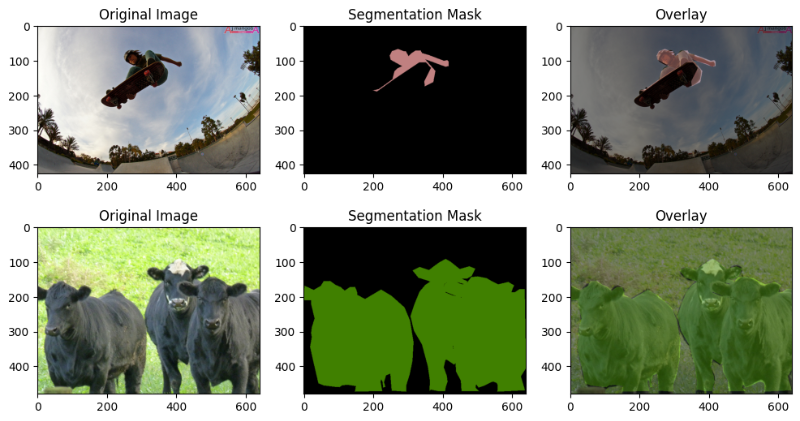
Although the COCO dataset is primarily a detection and instance segmentation dataset, it can be used for semantic segmentation pretraining as well. In fact, all the Torchvision semantic segmentation models are pretrained on the COCO dataset. However, one small modification is that instead of training on the 80 COCO classes, only the images corresponding to the 20 Pascal VOC semantic segmentation classes are considered.
Here are a few images along with their segmentation masks from the COCO dataset.
Project Directory Structure
Let’s take a look at the entire project directory structure.
├── coco2017
├── inference_data
│   ├── images
│   │   ├── image_1.jpg
│   │   ├── image_2.jpg
│   │   └── image_3.jpg
│   └── videos
│       ├── video_1.mp4
│       └── video_2.mp4
├── models
│   ├── custom_lraspp_mobilenetv3_small.py
│   └── __init__.py
├── outputs
│   └── lraspp_mobilenetv3small [31 entries exceeds filelimit, not opening dir]
├── coco_utils.py
├── config.py
├── custom_utils.py
├── inference_image.py
├── inference_video.py
├── __init__.py
├── presets.py
├── README.md
├── requirements.txt
├── train.py
├── transforms.py
├── utils.py
└── v2_extras.py
- The
coco2017directory contains the dataset that we downloaded above. - The
inference_datadirectory contains the images and videos that we will use for inference once the pretraining stage is complete. - As we will be creating a custom semantic segmentation model, we will keep all related code files in the
modelsdirectory. - The
outputsdirectory contains models from the pretraining stage. - Directly inside the parent project directory, we have the official Torchvision scripts and a few custom scripts as well. The
config.py,custom_utils.py,inference_image.py, andinference_video.pyare the custom scripts and the rest are from Torchvision semantic segmentation references.
All the code files and pretrained weights are available via the download section.
Download Code
Install Dependencies
You can install the requirements using the requirements.txt file.
pip install -r requirements.txt
If you wish to pretrain as well, it is recommended to download the COCO 2017 dataset and keep it in the above structure before moving forward.
Pretraining a Semantic Segmentation Model on the COCO Dataset
We will mostly explore the model preparation in the coding section. As the codebase is large, it is difficult to go through all the Python files. Feel free to jump into any of the code files to gain a deeper understanding of the project.
The LRASPP MobileNetV3 Semantic Segmentation Model
We will convert the official source code from Torchvision which builds the LRASPP semantic segmentation model. We will switch the MobileNetV3 Large backbone with the MobileNetV3 Small backbone.
The code is present in the models/custom_lraspp_mobilenetv3_small.py file. The following block contains all the code that we need.
"""
Modified from URL: https://pytorch.org/vision/stable/_modules/torchvision/models/segmentation/lraspp.html#LRASPP_MobileNet_V3_Large_Weights
"""

from torchvision.models.mobilenet import MobileNetV3
from torchvision.models.segmentation import LRASPP
from torchvision.models import mobilenet_v3_small, MobileNet_V3_Small_Weights
from torchvision.models._utils import IntermediateLayerGetter, _ovewrite_value_param
from typing import Optional, Any
from torchinfo import summary


def _lraspp_mobilenetv3(backbone: MobileNetV3, num_classes: int) -> LRASPP:
    backbone = backbone.features
    # Gather the indices of blocks which are strided. These are the locations of C1, ..., Cn-1 blocks.
    # The first and last blocks are always included because they are the C0 (conv1) and Cn.
    stage_indices = [0] + [i for i, b in enumerate(backbone) if getattr(b, "_is_cn", False)] + [len(backbone) - 1]
    low_pos = stage_indices[-4]  # use C2 here which has output_stride = 8
    high_pos = stage_indices[-1]  # use C5 which has output_stride = 16
    low_channels = backbone[low_pos].out_channels
    high_channels = backbone[high_pos].out_channels
    backbone = IntermediateLayerGetter(backbone, return_layers={str(low_pos): "low", str(high_pos): "high"})

    return LRASPP(backbone, low_channels, high_channels, num_classes)

def lraspp_mobilenet_v3_small(
    *,
    weights = None,
    progress: bool = True,
    num_classes: Optional[int] = None,
    weights_backbone: Optional[MobileNet_V3_Small_Weights] = MobileNet_V3_Small_Weights.IMAGENET1K_V1,
    **kwargs: Any,
) -> LRASPP:
    """Constructs a Lite R-ASPP Network model with a MobileNetV3-Large backbone from
    `Searching for MobileNetV3 <https://arxiv.org/abs/1905.02244>`_ paper.

    Args:
        weights (:class:`~torchvision.models.segmentation.LRASPP_MobileNet_V3_Large_Weights`, optional): The
            pretrained weights to use. See
            :class:`~torchvision.models.segmentation.LRASPP_MobileNet_V3_Large_Weights` below for
            more details, and possible values. By default, no pre-trained
            weights are used.
        progress (bool, optional): If True, displays a progress bar of the
            download to stderr. Default is True.
        num_classes (int, optional): number of output classes of the model (including the background).
        aux_loss (bool, optional): If True, it uses an auxiliary loss.
        weights_backbone (:class:`~torchvision.models.MobileNet_V3_Large_Weights`, optional): The pretrained
            weights for the backbone.
        **kwargs: parameters passed to the ``torchvision.models.segmentation.LRASPP``
            base class. Please refer to the `source code
            <https://github.com/pytorch/vision/blob/main/torchvision/models/segmentation/lraspp.py>`_
            for more details about this class.
    """
    if kwargs.pop("aux_loss", False):
        raise NotImplementedError("This model does not use auxiliary loss")

    weights_backbone = MobileNet_V3_Small_Weights.verify(weights_backbone)

    if weights is not None:
        print('Loading LRASPP segmentation pretrained weights...')
        weights_backbone = None
        num_classes = _ovewrite_value_param("num_classes", num_classes, len(weights.meta["categories"]))
    elif num_classes is None:
        print('Loading custom backbone')
        num_classes = 21

    backbone = mobilenet_v3_small(weights=weights_backbone, dilated=True)
    model = _lraspp_mobilenetv3(backbone, num_classes)

    if weights is not None:
        print('Loading LRASPP segmentation pretrained weights...')
        model.load_state_dict(weights.get_state_dict(progress=progress, check_hash=True))

    return model


if __name__ == '__main__':
    model = lraspp_mobilenet_v3_small()
    summary(model)
In the above code block, the _lraspp_mobilenetv3 function extracts the features from the low_channels and high_channels. These are used to build the LRASPP decoder head by merging the features. To get the best results, choosing the layers strategically might be important as different backbones learn different types of features at different depths.
The lraspp_mobilenet_v3_small builds the entire model. It accepts the backbone weight mapping which is MobileNet_V3_Small_Weights.IMAGENET1K_V1 in our case. As we are not loading a complete semantic segmentation model’s pretrained weights, the final model gets created using the pretrained backbone and calling the _lraspp_mobilenetv3 function.
Executing this file gives us the following output.
python models/custom_lraspp_mobilenetv3_small.py
Loading custom backbone
===========================================================================
Layer (type:depth-idx)                             Param #
===========================================================================
LRASPP                                             --
├─IntermediateLayerGetter: 1-1                     --
│    └─Conv2dNormActivation: 2-1                   --
│    │    └─Conv2d: 3-1                            432
│    │    └─BatchNorm2d: 3-2                       32
│    │    └─Hardswish: 3-3                         --
│    └─InvertedResidual: 2-2                       --
│    │    └─Sequential: 3-4                        744
│    └─InvertedResidual: 2-3                       --
│    │    └─Sequential: 3-5                        3,864
│    └─InvertedResidual: 2-4                       --
│    │    └─Sequential: 3-6                        5,416
│    └─InvertedResidual: 2-5                       --
│    │    └─Sequential: 3-7                        13,736
│    └─InvertedResidual: 2-6                       --
│    │    └─Sequential: 3-8                        57,264
│    └─InvertedResidual: 2-7                       --
│    │    └─Sequential: 3-9                        57,264
│    └─InvertedResidual: 2-8                       --
│    │    └─Sequential: 3-10                       21,968
│    └─InvertedResidual: 2-9                       --
│    │    └─Sequential: 3-11                       29,800
│    └─InvertedResidual: 2-10                      --
│    │    └─Sequential: 3-12                       91,848
│    └─InvertedResidual: 2-11                      --
│    │    └─Sequential: 3-13                       294,096
│    └─InvertedResidual: 2-12                      --
│    │    └─Sequential: 3-14                       294,096
│    └─Conv2dNormActivation: 2-13                  --
│    │    └─Conv2d: 3-15                           55,296
│    │    └─BatchNorm2d: 3-16                      1,152
│    │    └─Hardswish: 3-17                        --
├─LRASPPHead: 1-2                                  --
│    └─Sequential: 2-14                            --
│    │    └─Conv2d: 3-18                           73,728
│    │    └─BatchNorm2d: 3-19                      256
│    │    └─ReLU: 3-20                             --
│    └─Sequential: 2-15                            --
│    │    └─AdaptiveAvgPool2d: 3-21                --
│    │    └─Conv2d: 3-22                           73,728
│    │    └─Sigmoid: 3-23                          --
│    └─Conv2d: 2-16                                525
│    └─Conv2d: 2-17                                2,709
===========================================================================
Total params: 1,077,954
Trainable params: 1,077,954
Non-trainable params: 0
===========================================================================
The final model with 21 classes (representing the Pascal VOC dataset classes) contains 1.07 million parameters.
If you wish to learn more about modifying Torchvision segmentation model, then you may have a look at this article where we build custom DeepLabV3 model.
Training the Custom LRASPP MobileNetV3 Small Model
We will be skipping the rest of the code for the sake of brevity in this article. The only other modification that we made in the code is in the train.py script. Here, we commented out the loading of the Torchvision model and loaded our own model.
# model = torchvision.models.get_model(
    #     args.model,
    #     weights=args.weights,
    #     weights_backbone=args.weights_backbone,
    #     num_classes=num_classes,
    #     aux_loss=args.aux_loss,
    # )

    model = lraspp_mobilenet_v3_small(num_classes=num_classes)
    summary(model)
The training results shown here were carried out on a machine with 10GB RTX 3080 GPU, 10th generation i7 CPU, and 32 GB of RAM.
We can execute the following command to start the training.
torchrun --nproc_per_node=1 train.py --lr 0.02 --dataset coco -b 64 -j 8 --amp --output-dir outputs/lraspp_mobilenetv3small --data-path coco2017
Here are the command line arguments that we use:
--nproc_per_node=1: As we are training on a single machine, so, the number of nodes for us is 1.--lr: This is the base learning rate for the optimizer.--dataset: The pretraining dataset. As we are training on the COCO dataset, the value here iscoco.-b: The batch size for the data loaders.-j: This specifies the number of parallel workers for the data loaders.--amp: This is a boolean argument specifying the training script to use mixed precision training.--output_dir: The path where the trained weights will be stored.--data-path: The folder path containing the COCO dataset.
By default, the training runs for 30 epochs, which we can change using the --epochs argument.
The following block shows the outputs from the final epoch.
Epoch: [29]  [   0/1445]  eta: 1:14:42  lr: 0.000936160425031581  loss: 0.3725 (0.3725)  time: 3.1019  data: 2.8259  max mem: 8356
Epoch: [29]  [  10/1445]  eta: 0:14:57  lr: 0.0009303236046314702  loss: 0.3079 (0.2989)  time: 0.6255  data: 0.3819  max mem: 8356
Epoch: [29]  [  20/1445]  eta: 0:12:02  lr: 0.0009244827124700352  loss: 0.2815 (0.2971)  time: 0.3771  data: 0.1361  max mem: 8356
Epoch: [29]  [  30/1445]  eta: 0:10:41  lr: 0.0009186377170825067  loss: 0.2815 (0.2914)  time: 0.3585  data: 0.1244  max mem: 8356
.
.
.
Epoch: [29]  [1430/1445]  eta: 0:00:05  lr: 1.4429624715447326e-05  loss: 0.2976 (0.2985)  time: 0.3901  data: 0.1544  max mem: 8356
Epoch: [29]  [1440/1445]  eta: 0:00:01  lr: 4.672978643683746e-06  loss: 0.3055 (0.2986)  time: 0.3240  data: 0.1058  max mem: 8356
Epoch: [29] Total time: 0:08:54
Test:  [   0/5000]  eta: 2:49:24    time: 2.0329  data: 1.4863  max mem: 8356
Test:  [ 100/5000]  eta: 0:02:25    time: 0.0100  data: 0.0020  max mem: 8356
.
.
.
Test:  [4800/5000]  eta: 0:00:01    time: 0.0086  data: 0.0017  max mem: 8356
Test:  [4900/5000]  eta: 0:00:00    time: 0.0083  data: 0.0017  max mem: 8356
Test: Total time: 0:00:43
global correct: 89.8
average row correct: ['93.4', '74.5', '67.0', '64.6', '51.0', '21.4', '73.0', '51.2', '86.9', '22.4', '71.8', '69.4', '77.1', '71.9', '75.6', '84.6', '38.1', '74.2', '48.3', '80.4', '53.2']
IoU: ['88.7', '60.3', '54.6', '47.4', '42.7', '18.4', '66.7', '40.9', '69.7', '19.3', '59.9', '33.4', '61.8', '59.3', '62.1', '73.3', '23.5', '57.7', '40.5', '68.9', '43.5']
mean IoU: 52.0
Training time 5:00:17
The model reaches a mean IoU of 52% on the last epoch. We will use this model to run inference.
Running Inference using the Custom Segmentation Model Pretrained on the COCO Dataset
There are two scripts for inference:
inference_image.py: To run inference on images.inference_video.py: To run inference on videos.
Let’s start with the image inference.
python inference_image.py --input inference_data/images/ --model outputs/lraspp_mobilenetv3small/model_29.pth
Here, we pass the paths to the input image directory and the model weights. The images mostly contain humans to check whether our small custom semantic segmentation model can segment out persons properly or not.
Following are the results.

The results are not perfect but they are not bad for a 1.07M parameter model as well. In most cases, it is able to segment the output of the persons properly.
Running inference on videos will give us an even better idea of the capability of the model.
python inference_video.py --input inference_data/videos/video_1.mp4 --model outputs/lraspp_mobilenetv3small/model_29.pth
For video inference, we provide the path to a video file.
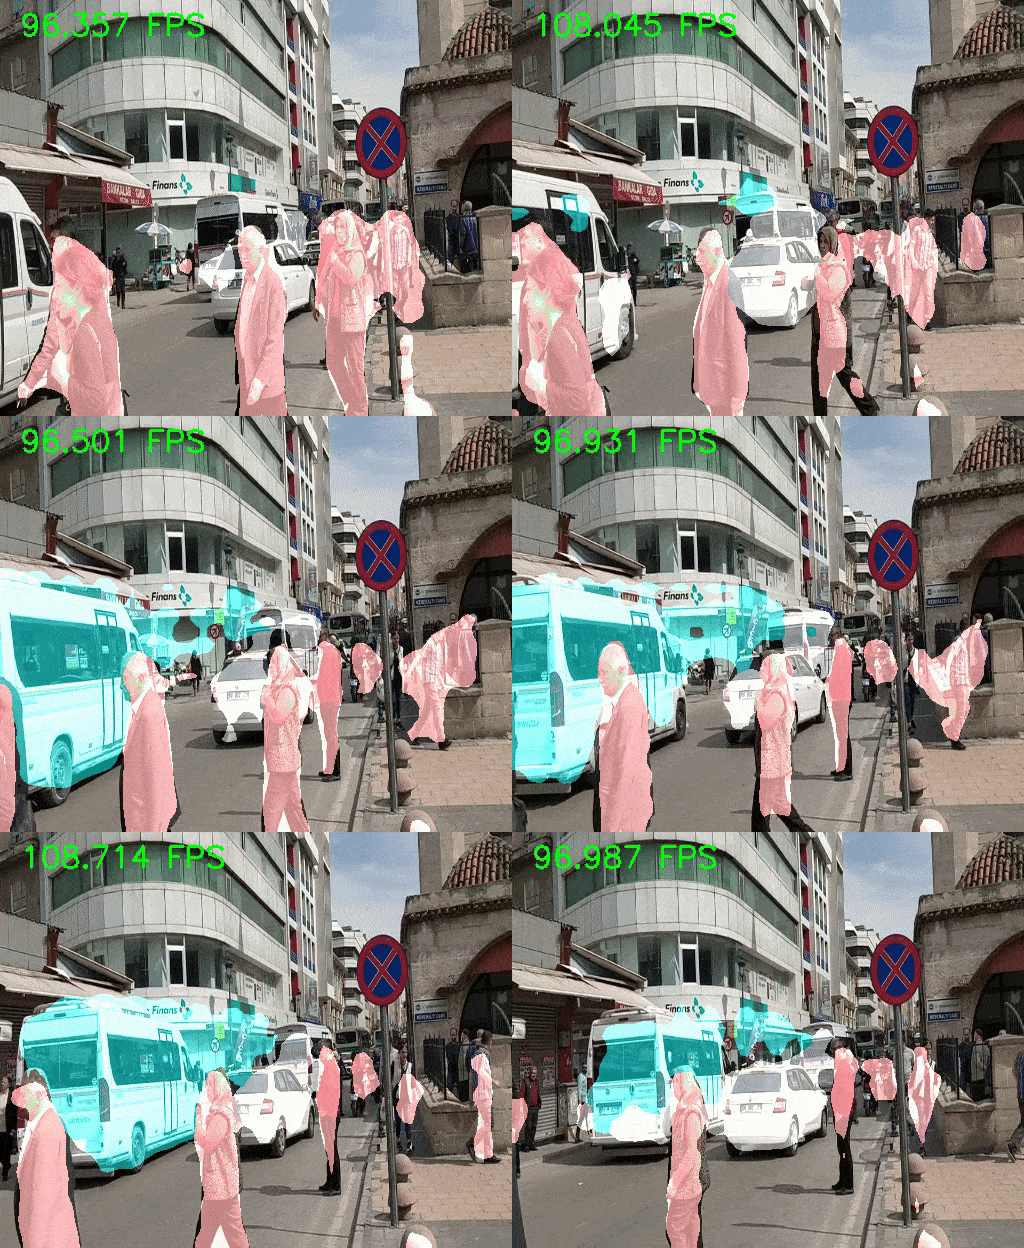
In this case, the persons are moving and the model seems to be able to segment them pretty well. Moreover, we are getting an average of 105 FPS on the RTX 3080 GPU.
Although it is worth noting that while running inference, we are resizing the frames to 416×512 (height x width). Some of the speedup comes from there as well.
Now, let’s run the model on a complex scene.
python inference_video.py --input inference_data/videos/video_3.mp4 --model outputs/lraspp_mobilenetv3small/model_29.pth
The results are not perfect here, however, they are not extremely bad as well. With more training and augmentation, the model can improve a lot. It is facing difficulty in segmenting out the persons who are far away.
Summary and Conclusion
In this article, we modified the Torchvision LRASPP model with a custom MobileNetV3 backbone and carried out pretraining on the COCO dataset. This provided us with the knowledge and idea to modify backbones in predefined Torchvision segmentation models. This model, which is small and gives more than real-time FPS can be used for further task-specific fine-tuning. I hope this article was worth your time.
If you have any doubts, thoughts, or suggestions, please leave them in the comment section. I will surely address them.
You can contact me using the Contact section. You can also find me on LinkedIn, and Twitter.


1 thought on “Pretraining Semantic Segmentation Model on COCO Dataset”