
In this article, we will be training and optimizing the Faster RCNN MobileNetV3 object detection for real-time inference on the CPU.
There are hundreds of object detection models out there right now. Most of them are single stage object detectors like SSD and the YOLO family. However, the race to speed and accuracy started with Faster RCNN models in 2015. Although old (in addition to being two stage), they are still good at small object detection. In this article, we will try to optimize one of the Faster RCNN models using ONNX export and run inference on the GPU and CPU. Our target will be to reach an average of more than 24 FPS on a modern CPU during inference. For this, we will use the Faster RCNN MobileNetV3 FPN model trained at 320 pixels.
We will cover the following topics in this article
- We will fine tune the model on a single class person detection dataset. So, we will start with the explanation of the dataset.
- The next part is setting up the codebase. We will use the PyTorch Faster RCNN Training Pipeline for training and inference.
- Next, we will train the Faster RCNN MobileNetV3 Large FPN 320 model.
- After training, we will first run inference natively using PyTorch.
- Then we will export the model to ONNX and run inference on both GPU and CPU.
- Finally, we will analyze all the results and compare the FPS.
The Person Detection Dataset
We are going to fine tune the Faster RCNN MobileNetV3 on a person detection dataset. Although we are using a COCO pretrained model, we are further fine-tuning it to reduce the number of classes that it can detect. This in turn reduces the computation cost as the number of trainable parameters becomes less.
You can find the dataset here on Kaggle. The dataset contains images of persons and person-like instances (e.g. statues). However, the modified dataset we are using labels all such instances as person. This is to decrease the complexity and focus more on the optimization part.
Following is the directory structure after downloading and extracting the dataset.
├── Test
│   └── Test
│       └── JPEGImages [470 entries exceeds filelimit, not opening dir]
├── Train
│   └── Train
│       └── JPEGImages [1888 entries exceeds filelimit, not opening dir]
└── Val
    └── Val
        └── JPEGImages [320 entries exceeds filelimit, not opening dir]
Each of the Train, Val, and Test folders contain the JPEG images and their corresponding XML annotation files. There are 944 training, 160 validation, and 235 test instances.
Here are some of the annotated samples from the dataset.
The Project Directory Structure
Let’s take a look at the entire project directory structure.
├── fasterrcnn-pytorch-training-pipeline
│   ├── data
│   │   └── README.md
│   ├── data_configs
│   │   ├── aquarium.yaml
│   │   ...
│   │   └── voc.yaml
│   ├── docs
│   │   ├── upcoming_updates.md
│   │   └── updates.md
│   ├── example_test_data
│   │   ├── image_1.jpg
│   │   ├── image_2.jpg
│   │   ├── README.md
│   │   └── video_1.mp4
│   ├── models [34 entries exceeds filelimit, not opening dir]
│   ├── notebook_examples
│   │   ├── custom_faster_rcnn_training_colab.ipynb
│   │   ├── custom_faster_rcnn_training_kaggle.ipynb
│   │   └── visualizations.ipynb
│   ├── outputs
│   │   ├── inference
│   │   └── training
│   ├── __pycache__
│   │   └── datasets.cpython-310.pyc
│   ├── readme_images
│   │   ├── gif_1.gif
│   │   ├── vs-2017-annotated.jpg
│   │   └── vs-2017.png
│   ├── torch_utils
│   │   ├── __pycache__
│   │   ├── coco_eval.py
│   │   ├── coco_utils.py
│   │   ├── engine.py
│   │   ├── __init__.py
│   │   ├── README.md
│   │   └── utils.py
│   ├── utils
│   │   ├── __pycache__
│   │   ├── annotations.py
│   │   ├── general.py
│   │   ├── __init__.py
│   │   ├── logging.py
│   │   ├── transforms.py
│   │   └── validate.py
│   ├── weights
│   │   └── model.onnx
│   ├── _config.yml
│   ├── datasets.py
│   ├── eval.py
│   ├── export.py
│   ├── inference.py
│   ├── inference_video.py
│   ├── __init__.py
│   ├── LICENSE
│   ├── onnx_inference_image.py
│   ├── onnx_inference_video.py
│   ├── README.md
│   ├── requirements.txt
│   └── train.py
├── inference_data
│   ├── video_1.mp4
│   └── video_2.mp4
└── input
    ├── Test
    │   └── Test
    ├── Train
    │   └── Train
    └── Val
        └── Val
- The
fasterrcnn-pytorch-training-pipelinedirectory contains all the training, inference, and export scripts that we need for optimizing the Faster RCNN MobileNetV3 model. This is part of this GitHub repository. However, you need not clone it. You will get access to the entire downloadable zip file along with the trained weights. You just need to set up the environment which we will cover in the next section. - The
inference_datadirectory contains two videos that we will carry out inference on. - Finally, the
inputdirectory contains the training dataset that we discussed in the previous section.
The code files, trained weights, and inference data are available via the download section. To carry out training, you just need to download and arrange the dataset in the above structure.
Download Code
The PyTorch Faster RCNN Training Pipeline
We will use the code from the PyTorch Faster RCNN Training pipeline for training, inference, and exporting the model to ONNX format.
After downloading and extracting the zip file carry out the following steps.
Enter the Project Directory
cd fasterrcnn-pytorch-training-pipeline/
Install PyTorch (Conda package manager)
Although it is possible to use any PyTorch version above 1.12.1, I highly recommend using the same as shown in this article, i.e., PyTorch 1.12.1. Execute the following command in the environment of your choice to install it.
conda install pytorch==1.12.1 torchvision==0.13.1 torchaudio==0.12.1 cudatoolkit=11.6 -c pytorch -c conda-forge
You can surely try and install a newer version.
Install the Rest of the Requirements
pip install -r requirements.txt
This will install the required packages including the proper version of ONNX and ONNX GPU Runtime which are crucial for running inference later on.
Note: After downloading and extracting the above code files, you will find the trained weights inside outputs/training/mbv3_320_fpn and the exported weights inside the weights directory. However, you are free to carry out your training and export experiments while following the article.
The Dataset YAML File
Before we can train the Faster RCNN MobileNetV3 model and optimize it, we need to define a dataset YAML file. We need this for training the model. The codebase already comes with the required person.yaml file inside the data_configs directory. Here are its contents.
# Images and labels direcotry should be relative to train.py
TRAIN_DIR_IMAGES: '../input/Train/Train/JPEGImages'
TRAIN_DIR_LABELS: '../input/Train/Train/JPEGImages'
VALID_DIR_IMAGES: '../input/Val/Val/JPEGImages'
VALID_DIR_LABELS: '../input/Val/Val/JPEGImages'
# Optional test data path. If given, test paths (data) will be used in
# `eval.py`.
TEST_DIR_IMAGES: '../input/Test/Test/JPEGImages'
TEST_DIR_LABELS: '../input/Test/Test/JPEGImages'

# Class names.
CLASSES: [
    '__background__',
    'person'
]

# Number of classes (object classes + 1 for background class in Faster RCNN).
NC: 2

# Whether to save the predictions of the validation set while training.
SAVE_VALID_PREDICTION_IMAGES: True
The file contains the paths to the training, validation, and test images & annotations. It also contains the names and number of classes including the background class.
We will have to provide the path to this dataset configuration file while executing the training script.
Training the Faster RCNN MobileNetV3 Model
Before optimizing the Faster RCNN MobileNetV3 model, we need to obtain the trained PyTorch weights. We will use the train.py script to start the training process.
The training shown here was carried out on a system with 10 GB RTX 3080 GPU, 32 GB RAM, and 10th generation i7 CPU.
We can execute the following script within the fasterrcnn-pytorch-training-pipeline directory to start the training process.
python train.py --model fasterrcnn_mobilenetv3_large_320_fpn --data data_configs/person.yaml --epochs 20 --imgsz 320 --square-training --name mbv3_320_fpn --use-train-aug --mosaic 0.3
Following are the command line arguments that we use:
--model: This accepts one of the model names supported by the library. Here we are using thefasterrcnn_mobilenetv3_large_320_fpnmodel. You can find all the supported models here.--data: The path to the dataset configuration file.--epochs: The number of epochs to train for. We are training for 20 epochs.--imgsz: This accepts a single integer value defining the number of pixels that the longest side will be resized to. As we want to create an optimized model, we are providing a value of 320.--square-training: This is a boolean argument. Providing this will ignore aspect ratio resizing and will resize all images to a square shape. In this case, it will be 320×320 pixels.--name: The project directory name to save inside theoutput/trainingdirectory.--use-train-aug: This is another boolean argument indicating the usage of image augmentations like blur, gray, brightness contrast, color jitter, and random gamma.--mosaic: This accepts a floating value between 0.0 and 1.0 indicating the probability of applying mosaic augmentation to the training dataset.
Analyzing the Training Results
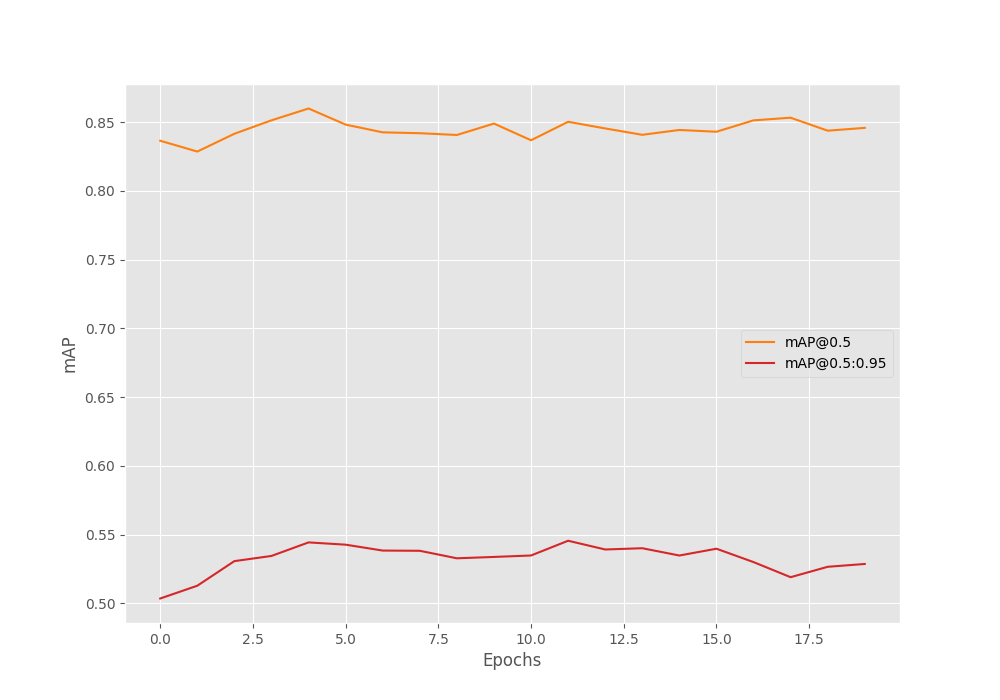
For the above training run, the best model was saved on epoch 12.
 Average Precision  (AP) @[ IoU=0.50:0.95 | area=   all | maxDets=100 ] = 0.546
 Average Precision  (AP) @[ IoU=0.50      | area=   all | maxDets=100 ] = 0.850
 Average Precision  (AP) @[ IoU=0.75      | area=   all | maxDets=100 ] = 0.568
 Average Precision  (AP) @[ IoU=0.50:0.95 | area= small | maxDets=100 ] = 0.030
 Average Precision  (AP) @[ IoU=0.50:0.95 | area=medium | maxDets=100 ] = 0.322
 Average Precision  (AP) @[ IoU=0.50:0.95 | area= large | maxDets=100 ] = 0.666
 Average Recall     (AR) @[ IoU=0.50:0.95 | area=   all | maxDets=  1 ] = 0.356
 Average Recall     (AR) @[ IoU=0.50:0.95 | area=   all | maxDets= 10 ] = 0.604
 Average Recall     (AR) @[ IoU=0.50:0.95 | area=   all | maxDets=100 ] = 0.609
 Average Recall     (AR) @[ IoU=0.50:0.95 | area= small | maxDets=100 ] = 0.100
 Average Recall     (AR) @[ IoU=0.50:0.95 | area=medium | maxDets=100 ] = 0.415
 Average Recall     (AR) @[ IoU=0.50:0.95 | area= large | maxDets=100 ] = 0.728
We are using mAP as the evaluation metric here. The model was able to reach a primary mAP of 0.546.
Here is the mAP graph from the training run.
Running Inference using Native PyTorch
When running inference after optimizing the Faster RCNN MobileNetV3 in the ONNX format, we will need a comparison point. For this, first, we will run video inference using the native PyTorch model that we have obtained.
All the inference experiments shown in the article are run on a system with 10 GB RTX 3080 GPU, 32 GB RAM, and 10th generation i7 CPU.
Let’s run inference on a video using the inference_video.py file. First, we will run it using the CUDA device.
python inference_video.py --weights outputs/training/mbv3_320_fpn/best_model.pth --input ../inference_data/video_2.mp4 --threshold 0.6 --device cuda --square-img --imgsz 320 --show
We use the following command line arguments in the above command:
--weights: Path to the best trained weights.--input: Path to the input video file on which to run inference.--threshold: Confidence threshold for filtering out detections.--device: The computation device.--square-img: This is a boolean argument indicating the script to resize the image to a square shape (320×320 in this case as--imgszis 320) rather than aspect ratio resizing. As we have trained our model with square images, we will get the best inference results with square images as well.--show: Show the inference output using the OpenCV window.
Following is the output video.
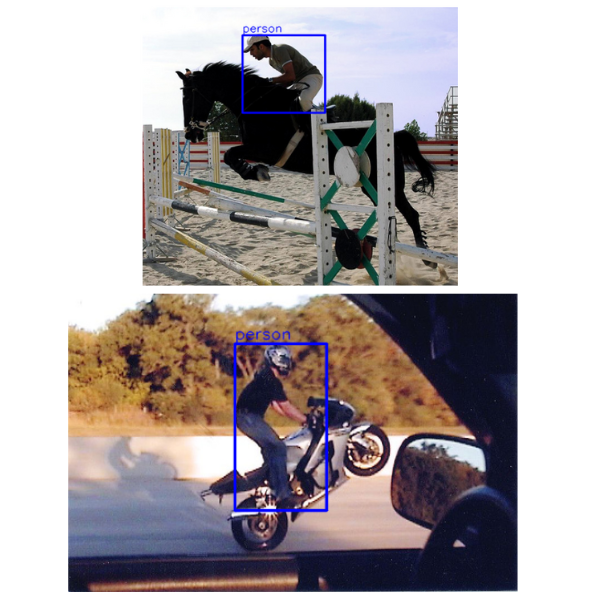
The detection results are not excellent in this case as our training dataset was small. However, let’s focus on the FPS here. The model averages at 75.3 FPS.
Let’s run another inference experiment on the CPU device and check the results. We just change the --device to cpu.
python inference_video.py --weights outputs/training/mbv3_320_fpn/best_model.pth --input ../inference_data/video_2.mp4 --threshold 0.6 --device cpu --square-img --imgsz 320 --show
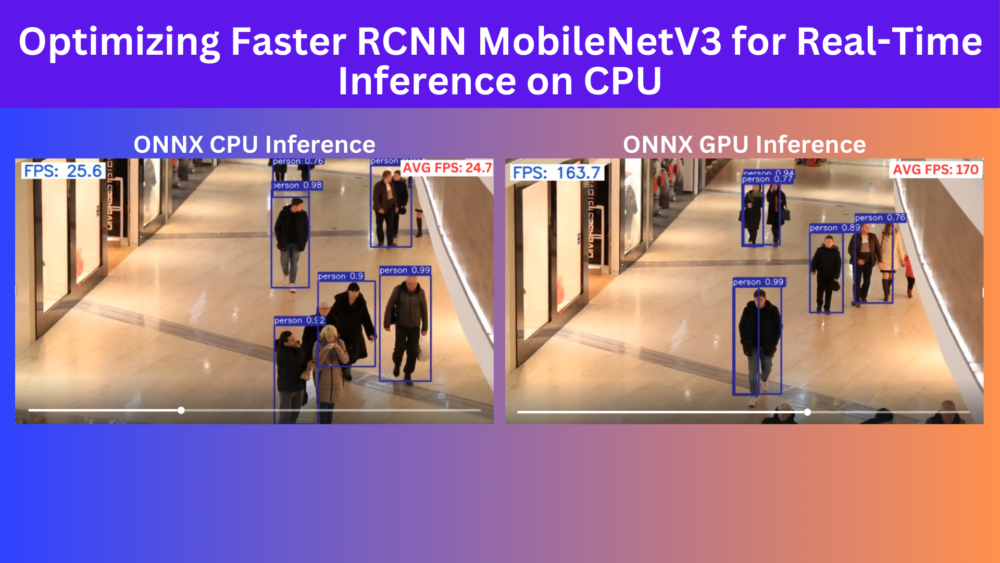
This time the average FPS is 19.7. This is not real-time. With the ONNX export, we will target at least 25 FPS.
Optimizing the Faster RCNN MobileNetV3 with ONNX Export
Exporting to ONNX is simple with the codebase that we are using. We have the export.py script that handles everything for us.
We can export and optimize our trained Faster RCNN MobileNetV3 model using the following command.
python export.py --weights outputs/training/mbv3_320_fpn/best_model.pth --data data_configs/person.yaml --out model.onnx
The above command contains the path to the weights file, the custom dataset YAML file, and the ONNX model output name. The model.onnx will be stored in the weights directory.
Using the Optimized Faster RCNN MobileNetV3 Model for Inference
Let’s run inference using the optimized model on the CPU first. This time, we will use the onnx_inference_video.py script.
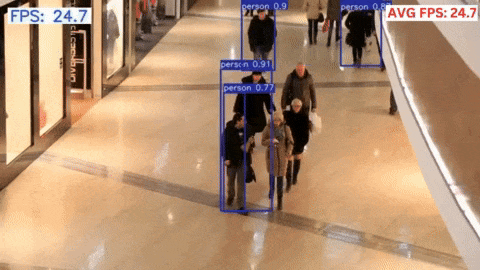
python onnx_inference_video.py --input ../inference_data/video_2.mp4 --weights weights/model.onnx --data data_configs/person.yaml --show --imgsz 320 --threshold 0.7 --device cpu
We use a very similar command just as we did for the native PyTorch inference. However, this time, we provide the path to the exported ONNX weights.
The FPS fluctuates somewhere between 23 to 31 FPS on the 10th generation i7 CPU. A more modern CPU will give much better results. We get an average of 24.7 FPS which is a 5 FPS increment compared to the native PyTorch CPU inference. This is not bad considering we just exported the model to ONNX without any further optimzation.
Let’s run the inference on the GPU now.
python onnx_inference_video.py --input ../inference_data/video_2.mp4 --weights weights/model.onnx --data data_configs/person.yaml --show --imgsz 320 --threshold 0.7 --device cuda
We just changed the device to cuda. Following is the result.
The throughput reaches an average of 170 FPS. This is almost a 100 FPS increment compared to the native PyTorch GPU inference. This shows the potential of ONNX exported models with minimal manual optimization. We can further optimize the model before exporting such as pruning weights.
Summary and Conclusion
In this article, we trained a Faster RCNN MobileNetV3 object detection model for person detection. Along with that, we exported and optimized the trained weights using ONNX and compared the performance improvement with native PyTorch inference. This gave us an overview of the potential of exporting models to ONNX for real-time inference even on the CPU. I hope that this article was worth your time.
If you have any doubts, thoughts, or suggestions, please leave them in the comment section. I will surely address them.
You can contact me using the Contact section. You can also find me on LinkedIn, and Twitter.

Does its compulsory to give the input image of 320*320 in input.If i want to train the image size of 800*800 will it change the size of my dataset?
and if i want to train 200*200 Does it change the size of image to 320?
As like other models we give image size of our demand , Does it not work like the same like other models?
You can give any other size. However, the MobileNetV3 FPN 320 resizes the image internally to 320×320.
Hi,
I have checked your SSD and this tutorial and they looked really impressive. I hope you will do some tutorials on pytorch-lighting as well. Specially teaching us a code with backbone, neck and head.
Thanks
Hello Subhan. I will surely try my best.