

This article is going to be short and straightforward. We will carry out image similarity with the I-JEPA. We will cover both, pure PyTorch implementation and Hugging Face implementation as well.

In the last article, we covered the introduction to I-JEPA. If you are getting started with the I-JEPA model, I highly recommend going through the article first.
What are we going to cover in image similarity with I-JEPA?
- Setting up the environment and downloading weights.
- Cloning the GitHub repository for easier access to the model architecture.
- Running image similarity with I-JEPA with a pure PyTorch implementation.
- Running image similarity by loading the model from Hugging Face.
Project Directory Structure
We will use one of the forks of the original I-JEPA repository that I maintain. The original repository is now archived.
However, as I am planning to add code for downstream tasks, this article includes a version of the code for download that contains the image similarity code only. You are free to take a look at the repository in case you are interested in image classification and semantic segmentation using I-JEPA as well.
Here is a directory structure of the project that we are dealing with in this article.
├── configs
│   ├── in1k_vith14_ep300.yaml
│   ├── in1k_vith16-448_ep300.yaml
│   ├── in22k_vitg16_ep44.yaml
│   └── in22k_vith14_ep66.yaml
├── input
│   ├── image_1.jpg
│   ├── image_2.jpg
│   ├── image_3.jpg
│   └── image_4.jpg
├── src
│   ├── datasets
│   │   └── imagenet1k.py
│   ├── masks
│   │   ├── __pycache__
│   │   │   └── utils.cpython-310.pyc
│   │   ├── default.py
│   │   ├── multiblock.py
│   │   ├── random.py
│   │   └── utils.py
│   ├── models
│   │   ├── __pycache__
│   │   │   └── vision_transformer.cpython-310.pyc
│   │   └── vision_transformer.py
│   ├── utils
│   │   ├── __pycache__
│   │   │   └── tensors.cpython-310.pyc
│   │   ├── distributed.py
│   │   ├── logging.py
│   │   ├── schedulers.py
│   │   └── tensors.py
│   ├── helper.py
│   ├── train.py
│   └── transforms.py
├── weights
│   └── IN1K-vit.h.14-300e.pth.tar
├── CODE_OF_CONDUCT.md
├── CONTRIBUTING.md
├── image_similarity_hf.py
├── image_similarity_pt.py
├── LICENSE
├── load_model_test.py
├── main_distributed.py
├── main.py
├── NOTES.md
├── README.md
└── requirements.txt
A lot of it comes from the original repository. Let’s focus on the important ones.
- The
image_similarity_hf.pyandimage_similarity_pt.pyare the image similarity scripts using Hugging Face and the pure PyTorch implementations. - The
weightsdirectory contains the pretrained I-JEPA weights from one of the links of the original repository. - The
srcdirectory is part of the original directory where the Vision Transformer model code, data loading, and utility scripts are present. The configs directory contains the model training configurations. - Images for the similarity test are present in the
inputdirectory. - We also have a
requirements.txtfile for installing all the dependencies.
Download Code
Installing the Requirements
We can install the necessary libraries via the requirements file after downloading and extracting the zip file.
pip install -r requirements.txt
This is all the setup we need before getting into the code for image similarity using I-JEPA.
Implementing Image Similarity with I-JEPA
First, we will cover the image similarity code with the PyTorch implementation using the repository code and models. Then we will move to the Hugging Face implementation.
PyTorch Implementation
Before we get into the coding part of it, we need to download the pretrained weights and keep them in the weights directory. We will use the ViT-H I-JEPA model trained with 14×14 patches. Here is the link to download the weights.
The code for the PyTorch implementation is present in the image_similarity_pt.py file.
import torch
import cv2

from src.models.vision_transformer import vit_huge
from torch.nn.functional import cosine_similarity
from torchvision import transforms

device = 'cuda'

img_transform = transforms.Compose([
    transforms.Normalize(
        mean=(0.5, 0.5, 0.5),
        std=(0.5, 0.5, 0.5)
    )
])

def load_model(weights):
    ckpt = torch.load(weights, map_location='cpu')
    print(ckpt.keys())

    ckpt_encoder = ckpt['encoder']

    model = vit_huge(patch_size=14)
    print('#'*30, 'Model', '#'*30, )
    print(model)
    print('#'*67)

    for k, v in ckpt_encoder.items():
        model.state_dict()[k[len('module.'):]].copy_(v)

    model = model.to(device).eval()

    return model


def get_embeddings(image_path, model):
    image = cv2.imread(image_path)
    image = cv2.resize(image, (224, 224))
    image = cv2.cvtColor(image, cv2.COLOR_BGR2RGB).astype('float32')

    image = torch.tensor(image) / 255.
    image = torch.permute(image, (2, 0, 1))
    image = img_transform(image)
    image = image.unsqueeze(0).to(device)

    with torch.no_grad():
        embed = model(image)

    avg_embed = embed.mean(dim=1)

    print(f"Output shape: {embed.shape}")
    print(f"Mean shape: {avg_embed.shape}")

    return avg_embed


def check_cosine_similarity(embed_1, embed_2):
    similarity = cosine_similarity(embed_1, embed_2)

    return similarity


weights_path = 'weights/IN1K-vit.h.14-300e.pth.tar'
model = load_model(weights=weights_path)

embed_1 = get_embeddings('input/image_1.jpg', model)
embed_2 = get_embeddings('input/image_4.jpg', model)

similarity = check_cosine_similarity(embed_1, embed_2)

print(similarity)
It is a simple code with only the necessary components. Let’s go through some of the important parts.
- We first import the necessary modules. This includes the
vit_hugemodel from thevision_transformermodule. - Then we set the computation device and define the image transforms which include the mean and standard deviation as per the training configuration files.
- The
load_modelfunction loads the model checkpoints after initializing thevit_hugemodel withpatch_size=14. As this weight was created via distributed training, the state dictionary loading process is somewhat different. - Next, we have the
get_embeddingsfunction that accepts an image path and the model as parameters. It loads the model, proprocesses it, converts it to tensor, and forward passes it through the model. We get the mean of the embeddings for comparing the similarity. - The
check_cosine_similarityaccepts two averaged-out image embeddings and returns the similarity score. - Finally, we load the weights & model, get the embeddings, and run the similarity scores of any two images. You can change the image paths and check the results.
Executing the PyTorch Implementation for Image Similarity with I-JEPA
Let’s start with two similar images of cats (images 1 and 2 in the input directory).
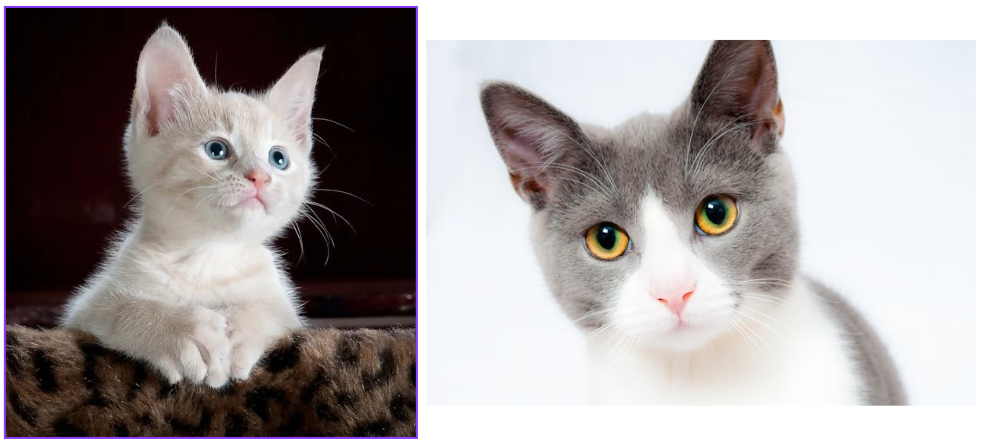
We can execute the script to get the score. For the above two images, we should get a high score.
python image_similarity_pt.py
We get the following output for the above two images.
tensor([0.6494], device='cuda:0')
There is almost a 65% match between the two images, which seems to be correct.
Now, let’s check the similarity between a cat and a dog (images 1 and 3 in the input directory).
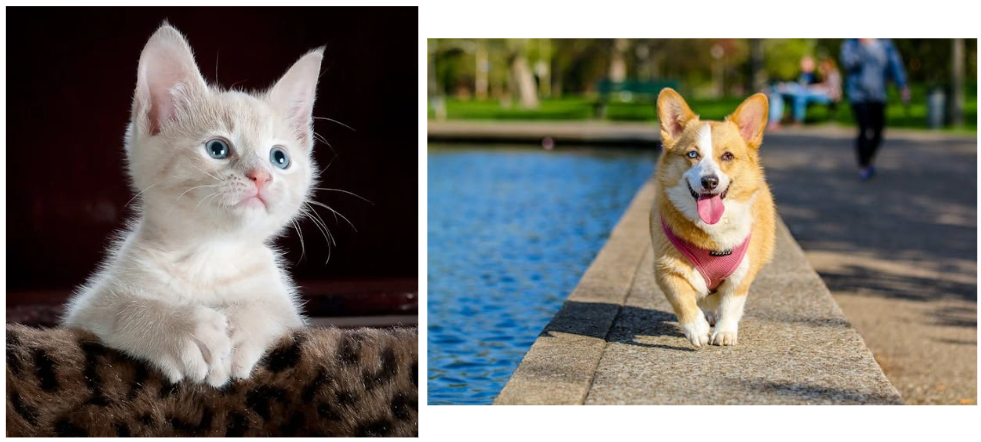
python image_similarity_pt.py
Following is the output.
tensor([0.2649], device='cuda:0')
The match is just 26.5%.
Let’s move on to the Hugging Face implementation.
Hugging Face Implementation
The code for the Hugging Face implementation for I-JEPA image similarity is simpler, as the model downloading and image preprocessing is automated to an extent.
The code for this is present in the image_similarity_hf.py file.
from PIL import Image
from torch.nn.functional import cosine_similarity
from transformers import AutoModel, AutoProcessor

import torch

def load_model(model_id):
    processor = AutoProcessor.from_pretrained(model_id)
    model = AutoModel.from_pretrained(model_id).eval()

    return model, processor


def get_embeddings(image_path, model, processor):
    image = Image.open(image_path)

    inputs = processor(image, return_tensors='pt')

    with torch.no_grad():
        outputs = model(**inputs)

    print(f"Outputs shape: {outputs.last_hidden_state.shape}")
    hidden_states = outputs.last_hidden_state.mean(dim=1)
    print(f"Mean shape: {hidden_states.shape}")

    return hidden_states


def check_cosine_similarity(embed_1, embed_2):
    similarity = cosine_similarity(embed_1, embed_2)

    return similarity


model_id = 'facebook/ijepa_vith14_1k'
model, processor = load_model(model_id)


embed_1 = get_embeddings('input/image_3.jpg', model, processor)
embed_2 = get_embeddings('input/image_4.jpg', model, processor)

similarity = cosine_similarity(embed_1, embed_2)
print(similarity)
We have similar functions here.
- The
load_modelfunction loads the model from the'facebook/ijepa_vith14_1k'tag. It loads the image processor along with that as well. - The
get_embeddingsfunction first passes the image through the processor and then forward passes it through the model. We get the mean of thelast_hidden_stateof the outputs. - For checking the similarity, the
check_cosine_similarityfunction is exactly the same as earlier. - Finally, we load the model, get the embeddings, and check the similarity score.
We can execute the script with the same images as the PyTorch implementation to check whether we get the same scores or not. First, with the same cat images (images 1 and 2).
python image_similarity_hf.py
Following is the output.
tensor([0.6501])
We get a 65% match. With the PyTorch implementation, it was 64.94%. This looks good and perhaps the slight difference is because of image loading between PIL and OpenCV.
The following is the score for the cat and the dog image.
tensor([0.2618])
Again, we have a very similar score of around 26%.
You can test with your own images and see the similarity scores for different images.
Further Improvements
This project can be taken further and improved to create a full-fledged image search application. We will try to implement that in one of the future articles.
Summary and Conclusion
In this short article, we covered the image similarity code with I-JEPA. We tested two implementations, PyTorch and Hugging Face. We also discussed some potential improvements that we may try out in the future.
If you have any questions, thoughts, or suggestions, please leave them in the comment section. I will surely address them.
You can contact me using the Contact section. You can also find me on LinkedIn, and X.
