

Since their inception, VLMs (Vision Language Models) have undergone tremendous improvements in capabilities. Today, we not only use them for image captioning, but also for core vision tasks like object detection and pointing. Additionally, smaller and open-source VLMs are catching up to the capabilities of the closed ones. One of the best examples among these is Moondream3, the latest version in the Moondream family of VLMs.
As of the writing of this article, Moondream3 is still in preview mode. A paper/technical report is yet to be released. We will cover as much as possible from the official technical post, the architecture, capabilities, and core vision tasks that Moondream3 can carry out.
We will cover the following topics for Moondream3:
- What is the architecture of Moondream, and why is it a larger model compared to its previous iteration?
- What core vision and vision-language tasks can Moondream3 carry out?
- What are the steps to carry out different vision-language tasks using the model?
- Image captioning
- Visual querying
- Object detection
- Object pointing
- OCR (Optical Character Recognition)
Moondream3 Architecture
As an official technical paper has not been released, we will infer as much as we can from the available article.
Moondream3 is still in the preview stage, and a lot of improvements will come very soon.
The latest Moondream model goes bigger in parameters. It is a 9B MoE (Mixture of Experts) architecture compared to its 2B dense predecessor, Moondream2.
The increase in parameters helps it come close in performance to and often surpass many of the closed-source frontier models, such as ChatGPT, Claude, and Gemini. At the same time, the MoE architecture with 2B active parameters helps it achieve faster inference. The new architecture helps Moondream3 become:
- Capable of better visual reasoning
- Trainable for custom tasks
- Faster compared to other closed-source frontier models
- Inexpensive when deploying in real-world scenarios
What Vision Tasks Can Moondream3 Carry Out?
Moondream3 is capable of carrying out complex vision and visual reasoning tasks such as:
- Object detection with natural language prompt.
- Object pointing with natural language prompt.
- Image captioning and complex visual querying.
- Outputting structured output.
- OCR in complex scenarios while maintaining output structure.
These capabilities are built into Moondream3, and that’s what makes this open-source model so powerful. I highly recommend going through the official article once, which lays out a few examples and benchmarks in detail.
Further in this article, we will carry out all of the above mentioned vision tasks using Moondream3.
Directory Structure
The following is the directory structure that we maintain for this article.
├───input
├───moondream3_caption.py
├───moondream3_detection.py
├───moondream3_inference.ipynb
├───moondream3_pointing.py
├───moondream3_pointing_video.py
├───moondream3_video_detection.py
├───moondream3_visual_query.py
├───requirements.txt
└───outputs
- We have a different Python script for each task.
- The
inputandoutputsdirectories contain the data and results from the experiments, respectively.
All the code files and input data will be provided as a zip file via the download section.
Download Code
Installing Dependencies
We need the latest version of Hugging Face Transformers, Accelerate, and PyTorch to run the code. All the requirements are available in the requirements.txt file.
pip install -r requirements.txt
This is all the setup we need to carry out inference.
Moondream3 In Action – Inference using Moondream3
Let’s jump into the code and inference experiments without any delay.
Before running the code, please make sure that you have at least 20GB of VRAM for inference. The model loading in FP16/BF16 requires around 18GB VRAM, and it can increase a bit during inference.
Image Captioning using Moondream3
We will start with the image captioning experiment. The code for this is present in the moondream3_caption.py file. The following block contains the entire code.
from transformers import AutoModelForCausalLM
from PIL import Image

import torch
import argparse

parser = argparse.ArgumentParser()
parser.add_argument(
    '--input',
    help='path to the input image'
)
parser.add_argument(
    '--length',
    help='how long the caption should be',
    default='short',
    choices=['short', 'normal', 'long']
)
args = parser.parse_args()

model = AutoModelForCausalLM.from_pretrained(
    'moondream/moondream3-preview',
    trust_remote_code=True,
    dtype=torch.bfloat16,
    device_map={'': 'cuda'},
)
model.compile()

image = Image.open(args.input)

print('CAPTION:\n')
for t in model.caption(image, length=args.length, stream=True)['caption']:
    print(t, end='', flush=True)
print('\n')
Moondream3 can output either a short, normal, or long caption for an image based on user preference. We can control that via the length argument during inference. For this, we also have a command line argument so that we can control it when executing the script.
We load the model in BF16 format. As the model is using FlexAttention, the compile() method helps in fast decoding and handles warmup as well.
We read the image and carry out the inference in streaming format. Let’s execute the code and check an example output.
python moondream3_caption.py --input input/image_1.jpg
Following is the image and output when the default caption length is short.
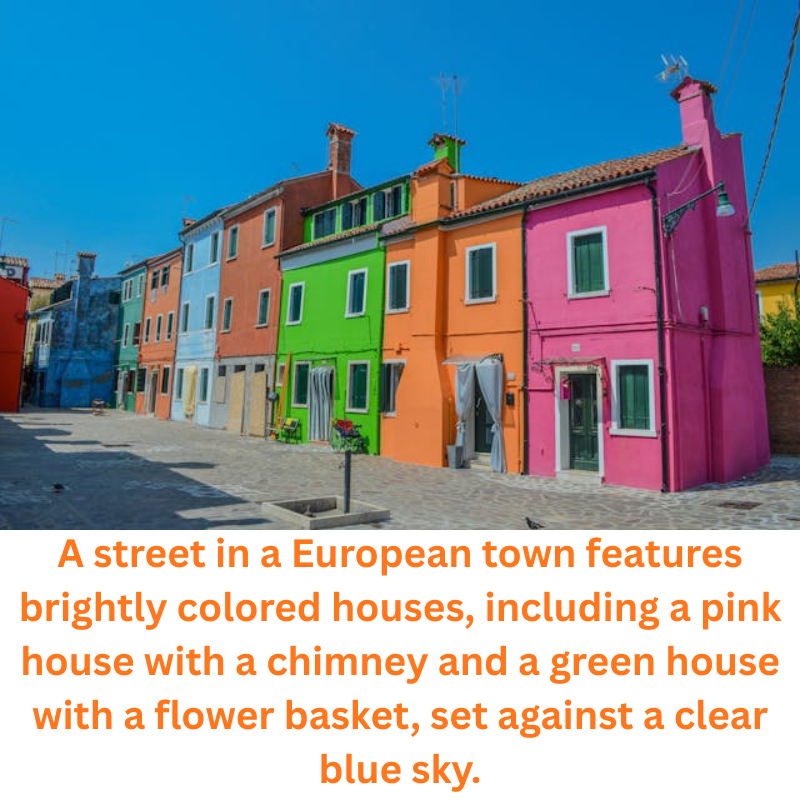
The caption looks good; however, it contains a few odd terms like “flower-basket”.
Let’s try with a longer caption.
python moondream3_caption.py --input input/image_1.jpg --length long
We get the following output.
CAPTION:

The image portrays a vibrant street scene in a town, characterized by a row of
colorful houses that stand out against the clear blue sky. The houses are
painted in a variety of bright hues, including pink, orange, green, blue, and
white, creating a visually striking and cheerful atmosphere. The houses are
closely packed together, forming a continuous row along the street.

Starting from the left, the first house is pink, followed by a house painted
orange. The third house is green, and the fourth house is blue. The fifth house
is painted white, and the sixth house is pink. The seventh house is orange, and
the eighth house is pink. The ninth house is blue, and the tenth house is pink.
The eleventh house is orange, and the twelfth house is pink. The thirteenth
house is blue, and the fourteenth house is pink. The fifteenth house is orange,
and the sixteenth house is pink.

The houses have small front doors and windows, with some having curtains or
blinds drawn. The roofs of the houses are flat and covered with tiles. The
street in front of the houses is paved with light-colored stones, creating a
clean and uniform appearance. The street is relatively empty, with no visible
people or vehicles.

The sky above is a clear, bright blue, indicating a sunny day. The sunlight
casts shadows on the ground, adding depth and dimension to the scene. The
overall impression is one of a peaceful and colorful neighborhood, showcasing
the unique and artistic architecture of the town.
At first glance, everything looks good. However, taking a closer look at the second paragraph, we can see clear hallucination. After pointing out the color of the first three houses, it goes on to hallucinate the colors till the fifteenth house, which is not even present in the image.
This shows that complex scenarios might throw the model off sometimes.
Visual Query using Moondream3
Let’s jump into visual querying, where we ask the model a question about the image. The code is present in moondream3_visual_query.py file.
from transformers import AutoModelForCausalLM
from PIL import Image

import torch
import argparse

parser = argparse.ArgumentParser()
parser.add_argument(
    '--input',
    help='path to the input image'
)
parser.add_argument(
    '--prompt',
    help='user prompt for the object to query',
    required=True
)
args = parser.parse_args()

model = AutoModelForCausalLM.from_pretrained(
    'moondream/moondream3-preview',
    trust_remote_code=True,
    dtype=torch.bfloat16,
    device_map={'': 'cuda'},
)
model.compile()

image = Image.open(args.input)

query = args.prompt

print(query)
print(model.query(image, query)['answer'])
We have argument parsers for the image path and the user query. After loading the model and reading the image, we use the query() method of the model to get the answer.
Let’s run the code using the same image as above.
python moondream3_visual_query.py --input input/image_1.jpg --prompt "How many different colors of houses are there and what are they?"
The model gives the following answer.
5 colors: orange, green, blue, pink, and light blue
The model has recognized all the major colors correctly; however, it missed the light brown colored house.
Let’s ask another question based on the following image.

python moondream3_visual_query.py --input input/image_2.jpg --prompt "How many graiffes are there"
5
It is counting where many models make mistakes. The answer here, however, is correct.
Image Pointing using Moondream3
The next task we will carry out is pointing to objects. The code for this resides in the moondream3_pointing.py file.
Following is the entire code for image pointing using Moondream3.
from transformers import AutoModelForCausalLM
from PIL import Image

import cv2
import numpy as np
import argparse
import os
import torch

parser = argparse.ArgumentParser()
parser.add_argument(
    '--input',
    help='path to the input image'
)
parser.add_argument(
    '--prompt',
    help='user prompt for the object to point',
    required=True
)
parser.add_argument(
    '--out',
    default=None,
    help='name of the output file'
)
args = parser.parse_args()

out_dir = 'outputs'
os.makedirs(out_dir, exist_ok=True)

model = AutoModelForCausalLM.from_pretrained(
    'moondream/moondream3-preview',
    trust_remote_code=True,
    dtype=torch.bfloat16,
    device_map={'': 'cuda'},
)
model.compile()

image = Image.open(args.input)

pointing = args.prompt
print(f"Pointing to: {pointing}")
points = model.point(image, pointing)['points']
print(points)

image_array = cv2.cvtColor(np.array(image), cv2.COLOR_RGB2BGR)

for point in points:
    h, w = image_array.shape[:2]
    x = point['x']*w
    y = point['y']*h

    # Create a small blue circle.
    cv2.circle(
        image_array,
        center=(int(x), int(y)),
        radius=2,
        color=(255, 0, 0),
        thickness=-1,
        lineType=cv2.LINE_AA
    )
    # Create a larger white circle.
    cv2.circle(
        image_array,
        center=(int(x), int(y)),
        radius=4,
        color=(255, 255, 255),
        thickness=2,
        lineType=cv2.LINE_AA
    )
    # Create a larger red circle.
    cv2.circle(
        image_array,
        center=(int(x), int(y)),
        radius=6,
        color=(0, 0, 255),
        thickness=2,
        lineType=cv2.LINE_AA
    )

file_name = os.path.normpath(args.input).split(os.path.sep)[-1]

if args.out is not None:
    file_name = args.out + '.jpg'

cv2.imwrite(os.path.join(out_dir, 'pointing_'+file_name), image_array)

cv2.imshow('Image', image_array)
cv2.waitKey(0)
We can point to the desired objects in an image using the point() method and passing in the image and the prompt as parameters.
The model returns the coordinates in normalized format.
Let’s try to point out all the giraffes in the image.
python moondream3_pointing.py --input input/image_2.jpg --prompt "giraffes"
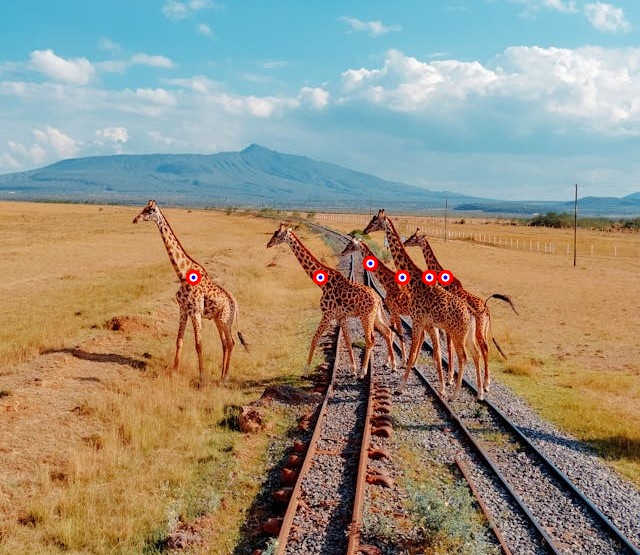
The model has pointed out all the giraffes. However, there is an additional point on the rightmost giraffe as well.
Next, let’s try to point out a few houses in the other images.
python moondream3_pointing.py --input input/image_1.jpg --prompt "green and the orange house" --out house
We can use --out command line argument to specify the output file name inside the outputs directory.
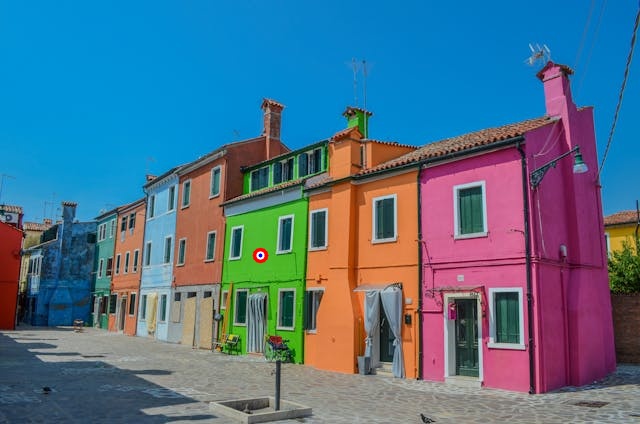
This is also a partial failure case as the model did not point to the orange house.
For the final pointing experiment, let’s ask the model to point to windows.
# Failure.
python moondream3_pointing.py --input input/image_1.jpg --prompt "windows on the pink house" --out windows

This also seems like a failure, as the model points to many additional windows that are not in the prompt. It seems like the model might have difficulty recognizing colors.
Video Pointing using Moondream3
We can use Moondream3 to point to objects in videos. The moondream3_pointing_video.py file contains the code for this.
from transformers import AutoModelForCausalLM
from PIL import Image

import cv2
import time
import argparse
import os
import torch

parser = argparse.ArgumentParser()
parser.add_argument(
    '--input',
    help='path to the input video'
)
parser.add_argument(
    '--prompt',
    help='user prompt for the object to point',
    required=True
)
parser.add_argument(
    '--out',
    default=None,
    help='name of the output file'
)
args = parser.parse_args()

out_dir = 'outputs'
os.makedirs(out_dir, exist_ok=True)

model = AutoModelForCausalLM.from_pretrained(
    'moondream/moondream3-preview',
    trust_remote_code=True,
    dtype=torch.bfloat16,
    device_map={'': 'cuda'},
)
model.compile()

cap = cv2.VideoCapture(args.input)

frame_width = int(cap.get(3))
frame_height = int(cap.get(4))

save_name = os.path.normpath(args.input).split(os.path.sep)[-1]
if args.out is not None:
    save_name = args.out + '.mp4'
# Define codec and create VideoWriter object.
out = cv2.VideoWriter(f"{out_dir}/pointing_{save_name}",
                    cv2.VideoWriter_fourcc(*'mp4v'), 30,
                    (frame_width, frame_height))

pointing = args.prompt

frame_count = 0 # To count total frames.
total_fps = 0 # To get the final frames per second.

while cap.isOpened():
    ret, frame = cap.read()

    if ret:
        frame_pil = Image.fromarray(frame).convert('RGB')

        print(f"Pointing to: {pointing}")
        start_time = time.time()

        points = model.point(frame_pil, pointing)['points']

        end_time = time.time()

        fps = 1 / (end_time - start_time)
        total_fps += fps
        frame_count += 1

        for point in points:
            h, w = frame.shape[:2]
            x = point['x']*w
            y = point['y']*h

            # Create a small blue circle.
            cv2.circle(
                frame,
                center=(int(x), int(y)),
                radius=2,
                color=(255, 0, 0),
                thickness=-1,
                lineType=cv2.LINE_AA
            )
            # Create a larger white circle.
            cv2.circle(
                frame,
                center=(int(x), int(y)),
                radius=4,
                color=(255, 255, 255),
                thickness=2,
                lineType=cv2.LINE_AA
            )
            # Create a larger red circle.
            cv2.circle(
                frame,
                center=(int(x), int(y)),
                radius=6,
                color=(0, 0, 255),
                thickness=2,
                lineType=cv2.LINE_AA
            )

        out.write(frame)

        cv2.imshow('Image [Press Q to exit]', frame)
        # Press `q` to exit
        if cv2.waitKey(1) & 0xFF == ord('q'):
            break
    else:
        break

# Release VideoCapture().
cap.release()
# Close all frames and video windows.
cv2.destroyAllWindows()

# Calculate and print the average FPS.
avg_fps = total_fps / frame_count
print(f"Average FPS: {avg_fps:.3f}")
The code remains almost the same, except that we point to the object in each frame of the video.
python moondream3_pointing_video.py --input input/video_1.mp4 --prompt "giraffes" --out giraffes
Although there is some flickering, the model seems to be able to point to the giraffes in all frames.
Object Detection in Images using Moondream3
Next, we will tackle object detection in videos using Moondream3. The moondream3_detection.py file contains the code for this.
from transformers import AutoModelForCausalLM
from PIL import Image

import cv2
import numpy as np
import argparse
import os
import torch

parser = argparse.ArgumentParser()
parser.add_argument(
    '--input',
    help='path to the input image'
)
parser.add_argument(
    '--prompt',
    help='user prompt for the object to detect',
    required=True
)
parser.add_argument(
    '--out',
    default=None,
    help='name of the output file'
)
args = parser.parse_args()
args = parser.parse_args()

out_dir = 'outputs'
os.makedirs(out_dir, exist_ok=True)

model = AutoModelForCausalLM.from_pretrained(
    'moondream/moondream3-preview',
    trust_remote_code=True,
    dtype=torch.bfloat16,
    device_map={'': 'cuda'},
)
model.compile()

image = Image.open(args.input)

detecting = args.prompt
print(f"Object detection: {detecting}")
objects = model.detect(image, detecting)['objects']
print(objects)

image_array = cv2.cvtColor(np.array(image), cv2.COLOR_RGB2BGR)

for object in objects:
    h, w = image_array.shape[:2]
    xmin = object['x_min']*w
    ymin = object['y_min']*h
    xmax = object['x_max']*w
    ymax = object['y_max']*h

    cv2.rectangle(
        image_array,
        pt1=(int(xmin), int(ymin)),
        pt2=(int(xmax), int(ymax)),
        color=(0, 0, 255),
        thickness=4,
        lineType=cv2.LINE_AA
    )
    cv2.rectangle(
        image_array,
        pt1=(int(xmin), int(ymin)),
        pt2=(int(xmax), int(ymax)),
        color=(255, 255, 255),
        thickness=1,
        lineType=cv2.LINE_AA
    )

file_name = os.path.normpath(args.input).split(os.path.sep)[-1]
if args.out is not None:
    file_name = args.out + '.jpg'

cv2.imwrite(os.path.join(out_dir, 'detection_'+file_name), image_array)

cv2.imshow('Image', image_array)
cv2.waitKey(0)
The code is very similar to pointing. We use the detect() method of the model while passing the image and object name as the prompt for detection. Here also, the coordinates are normalized according to image dimensions.
python moondream3_detection.py --input input/image_1.jpg --prompt "windows in the pink house" --out windows
Following is the output.

Again, in this case also, the model detects additional windows.
Object Detection in Videos using Moondream3
The video object detection code remains similar and is present in moondream3_video_detection.py file.
from transformers import AutoModelForCausalLM
from PIL import Image

import cv2
import os
import time
import argparse
import os
import torch

parser = argparse.ArgumentParser()
parser.add_argument(
    '--input',
    help='path to the input video'
)
parser.add_argument(
    '--prompt',
    help='user prompt for the object to detect',
    required=True
)
parser.add_argument(
    '--out',
    default=None,
    help='name of the output file'
)
args = parser.parse_args()

out_dir = 'outputs'
os.makedirs(out_dir, exist_ok=True)

model = AutoModelForCausalLM.from_pretrained(
    'moondream/moondream3-preview',
    trust_remote_code=True,
    dtype=torch.bfloat16,
    device_map={'': 'cuda'},
)
model.compile()

cap = cv2.VideoCapture(args.input)

frame_width = int(cap.get(3))
frame_height = int(cap.get(4))

save_name = os.path.normpath(args.input).split(os.path.sep)[-1]
if args.out is not None:
    save_name = args.out + '.mp4'
# Define codec and create VideoWriter object.
out = cv2.VideoWriter(f"{out_dir}/detection_{save_name}",
                    cv2.VideoWriter_fourcc(*'mp4v'), 30,
                    (frame_width, frame_height))

detecting = args.prompt

frame_count = 0 # To count total frames.
total_fps = 0 # To get the final frames per second.

while cap.isOpened():
    ret, frame = cap.read()

    if ret:
        frame_pil = Image.fromarray(frame).convert('RGB')

        print(f"Object detection: {detecting}")
        start_time = time.time()

        objects = model.detect(frame_pil, detecting)['objects']

        end_time = time.time()

        fps = 1 / (end_time - start_time)
        total_fps += fps
        frame_count += 1

        for object in objects:
            h, w = frame.shape[:2]
            xmin = object['x_min']*w
            ymin = object['y_min']*h
            xmax = object['x_max']*w
            ymax = object['y_max']*h

            cv2.rectangle(
                frame,
                pt1=(int(xmin), int(ymin)),
                pt2=(int(xmax), int(ymax)),
                color=(0, 0, 255),
                thickness=4,
                lineType=cv2.LINE_AA
            )
            cv2.rectangle(
                frame,
                pt1=(int(xmin), int(ymin)),
                pt2=(int(xmax), int(ymax)),
                color=(255, 255, 255),
                thickness=1,
                lineType=cv2.LINE_AA
            )

        out.write(frame)

        cv2.imshow('Image [Press Q to exit]', frame)
        # Press `q` to exit
        if cv2.waitKey(1) & 0xFF == ord('q'):
            break
    else:
        break

# Release VideoCapture().
cap.release()
# Close all frames and video windows.
cv2.destroyAllWindows()

# Calculate and print the average FPS.
avg_fps = total_fps / frame_count
print(f"Average FPS: {avg_fps:.3f}")
Let’s detect the giraffes.
python moondream3_video_detection.py --input input/video_1.mp4 --prompt "giraffes" --out giraffes
The video object detection looks extremely stable, and the model seems to be doing well here.
OCR using Moondream3
The final set of experiments is going to be one of the most demanding ones in the vision industry, i.e., OCR.
We do not need a new script for this. The moondream3_visual_query.py with custom prompts should be enough.
Let’s try the first image, which is a combination of logos and text.
python moondream3_visual_query.py --input input/ocr_image_1.jpg --prompt "OCR this image"
In the following figure, the top part is the input image, and the bottom part shows the output.

The output structure is unique. It is a structured output in JSON format, which might be appreciated in scenarios when carrying out OCR on forms and tables. The text is correct, and the model is able to recognize some of the logos correctly.
Next, let’s try the following image, which contains only text but is low-resolution.

python moondream3_visual_query.py --input input/ocr_image_2.jpg --prompt "OCR this image"
Interestingly, this was a complete failure, and the model did not output anything.
Now, one final experiment for OCR using Moondream3.
python moondream3_visual_query.py --input input/ocr_image_3.jpg --prompt "OCR this image"
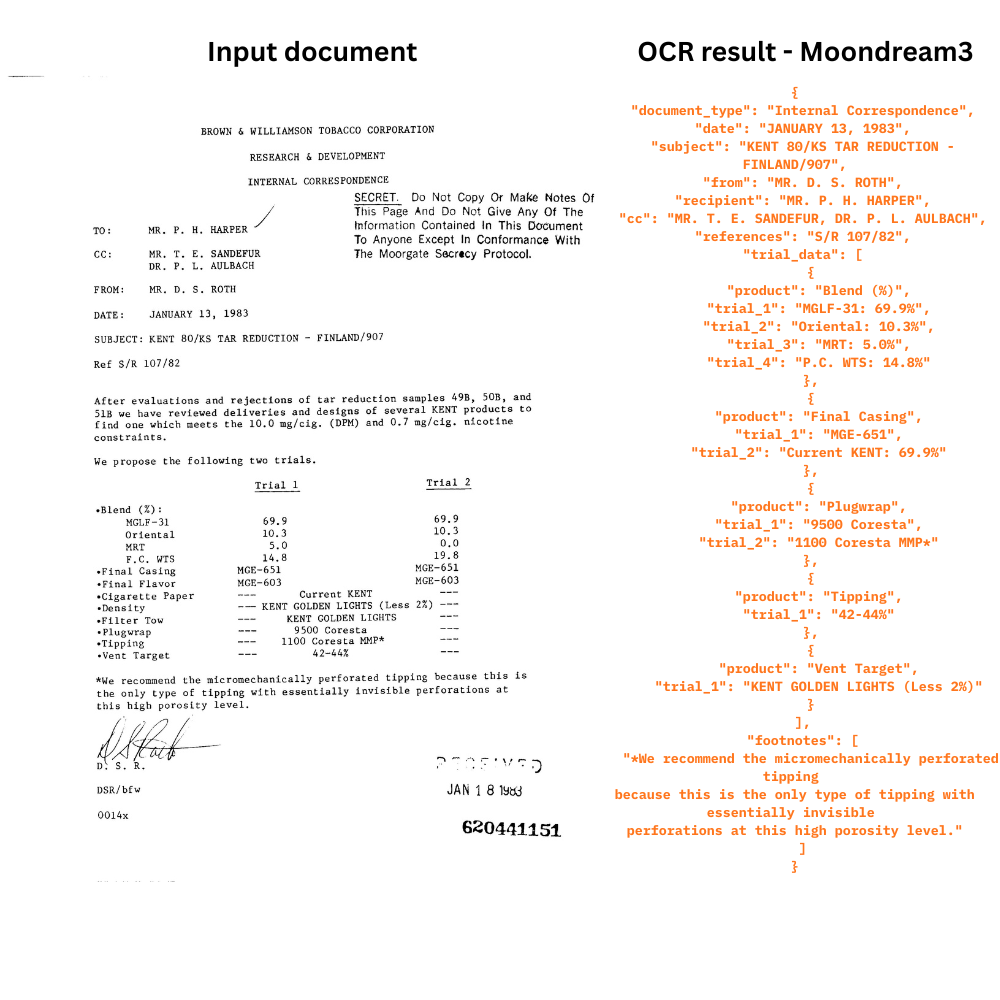
The model seems to have caught the most important text components in its structured output. However, it seems to have missed the headings and the text to the right of it.
Key Takeaways
The following are some of the takeaways from our inference experiments using Moondream3.
- The model has issues in recognizing colors. This carries forward to pointing to specific colored objects, counting, and detecting them as well.
- There is temporal flickering when carrying out pointing in videos.
- Although the structure of the OCR output is good, advanced prompting might be needed to extract the text in plain-text format.
Still, the model is just in the preview stage, and the technical article mentions that the final model is still being trained. We can surely hope that these issues will be eradicated with the next release.
Summary and Conclusion
In this article, we covered the latest model in the Moondream series, that is, Moondream3. We discussed the architecture briefly, then carried out inference for different tasks, and discussed some of the glaring issues.
If you have any questions, thoughts, or suggestions, please leave them in the comment section. I will surely address them.
You can contact me using the Contact section. You can also find me on LinkedIn, and X.
