

SmolLM2 by Hugging Face is a family of small language models. There are three variants each for the base and instruction tuned model. They are SmolLM2-135M, SmolLM2-360M, and SmolLM2-1.7B. For their size, they are extremely capable models, especially when fine-tuned for specific tasks. In this article, we will be fine-tuning SmolLM2 on machine translation task.

We will train one of the SmolLM2 models to translate French to English. With this, we will cover the following topics:
- Preparing the French-to-English translation dataset from the WMT dataset.
- Preparing the SmolLM2 model and tokenizer.
- Fine-tuning the model and running inference.
- Evaluating the fine-tuned model using the Hugging Face Lighteval library.
Let’s jump right into the article.
The WMT14 French-to-English Translation Dataset
We will use the WMT14 dataset from Hugging Face to fine-tune the SmolLM2-135M Instruct model.
It contains translation subsets for the following languages:
- Czech <-> English (cs-en)
- French <-> English (fr-en)
- Hindi <-> English (hi-en)
- Russian <-> English (ru-en)
- German <-> English (de-en)
We will use the fr-en subset, which contains 40.8 million training, 3000 validation, and 3000 test samples. However, we will use a smaller subset and not the entire 40.8M corpus.

Directory Structure
Following is the project directory structure.
├── results
│   └── results
├── smollm2_135m_wmt_fr_en
│   ├── best_model
│   └── logs
├── smollm2_135m_wmt_fr_en_large_data
│   ├── best_model
│   └── logs
├── requirements.txt
├── smollm2_finetuned_wmt_eval.ipynb
├── smollm2_pretrained_wmt_eval.ipynb
├── smollm2_wmt_finetuning.ipynb
└── smollm2_wmt_finetuning_large_data.ipynb
- We have four different Jupyter Notebooks. Two for training the model, and the other two for evaluation using the
lightevallibrary. - The
smollm2_135m_wmt_fr_endirectory contains the fine-tuned model. - The
resultsdirectory contains the evaluation results.
The trained model and the Jupyter Notebooks are available via the download section.
Download Code
Installing Dependencies
The requirements.txt file contains all the major dependencies for the project. They are PyTorch, Transformers, Lighteval, and TRL.
pip install -r requirements.txt
Fine-Tuning SmolLM2-135M for Machine Translation
Let’s jump right into the code now. The code for fine-tuning SmolLM2 is present in the smollm2_wmt_finetuning_large_data.ipynb Jupyter Notebook. In this notebook, we will be training the model on 500,000 samples.
In case you want to run the training on a smaller subset, you may run the smollm2_wmt_finetuning.ipynb notebook.
All the training and evaluation were done on a system with a 10GB RTX 3080 GPU, 32GB RAM, and an i7 10th generation processor.
Import Statements
The following code block contains all the imports that we need for the training.
import os
import torch

from datasets import load_dataset, Dataset
from transformers import (
    AutoModelForCausalLM,
    AutoTokenizer,
    pipeline,
    logging
)
from trl import SFTTrainer, SFTConfig, setup_chat_format
We will use the SFTrainer class for starting the training, and SFTConfig class to define the training arguments.
To avoid warnings and unwanted deadlocks, we are turning off tokenizer parallelism.
os.environ["TOKENIZERS_PARALLELISM"] = "false"
Training Hyperparameters
Next, we define some important hyperparameters for training.
batch_size = 8
num_workers = 12
epochs = 1
bf16 = True
fp16 = False
gradient_accumulation_steps = 8
seq_length = 512
logging_steps = 1000
learning_rate = 0.0001
model_id = 'HuggingFaceTB/SmolLM2-135M-Instruct'
out_dir = 'smollm2_135m_wmt_fr_en_large_data'
seed = 42
- Here, the micro batch size is 8 with 8 gradient accumulation steps, making the global batch size 64.
- We will be training the model for 1 epoch.
- The number of workers for the data processing is set to 12. You can change this depending on the system that you are using.
- As the training was run on an RTX 3080 GPU, we have set
bf16toTrue. If you are using P100 or T14 GPU on Colab/Kaggle, you can makefp16 = True, andbf16 = False.
Sample Inference Before Fine-Tuning
Let’s load the model and carry out a sample inference for translation before fine-tuning.
# Translates to - Hello! How are you?
messages = [
    {
        'role': 'user', 'content': 'Translate from French to English: Bonjour! Comment vas-tu?'
    }
]

input_text=tokenizer.apply_chat_template(messages, tokenize=False)
print(input_text)
inputs = tokenizer.encode(input_text, return_tensors='pt').to(device)
outputs = model.generate(
    inputs,
    max_new_tokens=50,
    temperature=0.2,
    top_p=0.9,
    do_sample=True
)
print(tokenizer.decode(outputs[0]))
We get the following output.
<|im_start|>system
You are a helpful AI assistant named SmolLM, trained by Hugging Face<|im_end|>
<|im_start|>user
Translate from French to English: Bonjour! Comment vas-tu?<|im_end|>

<|im_start|>system
You are a helpful AI assistant named SmolLM, trained by Hugging Face<|im_end|>
<|im_start|>user
Translate from French to English: Bonjour! Comment vas-tu?<|im_end|>
<|im_start|>assistant
Bonjour! Comment vas-tu?<|im_end|>
The model just gave the same result as the user query. It is not capable of translating from French to English at the moment because of its small size.
Load and Prepare the WMT14 French-to-English Dataset
Next, we will load the dataset and create a training subset.
dataset = load_dataset('wmt/wmt14', 'fr-en')

train_dataset = Dataset.from_dict(dataset['train'][:500000])
# train_dataset = dataset['train']
valid_dataset = dataset['validation']
test_dataset = dataset['test']

def tokenize_function(examples):
    fr = [example['fr'] for example in examples['translation']]
    en = [example['en'] for example in examples['translation']]

    texts = [
        tokenizer.apply_chat_template(
            [
                {'role': 'user', 'content': f"FR: {prompt} EN: "},
                {'role': 'assistant', 'content': response}
            ],
            tokenize=False
        )
        for prompt, response in zip(fr, en)
    ]
    return tokenizer(
        texts,
        truncation=True,
        padding='max_length',
        max_length=seq_length
    )
We are using only 500,000 samples out of the 4.5M samples from the training set. If you wish, you can train on the entire set as well.
The tokenize_function is a helper function that creates the translation samples in the format that the model expects.
The following code block maps the training and validation sets to the above helper function/
dataset_train = train_dataset.map(
    tokenize_function,
    batched=True,
    batch_size=4096,
    num_proc=num_workers
)
dataset_valid = valid_dataset.map(
    tokenize_function,
    batched=True,
    batch_size=4096,
    num_proc=num_workers
)
This creates the samples in the following format.
<|im_start|>system
You are a helpful AI assistant named SmolLM, trained by Hugging Face<|im_end|>
<|im_start|>user
FR: On peut s' en féliciter, mais nous entendons que cela continue et c' est bien pour cette raison que l' on ne peut que déplorer que le Parlement européen soit tenu, aujourd' hui, en marge du processus décisionnel qui préside aux destinées du secteur postal en Europe. EN: <|im_end|>
<|im_start|>assistant
We may congratulate ourselves
We can see that the tokenizer applied all the necessary special tokens. These include the system prompt tokens, the BOS and EOS token, which are quite necessary for the model to learn the translation correctly.
Furthermore, we are using the following format for teaching the model to translate from French to English.
FR: {french_sentence} EN: {english_sentence}
The user prompt is FR: {french_sentence} EN:. The EN: is the cue for the assistant to start the translation.
This format is necessary because the lighteval library uses a similar format during evaluation. That is:
TRANSLATION_CONTEXT = "{source_label}{colon}{sentence_space}{source_text}{sentence_space}{target_label}{colon}"
Prepare the Model
The next code block loads the model with the correct data type as per our training hyperparameters.
if bf16:
    model = AutoModelForCausalLM.from_pretrained(
        model_id, trust_remote_code=True
    ).to(dtype=torch.bfloat16)
else:
    model = AutoModelForCausalLM.from_pretrained(
        model_id, trust_remote_code=True
    )
Training Arguments
Now, we will define all the necessary training arguments using the SFTConfig class.
training_args = SFTConfig(
    output_dir=f"{out_dir}/logs",
    eval_strategy='steps',
    weight_decay=0.01,
    load_best_model_at_end=True,
    per_device_train_batch_size=batch_size,
    per_device_eval_batch_size=batch_size,
    logging_strategy='steps',
    save_strategy='steps',
    save_steps=1000,
    logging_steps=logging_steps,
    num_train_epochs=epochs,
    save_total_limit=2,
    bf16=bf16,
    fp16=fp16,
    report_to='tensorboard',
    dataloader_num_workers=num_workers,
    gradient_accumulation_steps=gradient_accumulation_steps,
    learning_rate=learning_rate,
    lr_scheduler_type='constant',
    # lr_scheduler_type='linear',
    max_seq_length=seq_length,
    seed=seed
)
You can make changes to the configuration according to your requirements.
We use the SFTTrainer class to initialize the trainer object and pass the above training arguments.
trainer = SFTTrainer(
    model=model,
    train_dataset=dataset_train,
    eval_dataset=dataset_valid,
    tokenizer=tokenizer,
    args=training_args
)
We can also check the training data loader samples using trainer object.
dataloader = trainer.get_train_dataloader()
for i, sample in enumerate(dataloader):
    print(tokenizer.decode(sample['input_ids'][0]))
    print('#'*50)
    if i == 5:
        break
Training the Model
Let’s start the training process now.
history = trainer.train()

model.save_pretrained(f"{out_dir}/best_model")
tokenizer.save_pretrained(f"{out_dir}/best_model")
After training, we are loading and saving the best model.
Following is the log after the training is complete.
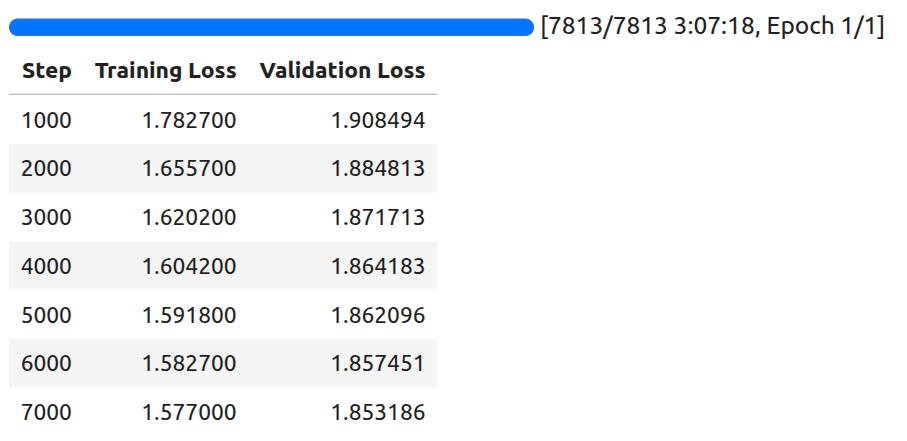
By the final evaluation step, the model reached a validation loss of 1.85.
Inference using the Trained Model
Let’s run inference using the trained model.
from transformers import (
    AutoModelForCausalLM,
    AutoTokenizer
)

device = 'cuda'
tokenizer = AutoTokenizer.from_pretrained('smollm2_135m_wmt_fr_en_large_data/best_model/')
model = AutoModelForCausalLM.from_pretrained('smollm2_135m_wmt_fr_en_large_data/best_model/').to(device)

fr_sentences = [
    'Bonjour! Comment vas-tu?', # Hello! How are you?
    "Qu'est-ce que c est?" # What is it?
]

def translate(sentence):
    messages = [
        {
            'role': 'user',
            'content': f"FR: {sentence} EN: "
        }
    ]

    input_text = tokenizer.apply_chat_template(messages, tokenize=False, add_generation_prompt=True)
    print(input_text)
    inputs = tokenizer(input_text, return_tensors='pt').to(device)
    print(inputs)
    outputs = model.generate(
        **inputs,
        max_new_tokens=128,
        temperature=0.2,
        top_p=0.9,
        eos_token_id=tokenizer.eos_token_id,
        do_sample=True
    )
    print(tokenizer.decode(outputs[0], skip_special_tokens=True))

for sentence in fr_sentences:
    translate(sentence)
    print('#'*50)
We have a list of simple French sentences and a helper function to translate them. Following are the results after translation.
<|im_start|>system
You are a helpful AI assistant named SmolLM, trained by Hugging Face<|im_end|>
<|im_start|>user
FR: Bonjour! Comment vas-tu? EN: <|im_end|>
<|im_start|>assistant

{'input_ids': tensor([[    1,  9690,   198,  2683,   359,   253,  5356,  5646, 11173,  3365,
          3511,   308, 34519,    28,  7018,   411,   407, 19712,  8182,     2,
           198,     1,  4093,   198, 13422,    42, 11948, 24583,    17, 19429,
         23481,    29, 24961,    47, 11286,    42,   216,     2,   198,     1,
           520,  9531,   198]], device='cuda:0'), 'attention_mask': tensor([[1, 1, 1, 1, 1, 1, 1, 1, 1, 1, 1, 1, 1, 1, 1, 1, 1, 1, 1, 1, 1, 1, 1, 1,
         1, 1, 1, 1, 1, 1, 1, 1, 1, 1, 1, 1, 1, 1, 1, 1, 1, 1, 1]],
       device='cuda:0')}
system
You are a helpful AI assistant named SmolLM, trained by Hugging Face
user
FR: Bonjour! Comment vas-tu? EN:
assistant
Hello! How are you?
##################################################
<|im_start|>system
You are a helpful AI assistant named SmolLM, trained by Hugging Face<|im_end|>
<|im_start|>user
FR: Qu'est-ce que c est? EN: <|im_end|>
<|im_start|>assistant

{'input_ids': tensor([[    1,  9690,   198,  2683,   359,   253,  5356,  5646, 11173,  3365,
          3511,   308, 34519,    28,  7018,   411,   407, 19712,  8182,     2,
           198,     1,  4093,   198, 13422,    42,  3069,    23,   381,    29,
           319, 10168,   265,  1264,    47, 11286,    42,   216,     2,   198,
             1,   520,  9531,   198]], device='cuda:0'), 'attention_mask': tensor([[1, 1, 1, 1, 1, 1, 1, 1, 1, 1, 1, 1, 1, 1, 1, 1, 1, 1, 1, 1, 1, 1, 1, 1,
         1, 1, 1, 1, 1, 1, 1, 1, 1, 1, 1, 1, 1, 1, 1, 1, 1, 1, 1, 1]],
       device='cuda:0')}
system
You are a helpful AI assistant named SmolLM, trained by Hugging Face
user
FR: Qu'est-ce que c est? EN:
assistant
What is that? (FR)
##################################################
The first translation is entirely correct, which the model was not able to do before fine-tuning. The second one is almost correct, however, the model added the “(FR)” string at the end.
Surely, training on more samples and for longer will yield a much better model.
Evaluating the SmolLM2 for Translation using Lighteval
Before we evaluate the fine-tuned model, let’s evaluate the pretrained model on the wmt14:fr-en task. The code for this is present in the smollm2_pretrained_wmt_eval.ipynb Jupyter Notebook.
Following is the command.
!lighteval accelerate \
    "model_name=HuggingFaceTB/SmolLM2-135M-Instruct,batch_size=3" \
    "lighteval|wmt14:fr-en|0|0" \
    --dataset-loading-processes 8 \
    --max-samples 100
- The first argument is
model_name=HuggingFaceTB/SmolLM2-135M-Instruct,batch_size=3. Here, we pass the Hugging Face model library tag and the batch size to use for evaluation. - The next argument is the task,
lighteval|wmt14:fr-en|0|0. It follows the following format:- {suite}|{task}|{num_few_shot}|{0 for strict `num_few_shots`, or 1 to allow a truncation if context size is too small}
- You can find more details about the format here.
- Then we define the processes to use for data loading and the number of samples to evaluate on. As the evaluation takes quite a long time, we use just 100 samples for evaluation.
The following are the evaluation results using the pretrained model.
|         Task          |Version|Metric| Value |   |Stderr|
|-----------------------|------:|------|------:|---|-----:|
|all                    |       |bleu  | 7.1294|±  |0.1726|
|                       |       |chrf  | 9.9403|±  |0.2446|
|                       |       |ter   |34.8837|±  |0.6558|
|lighteval:wmt14:fr-en:0|      0|bleu  | 7.1294|±  |0.1726|
|                       |       |chrf  | 9.9403|±  |0.2446|
|                       |       |ter   |34.8837|±  |0.6558|
The BLEU score is quite low in this case.
Let’s use the fine-tuned model for evaluation and check. The code for this is present in the smollm2_finetuned_wmt_eval.ipynb Jupyter Notebook.
!lighteval accelerate \
    "model_name=smollm2_135m_wmt_fr_en_large_data/best_model/,batch_size=3,max_length=512" \
    "lighteval|wmt14:fr-en|0|0" \
    --dataset-loading-processes 8 \
    --max-samples 30
Here, we give the model path to the best trained model directory. We have an additional argument here, that is, max_length=512. This is to ensure that the model does not generate unnecessarily long text, which also increases the evaluation time.
We get the following result.
|         Task          |Version|Metric| Value |   |Stderr |
|-----------------------|------:|------|------:|---|------:|
|all                    |       |bleu  | 7.8098|±  | 0.2485|
|                       |       |chrf  | 8.6382|±  | 0.3911|
|                       |       |ter   |34.8837|±  |27.2718|
|lighteval:wmt14:fr-en:0|      0|bleu  | 7.8098|±  | 0.2485|
|                       |       |chrf  | 8.6382|±  | 0.3911|
|                       |       |ter   |34.8837|±  |27.2718|
The result is marginally better this time. We do not have a perfect model, but training on more samples will surely make it better.
Summary and Conclusion
In this article, we covered two important aspects while fine-tuning SmolLM2-135M Instruct for machine translation. The first one is the fine-tuning task itself, and the second one is model evaluation using Lighteval. We also discussed the shortcomings of the model and how to improve them.
If you have any questions, thoughts, or suggestions, please leave them in the comment section. I will surely address them.
You can contact me using the Contact section. You can also find me on LinkedIn, and X.
