

In the last two articles, we covered the introduction to Qwen3-VL and a practical application using the same model, respectively. In this article, we will take the next step by fine-tuning the Qwen3-VL model.
The previous article covered a sketch to HTML application using the Qwen3-VL 4B model. Although we were getting decent outputs, we can improve the results to a large extent. Here, we will take the next logical step in the same direction by fine-tuning Qwen3-VL 2B on an image to HTML dataset. This will allow us to investigate how the model improves by training on task specific dataset.
We will cover the following while training Qwen3-VL on a custom dataset:
- Discussing the image to HTML dataset and its format.
- Setting up Hugging Face Transformers and Unsloth for fine-tuning.
- Training and inference.
The Sketch to HTML Dataset
We will be using the Sketch2Code dataset, whose information we can find on Hugging Face.
The final dataset that we will use is not the exact one from Hugging Face; rather, you can download it from this link.
After downloading and extracting the dataset, we find the following directory structure.
sketch2code_dataset_v1
└── sketch2code_dataset_v1_cleaned
Inside the sketch2code_dataset_v1_cleaned, there will be two images for each HTML file. One is a direct screenshot of the webpage, and another is a hand-drawn/scribbled image.
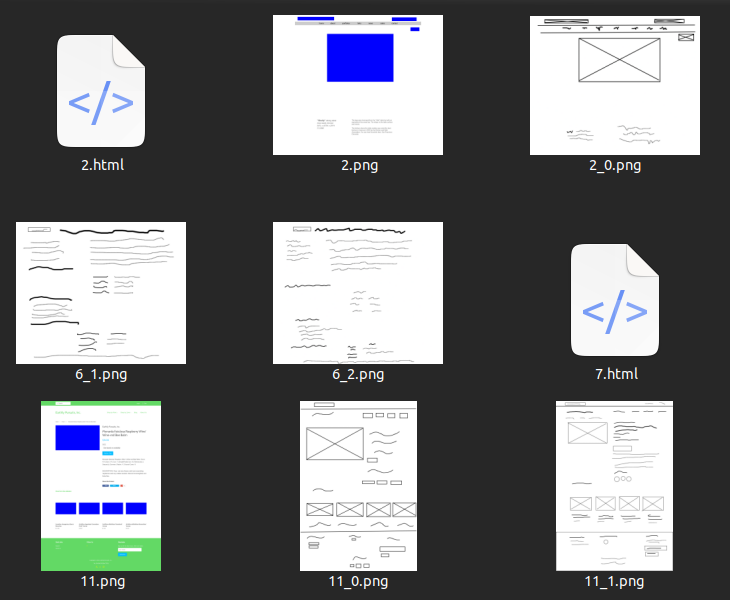
Furthermore, not all the images contain a corresponding HTML file. We will write the code to filter that later. Also, we will only use the direct screenshots and the corresponding HTML files for training the Qwen3-VL model, while discarding the hand-drawn ones.
Project Directory Structure
Let’s take a look at the entire directory structure.
├── lora_model
│   ├── adapter_config.json
│   ├── adapter_model.safetensors
│   ├── added_tokens.json
│   ├── chat_template.jinja
│   ├── merges.txt
│   ├── preprocessor_config.json
│   ├── README.md
│   ├── special_tokens_map.json
│   ├── tokenizer_config.json
│   ├── tokenizer.json
│   ├── video_preprocessor_config.json
│   └── vocab.json
├── outputs
│   ├── checkpoint-500
│   └── README.md
├── sketch2code_dataset_v1
│   └── sketch2code_dataset_v1_cleaned
├── Qwen3_VL_8B_Vision.ipynb
└── requirements.txt
- We have a Jupyter Notebook for training the model.
- The
lora_modelandoutputsdirectories contain the final and intermediate checkpoints. - We already discussed the
sketch2code_dataset_v1dataset in the previous section.
The final checkpoints and Jupyter Notebook are provided as a zip file for download. If you wish to train the model, you need to download the dataset and arrange it in the above structure.
Download Code
Installing Dependencies
If you are working locally, then create a virtual environment with Python 3.12, and you can directly install the requirements.
pip install -r requirements.txt
If you are working in an online environment (Kaggle, Colab, Lightning Studio), you can uncomment the first cell of the notebook to install the requirements.
Code for Fine-Tuning Qwen3-VL
Let’s jump into the code for fine-tuning the model for sketch to HTML.
All the training code resides in the Qwen3_VL_8B_Vision.ipynb Jupyter Notebook.
Let’s start with the imports and some of the hyperparameters.
from unsloth import FastVisionModel
from datasets import load_dataset, Dataset
from PIL import Image
from unsloth.trainer import UnslothVisionDataCollator
from trl import SFTTrainer, SFTConfig

import torch
import pandas as pd
import glob as glob
import os

# Parameters.
training_steps = 500
seq_length = 22000
We will be training the model for 500 steps.
The other important thing to note here is that we are training with a longer context length of 22000. This is because the HTML ground truth files we have range from ~5,000 tokens to ~75,000 tokens. As training on all the HTML files with full context is resource intensive we will filter out the samples that are more than 20000 contexts with HTML and image tokens combined. This is one of the constraints that we have to keep in mind.
Load the Model
The following code block loads the model with the necessary parameters.
model, tokenizer = FastVisionModel.from_pretrained(
    'unsloth/Qwen3-VL-2B-Instruct',
    load_in_4bit=True,
    use_gradient_checkpointing='unsloth',
    gpu_memory_utilization=1.0,
    max_seq_length=seq_length
)

model = FastVisionModel.get_peft_model(
    model,
    finetune_vision_layers=True,
    finetune_language_layers=True,
    finetune_attention_modules=True,
    finetune_mlp_modules=True,

    r=64,
    lora_alpha=128,
    lora_dropout=0,
    bias='none',
    random_state=3407,
    use_rslora=False,
    loftq_config=None,
    max_seq_length=seq_length
    # target_modules = 'all-linear', # Optional now! Can specify a list if needed
)
We are using a LoRA and Alpha of 64 and 128, respectively.
Loading and Preparing the Dataset
Next, let’s load the images and corresponding HTML files.
data_path = 'sketch2code_dataset_v1/sketch2code_dataset_v1_cleaned/'

all_images = glob.glob(os.path.join(data_path, '*.png'))
all_htmls = glob.glob(os.path.join(data_path, '*html'))

final_images, final_htmls = [], []

for html in all_htmls:
    html_file_name = html.split(os.path.sep)[-1].split('.html')[0]
    image_file_path = data_path + html_file_name + '.png'

    final_htmls.append(html)
    final_images.append(image_file_path)

print(len(final_htmls), len(final_images))
We filter out the images for which the HTML files are present. At this moment, there are 484 samples.
However, the next few code block processes the dataset, and we use the Qwen3-VL tokenizer to tokenize the dataset and count the number of tokens for each sample. This filters out any image + HTML sample that contains more than 20000 tokens.
df = pd.DataFrame(columns=['image_paths', 'html_paths'])
df['image_paths'] = final_images
df['html_paths'] = final_htmls

hf_data = Dataset.from_pandas(df)

instruction = 'Convert the image to HTML code.'

def convert_to_conversation(sample):
    image = Image.open(sample['image_paths'])

    with open(sample['html_paths'], 'r') as f:
        html_content = f.read()

    conversation = [
        { 'role': 'user',
          'content' : [
            {'type' : 'text',  'text'  : instruction},
            {'type' : 'image', 'image' : image} ]
        },
        { 'role' : 'assistant',
          'content' : [
            {'type' : 'text',  'text'  : html_content} ]
        },
    ]

    # Check condition and keep specific length samples.
    chat_sample = tokenizer.apply_chat_template(conversation)
    tokenized_sample = tokenizer(image, chat_sample, return_tensors='pt')
    len_tokenized_sample = len(tokenized_sample['input_ids'][0])

    if len_tokenized_sample <= 20000:
        return { 'messages': conversation }
    else:
        return None

converted_dataset = [convert_to_conversation(sample) for sample in hf_data]
converted_dataset = [x for x in converted_dataset if x is not None]

print(len(converted_dataset))
The filtration logic is contained within lines 28 to 30 in the above code block.
The training for this was done on a GPU with 10GB VRAM (RTX 3080), and Unsloth offloaded the gradients to CPU RAM (32 GB RAM system). If you have a system with more VRAM and system RAM, you can certainly use a higher context limit.
Now, one major question arises here. Why filter out some of the files when we already set the context limit of the model to 22000?
This is because for any sample containing more than 20000 tokens, it will be truncated. This means the model will never see the ending </html> tag for such samples. This will lead the model to learn incomplete endings, which results in non-ending generations after fine-tuning the model. In fact, I added the above filtration logic only after finding out the issue after 3 training runs. The model just kept on generating HTML code without stopping and hitting a context length of 22000 during inference. So, this is quite important.
If you wish, you can execute the following code to check the combined image + text context length of each sample in our filtered dataset.
def check_token_lengths(converted_dataset):
    sample_tokens_lt_20000 = 0

    for i, data in enumerate(converted_dataset):
        chat_sample = tokenizer.apply_chat_template(data['messages'])
        tokenized_sample = tokenizer(data['messages'][0]['content'][1]['image'], chat_sample, return_tensors='pt')

        num_tokens = len(tokenized_sample['input_ids'][0])
        print('Sample ', i, ': Num Tokens: ', num_tokens)

        if num_tokens <= 20000:
            sample_tokens_lt_20000 += 1

    print(f"Samples with less than 20000 tokens: {sample_tokens_lt_20000}")

check_token_lengths(converted_dataset)
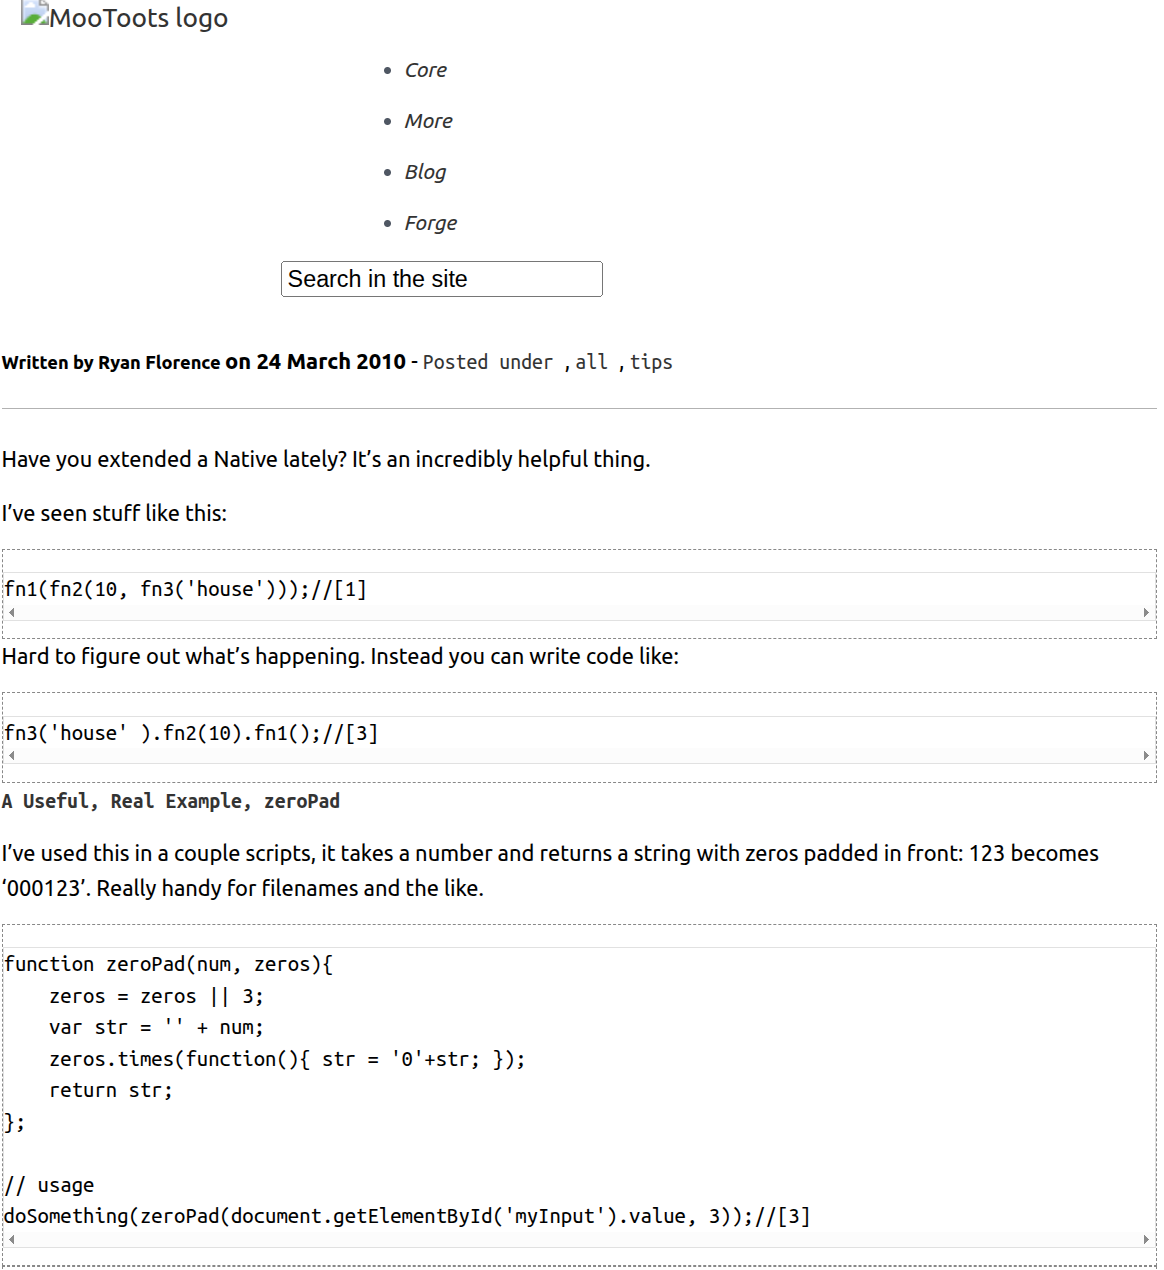
Inference Before Fine-Tuning
Let’s run inference before fine-tuning the model on one of the samples.
FastVisionModel.for_inference(model) # Enable for inference!

image = converted_dataset[0]['messages'][0]['content'][1]['image']
instruction = 'Convert the image to HTML code.'

messages = [
    {'role': 'user', 'content': [
        {'type': 'image'},
        {'type': 'text', 'text': instruction}
    ]}
]
input_text = tokenizer.apply_chat_template(messages, add_generation_prompt = True)
inputs = tokenizer(
    image,
    input_text,
    add_special_tokens = False,
    return_tensors = 'pt',
).to('cuda')

from transformers import TextStreamer
text_streamer = TextStreamer(tokenizer, skip_prompt = True)
_ = model.generate(
    **inputs,
    streamer=text_streamer,
    max_new_tokens=20000,
    use_cache=True,
    temperature=1.5,
    min_p=0.1
)
We are using the first sample from the converted dataset. In most cases, the model just keeps on generating the HTML code without stopping. This shows the limitation of the 2B model when loaded in INT4 format. This initial issue will help us compare the results after fine-tuning.
Training the Model
Note: If you are training on a system with less than 20GB VRAM, be sure to have more system RAM available. With a 10GB RTX 3080 GPU, around 14GB of system RAM is used for gradient offloading.
Next, we initialize the Trainer and start the training.
FastVisionModel.for_training(model)

trainer = SFTTrainer(
    model=model,
    tokenizer=tokenizer,
    data_collator=UnslothVisionDataCollator(model, tokenizer),
    train_dataset=converted_dataset,
    args=SFTConfig(
        per_device_train_batch_size=1,
        gradient_accumulation_steps=2,
        warmup_steps=5,
        max_steps=training_steps,
        learning_rate=2e-4,
        logging_steps=50,
        optim='adamw_8bit',
        weight_decay=0.001,
        lr_scheduler_type='linear',
        seed=3407,
        output_dir='outputs',
        report_to='none',

        # For vision fine-tuning:
        remove_unused_columns=False,
        dataset_text_field='',
        dataset_kwargs={'skip_prepare_dataset': True},
        max_length=seq_length,
    ),
)

trainer_stats = trainer.train()
We are using a batch size of 1 with a gradient accumulation step of 2. You can use a higher batch size if you have more VRAM at your disposal.
The following are the training logs.
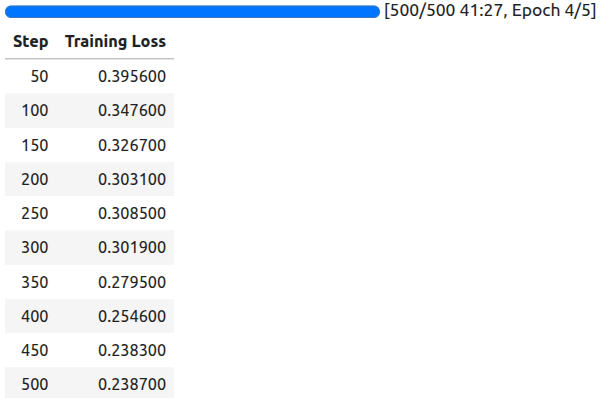
We have a loss of 0.238 after 500 steps.
Finally, we save the model.
model.save_pretrained('lora_model')  # Local saving
tokenizer.save_pretrained('lora_model')
Inference After Fine-Tuning
As we have the trained model now, let’s run inference on the first sample again, which we did before fine-tuning.
FastVisionModel.for_inference(model)

def inference(sample):
    image = sample['messages'][0]['content'][1]['image']
    instruction = 'Convert the image to HTML code.'

    messages = [
        {'role': 'user', 'content': [
            {'type': 'image'},
            {'type': 'text', 'text': instruction}
        ]}
    ]
    input_text = tokenizer.apply_chat_template(messages, add_generation_prompt = True)
    inputs = tokenizer(
        image,
        input_text,
        add_special_tokens = False,
        return_tensors = 'pt',
    ).to('cuda')

    from transformers import TextStreamer
    text_streamer = TextStreamer(tokenizer, skip_prompt=True)
    _ = model.generate(
        **inputs,
        streamer=text_streamer,
        max_new_tokens=20000,
        use_cache=True,
        temperature=1.5,
        min_p=0.1
    )

inference(converted_dataset[0])
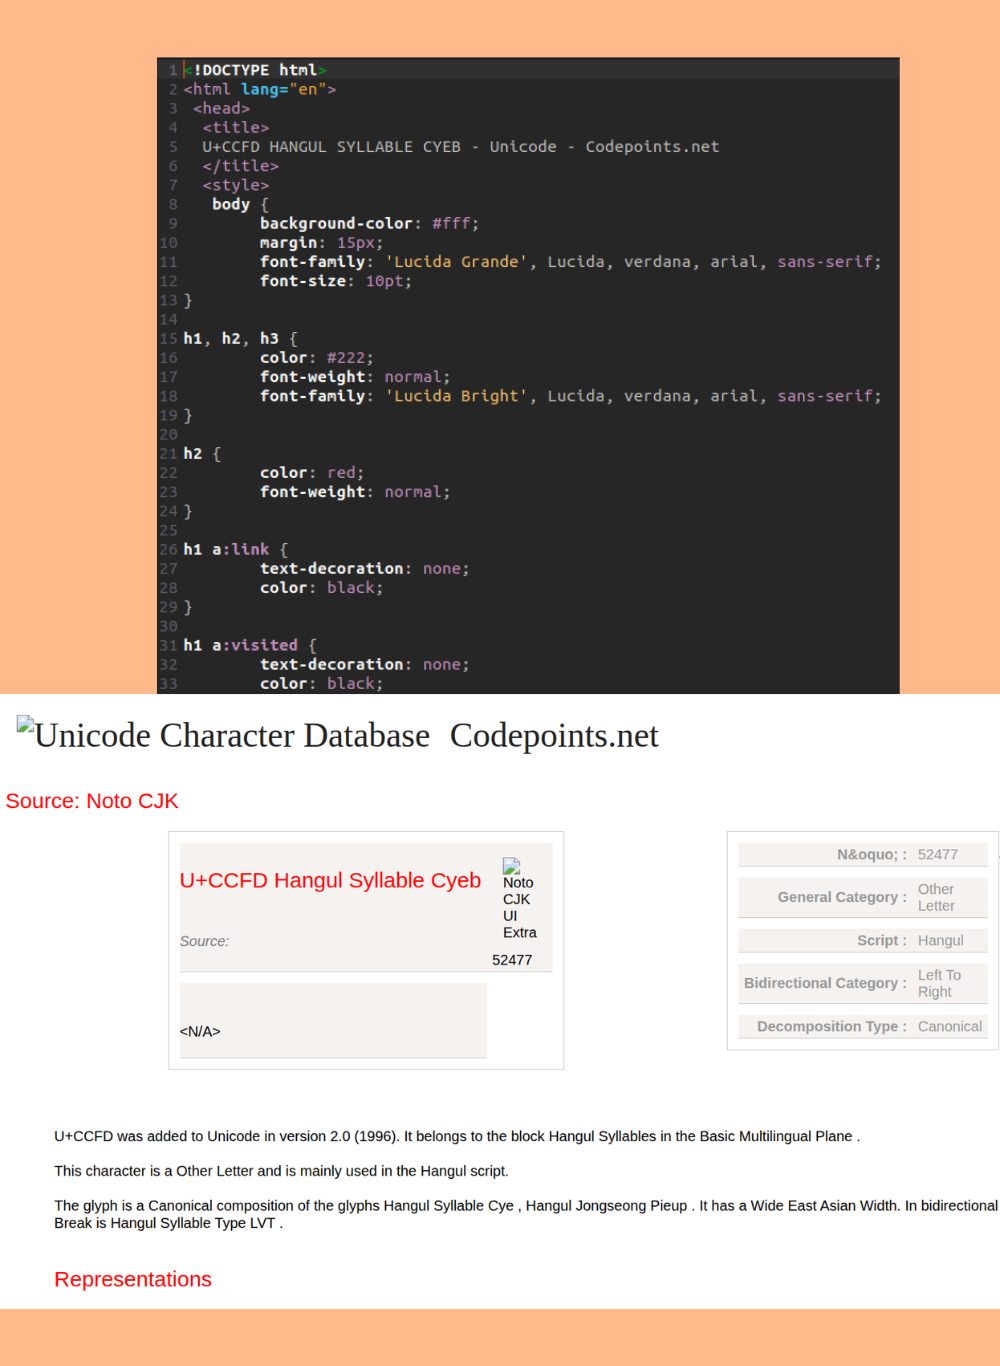
I am skipping the HTML code output here. The following image shows the rendered HTML.
This may not be perfect, but we are now getting results that were not possible prior to fine-tuning.
In case you want to check the original image from the dataset, it is image file 14957.png. As you may observe, the model still has to learn to add proper code backgrounds and colored fonts. Longer training will surely give better results.
Summary and Conclusion
In this article, we fine-tuned the Qwen3-VL 2B model for sketch to HTML code use case. While doing so, we experienced issues with long context training, such as high VRAM requirements. Furthermore, the model we trained is not state-of-the-art. We will need a larger dataset and even longer context training to make it a good model.
If you have any questions, thoughts, or suggestions, please leave them in the comment section. I will surely address them.
You can contact me using the Contact section. You can also find me on LinkedIn, and X.
