

Phi-3.5 Vision Instruct is one of the most popular small VLMs (Vision Language Models) out there. With around 4B parameters, it is easy to run within 10GB VRAM, and it gives good results out of the box. However, it falters in OCR tasks involving small text, such as receipts and forms. We will tackle this problem in the article. We will be fine-tuning Phi-3.5 Vision Instruct on a receipt OCR dataset to improve its accuracy.

OCR is a complex task in itself. Most small VLMs are not good at them because they are generally pretrained for image/video explanation and captioning. That’s why fine-tuning the Phi Vision Instruct model will reveal the benefits firsthand.
We will cover the following topics while fine-tuning Phi-3.5 Vision Instruct:
- Discussing the dataset and creation of the annotation. We will use the SROIEv2 dataset.
- Preparing the Phi-3.5 Vision Instruct for fine-tuning for the OCR task.
- Training and inference on receipt images.
- Running evaluation for calculating CER on the ground truth test data.
Let’s jump into the article.
The SROIEv2 Dataset for Fine-Tuning Phi-3.5 Vision Instruct
We will use a slightly modified version of the SROIEv2 (Scanned receipts OCR and information extraction) dataset.
In this dataset, the annotations have been generated by another VLM and stored in plain text file format.
The dataset is available here on Kaggle.
The following is the directory structure after downloading and extracting the dataset.
input/
├── claude35haiku_annots
│   ├── test_annots  [347 entries exceeds filelimit, not opening dir]
│   └── train_annots  [626 entries exceeds filelimit, not opening dir]
├── gemini-2.0-flash
│   ├── test_annots  [347 entries exceeds filelimit, not opening dir]
│   └── train_annots  [626 entries exceeds filelimit, not opening dir]
├── input.txt
├── qwen2_5_vl_3b_annots
│   ├── test_annots  [347 entries exceeds filelimit, not opening dir]
│   └── train_annots  [626 entries exceeds filelimit, not opening dir]
├── qwen2_vl_2b_annots
│   ├── test_annots  [347 entries exceeds filelimit, not opening dir]
│   └── train_annots  [626 entries exceeds filelimit, not opening dir]
├── qwen2_vl_7b_annots
│   ├── test_annots  [347 entries exceeds filelimit, not opening dir]
│   └── train_annots  [626 entries exceeds filelimit, not opening dir]
└── sroie_v2
    └── SROIE2019
        ├── test
        │   ├── box
        │   ├── entities
        │   └── img
        └── train
            ├── box
            ├── entities
            └── img
- The
sroie_v2folder contains the original data with aSROIE2019subdirectory. Thetrainandtestsubdirectories contain the splits, and theimgdirectories contain the images. - The several top directories contain the annotations from different models, such as Claude, Gemini, etc. However, we will use the annotations in the
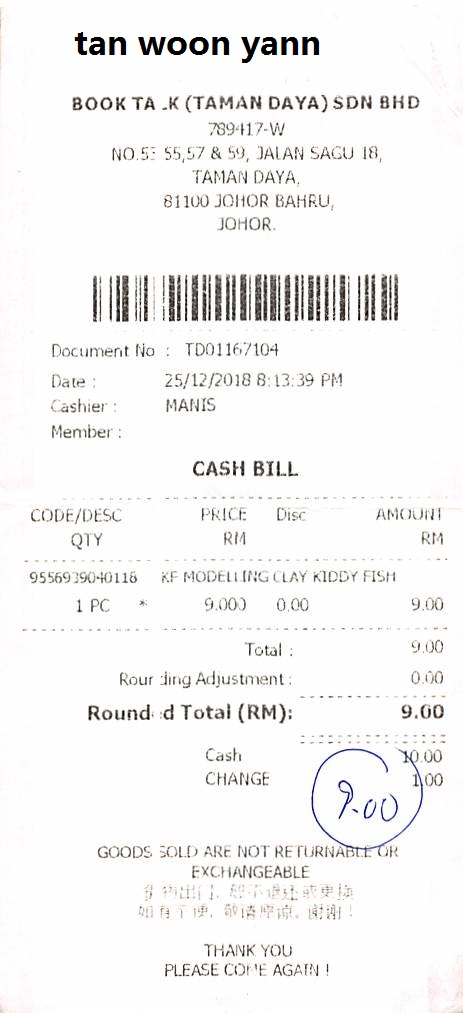
qwen2_5_vl_3b_annotsdirectory as Qwen2.5 VL 3B gave the best results. All the annotations have been saved in plain text files. The following is an example.
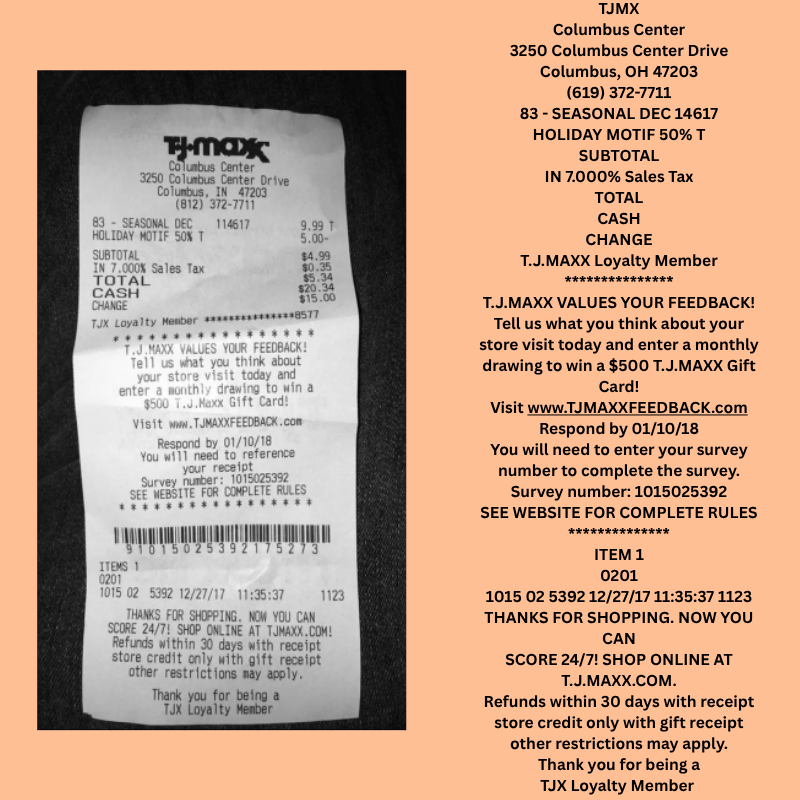
tan woon yann
BOOK TA .K (TAMAN DAYA) SDN BHD
789417-W
NO.5: 55,57 & 59, JALAN SAGU 1B,
TAMAN DAYA,
81100 JOHOR BAHRU,
JOHOR.
Document No : TD01167104
Date : 25/12/2018 8:13:39 PM
Cashier : MANIS
Member :
CASH BILL
CODE/DESC PRICE Disc AMOUNT
QTY RM
95569390-H0118 RF MODELLING CLAY KIDDY FISH
1 PC * 9.000 0.00 9.00
Total : 9.00
Rounding Adjustment : 0.00
Round d Total (RM): 9.00
Cash 90.00
CHANGE 0.00
GOODS SOLD ARE NOT RETURNABLE OR
EXCHANGEABLE
如有问题,敬请原谅。谢谢!
THANK YOU
PLEASE COME AGAIN!
And the following is the corresponding receipt image.
It is the same dataset that we used for fine-tuning SmolVLM for receipt OCR.
There are 626 training and 347 validation samples. Please go through the directory structure once after downloading the dataset. It will help you understand the dataset better.
The Project Directory Structure
Let’s take a look at the entire project directory structure.
├── evals
│   ├── fine_tuned_test_cer.ipynb
│   ├── ground_truth_cer.ipynb
│   └── readme.txt
├── inference_data
│   ├── image_1.jpeg
│   ├── image_2_cropped.jpeg
│   └── image_2.jpeg
├── input
│   ├── claude35haiku_annots
│   ├── gemini-2.0-flash
│   ├── qwen2_5_vl_3b_annots
│   ├── qwen2_vl_2b_annots
│   ├── qwen2_vl_7b_annots
│   ├── sroie_v2
│   └── input.txt
├── notebooks
│   ├── annot_notebooks
│   ├── trained_models
│   ├── wandb
│   ├── phi_3_5_vision_inference_pretrained.ipynb
│   └── phi_3_5_vision_lora_sft_sroie.ipynb
└── requirements.txt
- The
evalsdirectory contains the notebooks that we use to carry out CER evaluation on the validation dataset after training. - The
inference_datadirectory contains a few sample receipt images from the internet for testing after training. - We have already seen the
inputdirectory structure above. - The
notebooksdirectory contains the training and inference notebooks along with the trained adapters in thetrained_modelsfolder.
If you want to run training or evaluation, please download the dataset from Kaggle and organize it according to the above structure. The rest of the notebooks and inference dataset will be provided for download as a zip file.
Download Code
Setup and Installing Requirements
We can install all the necessary libraries using the requirements file.
pip install -r requirements.txt
Additionally, we log everything to Weights and Biases. So, create a .env file and add your Weight and Biases API key to the file.
WANDB_API_KEY=YOUR_API_KEY_HERE
This is all we need for the setup. Let’s move on to the training notebook.
Fine-Tuning Phi-3.5 Vision Instruct for Receipt OCR
The code for the Phi-3.5 Vision Instrcut fine-tuning is present in the phi_3_5_vision_lora_sft_sroie.ipynb Jupyter Notebook. Let’s go through the important sections of the code.
Import Statements and Setup
The following are all the libraries and modules that we need along the way.
import glob
import pandas as pd
import os
import torch
import gc
import time
import matplotlib.pyplot as plt
import transformers

from datasets import Dataset
from PIL import Image
from transformers import AutoModelForCausalLM, AutoProcessor
from transformers import BitsAndBytesConfig
from peft import LoraConfig, get_peft_model
Let’s also set the Transformers tokenizer’s parallelism to false to avoid a few warnings.
os.environ['TOKENIZERS_PARALLELISM'] = 'false'

from dotenv import load_dotenv

load_dotenv()

wandb_api_key = os.getenv('WANDB_API_KEY')

%%bash
wandb login $wandb_api_key
Along with that, we also log into Weight and Biases for logging.
Define Data Paths and Load Dataset
The following code block defines the paths to the annotation files and the image directory.
train_annot_paths = '../input/qwen2_5_vl_3b_annots/train_annots/'
test_annot_paths = '../input/qwen2_5_vl_3b_annots/test_annots/'

root_image_path = '../input/sroie_v2/SROIE2019'
Next, we need to define a preprocessing function for the data conversion into the required format for Phi-3.5 Vision Instruct.
def format_data(samples):
    data_samples = []
    image_paths = []

    query = 'You are a vision language model expert at OCR of receipts, invoices, and forms. OCR this image accurately.'

    for i in range(len(samples['image_paths'])):
        image = samples['image_paths'][i]
        label = samples['text_paths'][i]

        message = [
            {'role': 'user', 'content': f'<|image_1|>\n{query}'},
            {'role': 'assistant', 'content': label}
        ]

        image_paths.append(image)
        data_samples.append(message)
    return {
        'data': data_samples,
        'images': image_paths
    }
In the above code block. We have set a default prompt to steer the model in the correct direction. Along with that, as we are dealing with images and prompts here, we also:
- Set the roles of the
userandassistantcorrectly. - This necessitates a default
<|image_1|>\nplaceholder followed by the user query for theuserrole. - For the
assistantrole, thecontentis the label from the text file corresponding to the image.
We maintain two lists. data_samples for the prompt data and image_paths to store the image paths. We will later read and feed the image to the processor in the collation function.
Next, we need to read the text files and prepare the paths for images & corresponding text labels.
train_text_files = glob.glob(os.path.join(train_annot_paths, '*.txt'))
test_text_files = glob.glob(os.path.join(test_annot_paths, '*.txt'))

train_text_files.sort()
test_text_files.sort()

def prepare_img_txt_list(text_files, split='train'):
    all_images, all_texts = [], []

    for text_file in text_files:
        text = open(text_file).read()

        if len(text) > 200:
            text_file_name = text_file.split(os.path.sep)[-1].split('.txt')[0]

            image_file_name = os.path.join(f'{root_image_path}/{split}/img/', text_file_name+'.jpg')

            all_images.append(image_file_name)
            all_texts.append(text)

    return all_images, all_texts

all_train_images, all_train_texts = prepare_img_txt_list(train_text_files, split='train')
all_test_images, all_test_texts = prepare_img_txt_list(test_text_files, split='test')

train_df = pd.DataFrame(
    {
        'image_paths': all_train_images,
        'text_paths': all_train_texts
    }
)

test_df = pd.DataFrame(
    {
        'image_paths': all_test_images,
        'text_paths': all_test_texts
    }
)

train_from_df = Dataset.from_pandas(train_df)
test_from_df = Dataset.from_pandas(test_df)

train_dataset = train_from_df.map(
    format_data,
    batched=True,
    batch_size=1,
    num_proc=8,
    remove_columns=train_from_df.column_names
)
test_dataset = test_from_df.map(
    format_data,
    batched=True,
    batch_size=1,
    num_proc=8,
    remove_columns=test_from_df.column_names
)
In the above code block, we first create Hugging Face datasets from the train and test data frames (lines 40 and 41). Then we map the datasets to the format_data function to create the final datasets.
Printing a single sample from train_dataset looks like the following.
{
   "data":[
      {
         "content":"<|image_1|>\nYou are a vision language model expert at creating at OCR of receipts, invoices, and forms. OCR this image accurately.",
         "role":"user"
      },
      {
         "content":"tan woon yann\nBOOK TA .K (TAMAN DAYA) SDN BHD\n789417-W\nNO.5: 55,57 & 59, JALAN SAGU 1B,\nTAMAN DAYA,\n81100 JOHOR BAHRU,\nJOHOR.\nDocument No : TD01167104\nDate : 25/12/2018 8:13:39 PM\nCashier : MANIS\nMember :\nCASH BILL\nCODE/DESC PRICE Disc AMOUNT\nQTY RM\n95569390-H0118 RF MODELLING CLAY KIDDY FISH\n1 PC * 9.000 0.00 9.00\nTotal : 9.00\nRounding Adjustment : 0.00\nRound d Total (RM): 9.00\nCash 90.00\nCHANGE 0.00\nGOODS SOLD ARE NOT RETURNABLE OR\nEXCHANGEABLE\n如有问题,敬请原谅。谢谢!\nTHANK YOU\nPLEASE COME AGAIN!",
         "role":"assistant"
      }
   ],
   "images":"../input/sroie_v2/SROIE2019/train/img/X00016469612.jpg"
}
We have a dictionary with data and images keys. The former contains the preprocessed data and the latter contains the image path.
Load the Phi-3.5 Vision Instruct Model
The following code block loads the model from sovitrath/Phi-3.5-vision-instruct. This has a slightly modified version of the model script, which works correctly with more recent versions of Transformers. The architecture remains unchanged.
model_id = 'sovitrath/Phi-3.5-vision-instruct'

# BitsAndBytesConfig int-4 config
bnb_config = BitsAndBytesConfig(
    load_in_4bit=True,
    bnb_4bit_use_double_quant=True,
    bnb_4bit_quant_type='nf4',
    bnb_4bit_compute_dtype=torch.bfloat16
)

# Load model and tokenizer
model = AutoModelForCausalLM.from_pretrained(
    model_id,
    device_map='auto',
    torch_dtype=torch.bfloat16,
    trust_remote_code=True,
    quantization_config=bnb_config,
    # _attn_implementation='flash_attention_2', # Use `flash_attention_2` on Ampere GPUs and above and `eager` on older GPUs.
    _attn_implementation='eager', # Use `flash_attention_2` on Ampere GPUs and above and `eager` on older GPUs.
)
processor = AutoProcessor.from_pretrained(model_id, trust_remote_code=True)
processor.tokenizer.pad_token = processor.tokenizer.eos_token
processor.tokenizer.padding_side = 'left'
We will carry out QLoRA training of the Phi model. We also define the end of sequence and padding tokens for the processor.
Let’s define the LoRA configuration.
# Configure LoRA
peft_config = LoraConfig(
    r=8,
    lora_alpha=16,
    lora_dropout=0.0,
    target_modules=['down_proj','o_proj','k_proj','q_proj','gate_proj','up_proj','v_proj'],
    use_dora=True,
    init_lora_weights='gaussian'
)

# Apply PEFT model adaptation
peft_model = get_peft_model(model, peft_config)

# Print trainable parameters
peft_model.print_trainable_parameters()
We set a rank of 8 and alpha of 16. This amounts to around 5.9 million trainable parameters in the model.
Fine-Tuning the Model
Before fine-tuning, we need to define the TrainingArguments and the collate function.
output_dir = 'trained_models/adapters/phi_3_5_vision_qwen2_5_vl_3b_gt_20251008'

# Configure training arguments using SFTConfig
training_args = transformers.TrainingArguments(
    output_dir=output_dir,
    logging_dir=output_dir,
    # num_train_epochs=1,
    max_steps=1200, # 625,
    per_device_train_batch_size=1, # Batch size MUST be 1 for Phi 3.5 Vision Instruct fine-tuning
    per_device_eval_batch_size=1, # Batch size MUST be 1 for Phi 3.5 Vision Instruct fine-tuning
    gradient_accumulation_steps=4, # 4
    warmup_steps=50,
    learning_rate=1e-4,
    weight_decay=0.01,
    logging_steps=400,
    eval_steps=400,
    save_steps=400,
    logging_strategy='steps',
    eval_strategy='steps',
    save_strategy='steps',
    save_total_limit=2,
    optim='adamw_torch_fused',
    bf16=True,
    report_to='wandb',
    remove_unused_columns=False,
    gradient_checkpointing=True,
    dataloader_num_workers=4,
    # dataset_text_field='',
    # dataset_kwargs={'skip_prepare_dataset': True},
    load_best_model_at_end=True,
    save_safetensors=True,
)
One major thing to note in the above code block is that we are using a batch size of 1. Phi-3.5 Vision Instruct model’s processor does not accept a list of images, so it will throw an error with multi-image batches.
We have set the gradient accumulation step to 4 to compensate for efficient backpropagation. However, a batch size of 1 is still inefficient in terms of compute usage.
Next, the collate function.
def collate_fn(examples):
    user_prompt = examples[0]['data'][0]['content']
    messages = [{'role': 'user', 'content': user_prompt}]

    ground_truth = examples[0]['data'][1]['content']
    answer = f"{ground_truth}<|end|>\n<|endoftext|>"

    prompt = processor.tokenizer.apply_chat_template(
        messages,
        tokenize=False,
        add_generation_prompt=True
    )

    image = Image.open(examples[0]['images'])

    # Process prompt and image
    batch = processor(prompt, [image], return_tensors='pt', padding=True)

    # Tokenize answer
    answer_input_ids = processor.tokenizer(
        answer, add_special_tokens=False, return_tensors='pt'
    )['input_ids']

    # Concatenate input_ids
    batch['input_ids'] = torch.cat([batch['input_ids'], answer_input_ids], dim=1)

    # Create labels with proper masking
    ignore_index = -100
    prompt_length = batch['input_ids'].size(1) - answer_input_ids.size(1)
    labels = torch.cat([
        torch.full((1, prompt_length), ignore_index, dtype=torch.long),
        answer_input_ids
    ], dim=1)

    batch['labels'] = labels

    # Update attention mask
    batch['attention_mask'] = torch.ones_like(batch['input_ids'])

    ######### THE FOLLOWING WILL NOT BE NEEDED WITH SFTTrainer and SFTConfig #########
    ######### ONLY NEEDED FOR WHEN USING TrainingArguments and Trainer #########
    # Ensure only floating-point tensors require gradients
    for key, value in batch.items():
        if isinstance(value, torch.Tensor) and torch.is_floating_point(value):
            batch[key] = value.clone().detach().requires_grad_(True)

    return batch
The function accepts one example at a time, and we extract the message and image path. We pass these to the processor and apply the chat template.
We have borrowed a few code snippets from this article, such as the last lines regarding the gradients. This is quite necessary for the correct training of the model.
Finally, we define the Trainer and start the training. The training happened on a 10GB RTX 3080 GPU.
trainer = transformers.Trainer(
    model=peft_model,
    args=training_args,
    train_dataset=train_dataset,
    eval_dataset=test_dataset,
    data_collator=collate_fn
)

trainer.can_return_loss = True

trainer.train()
The following are the training logs.
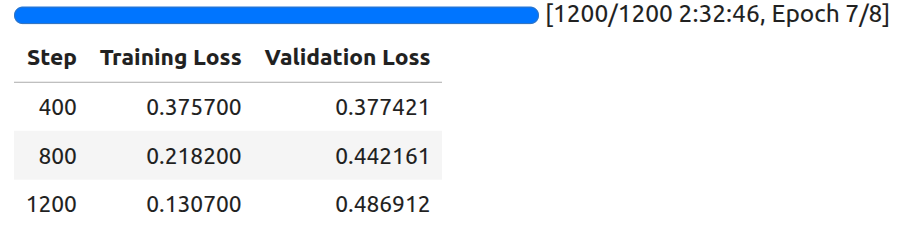
The least loss is achieved at 400 steps. We will use the model saved at that point for inference.
We can also use the following code to save the best model in the end.
trainer.save_model(training_args.output_dir)
processor.image_processor.save_pretrained(training_args.output_dir)
processor.tokenizer.save_pretrained(training_args.output_dir)
This ends all the training steps needed. Next, we will move on to inference.
Inference Using the Phi-3.5 Vision Instruct Model
Let’s jump into the inference notebook now. The code for this is present in the phi_3_5_vision_ft_inference.ipynb Jupyter Notebook.
Imports:
import torch
import matplotlib.pyplot as plt

from PIL import Image
from transformers import AutoModelForCausalLM, AutoProcessor
Loading the trained Phi-3.5 Vision Instruct model:
model_id = 'trained_models/adapters/phi_3_5_vision_qwen2_5_vl_3b_gt_20251008'
# Hub path also works.
# model_id = 'sovitrath/Phi-3.5-Vision-Instruct-OCR'

model = AutoModelForCausalLM.from_pretrained(
    model_id,
    device_map='auto',
    torch_dtype=torch.bfloat16,
    trust_remote_code=True,
    # _attn_implementation='flash_attention_2', # Use `flash_attention_2` on Ampere GPUs and above and `eager` on older GPUs.
    _attn_implementation='eager', # Use `flash_attention_2` on Ampere GPUs and above and `eager` on older GPUs.
)

processor = AutoProcessor.from_pretrained(model_id, trust_remote_code=True)
The model has also been published in Hugging Face under Phi-3.5-Vision-Instruct-OCR.
So, you can either use the local directory path for model_id or the hub model path in case you are not training the model yourself.
Test function:
def test(model, processor, image, max_new_tokens=1024, device='cuda'):
    placeholder = f"<|image_1|>\n"
    messages = [
        {
            'role': 'user',
            'content': placeholder + 'OCR this image accurately'
        },
    ]

    # Prepare the text input by applying the chat template
    text_input = processor.tokenizer.apply_chat_template(
        messages,
        add_generation_prompt=True,
        tokenize=False
    )

    if image.mode != 'RGB':
        image = image.convert('RGB')

    # Prepare the inputs for the model
    model_inputs = processor(
        text=text_input,
        images=[image],
        return_tensors='pt',
    ).to(device)  # Move inputs to the specified device

    # Generate text with the model
    generated_ids = model.generate(**model_inputs, max_new_tokens=max_new_tokens)

    # Trim the generated ids to remove the input ids
    trimmed_generated_ids = [
        out_ids[len(in_ids):] for in_ids, out_ids in zip(model_inputs.input_ids, generated_ids)
    ]

    # Decode the output text
    output_text = processor.batch_decode(
        trimmed_generated_ids,
        skip_special_tokens=True,
        clean_up_tokenization_spaces=False
    )

    return output_text[0]  # Return the first decoded output text
The test function loads the image, defines the messages list, and takes care of the forward pass. It returns the final text output after truncating the user input.
Running inference:
We have a few images from the internet on which we have run inference. Let’s check the results.
Result 1:
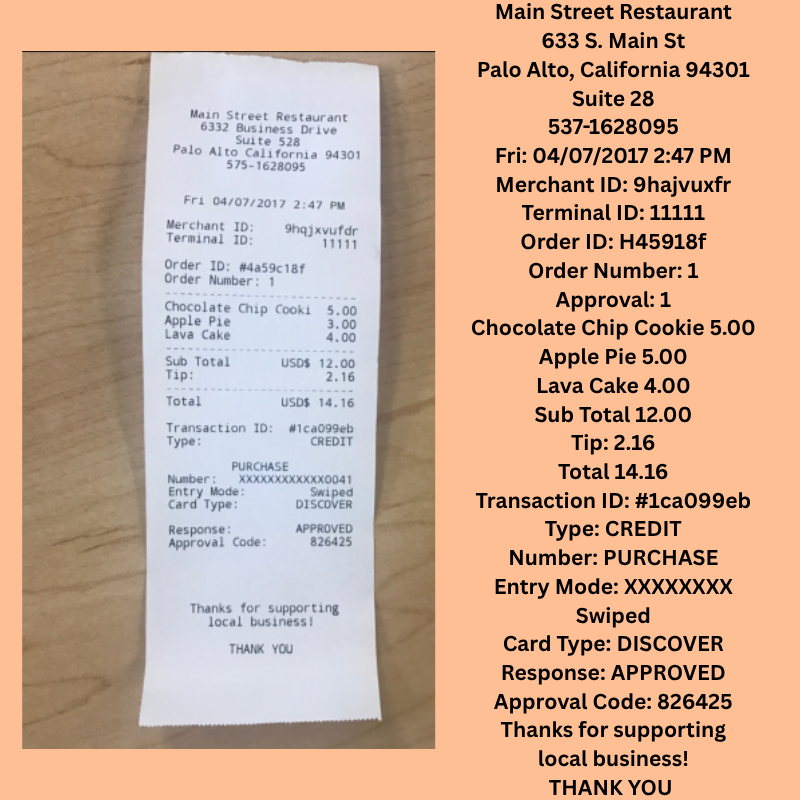
We can see that the model has captured the overall structure of the document’s layout. However, the OCR is not entirely correct. For example, the prices of the items captured are not correct in all cases.
Result 2:
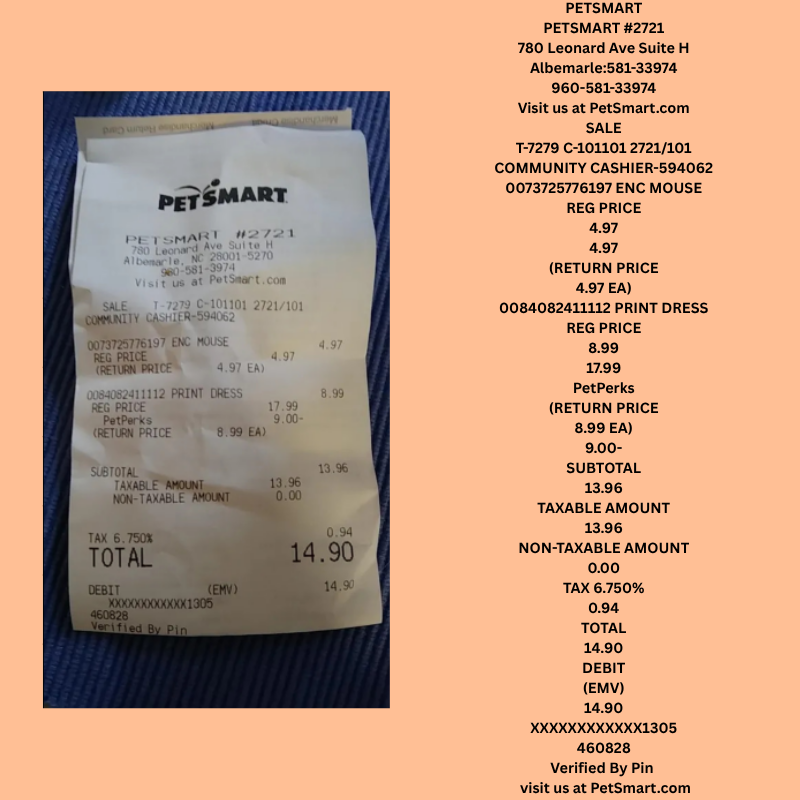
This is a slightly more complex scenario with a crumpled receipt. In this case, the model is able to capture the textual components correctly; however, it is struggling to capture the numerical components accurately.
Result 3:
In this case, we have a lot of small text. Interestingly, the model is capturing a lot of nuanced things, like the email. Still, we can see the struggle with capturing the numbers correctly or not capturing them at all.
It seems like applying some form of augmentation to our original dataset will help the model immensely in capturing different numerical components under different scenarios.
Note: This model is now part of the local_file_search project.
CER Evaluation
We also have a notebook under the evals directory for running CER (Character Error Rate) Evaluation. The code is present in the fine_tuned_test_cer.ipynb Jupyter Notebook.
We are not going through the notebook here; however, I highly recommend taking a look at it on your own. We use the annotations obtained from the Qwen2.5 VL 3B model test set as ground truth.
The current trained model reached a CER of 0.355. This is obviously not ideal, and there is much room for improvement. For a more realistic scenario, we can also run ROUGE and BLEU evaluations.
Summary and Conclusion
In this article, we covered the fine-tuning of Phi-3.5 Vision Instruct for receipt OCR. We started with the discussion of the SROIEv2 dataset, along with how we created the annotations. Next, we covered the training code, followed by running inference on unseen images. We also discussed the weaknesses of the current model. Finally, we covered the CER evaluation and a few points on how to improve the model
If you have any questions, thoughts, or suggestions, please leave them in the comment section. I will surely address them.
You can contact me using the Contact section. You can also find me on LinkedIn, and X.
