
In this article, we will fine-tune the OPT-350M language model for extractive summarization.
The OPT (Open Pretrained Transformers) series of language models by Meta AI is a next token prediction model offering several model sizes. It is compelling because it is one of the few base language models that is openly available and is comparable to GPT-3. In this article, we will use one of the smaller ones, OPT-350M for extractive summarization. This article is part of our experimentation series where we fine-tune decoder-only models for text summarization.
In the last article, we fine-tuned the Phi 1.5 model for extractive summarization. Despite being much larger, the results were not compelling. The model was unable to finish the summarization properly. However, with OPT-350M we will make minor changes to the tokenizer and try to improve the results.
Note: This is going to be a small article laying out some changes to the tokenization technique to make the results marginally better. We will talk in length and carry out comprehensive comparisons in the coming articles.
We will cover the following points in this article
- As usual, we will start with a brief of the extractive summarization dataset.
- The second part involves the coding where:
- We will prepare the dataset in an instruction following format.
- Load the OPT-350M model.
- Load the tokenizer and make the necessary changes for proper beginning and ending of instructions.
- Train the OPT-350M model for extractive summarization.
- Finally, we will run inference and analyze the results qualitatively.
The Summarization Dataset
We will use the BBC extractive summarization dataset to train the OPT-350M model. We have covered the dataset in some detail in the last article. I would recommend going through it once if you are new to it.
In short, it contains around 2200 extractive summarization samples across 5 different categories: business, sports, politics, tech, and entertainment.
The Articles column contains the entire article and the Summaries column contains the respective summaries.
Later, we will convert the dataset into an instruction following one before training the model.
The Project Directory Structure
Following is the project directory structure.
├── inference_data
│   ├── sample_1.txt
│   └── sample_2.txt
├── outputs
│   └── opt_350m_summarizer
│       ├── best_model
│       └── logs
├── inference.ipynb
├── opt_350m_summarization.ipynb
└── requirements.txt
- The training code resides in the
opt_350m_summarization.ipynbnotebook and the inference code in theinference.ipynbnotebook. - The
outputsdirectory contains the best model weights and the training logs. - We have a few F1 news articles in the
inference_datadirectory. - Finally, the
requirements.txtcontains all the required libraries.
All the Jupyter Notebooks and trained model weights are available via the download section.
Download Code
Dependencies
We use the PyTorch framework for training the OPT-350M model for text summarization. Along with that, we use Hugging Face Transformers library for access to the model, datasets, and the training pipeline.
After installing the PyTorch framework, you can install all the required libraries using the following command.
pip install -r requirements.txt
Training OPT-350M for Extractive Summarization
Let’s jump into the coding part now. We will start with the import statements.
from datasets import load_dataset
from transformers import (
    AutoTokenizer,
    AutoModelForCausalLM,
    TrainingArguments,
    Trainer
)
from trl import SFTTrainer

import os
import torch
The training is going to happen through a supervised fine-tuning technique, so, we are importing the SFTTrainer from the trl library. Along with that, we are importing the necessary modules for loading the OPT-350M model and the tokenizer.
Training and Dataset Configuration
We will define all the training and dataset related configurations in one place. This makes it easier to modify them later if needed.
batch_size = 1
num_workers = os.cpu_count()
epochs = 10
bf16 = False
fp16 = True
gradient_accumulation_steps = 8
context_length = 1024
learning_rate = 0.0002
model_name = 'facebook/opt-350m'
out_dir = 'outputs/opt_350m_summarizer'
seed = 42
We have covered these configuration settings in detail in previous articles. I highly recommend going through a few of them to learn about training on different datasets with different techniques:
- Fine Tuning Phi 1.5 using QLoRA
- Instruction Tuning GPT2 on Alpaca Dataset
- Instruction Tuning OPT-125M
Dataset Preparation
Now comes one of the most important parts, the dataset preparation. Let’s load the BBC News Summary dataset and create the training and validation splits.
dataset = load_dataset('gopalkalpande/bbc-news-summary', split='train')
full_dataset = dataset.train_test_split(test_size=0.2, shuffle=True, seed=seed)
dataset_train = full_dataset['train']
dataset_valid = full_dataset['test']
After the split, we have 1779 training samples and 445 validation samples.
We need to preprocess the dataset so that we can feed it to the supervised fine-tuning trainer pipeline.
def preprocess_function(example):
    output_text = []
    for i in range(len(example['Articles'])):
        text = f"### Instruction:\nSummarize the following article.\n\n### Input:\n{example['Articles'][i]}\n\n### Response:\n{example['Summaries'][i]}</s>\n"
        output_text.append(text)
    return output_text
We simply modify the dataset to follow the Alpaca instruction format where we have the ### Instruction tag, the ### Input tag followed by the article, and the ### Response tag followed by the article summary.
At the end, we also append the special End of Sequence (EOS) token, </s> from the OPT tokenizer. This will tell the model where one summary ends and the next sample starts.
The OPT-350M Model
Loading the model is simple. Based on the data type chosen above, we load the model respectively.
if bf16:
    model = AutoModelForCausalLM.from_pretrained(model_name).to(dtype=torch.bfloat16)
else:
    model = AutoModelForCausalLM.from_pretrained(model_name)
Following is the model structure and summary.
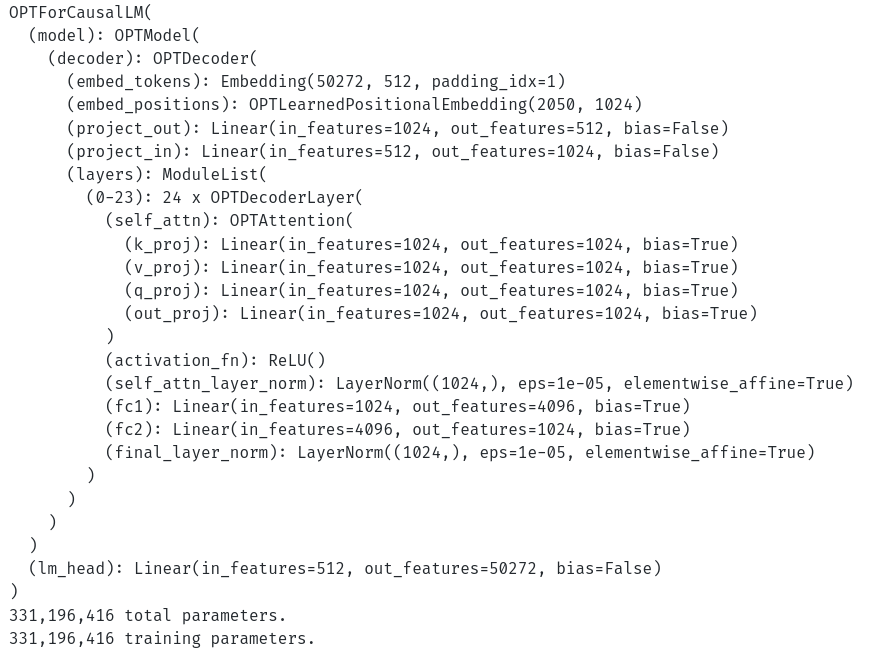
The model contains around 330 million trainable parameters.
Loading and Modifying the OPT Tokenizer
We need to make some modifications to the tokenizer so that the model learns to summarize articles properly. First, let’s load the tokenizer.
tokenizer = AutoTokenizer.from_pretrained(
    model_name,
    trust_remote_code=True,
    use_fast=False
)
Now, to learn to summarize the article properly the model needs two things:
- Knowing where a sample starts.
- Knowing where a sample ends.
Ideally, they should be represented by two different special tokens. However, by default, the OPT tokenizer uses the same </s> token for Beginning of Sequence (BOS) and End of Sequence (EOS). We need to fix the BOS token.
tokenizer.add_eos_token = True
tokenizer.bos_token = '<s>'
We change the bos_token of the tokenizer to <s>. Let’s print the tokenizer and ensure the changes have been made.
GPT2Tokenizer(name_or_path='facebook/opt-350m', vocab_size=50265,
 model_max_length=1000000000000000019884624838656, is_fast=False,
padding_side='right', truncation_side='right',
special_tokens={'bos_token': '<s>', 'eos_token': '</s>',
'unk_token': '</s>', 'pad_token': '<pad>'},
clean_up_tokenization_spaces=True),  added_tokens_decoder={
	1: AddedToken("<pad>", rstrip=False, lstrip=False,
single_word=False, normalized=True, special=True),
	2: AddedToken("</s>", rstrip=False, lstrip=False,
single_word=False, normalized=True, special=True),
}
We can observe that the bos_token and eos_token are two different special tokens now.
Defining the Training Arguments
Next, we define the training arguments.
training_args = TrainingArguments(
    output_dir=f"{out_dir}/logs",
    evaluation_strategy='epoch',
    weight_decay=0.01,
    load_best_model_at_end=True,
    per_device_train_batch_size=batch_size,
    per_device_eval_batch_size=batch_size,
    logging_strategy='epoch',
    save_strategy='epoch',
    save_total_limit=2,
    bf16=bf16,
    fp16=fp16,
    report_to='tensorboard',
    num_train_epochs=epochs,
    dataloader_num_workers=num_workers,
    gradient_accumulation_steps=gradient_accumulation_steps,
    learning_rate=learning_rate,
    lr_scheduler_type='constant',
    seed=seed
)
Initializing the SFTTrainer
We need to initialize the SFTTrainer with the OPT-350M model, the datasets, and the tokenizer among other necessary arguments.
trainer = SFTTrainer(
    model=model,
    train_dataset=dataset_train,
    eval_dataset=dataset_train,
    max_seq_length=context_length,
    tokenizer=tokenizer,
    args=training_args,
    formatting_func=preprocess_function
)
This preprocesses the dataset according to the preprocess_function definition. We can print a few samples and check how the dataset has been modified.
dataloader = trainer.get_train_dataloader()
for i, sample in enumerate(dataloader):
    print(tokenizer.decode(sample['input_ids'][0]))
    print('#'*50)
    if i == 5:
        break
Following is a sample.
<s>### Instruction:
Summarize the following article.

### Input:
PC photo printers challenge pros..Home printed pictures can be cheaper and
higher quality than those from High Street developers, tests shows...A survey
carried out by PC Pro magazine looked at which of 100 home photo printers
offered a better deal than handing your snaps to a photo lab. The tests
found that images from top PC printers kept their colour longer than
professionally produced photographs. But using the wrong printer cartridge
could means snaps fade in months, warned the magazine...The group test of
100 home photo printers for PCs discovered how much it costs to create images
using the devices compared to online developers as well as High Street names
such as Jessops, Boots and Snappy Snaps. The comprehensive test also revealed
how quickly different printers produced images, the quality of the finished
image and how resistant finished pictures were to smudging or water damage.
It found that although some ink for printers now costs more than £2 per
millilitre it can still be cheaper to produce prints from photographs at home
than it is to send them off to a High Street store. "If you really like your
photos, then it's definitely worth printing at home instead of going to the
high street, but only if you choose the right printer," said Nick Ross, top
tester at PC Pro...Mr Ross said that a new generation of printers produced
images with brighter colours and that were less likely to fade than many High
Street developers or even some professional wedding photographers. Some High
Street photo shops can be the cheapest when it came to developing prints that
were 6x4in, said Mr Ross, but the test revealed that images 7x5in and 8x10in
in size were cheaper to produce at home. According to PC Pro, producing a
print 8x10in on an Epson R800 printer using top quality paper costs £1.87. At
Jessops the same image would cost £2.50 and at Snappy Snaps £9.99. A 10x7in
snap at Boots would cost £4.99. "Considering how inconvenient it can be to go
to the High Street and how silver-halide prints can fade in the sun, we're
adamant that it's now better, cheaper and more convenient to print at home,"
he said. Ann Simpson, marketing manager at Snappy Snaps believes the convenience
of high street printing will continue to attract customers. "Some people will
want to do their own thing on their computer but the feedback to us is that
customers often have to print two or three pictures at home in order to get a
good one," she said. "Many people are not skilled at getting the colour,
contrast and cropping right and they don't want the hassle," she added. The
magazine test found that which ink consumers use determined how long their prints
lasted before they started fading. It recommended avoiding so-called third-party
inks not produced by printer makers because they tended to produce prints that
fade the quickest.

### Response:
The group test of 100 home photo printers for PCs discovered how much it costs
to create images using the devices compared to online developers as well as
High Street names such as Jessops, Boots and Snappy Snaps.It found that although
some ink for printers now costs more than £2 per millilitre it can still be
cheaper to produce prints from photographs at home than it is to send them off
to a High Street store.Some High Street photo shops can be the cheapest when
it came to developing prints that were 6x4in, said Mr Ross, but the test revealed
that images 7x5in and 8x10in in size were cheaper to produce at home."Considering
how inconvenient it can be to go to the High Street and how silver-halide prints
can fade in the sun, we're adamant that it's now better, cheaper and more
convenient to print at home," he said.Mr Ross said that a new generation of printers
produced images with brighter colours and that were less likely to fade than many
High Street developers or even some professional wedding photographers.According
to PC Pro, producing a print 8x10in on an Epson R800 printer using top quality
paper costs £1.87."If you really like your photos, then it's definitely worth
printing at home instead of going to the high street, but only if you choose the
right printer," said Nick Ross, top tester at PC Pro.Home printed pictures can
be cheaper and higher quality than those from High Street developers,
tests shows.</s>
We can see that the sample starts with the BOS token and ends with the EOS token.
Next, we need to execute the train() method of the trainer instance to start the fine-tuning process.
history = trainer.train()
Here are the training logs and the validation loss graph.

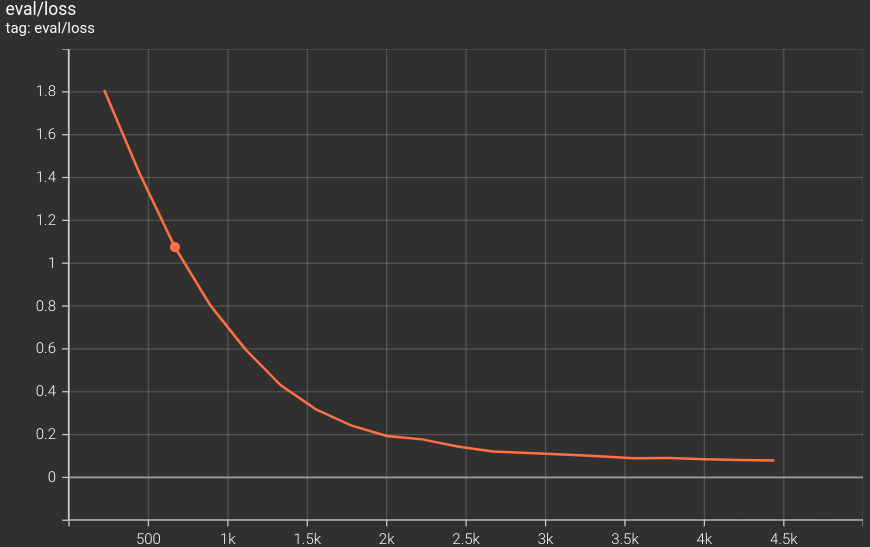
Interestingly, the loss was decreasing till the end of training. We can still train the model further for even better performance.
For now, let’s save the best model to disk.
model.save_pretrained(f"{out_dir}/best_model")
tokenizer.save_pretrained(f"{out_dir}/best_model")
Extractive Summarization Inference using the Fine-Tuned OPT-350M Model
The inference code is very similar to what we did in the previous post with the Phi 1.5 model, except for a few changes to the model loading.
Let’s start with the import statements and loading the model & the tokenizer.
from transformers import AutoModelForCausalLM, AutoTokenizer, pipeline

import torch
model = AutoModelForCausalLM.from_pretrained(
    'outputs/opt_350m_summarizer/best_model',
    device_map='cuda'
)
tokenizer = AutoTokenizer.from_pretrained('outputs/opt_350m_summarizer/best_model/')
Next, we define a prompt template similar to the one we had for training.
template = '<s>### Instruction:\nSummarize the following article.\n\n### Input:\n{text}\n\n### Response:'
We are going to define a simple function that will encompass everything.
def summarize(file_path, tokenizer, model, template):
    file = open(file_path, 'r')
    text = file.read()

    prompt = template.format(text=text)

    prompt_tokenized = tokenizer(
        prompt,
        return_tensors='pt',
        return_attention_mask=True
    ).to('cuda')

    output_tokenized = model.generate(
        **prompt_tokenized,
        eos_token_id=tokenizer.eos_token_id,
        max_length=len(prompt_tokenized['input_ids'][0])+500,
        repetition_penalty=1.1,
        temperature=0.8,
        top_k=40,
        top_p=0.1,
        do_sample=True,
        num_beams=5
    )

    answer = tokenizer.decode(token_ids=output_tokenized[0][len(prompt_tokenized[0]):]).strip()

    print(answer)
The function loads the text file according to the path that we pass, and uses the model and the tokenizer to generate the summary.
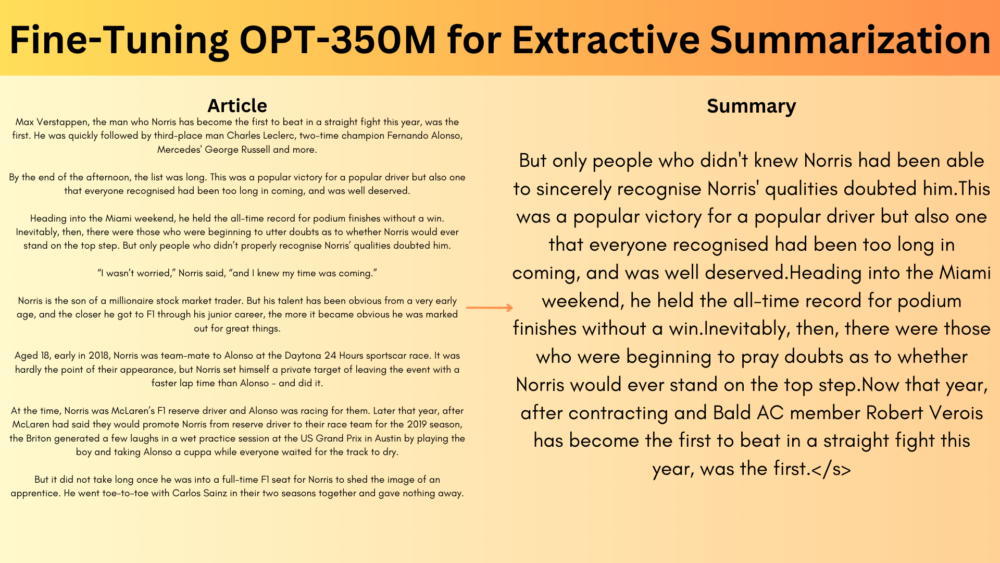
Let’s carry out inference on an F1 article.
summarize('inference_data/sample_2.txt', tokenizer, model, template)
But only people who didn't knew Norris had been able to
sincerely recognise Norris' qualities doubted him.This
was a popular victory for a popular driver but also one
that everyone recognised had been too long in coming,
and was well deserved.Heading into the Miami weekend,
he held the all-time record for podium finishes without
a win.Inevitably, then, there were those who were beginning
to pray doubts as to whether Norris would ever stand on
the top step.Now that year, after contracting and Bald AC
member Robert Verois has become the first to beat in a
straight fight this year, was the first.</s>
The sentence structure seems correct, however, paying close attention reveals that it is difficult to figure out the context of the article from the summary.
Takeaways
There are a few ways we can improve the entire summarization process using language models.
- Training on larger datasets including both abstractive and extractive summarization samples.
- Training LLMs and encoder-encoder models as well as doing a quantitative comparison of the metrics.
We will carry these out in future articles.
Summary and Conclusion
In this article, we fine-tuned the OPT-350M model for extractive summarization. Although the results were not highly impressive, we improved over the last article where the model was not able to generate a summary properly. This is possible because of the tokenization changes that we made. We also discussed some of the future prospects for the experiments. I hope that this article was worth your time.
If you have any doubts, thoughts, or suggestions, please leave them in the comment section. I will surely address them.
You can contact me using the Contact section. You can also find me on LinkedIn, and X.
