

This article is going to be exactly what the title suggests. We will be deploying LLMs on Runpod and Vast AI using Docker and Hugging Face Text Generation Inference (TGI).

What are we going to cover while learning about deploying LLMs?
- How to deploy LLMs on Runpod directly using GitHub Container Registry (GHCR) with Text Generation Inference Image?
- How to deploy LLMs on Vast directly using GitHub Container Registry with Text Generation Inference Image?
- What is the process to create a custom Docker image with Text Generation Inference (TGI) GHCR and deploy a custom LLM?
What are we not going to cover?
- How to scale LLM deployment?
From here on, we will use the following notations:
- GitHub Container Registry as GHCR
- Text Generation Inference as TGI
Prerequisites
All the commands that we will discuss here were run on an Ubuntu 22.04 operating system.
Before moving forward:
- Please ensure that you have Docker installed and have an account on Docker Hub. Furthermore, ensure that you have logged into your Docker Hub via CLI locally.
- Have a Runpod account with around $5 credits.
- Have a Vast.ai account with around $5 credits.
Deploying an LLM on Runpod via GHCR
We will start with the simplest method to deploy an LLM on Runpod, via a TGI image using GHCR. Also, we will not actually be dealing with a large language model in this article, but rather a very small, SmolLM2, for the sake of learning. But feel free to change the model while carrying out the steps.
Step 1: Choose a Community Pod
The very first step is choosing a community pod. You can choose a secured cloud pod as well, but they are a bit costlier; however, faster to start.

For example, here I am choosing an RTX A4000 pod.
Step 2: Editing Template to Use TGI Image from GHCR
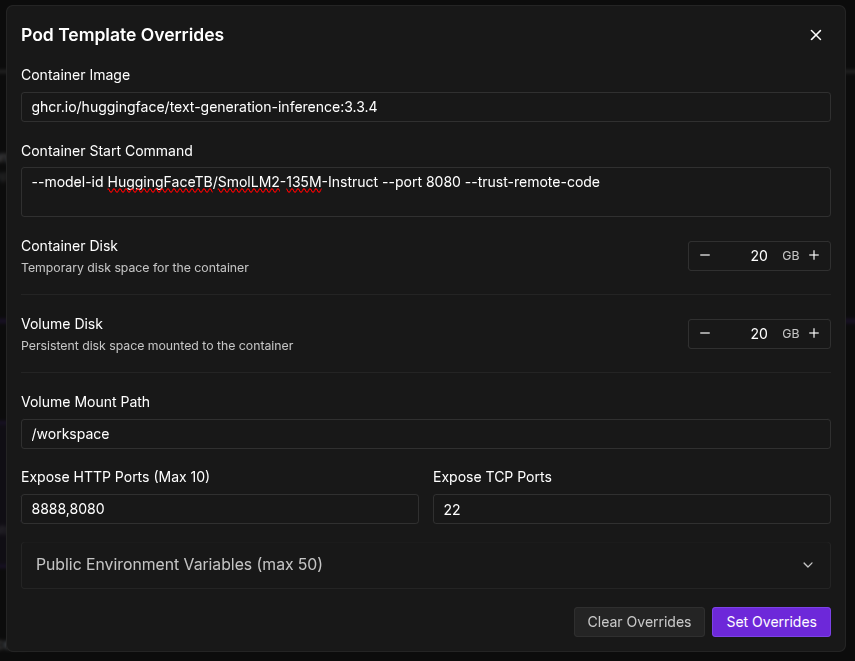
The next step is overriding the template image and using the Hugging Face TGI Image from GHCR by clicking the Edit Template button. We are using the latest image available at the moment, that is, version 3.3.4.
ghcr.io/huggingface/text-generation-inference:3.3.4
Now, we need to add a container start command. This indicates which model to use, which port to start TGI in, and also trusts remote code so that there are no download issues.
--model-id HuggingFaceTB/SmolLM2-135M-Instruct --port 8080 --trust-remote-code
For example, here, we are using the SmolLM2-135M Instruct model, which should take only a few seconds to download. You can replace that with any model ID from Hugging Face. However, if you go with gated models like Llama3, make sure to add your Hugging Face token to the list of environment variables.

Also, make sure to add port 8080 to the list of Exposed HTTP ports.
Set the overrides and deploy the pod.
When the pod starts, you should see your pod ID at the top.

We will need this later when making API calls.
Step 3: Making an API Call
After the pod is active, we are ready to make a call to the TGI completions endpoint.
curl -X POST https://you_pod_id-8080.proxy.runpod.net/v1/chat/completions \
    -X POST \
    -d '{
  "model": "tgi",
  "messages": [
    {
      "role": "system",
      "content": "You are a helpful assistant."
    },
    {
      "role": "user",
      "content": "What is deep learning?"
    }
  ],
  "stream": false,
  "max_tokens": 20
}' \
    -H 'Content-Type: application/json'
In the above command, replace you_pod_id with your pod ID. The 8080 refers to the exposed port, and if you wish, please change the content of the user. Here, we are asking, “What is deep learning?”.
With the above API call, we get the following response.
{
  "object": "chat.completion",
  "id": "",
  "created": 1751851016,
  "model": "HuggingFaceTB/SmolLM2-135M-Instruct",
  "system_fingerprint": "3.3.4-sha-d4bd5ca",
  "choices": [
    {
      "index": 0,
      "message": {
        "role": "assistant",
        "content": "Deep learning is a type of machine learning that uses a hierarchical architecture that separates training data into inputs,"
      },
      "logprobs": null,
      "finish_reason": "length"
    }
  ],
  "usage": {
    "prompt_tokens": 25,
    "completion_tokens": 20,
    "total_tokens": 45
  }
}
We get the assistant content according to the max_length parameter that we set in the API call. You can play around with the settings.
Deploying An LLM On Runpod With Our Own Docker Image
We will take this a step further. What if we want to have our own TGI Docker image with customized settings and want to deploy that on Runpod? We will do that exactly next.
Step 1: Downloading the Model
First, create a project directory, for example, smollm2. Next, download the model artifacts from Hugging Face using Git into the model directory. Create the model directory if it is not already present.
This is simply cloning a model repository from Hugging Face. For example, for the SmolLM2 model, the following is the command.
git clone https://huggingface.co/HuggingFaceTB/SmolLM2-135M-Instruct
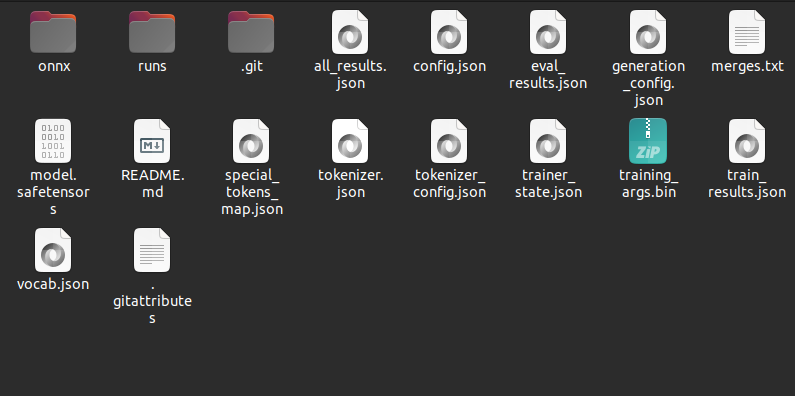
When you clone the model repository, it will download all artifacts in a subfolder with the model name. Cut and paste everything into the model directory such that the model directory looks like the following.
Step 2: Create a Dockerfile
Next, we need to create a Dockerfile with all the commands that we want the Docker Image to execute, along with several settings. The file is simply called Dockerfile, and following are its content.
FROM ghcr.io/huggingface/text-generation-inference:3.3.4

# Install necessary dependencies
RUN apt-get update && apt-get install -y \
    build-essential \
    python3 \
    python3-dev \
    curl \
    && rm -rf /var/lib/apt/lists/*

# Download and install get-pip.py using curl
RUN curl https://bootstrap.pypa.io/get-pip.py -o get-pip.py && \
    python3 get-pip.py && \
    rm get-pip.py

# Ensure pip is up to date
RUN python3 -m pip install --upgrade pip

# Install bitsandbytes with GPU support
RUN pip uninstall -y bitsandbytes && \
    pip install bitsandbytes --upgrade --no-cache-dir --force-reinstall

# Install Triton and other dependencies
RUN pip install triton==2.1.0

# Copy your model into the container
COPY ./model /data

# Set environment variables (optional)
ENV MODEL_ID=/data
ENV MAX_INPUT_LENGTH=1024
ENV MAX_TOTAL_TOKENS=2048

# Expose the inference port
EXPOSE 80
Here, we have taken a few additional precautions, like installing Python3, updating pip, and installing BitsAndBytes with GPU support (which is necessary to run the model on the GPU). These additional commands are usually necessary when running locally; however, there is a chance that these may not be needed when running on Runpod. Nevertheless, we can leave them there.
The COPY command copies the data from the model directory to the data directory. We also set a few environment variables, such as the model folder ID, the max input and output lengths.
Finally, we expose port 80.
Step 3: Creating and Pushing a Docker Image
Now, it is time to create the Docker Image.
sudo docker build -t my-image .
Replace my-image with the name you want to give to your image. In my case, I gave it the name smollm2-new.
It will take a while to create the image, given all the installations that need to be completed. After the image is created, we can test it locally using the following command.
docker run --gpus all -p 8080:80 smollm2-new
It will run on port 8080 with port 80 exposed. To test it, we can make an API call from the terminal.
curl 127.0.0.1:8080/v1/chat/completions \
    -X POST \
    -d '{
  "model": "tgi",
  "messages": [
    {
      "role": "system",
      "content": "You are a helpful assistant."
    },
    {
      "role": "user",
      "content": "What is deep learning?"
    }
  ],
  "stream": false,
  "max_tokens": 20
}' \
    -H 'Content-Type: application/json'
If everything goes well, you should get a response similar to what we got in the case of Runpod.
Next, we need to create a tag for our image and push it to Docker Hub.
sudo docker image tag my-image my-username/my-image:v1
Replace my-image with your Docker image name and my-username with your Docker Hub username. Here, I have given the tag as v1. This is necessary to differentiate between different builds.
Now, push the image to Docker Hub.
sudo docker push my-username/my-image:v1
This will take a while to complete.
For example, after my image was pushed to the hub, it looked like the following.

We can see the Image ID, the version, and other details.
Step 4: Deploying Our Custom Docker Image On Runpod
Now, we will deploy our image using Runpod. In Runpod, choose My Templates from the left navigation bar and click on New Template.
Add your Docker Hub Image ID here, along with 8888, 8080, and 80 as exposed ports. Choose disk space for both, container and volume as 20GB.

Now, choose a pod as earlier. This time, click on Change Template, choose the template that you just created. If you go to edit templates, you will see the Docker Image, the ports, and all other settings already overwritten. Deploy the pod.
After the pod starts, this time, use your pod ID along with port 80 as exposed port to connect with the completions endpoint and make an API call. Replace your-pod-id with the pod ID.
curl -X POST https://your-pod-id-80.proxy.runpod.net/v1/chat/completions \
    -X POST \
    -d '{
  "model": "tgi",
  "messages": [
    {
      "role": "system",
      "content": "You are a helpful assistant."
    },
    {
      "role": "user",
      "content": "What is deep learning?"
    }
  ],
  "stream": false,
  "max_tokens": 20
}' \
    -H 'Content-Type: application/json'
You should see a similar response.
This completes all the deployment processes that we wanted to cover with Runpod, via GHCR and a custom Docker Image as well.
Next, we will move to Vast.ai deployment.
Deploying LLMs on Vast.ai
The deployment process is going to be somewhat different with Vast.ai. Do ensure that you have an account and have added at least $5 as credits before moving forward.
Step 1: Creating a HuggingFace TGI Template on Vast.ai
Go to the templates tab on the left navigation bar and search for HuggingFace Llama3.

Click on the edit button, scroll to the bottom, toggle private mode on, and click on create. This will create a private template that you can see in your My Templates tab.
We will not deploy Llama3 here, but the same SmolLM2 as earlier. Using the saved official template, we can create a duplicate of it and make modification to deploy our own models with ease.
Create a duplicate of the template and name it something like HuggingFace SmolLM2 TGI API.
Step 2: Configuring the Deployment Options
Next, click on the edit button to make the suitable changes.

Here, we keep similar settings while removing the unwanted ones. The Docker image path remains the same. We remove a lot of Docker options that are not needed for this deployment. We have kept the exposed port the same, 5001. The MODEL_ARGS in the environment variables is changed to the SmolLM2 tag on Hugging Face. As this is not a gated model, we do not need to add the Hugging Face token.

The on-start script is also modified, and we remove some of the commands that are not needed. Following is the on-start script that we use.
#/bin/bash
env >> /etc/environment;
text-generation-launcher $MODEL_ARGS --json-output --port 5001 --hostname "0.0.0.0"
Note: If you are trying out gated models and have added your Hugging Face token, make sure that your template is private.
Step 3: Launching An Instance With The Template
Save the setting and deploy the template. This will let you choose the hardware of your choice for deployment. I recommend an RTX 3060 system with high download and upload speeds; otherwise, the instance startup may take time.
After the instance starts, we need to figure out two more things before we can make an API call. For Vast.ai API call, we need an authorization bearer token. We can execute the following command either by SSH’ing into the terminal of the instance or opening the Jupyter Lab terminal and executing the command.
echo $OPEN_BUTTON_TOKEN
This gives the bearer token; save it somewhere.
Next is the instance IP and mapped port. Remember that port 5001 of the instance is exposed. We need to get the IP and mapped port for that for our API call. Click on the button as highlighted in the following image and see the mapped IP and port for 5001. An example is shown below.
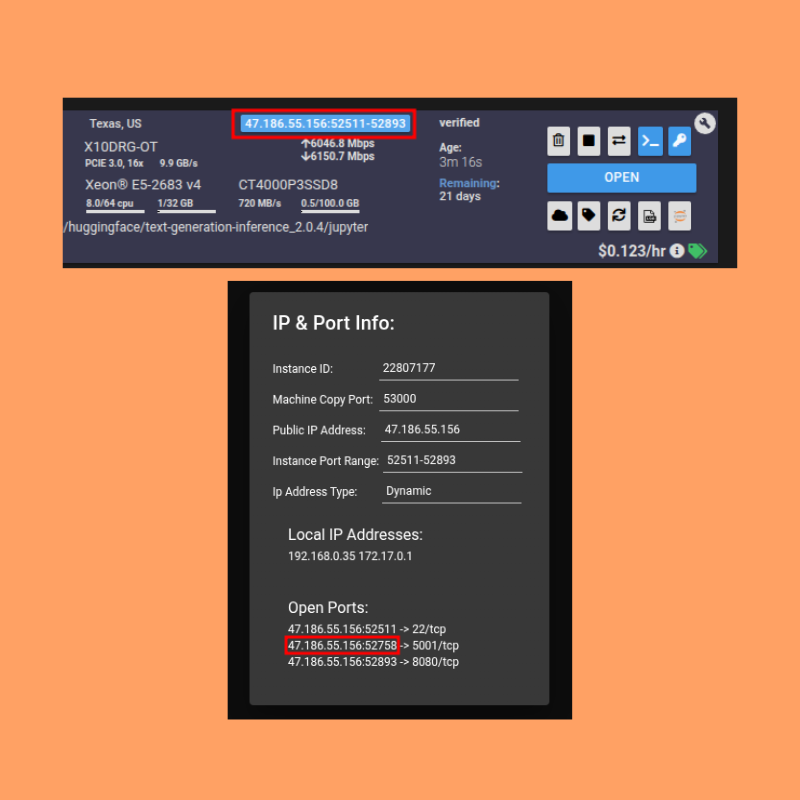
In the following command, replace your [INSTANCE_IP]:[MAPPED_PORT_5001] and YOUR_BEARER_TOKEN before making the API call.
curl -k -X POST http://[INSTANCE_IP]:[MAPPED_PORT_5001]/v1/chat/completions \
    -H 'Authorization: Bearer YOUR_BEARER_TOKEN' \
    -X POST \
    -d '{
  "model": "tgi",
  "messages": [
    {
      "role": "system",
      "content": "You are a helpful assistant."
    },
    {
      "role": "user",
      "content": "What is deep learning?"
    }
  ],
  "stream": false,
  "max_tokens": 20
}' \
    -H 'Content-Type: application/json'
If everything has gone correctly, then you should see a response in your terminal. Else, please recheck the steps.
Takeaways
This concludes the three different methods of deployment that we wanted to discuss in the article.
Debug steps are not provided here as issues may vary from user to user, and without checking the steps carried out, it is difficult to debug. However, if you face any issues, please let me know in the comments.
As you may have observed, we did not carry out a custom Docker Image deployment for Vast.ai. I was planning to put that up; however, even after several trials, I was unable to make it work. This is mostly because of how Vast.ai handles the current TGI GHCR images and how to make similar settings work with a custom container. Probably something to do with mapped/exposed ports and startup commands. Will continue to explore that.
From here on, you can try deploying larger models and maybe create a GUI application on top of the API calls. This will surely add some more complexity but also add to learning how the user interface at the front-end and API calls behind the scenes work together.
Summary and Conclusion
In this article, we carried out three different methods of deploying an LLM. We chose two different platforms, Runpod and Vast.ai. On Runpod, we deployed using the TGI GHCR image and also with a custom Docker Image. For Vast.ai, we went through the TGI GHCR image route.
If you have any questions, thoughts, or suggestions, please leave them in the comment section. I will surely address them.
You can contact me using the Contact section. You can also find me on LinkedIn, and X.
