
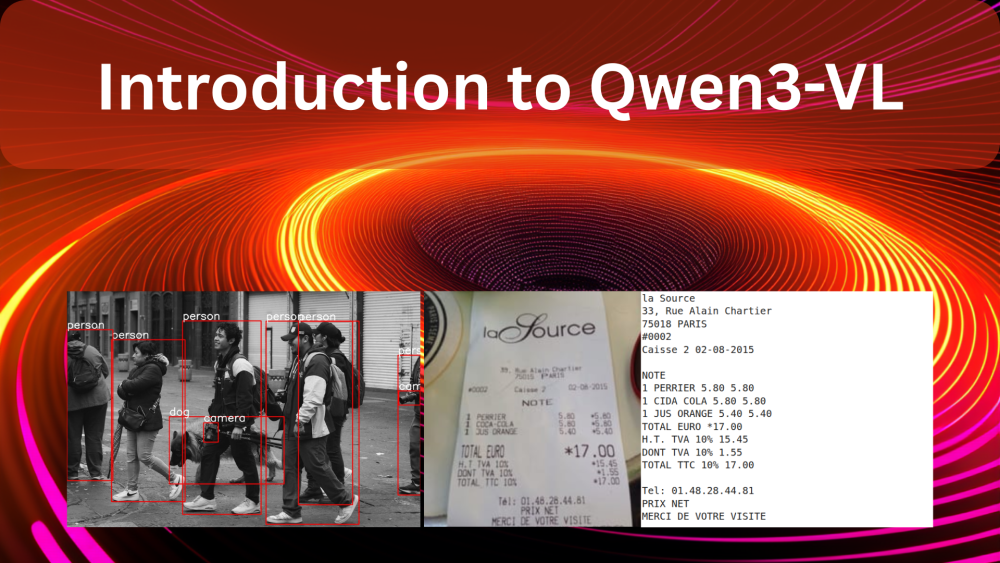
Qwen3-VL is the latest iteration in the Qwen Vision Language model family. It is the most powerful series of models to date in the Qwen-VL family. With models ranging from different sizes to separate instruct and thinking models, Qwen3-VL has a lot to offer. In this article, we will discuss some of the novel parts of the models and run inference for certain tasks.

As the official report or a paper has not been published yet, we will infer as much as we can from the official blog post.
Along with that, we will cover the following inference tasks with Qwen3-VL:
- Image captioning with Qwen3-VL.
- Object detection with Qwen3-VL.
- OCR with Qwen3-VL.
- Image to HTML with Qwen3-VL.
- Video understanding with Qwen3-VL.
What Makes Qwen3-VL Stand Out?
The goal of Qwen3-VL is not just to “see” images or videos, but to understand, reason, and act upon them. To achieve this, the architecture has been systematically upgraded to push the model from simple perception toward deeper cognition.
The series includes different versions, most notably the Qwen3-VL-235B-A22B-Instruct model, which excels at following instructions, and the Qwen3-VL-235B-A22B-Thinking model, which is optimized for complex, step-by-step reasoning tasks.
Architectural Innovations of Qwen3-VL
Qwen3-VL introduces several key architectural updates that enhance its capabilities, especially in handling high-resolution imagery and long videos.

- Interleaved-MRoPE: The model upgrades its positional encoding to Interleaved-MRoPE. This new method distributes temporal (time), height, and width information more evenly across feature dimensions. This ensures full-frequency coverage for all three aspects, significantly improving long video comprehension without sacrificing image understanding capabilities.
- DeepStack Technology: Departing from the conventional method of injecting visual tokens into a single layer of the language model, Qwen3-VL uses DeepStack. This technique injects visual features from multiple layers of the Vision Transformer (ViT) into multiple layers of the Large Language Model (LLM). This multi-layer injection preserves rich visual information, from low-level details to high-level concepts, enabling a much finer-grained visual understanding.
- Text-Timestamp Alignment: The mechanism for video temporal modeling has been upgraded. The model now uses an interleaved input format of “timestamps-video frames”, allowing for precise alignment between frame-level temporal information and the visual content. This greatly enhances the model’s ability to perform complex temporal reasoning, such as localizing specific events or actions within a long video.
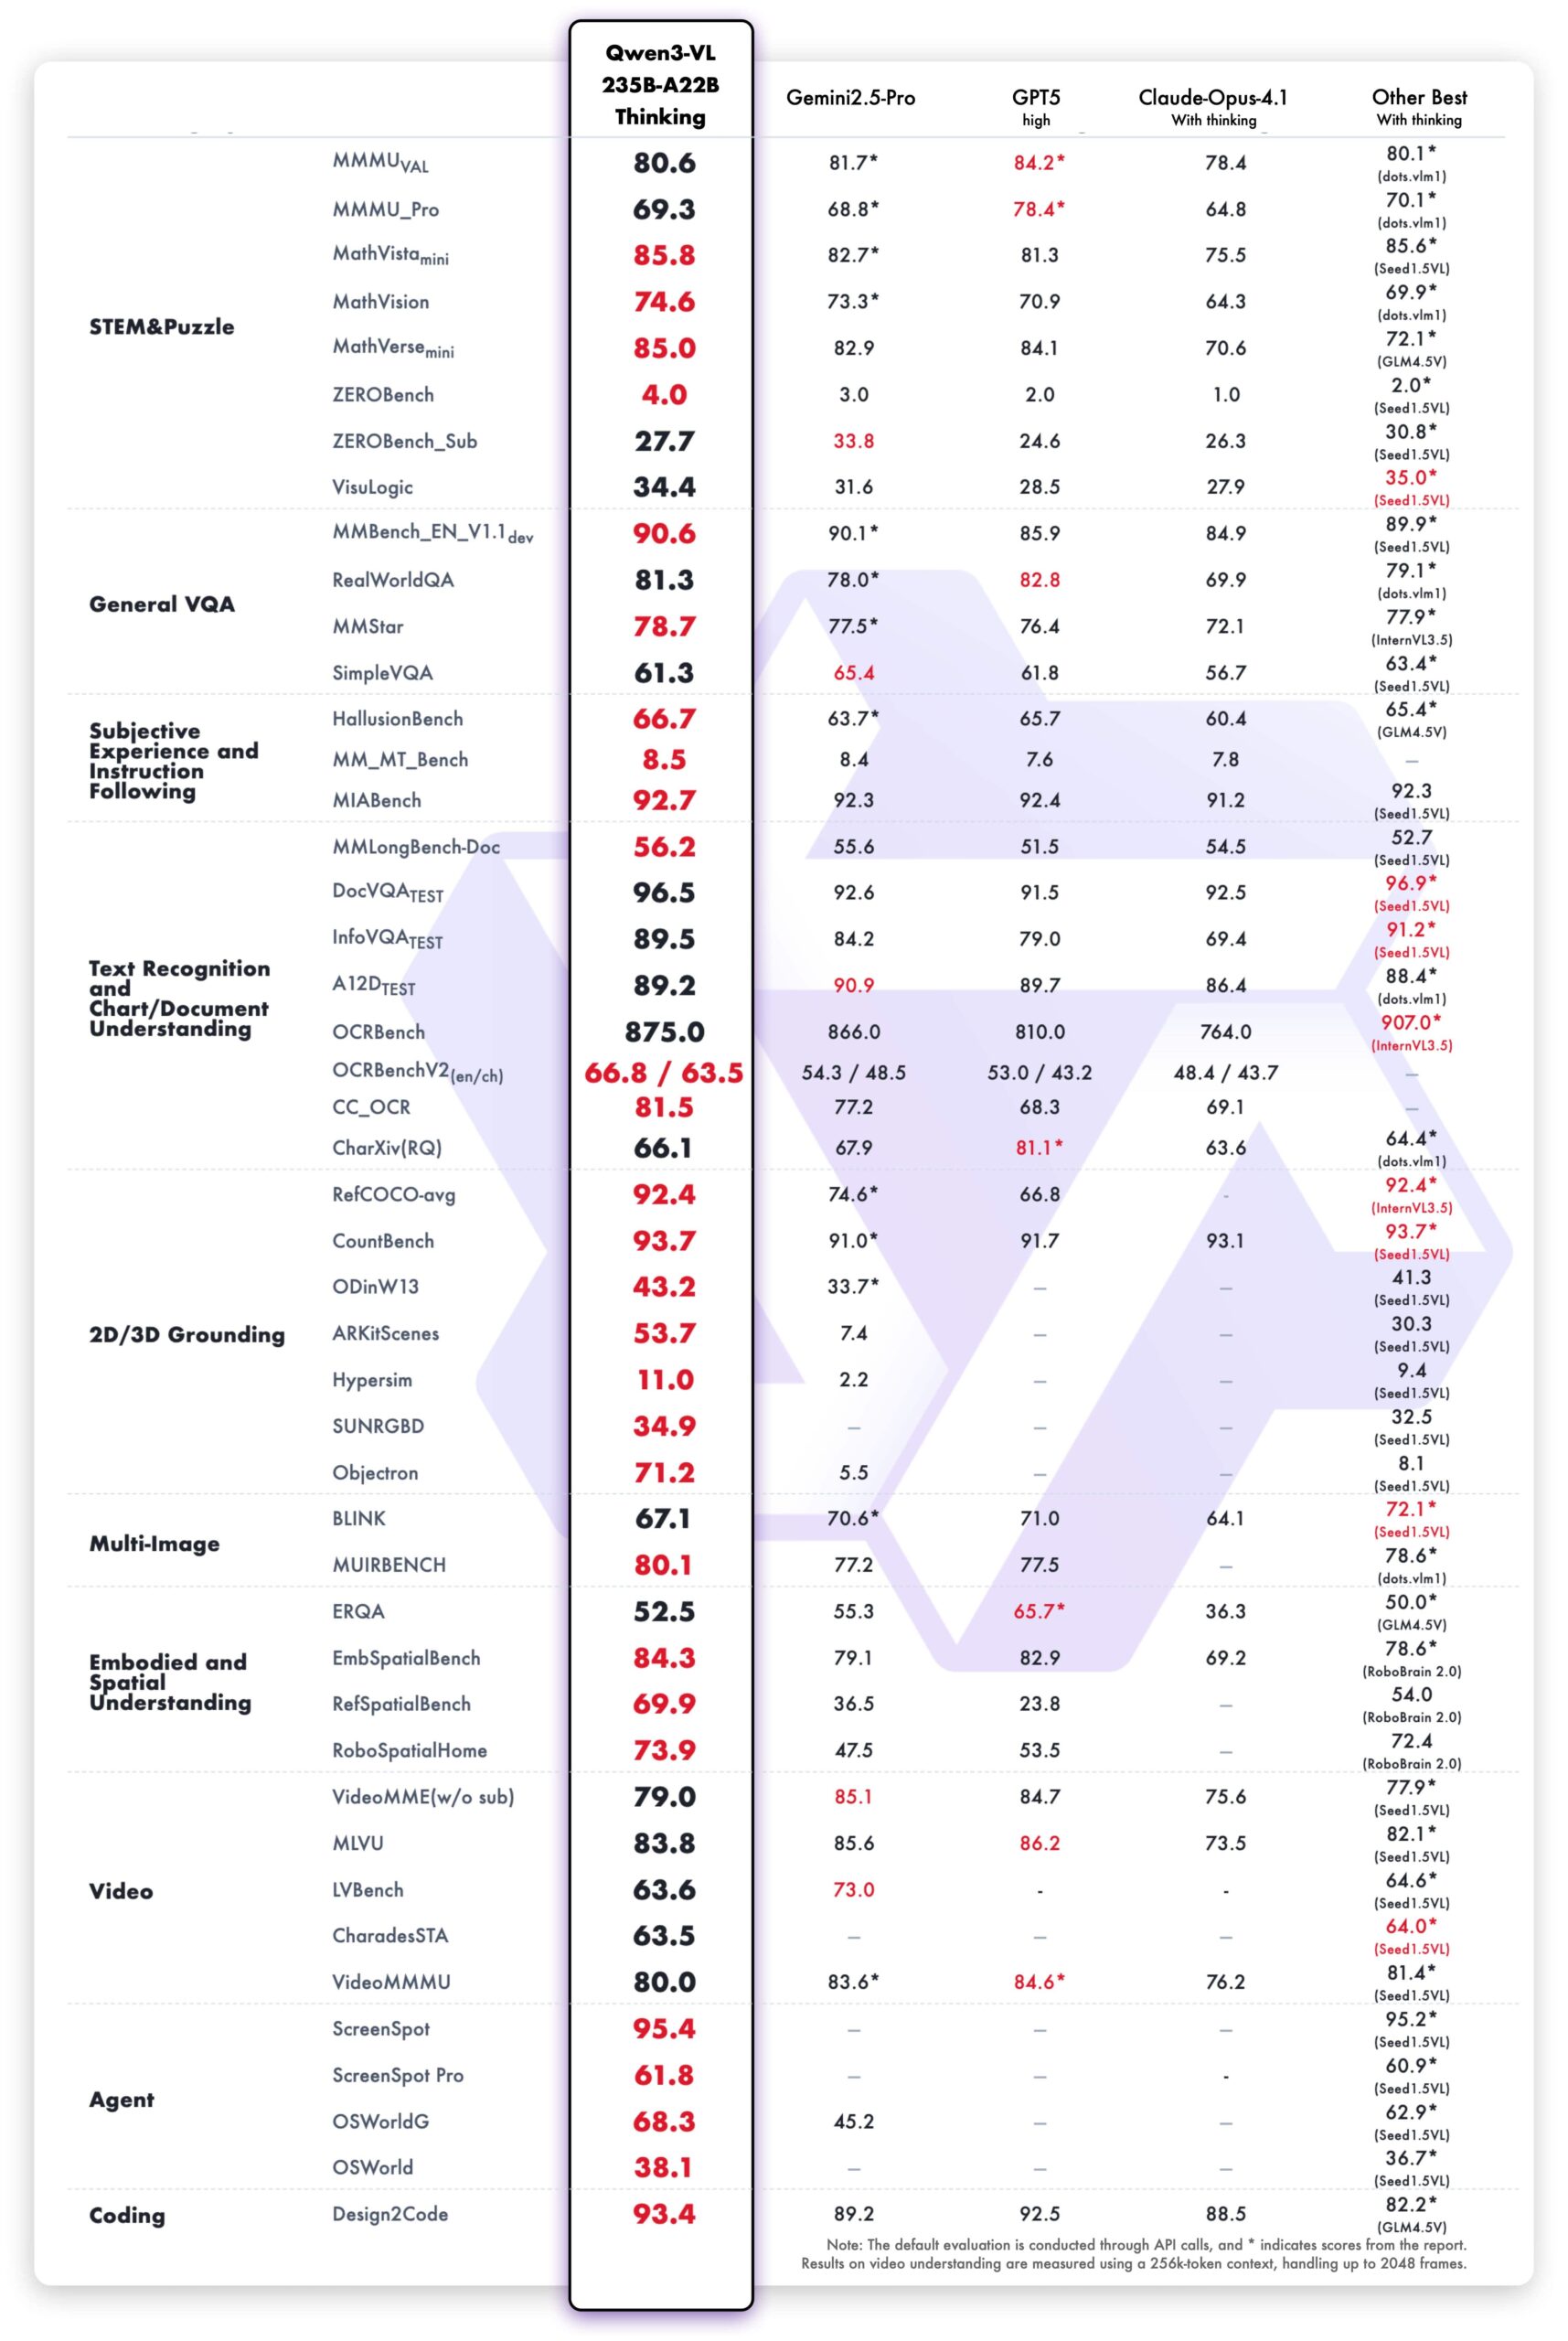
Model Performance and Benchmarks
Qwen3-VL has set new standards across a wide array of benchmarks, often outperforming top-tier closed-source models. The evaluation covers ten dimensions, including STEM reasoning, general VQA, 2D/3D grounding, video understanding, and agent capabilities.
General Multimodal Benchmarks
The Qwen3-VL-235B-A22B-Instruct model demonstrates top performance among non-reasoning models, surpassing competitors like Gemini 2.5 Pro and Claude Opus-4.1 on most metrics.
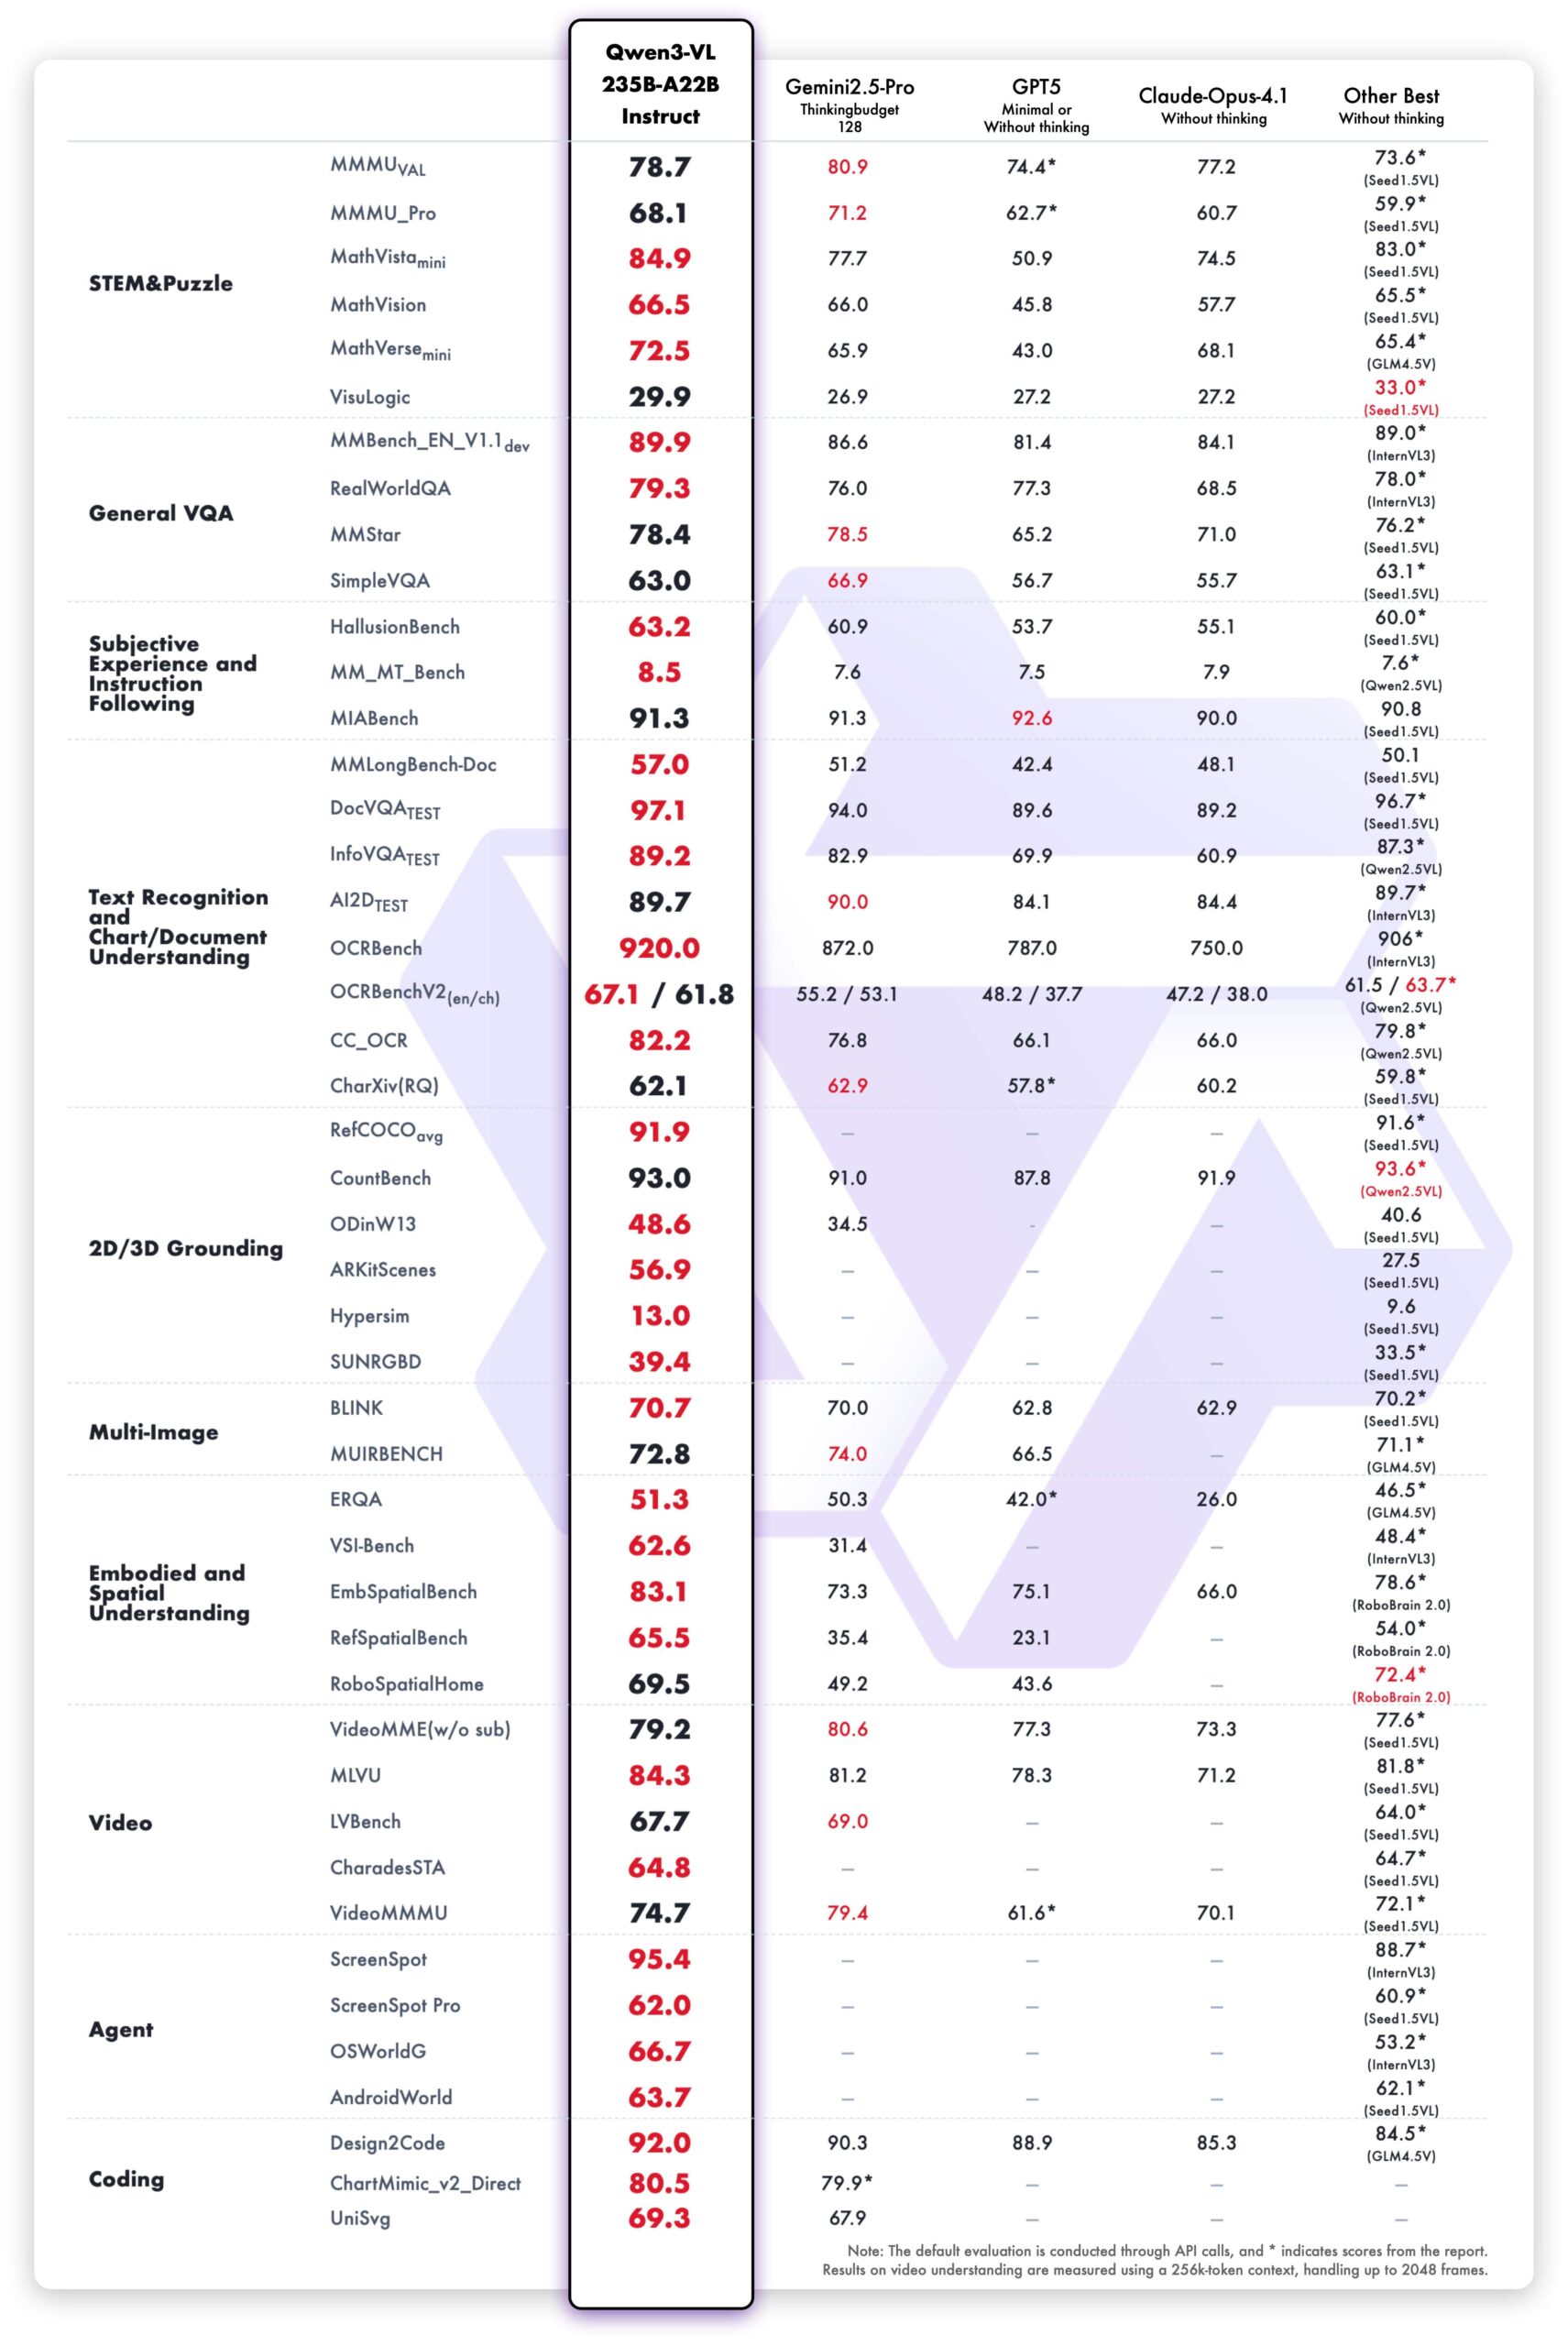
The Qwen3-VL-235B-A22B-Thinking model, optimized for reasoning, also establishes new state-of-the-art results among open-source models. It shows a competitive edge against closed-source models, particularly in complex multimodal math problems where it outperforms Gemini 2.5 Pro.
Text-Centric Benchmarks
A key strength of Qwen3-VL is its powerful language capability, inherited from early-stage joint pretraining of text and vision. Its performance on text-based tasks is comparable to the flagship language model, Qwen3-235B-A22B-2507.
Core Capabilities of Qwen3-VL
Beyond the benchmarks, Qwen3-VL introduces a suite of powerful capabilities that have practical, real-world applications.
Long-Context and Video Understanding
All models natively support a 256K token context, which can be expanded up to 1 million tokens. This allows the model to process hundreds of pages of documents or even videos up to two hours long. In “needle-in-a-haystack” experiments on long videos, the model achieved 100% accuracy with a 256K context length and 99.5% accuracy at 1M tokens, demonstrating incredibly strong long-sequence modeling.
Enhanced Multilingual OCR
The model’s Optical Character Recognition (OCR) capabilities have been significantly improved. Support has been expanded from 10 to 32 languages, including Thai, Hebrew, Greek, and Hindi. It performs reliably even in challenging conditions like poor lighting or tilted text and has enhanced accuracy for rare characters and ancient scripts.
Superior Spatial and 2D/3D Understanding
Qwen3-VL shows a much better understanding of spatial relationships. It can accurately judge object positions, occlusions, and viewpoint changes. Its 2D grounding can locate hundreds of objects with high precision, and it now supports 3D grounding, allowing it to predict an object’s real-world position, size, and depth.
Visual Agent and Tool Use
A standout feature is its ability to act as a visual agent. Qwen3-VL can operate computer and mobile interfaces by recognizing GUI elements, understanding button functions, and calling tools to complete tasks. This capability positions it as a powerful tool for automating digital tasks, with performance that tops global benchmarks like OS World.
Advanced Visual Coding
The model has made significant strides in visual coding. It can generate code from images or videos, effectively turning visual mockups or sketches into functional HTML, CSS, JavaScript, or even Draw.io diagrams.
Stronger STEM and Multidisciplinary Reasoning
The Thinking version of the model is specifically optimized for STEM fields. It can analyze complex problems in math, physics, and chemistry by noticing fine details in diagrams, breaking down the problem logically, and providing evidence-based answers.
It is highly recommended to review the official article for a deeper understanding through the graphs and comparisons provided.
In the next sections, we will cover the practical applications and run inference to see these capabilities in action.
Inference Experiments Using Qwen3-VL
In this section, we will go through a few different tasks using the Qwen3-VL 4B Instruct model.
Before that, let’s take a look at the directory structure and install the requirements.
Project Directory Structure
├── input
│   ├── image_1.jpg
│   ├── image_2.jpg
│   ├── image_3.jpg
│   ├── image_4.jpg
│   ├── large-receipt-image-dataset-SRD
│   ├── large-receipt-image-dataset-SRD.zip
│   ├── ollama_linux_ui.jpg
│   ├── ollama_linux_ui.png
│   └── video_1.mp4
├── outputs
│   ├── od_image_2.jpg
│   ├── od_image_3.jpg
│   └── out.html
├── qwen3_vl_4b_infer.ipynb
├── qwen3_vl_4b_ocr.ipynb
├── qwen3_vl_4b_od.ipynb
├── qwen3_vl_4b_sketch_to_html.ipynb
├── qwen3_vl_4b_video_understanding.ipynb
├── README.md
└── requirements.txt
- The
inputdirectory contains the images that we will use for inference. These are some images from the internet and the SRD dataset for OCR experiments. - The
outputsdirectory contains the results from the inference experiments. - We have five Jupyter Notebooks for different tasks. These range from simple image description to video understanding.
You can download the zip file that comes with this article, which will give you access to all the Jupyter Notebooks, inference data, and the requirements file.
Download Code
Installing Dependencies
The requirements file contains all the necessary libraries that we need to follow the code, along with the article.
pip install -r requirements.txt
This is all the setup we need. Let’s jump into the code.
Image Captioning and Description Using Qwen3-VL 4B Instruct
The very first use case that we’ll tackle is image captioning. It is a simple task that will get us up and running with the overall syntax of loading and using the model.
The code for this is present in the qwen3_vl_4b_infer.ipynb Jupyter Notebook.
Let’s start with the import statements and loading the model and processor.
from transformers import Qwen3VLForConditionalGeneration, AutoProcessor

import torch
model_id = 'Qwen/Qwen3-VL-4B-Instruct'

model = Qwen3VLForConditionalGeneration.from_pretrained(
    model_id,
    dtype=torch.bfloat16,
    attn_implementation='flash_attention_2',
    device_map='auto',
)
processor = AutoProcessor.from_pretrained(model_id)
Note: All the inference experiments shown in this article were run with Flash Attention enabled. If you have not installed Flash Attention or use a GPU that does not support it, simply comment the line attn_implementation='flash_attention_2'.
The next code block defines the image path, the message list, and carries out the forward pass after processing the input.
image_path = 'input/image_4.jpg'

messages = [
    {
        'role': 'user',
        'content': [
            {
                'type': 'image',
                'image': image_path,
            },
            {'type': 'text', 'text': 'Describe this image.'},
        ],
    }
]

# Preparation for inference
inputs = processor.apply_chat_template(
    messages,
    tokenize=True,
    add_generation_prompt=True,
    return_dict=True,
    return_tensors='pt'
)
inputs = inputs.to(model.device)

# Inference: Generation of the output
generated_ids = model.generate(**inputs, max_new_tokens=512)
generated_ids_trimmed = [
    out_ids[len(in_ids) :] for in_ids, out_ids in zip(inputs.input_ids, generated_ids)
]
output_text = processor.batch_decode(
    generated_ids_trimmed, skip_special_tokens=True, clean_up_tokenization_spaces=False
)

print(output_text[0])
We simply ask the model to describe the image. Following is the image, and the block following that is the output from the model.
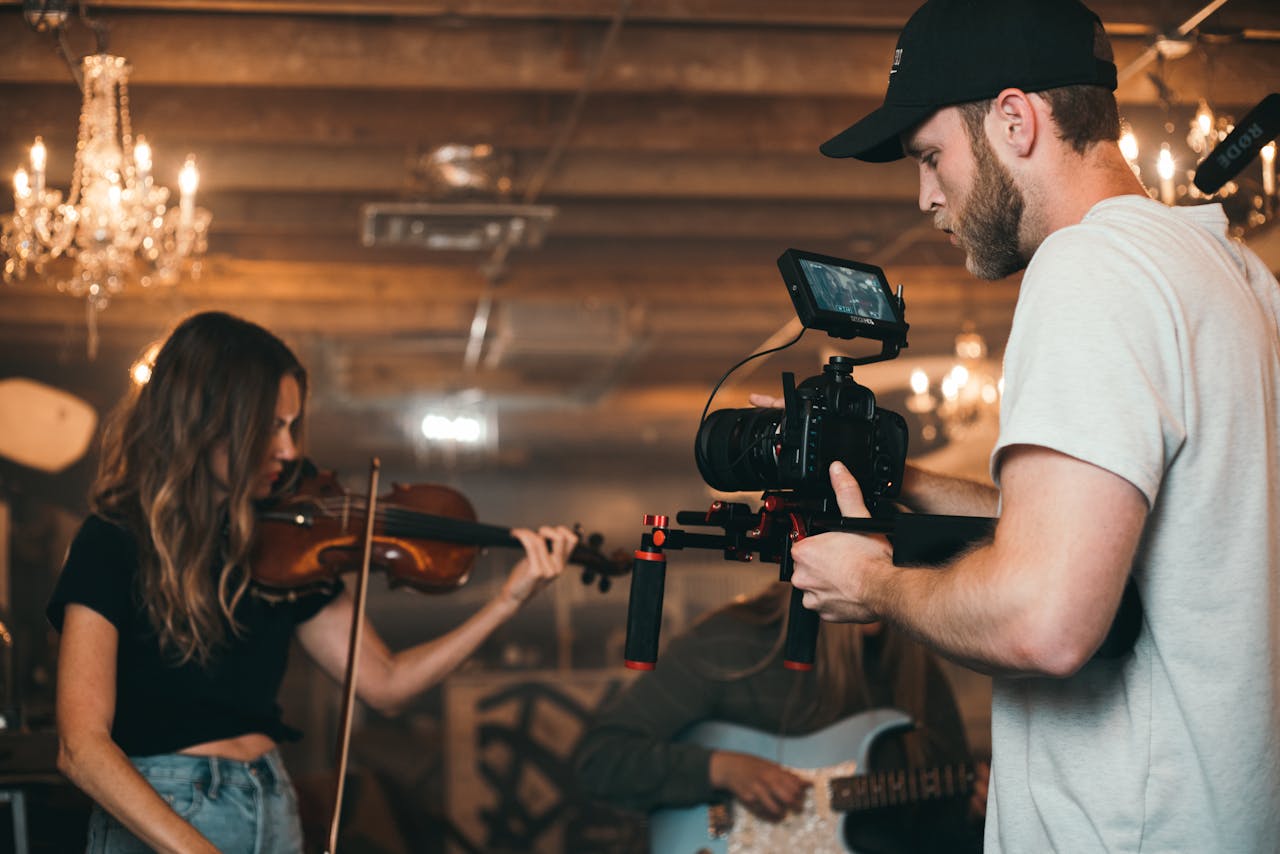
This is a dynamic, cinematic image capturing a live music recording or film shoot in a warmly lit, rustic indoor setting.

**Key Elements:**

- **The Musician (Left):** A woman with long, wavy brown hair is playing a violin. She is dressed in a black t-shirt and blue jeans, and her focus is entirely on her instrument. She is slightly out of focus, which helps to emphasize the cameraman.

- **The Cameraman (Right):** A man with a beard and wearing a black baseball cap and a light gray t-shirt is operating a professional camera. He is holding the camera on a stabilizing rig (likely a gimbal or similar device) with red accents. He is intensely focused on framing the shot, with his eyes on the camera's viewfinder or monitor. A small monitor is mounted on top of the camera, displaying a live preview of the scene.

- **The Setting:** The background features exposed wooden beams and a warm, ambient lighting scheme. Several ornate, lit chandeliers hang from the ceiling, casting a soft, golden glow. The atmosphere is intimate and artistic.

- **Other Musicians (Background):** In the blurred background, another musician is visible, playing a light blue electric guitar. This suggests a band or ensemble setting.

- **Composition & Mood:** The image uses a shallow depth of field, keeping the cameraman in sharp focus while softly blurring the violinist and the background. The lighting is moody and cinematic, with a warm color palette that enhances the intimate, creative atmosphere of the scene. The overall mood is one of focused artistic production.

This image effectively captures the intersection of music and filmmaking, showcasing the behind-the-scenes effort of capturing live performance.
The mode gives a detailed description of the image. However, to discover the real capabilities of the model, let’s run some more complex visual tasks.
Object Detection Using Qwen3-VL 4B Instruct
The next task that we will tackle is object detection, one of the core computer vision tasks.
The code is present in the qwen3_vl_4b_od.ipynb Jupyter Notebook.
Starting with the imports.
from transformers import Qwen3VLForConditionalGeneration, AutoProcessor

import torch
import os
import ast
import cv2
import matplotlib.pyplot as plt
Next, we define the output directory, the model ID, and load the model.
out_dir = 'outputs'
os.makedirs(out_dir, exist_ok=True)

model_id = 'Qwen/Qwen3-VL-4B-Instruct'

model = Qwen3VLForConditionalGeneration.from_pretrained(
    model_id,
    dtype=torch.bfloat16,
    attn_implementation='flash_attention_2',
    device_map='auto',
)
processor = AutoProcessor.from_pretrained(model_id)
We also need a few helper functions so that we can run inference easily on multiple samples.
The first one is for the detection forward pass.
def object_detection(model, processor, prompt, image_path):
    messages = [
        {
            'role': 'user',
            'content': [
                {
                    'type': 'image',
                    'image': image_path,
                },
                {'type': 'text', 'text': prompt},
            ],
        }
    ]

    inputs = processor.apply_chat_template(
        messages,
        tokenize=True,
        add_generation_prompt=True,
        return_dict=True,
        return_tensors='pt'
    )
    inputs = inputs.to(model.device)

    generated_ids = model.generate(**inputs, max_new_tokens=1024)
    generated_ids_trimmed = [
        out_ids[len(in_ids) :] for in_ids, out_ids in zip(inputs.input_ids, generated_ids)
    ]

    output_text = processor.batch_decode(
        generated_ids_trimmed, skip_special_tokens=True, clean_up_tokenization_spaces=False
    )

    return output_text
We have two more helper functions. One to annotate the original image with the bounding boxes and classes. The other is to visualize the image.
def annotate_image(image_path, output_string):
    output = output_text[0][8:-3:]
    image = cv2.imread(image_path)

    height, width, _ = image.shape

    for i, output in enumerate(final_output):
        x1, y1 = int(output['bbox_2d'][0] / 1000 * width), int(output['bbox_2d'][1] / 1000 * height)
        x2, y2 = int(output['bbox_2d'][2] / 1000 * width), int(output['bbox_2d'][3] / 1000 * height)

        cv2.rectangle(
            image,
            pt1=(x1, y1),
            pt2=(x2, y2),
            color=(0, 0, 255),
            thickness=2,
            lineType=cv2.LINE_AA
        )
        cv2.putText(
            image,
            text=output['label'],
            org=(x1, y1-5),
            fontFace=cv2.FONT_HERSHEY_SIMPLEX,
            fontScale=1.3,
            color=(255, 255, 255),
            thickness=2,
            lineType=cv2.LINE_AA
        )

    return image

def show(image):
    plt.imshow(image[..., ::-1])
    plt.axis('off')
    plt.show()
The model returns the bounding box coordinates normalized to a 0-1000 scale. We bring them to pixel coordinates relative to the original image by dividing by 1000 and multiplying by the respective dimensions.
Let’s provide the path to an image, define a prompt, and forward pass it through the model.
prompt = """locate every instance that belongs to the following categories: "car". Report bbox coordinates in JSON format."""

image_path = 'input/image_2.jpg'
output_text = object_detection(model, processor, prompt, image_path)

print(f"Raw output at index 0:\n {output_text[0]}")
string_list = output_text[0][8:-3:]
print(f"Raw output after removing JSON strings:\n {string_list}")
final_output = ast.literal_eval(string_list)
print(final_output)
print(f"Box info after converting to list: {final_output[0]['bbox_2d']}")
We ask the model to locate all the cars and provide the response in JSON format. As we get a string response, we need to do some post-processing and get the final JSON only that we can apply literal_eval to. This is how the sequence of processing looks like.
Raw output at index 0:
 ```json
[
	{"bbox_2d": [623, 748, 850, 860], "label": "car"},
	{"bbox_2d": [644, 701, 700, 762], "label": "car"},
	{"bbox_2d": [0, 731, 217, 874], "label": "car"},
	{"bbox_2d": [491, 677, 520, 710], "label": "car"},
	{"bbox_2d": [472, 667, 491, 693], "label": "car"},
	{"bbox_2d": [423, 679, 446, 722], "label": "car"},
	{"bbox_2d": [342, 705, 387, 781], "label": "car"},
	{"bbox_2d": [380, 697, 417, 753], "label": "car"},
	{"bbox_2d": [398, 689, 426, 743], "label": "car"},
	{"bbox_2d": [416, 685, 437, 742], "label": "car"},
	{"bbox_2d": [433, 677, 448, 710], "label": "car"},
	{"bbox_2d": [450, 677, 465, 700], "label": "car"},
	{"bbox_2d": [666, 712, 888, 827], "label": "car"},
	{"bbox_2d": [951, 795, 1000, 872], "label": "car"}
]
```
Raw output after removing JSON strings:
 [
	{"bbox_2d": [623, 748, 850, 860], "label": "car"},
	{"bbox_2d": [644, 701, 700, 762], "label": "car"},
	{"bbox_2d": [0, 731, 217, 874], "label": "car"},
	{"bbox_2d": [491, 677, 520, 710], "label": "car"},
	{"bbox_2d": [472, 667, 491, 693], "label": "car"},
	{"bbox_2d": [423, 679, 446, 722], "label": "car"},
	{"bbox_2d": [342, 705, 387, 781], "label": "car"},
	{"bbox_2d": [380, 697, 417, 753], "label": "car"},
	{"bbox_2d": [398, 689, 426, 743], "label": "car"},
	{"bbox_2d": [416, 685, 437, 742], "label": "car"},
	{"bbox_2d": [433, 677, 448, 710], "label": "car"},
	{"bbox_2d": [450, 677, 465, 700], "label": "car"},
	{"bbox_2d": [666, 712, 888, 827], "label": "car"},
	{"bbox_2d": [951, 795, 1000, 872], "label": "car"}
]

[{'bbox_2d': [623, 748, 850, 860], 'label': 'car'}, {'bbox_2d': [644, 701, 700, 762], 'label': 'car'}, {'bbox_2d': [0, 731, 217, 874], 'label': 'car'}, {'bbox_2d': [491, 677, 520, 710], 'label': 'car'}, {'bbox_2d': [472, 667, 491, 693], 'label': 'car'}, {'bbox_2d': [423, 679, 446, 722], 'label': 'car'}, {'bbox_2d': [342, 705, 387, 781], 'label': 'car'}, {'bbox_2d': [380, 697, 417, 753], 'label': 'car'}, {'bbox_2d': [398, 689, 426, 743], 'label': 'car'}, {'bbox_2d': [416, 685, 437, 742], 'label': 'car'}, {'bbox_2d': [433, 677, 448, 710], 'label': 'car'}, {'bbox_2d': [450, 677, 465, 700], 'label': 'car'}, {'bbox_2d': [666, 712, 888, 827], 'label': 'car'}, {'bbox_2d': [951, 795, 1000, 872], 'label': 'car'}]
Box info after converting to list: [623, 748, 850, 860]
And the following is the model output.
image = annotate_image(image_path, final_output)
show(image)

image_name = image_path.split(os.path.sep)[-1]
cv2.imwrite(os.path.join(out_dir, 'od_'+image_name), image)
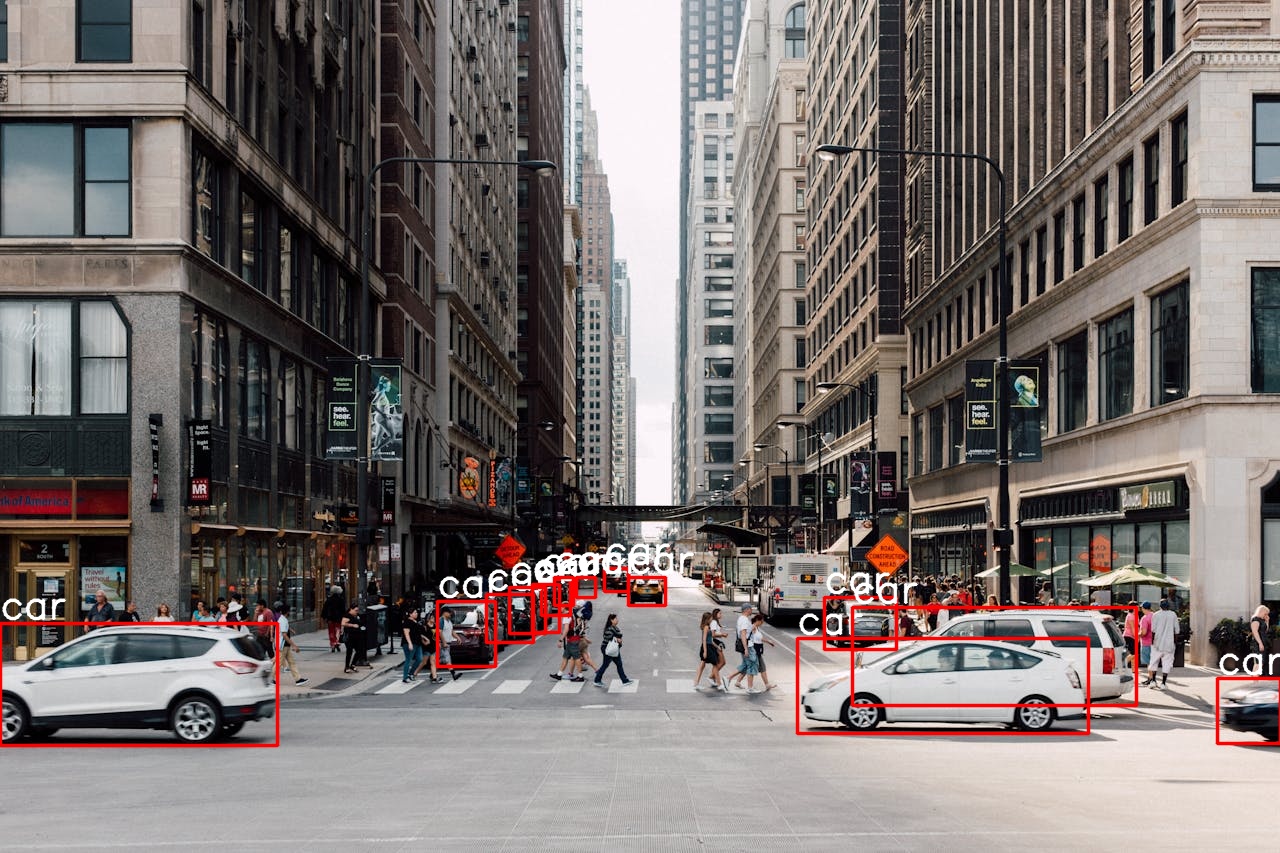
Interestingly, the model is able to detect all the cars, even those that are far away. This is almost SotA level object detection capability.
Let’s check one more result.
prompt = """locate every instance that belongs to the following categories: "person", "dog", "camera". Report bbox coordinates in JSON format."""

image_path = 'input/image_3.jpg'
output_text = object_detection(model, processor, prompt, image_path)

string_list = output_text[0][8:-3:]
final_output = ast.literal_eval(string_list)

image = annotate_image(image_path, final_output)
show(image)

image_name = image_path.split(os.path.sep)[-1]
cv2.imwrite(os.path.join(out_dir, 'od_'+image_name), image)
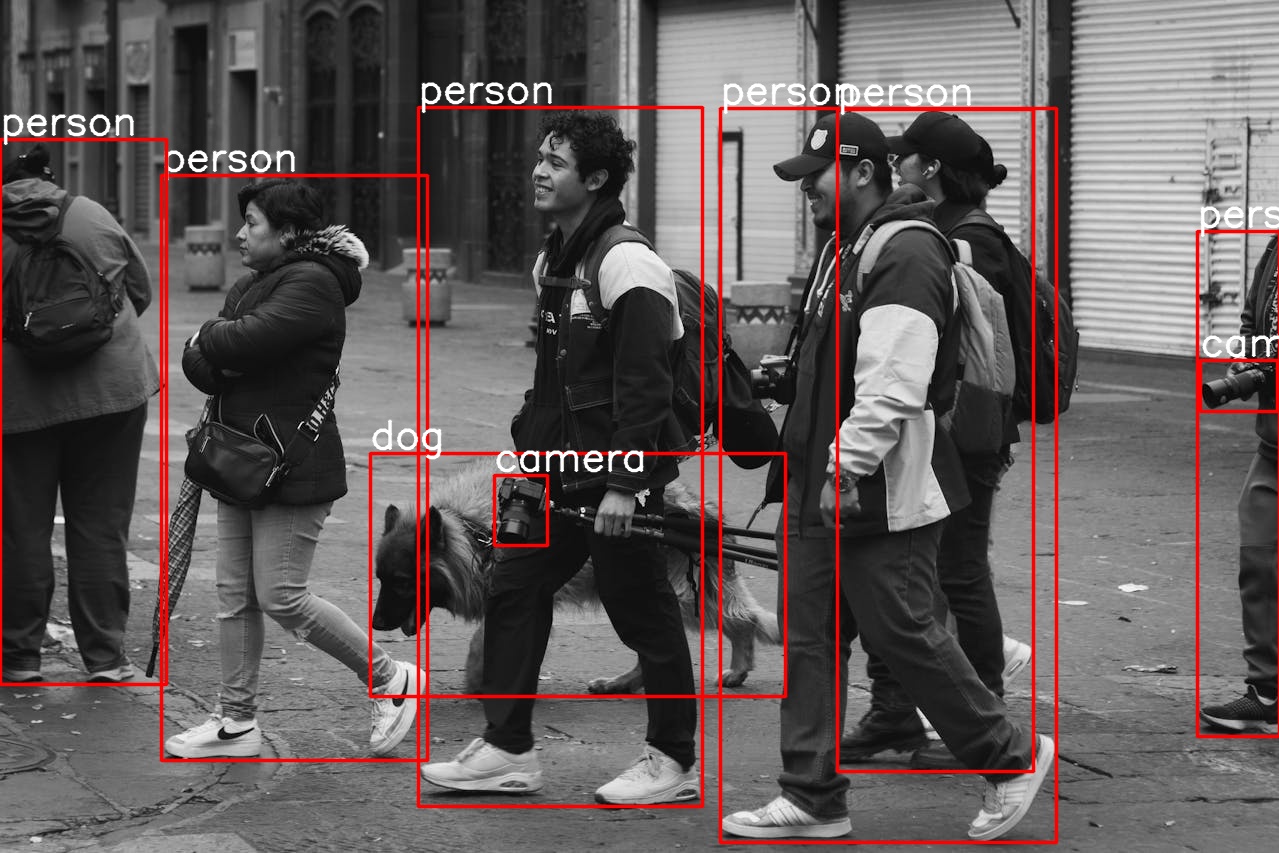
This time, the model detects all the persons, the dog, and even the camera at the far right end. It looks like Qwen3-VL is extremely good at the object detection task.
OCR with Qwen3-VL 4B
The next task that we will tackle is OCR, another sought after industrial task where high precision is necessary.
The qwen3_vl_4b_ocr.ipynb Jupyter Notebook contains the code for this. For the following OCR experiments, we use the images from SRD (Sample Receipt Dataset).
The first few blocks remain the same.
from transformers import Qwen3VLForConditionalGeneration, AutoProcessor

import torch
import os
import ast
import cv2
import matplotlib.pyplot as plt
import re

out_dir = 'outputs'
os.makedirs(out_dir, exist_ok=True)

model_id = 'Qwen/Qwen3-VL-4B-Instruct'

model = Qwen3VLForConditionalGeneration.from_pretrained(
    model_id,
    dtype=torch.bfloat16,
    attn_implementation='flash_attention_2',
    device_map='auto',
)
processor = AutoProcessor.from_pretrained(model_id)
Next, we have helper functions for carrying out OCR and visualizing the original image and the result.
def ocr(model, processor, prompt, image_path):
    messages = [
        {
            'role': 'user',
            'content': [
                {
                    'type': 'image',
                    'image': image_path,
                },
                {'type': 'text', 'text': prompt},
            ],
        }
    ]

    inputs = processor.apply_chat_template(
        messages,
        tokenize=True,
        add_generation_prompt=True,
        return_dict=True,
        return_tensors='pt'
    )
    inputs = inputs.to(model.device)

    generated_ids = model.generate(**inputs, max_new_tokens=2048)
    generated_ids_trimmed = [
        out_ids[len(in_ids) :] for in_ids, out_ids in zip(inputs.input_ids, generated_ids)
    ]

    output_text = processor.batch_decode(
        generated_ids_trimmed, skip_special_tokens=True, clean_up_tokenization_spaces=False
    )

    return output_text

def show(image_path):
    image = cv2.imread(image_path)
    plt.imshow(image[..., ::-1])
    plt.axis('off')
    plt.show()
We need to define the path to the image and the prompt that we pass to the ocr function.
image_path = 'input/large-receipt-image-dataset-SRD/1034-receipt.jpg'
prompt = """Give the OCR of this image without any additional context."""

output_text = ocr(model, processor, prompt, image_path)

print(output_text[0])
show(image_path)
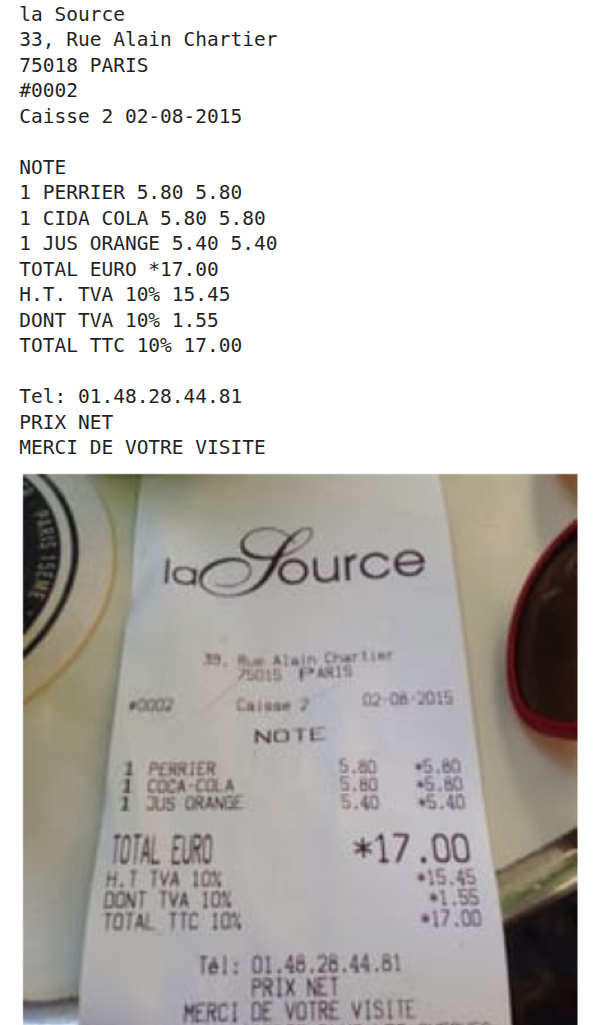
As we can see, the model is able to accurately recognize even small texts. This is quite interesting given the fact that we are using the smallest model in the series.
Let’s try one more example with complex lighting.
image_path = 'input/large-receipt-image-dataset-SRD/1199-receipt.jpg'
prompt = """Give the OCR of this image without any additional context."""

output_text = ocr(model, processor, prompt, image_path)

print(output_text[0])
show(image_path)
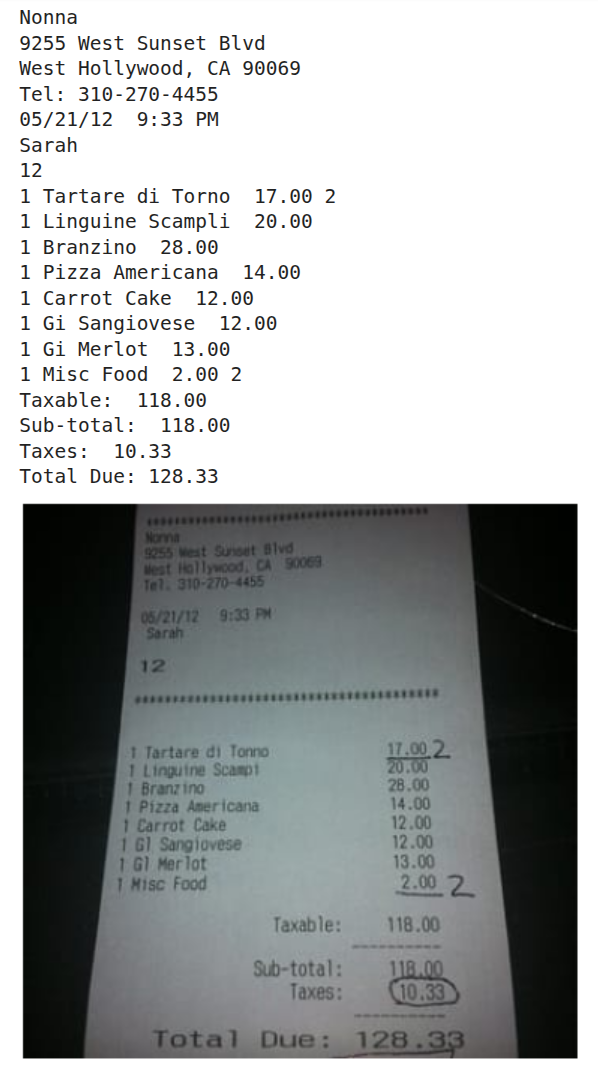
Even in this, the result is extremely accurate.
Now, there is a high chance that these images were already part of the training set. However, this does not take away the fact that for complex OCR tasks, we can fine-tune the Qwen3-VL model to be extremely accurate. Furthermore, with Flash Attention enabled, the model can easily be loaded even on a GPU with 8GB VRAM.
Sketch to HTML Using Qwen3-VL 4B Instruct
In this experiment, we will use the Qwen3-VL model to convert sketches (either hand-drawn or digital) to HTML code.
The qwen3_vl_4b_sketch_to_html.ipynb file contains the code for this.
Let’s start with the import statements and loading the model & processor.
from transformers import Qwen3VLForConditionalGeneration, AutoProcessor

import torch
import os
import ast
import cv2
import matplotlib.pyplot as plt
import re

out_dir = 'outputs'
os.makedirs(out_dir, exist_ok=True)

image_path = 'input/ollama_linux_ui.jpg'

model_id = 'Qwen/Qwen3-VL-4B-Instruct'

model = Qwen3VLForConditionalGeneration.from_pretrained(
    model_id,
    dtype=torch.bfloat16,
    attn_implementation='flash_attention_2',
    device_map='auto',
)
processor = AutoProcessor.from_pretrained(model_id)
The following is the image that we will convert to HTML code.
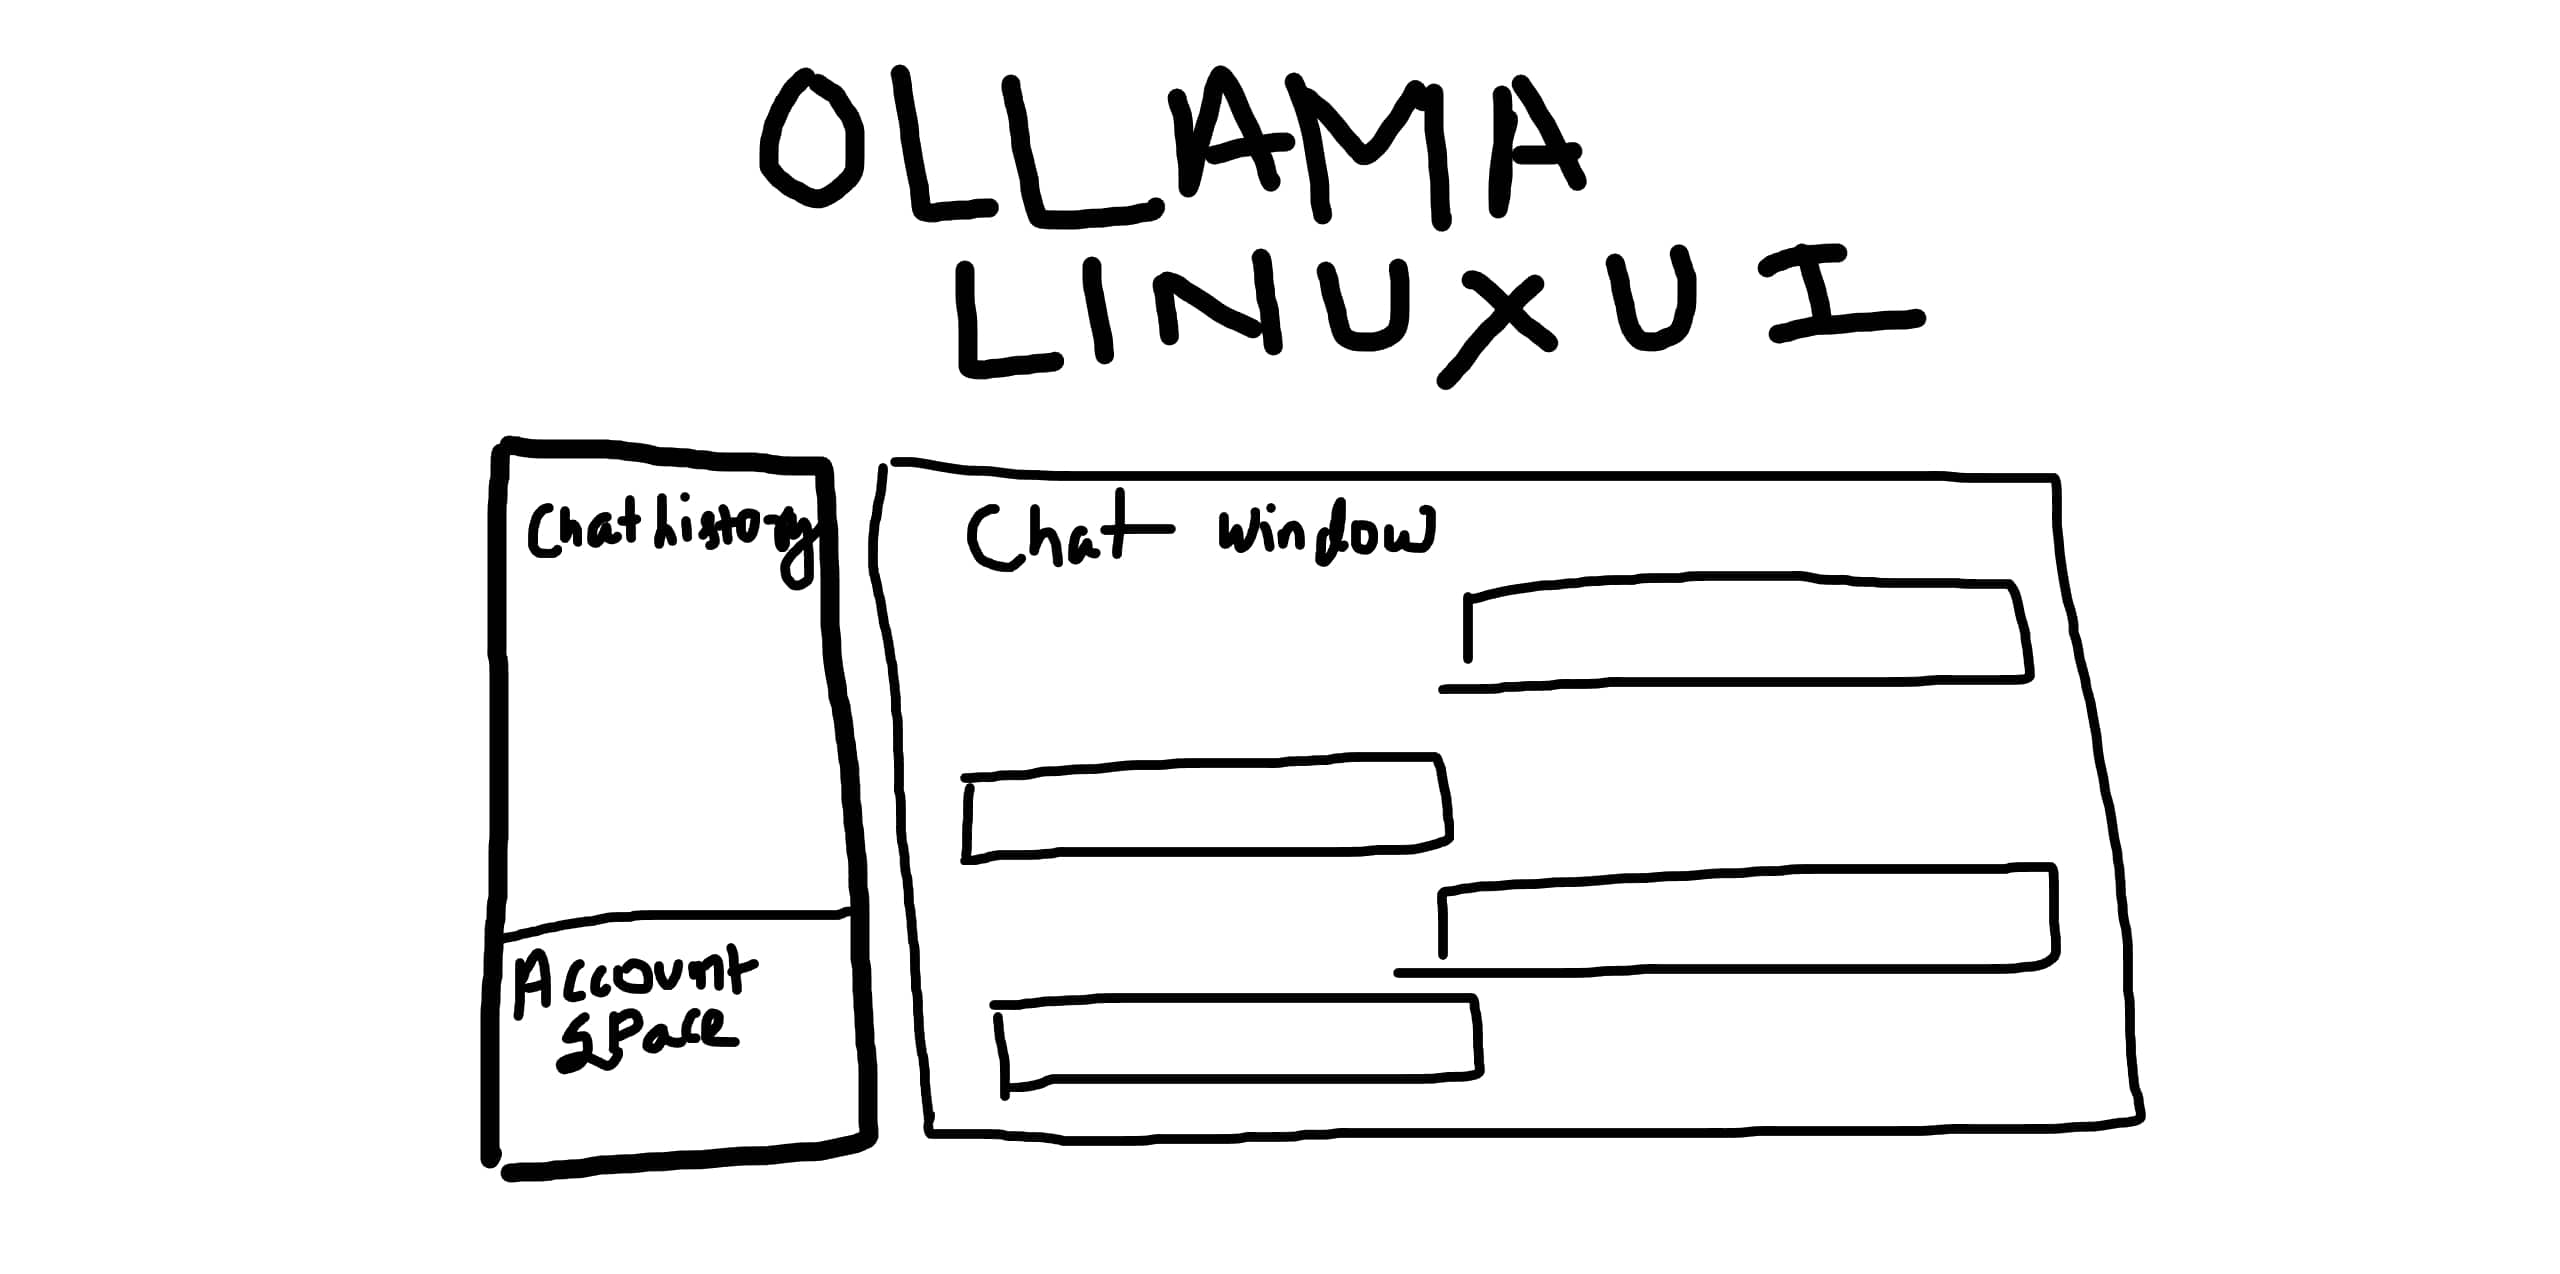
We will ask the model to create a mockup HTML page for Ollama chat UI for Linux. We have a sidebar, a main chat area, and a header.
prompt = """Create the webpage using HTML and CSS based on my sketch design. Color it in dark gray and white mode."""

messages = [
    {
        'role': 'user',
        'content': [
            {
                'type': 'image',
                'image': image_path,
            },
            {'type': 'text', 'text': prompt},
        ],
    }
]

inputs = processor.apply_chat_template(
    messages,
    tokenize=True,
    add_generation_prompt=True,
    return_dict=True,
    return_tensors='pt'
)
inputs = inputs.to(model.device)

generated_ids = model.generate(**inputs, max_new_tokens=2048)
generated_ids_trimmed = [
    out_ids[len(in_ids) :] for in_ids, out_ids in zip(inputs.input_ids, generated_ids)
]

print(output_text[0])
Such responses can span over a few thousand tokens. The Following image shows the truncated response.
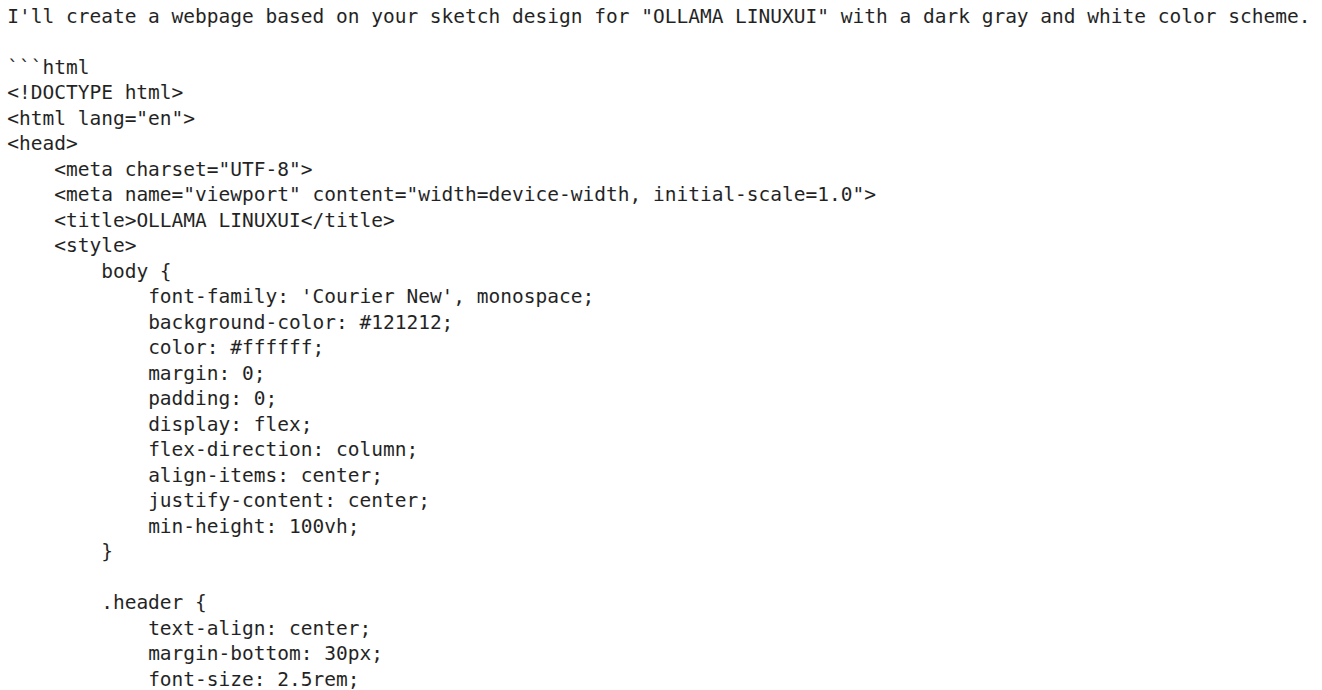
We need a helper function that retains just the code within the <html> tags. The following helper function has been borrowed from Qwen3-VL cookbooks.
def extract_last_code_block(text):
    """Extract the last named markdown code block from the text"""
    code_blocks = re.findall(r"```(?:python|html)(.*?)```", text, re.DOTALL)
    if code_blocks:
        return code_blocks[-1].strip()
    return None

out_html = os.path.join(out_dir, 'out.html')

with open(out_html, 'w') as f:
    f.write(html_code)
Finally, we save the HTML file. Let’s take a look at the rendered HTML page.
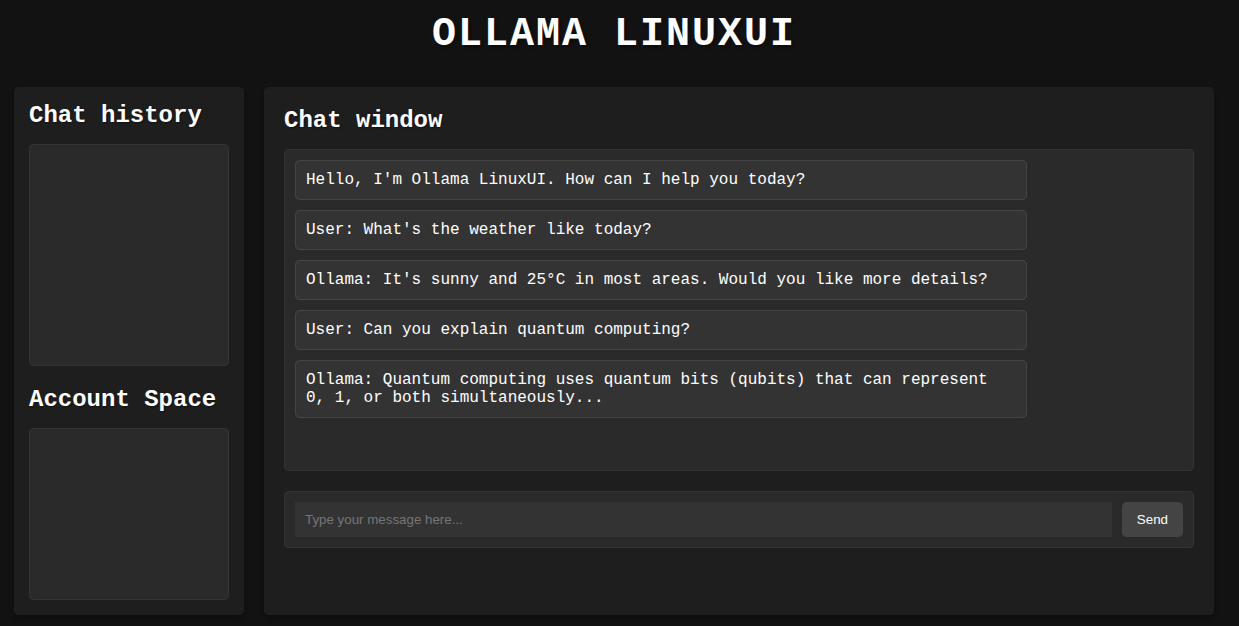
It is not perfect; however, we get a good idea of what the site may look like. The chat window has been populated with a few mock chats, the text box is interactive, and we can toggle between light and dark modes.
Video Understanding Using Qwen3-VL 4B
The final experiment that we will carry out using Qwen3-VL is for video understanding. This is a simplified version of the notebook present in the Qwen3-VL repository’s cookbooks folder. We borrow all the helper functions from the official notebook and do minor tweaks as per the requirements.
The code for this is present in qwen3_vl_4b_video_understanding.ipynb Jupyter Notebook.
The following are the import statements that we need.
from transformers import Qwen3VLForConditionalGeneration, AutoProcessor
from qwen_vl_utils import process_vision_info
from IPython.display import Markdown, display
from PIL import Image
from decord import VideoReader, cpu

import decord
import numpy as np
import os
import math
import hashlib
import torch
Next, we have two helper functions. One to read video frames and return them and the other to visualize them.
def get_video_frames(video_path, num_frames=128, cache_dir='.cache'):
    os.makedirs(cache_dir, exist_ok=True)

    video_hash = hashlib.md5(video_path.encode('utf-8')).hexdigest()
    if video_path.startswith('http://') or video_path.startswith('https://'):
        video_file_path = os.path.join(cache_dir, f'{video_hash}.mp4')
        if not os.path.exists(video_file_path):
            download_video(video_path, video_file_path)
    else:
        video_file_path = video_path

    frames_cache_file = os.path.join(cache_dir, f'{video_hash}_{num_frames}_frames.npy')
    timestamps_cache_file = os.path.join(cache_dir, f'{video_hash}_{num_frames}_timestamps.npy')

    if os.path.exists(frames_cache_file) and os.path.exists(timestamps_cache_file):
        frames = np.load(frames_cache_file)
        timestamps = np.load(timestamps_cache_file)
        return video_file_path, frames, timestamps

    vr = VideoReader(video_file_path, ctx=cpu(0))
    total_frames = len(vr)

    indices = np.linspace(0, total_frames - 1, num=num_frames, dtype=int)
    frames = vr.get_batch(indices).asnumpy()
    timestamps = np.array([vr.get_frame_timestamp(idx) for idx in indices])

    np.save(frames_cache_file, frames)
    np.save(timestamps_cache_file, timestamps)

    return video_file_path, frames, timestamps

def create_image_grid(images, num_columns=8):
    pil_images = [Image.fromarray(image) for image in images]
    num_rows = math.ceil(len(images) / num_columns)

    img_width, img_height = pil_images[0].size
    grid_width = num_columns * img_width
    grid_height = num_rows * img_height
    grid_image = Image.new('RGB', (grid_width, grid_height))

    for idx, image in enumerate(pil_images):
        row_idx = idx // num_columns
        col_idx = idx % num_columns
        position = (col_idx * img_width, row_idx * img_height)
        grid_image.paste(image, position)

    return grid_image
The above two are purely for visualization purposes and do not affect the inference.
The next function is for carrying out inference.
def inference(
    video,
    prompt,
    max_new_tokens=2048,
    total_pixels=20480 * 32 * 32,
    min_pixels=64 * 32 * 32,
    max_frames=2048,
    sample_fps=2
):
    """
    Perform multimodal inference on input video and text prompt to generate model response.

    Args:
        video (str or list/tuple): Video input, supports two formats:
            - str: Path or URL to a video file. The function will automatically read and sample frames.
            - list/tuple: Pre-sampled list of video frames (PIL.Image or url).
              In this case, `sample_fps` indicates the frame rate at which these frames were sampled from the original video.
        prompt (str): User text prompt to guide the model's generation.
        max_new_tokens (int, optional): Maximum number of tokens to generate. Default is 2048.
        total_pixels (int, optional): Maximum total pixels for video frame resizing (upper bound). Default is 20480*32*32.
        min_pixels (int, optional): Minimum total pixels for video frame resizing (lower bound). Default is 16*32*32.
        sample_fps (int, optional): ONLY effective when `video` is a list/tuple of frames!
            Specifies the original sampling frame rate (FPS) from which the frame list was extracted.
            Used for temporal alignment or normalization in the model. Default is 2.

    Returns:
        str: Generated text response from the model.

    Notes:
        - When `video` is a string (path/URL), `sample_fps` is ignored and will be overridden by the video reader backend.
        - When `video` is a frame list, `sample_fps` informs the model of the original sampling rate to help understand temporal density.
    """

    messages = [
        {"role": "user", "content": [
                {"video": video,
                "total_pixels": total_pixels,
                "min_pixels": min_pixels,
                "max_frames": max_frames,
                'sample_fps':sample_fps},
                {"type": "text", "text": prompt},
            ]
        },
    ]
    text = processor.apply_chat_template(messages, tokenize=False, add_generation_prompt=True)
    image_inputs, video_inputs, video_kwargs = process_vision_info(
        [messages],
        return_video_kwargs=True,
        image_patch_size= 16,
        return_video_metadata=True
    )
    if video_inputs is not None:
        video_inputs, video_metadatas = zip(*video_inputs)
        video_inputs, video_metadatas = list(video_inputs), list(video_metadatas)
    else:
        video_metadatas = None
    inputs = processor(
        text=[text],
        images=image_inputs,
        videos=video_inputs,
        video_metadata=video_metadatas,
        **video_kwargs,
        do_resize=False,
        return_tensors="pt"
    )
    inputs = inputs.to('cuda')

    output_ids = model.generate(**inputs, max_new_tokens=max_new_tokens)
    generated_ids = [output_ids[len(input_ids):] for input_ids, output_ids in zip(inputs.input_ids, output_ids)]
    output_text = processor.batch_decode(generated_ids, skip_special_tokens=True, clean_up_tokenization_spaces=True)
    return output_text[0]
Let’s load the model, provide a video file path, and visualize a few frames.
model_id = 'Qwen/Qwen3-VL-4B-Instruct'
model = Qwen3VLForConditionalGeneration.from_pretrained(
model_id,
dtype=torch.bfloat16,
attn_implementation='flash_attention_2',
device_map='auto',
)
processor = AutoProcessor.from_pretrained(model_id)
video_path = 'input/video_1.mp4'
prompt = 'Summarize the video'
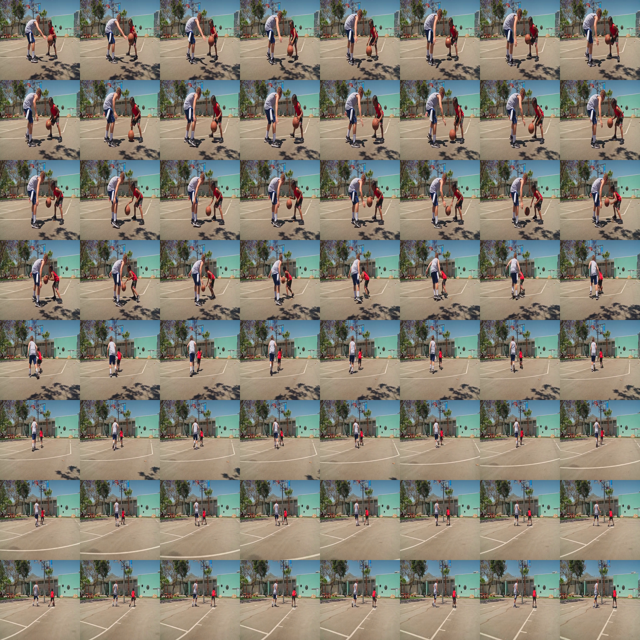
video_path, frames, timestamps = get_video_frames(video_path, num_frames=64)
image_grid = create_image_grid(frames, num_columns=8)
display(image_grid.resize((640, 640)))
The following image shows 64 frames from the video.
Finally, calling the inference function to get the response from the model.
response = inference(
    video_path,
    prompt,
    max_frames=2048
)
display(Markdown(response))
A young boy in a red shirt dribbles a basketball while being guarded by a taller boy in a gray tank top. The boy in red dribbles the ball, then passes it to the taller boy, who catches it and shoots it into the hoop. The taller boy then dribbles the ball and passes it back to the boy in red, who catches it and shoots it into the hoop. The two boys continue to pass the ball back and forth, with the taller boy always catching the ball and shooting it into the hoop. The game continues for a few more minutes, with the two boys passing the ball back and forth and shooting it into the hoop.
If you open the video and go through it, you will find that the model has hallucinated in the final part of the description. This is probably because the model did not get the entire context, as we are just using 2048 frames. I have also experimented with more frames; however, that led to even more hallucination. This might be because the 4B model is not capable enough to handle longer video contexts.
Key Takeaways and Further Experiments
Carrying out the above experiments gave us the first-hand initial impression of what the Qwen3-4B Instruct model is capable of. However, these experiments are just the starting point. We could explore so much more:
- Working with the thinking models to check whether the responses are better.
- Working with larger models for video understanding and sketch to HTML.
- Creating interactive video understanding and video object detection for real life use cases.
These are just a few ideas, and we can expand to much more. Let’s see whether we can tackle a few in the upcoming articles.
Summary and Conclusion
In this article, we experimented with the latest Qwen3-VL 4B Instruct model. Starting from simple image understanding to complex tasks such as object detection and video understanding, we covered a lot. We also discussed where the model is making mistakes and what could be some of the future projects & experiments.
If you have any questions, thoughts, or suggestions, please leave them in the comment section. I will surely address them.
You can contact me using the Contact section. You can also find me on LinkedIn, and X.
References

2 thoughts on “Introduction to Qwen3-VL”