Foundation and generative models are powering a number of innovative applications today. Starting from models like ChatGPT, Claude, and Molmo to segmentation models like SAM2, their impact on the deep learning industry is tremendous. These foundation models can automate numerous processes that took hours to complete earlier. One such example is partially automatic image segmentation using natural language with SAM2 and Molmo. In this article, we will build an application where we start from a text prompt, and use Molmo and SAM2 for generating segmentation maps of objects in an image.
In the previous article, we covered the Molmo family of models along with the PixMo datasets and running inference as well. Along with detailed image captioning, Molmo is capable of pointing to objects with x, and y coordinates when prompted appropriately. Furthermore, SAM2 is capable of segmenting objects when prompted with object coordinates. This enables us to create a semi-automatic pipeline where we can segment objects using natural language.
We will cover the following topics in this article
- What does the SAM2 + Molmo pipeline look like for segmenting images with natural language?
- What are the different models involved in the natural language image segmentation pipeline?
- How to set up SAM2 locally?
- What does the codebase look like for the project?
- What results do we get using SAM2 + Molmo for image segmentation?
How Does the Integration of SAM2 and Molmo Work for Natural Language Image Segmentation?
In this section, we will focus on understanding the pipeline and integration of different components involved with image segmentation with natural language.
Primarily, there are two deep learning models involved:
- Molmo: The Molmo VLM will help us extract the coordinates of objects using natural language. Here, we will use the MolmoE-1B-7B model which is a mixture of experts with 7B parameters and 1B active parameters.
- SAM2 (Segment Anything Model 2): Then we will feed the image and the point coordinates as prompts to the SAM2 model for automated segmentation. To get the best segmentation results, we will use the new largest SAM2 model, that is, SAM2.1 Hiera Large.
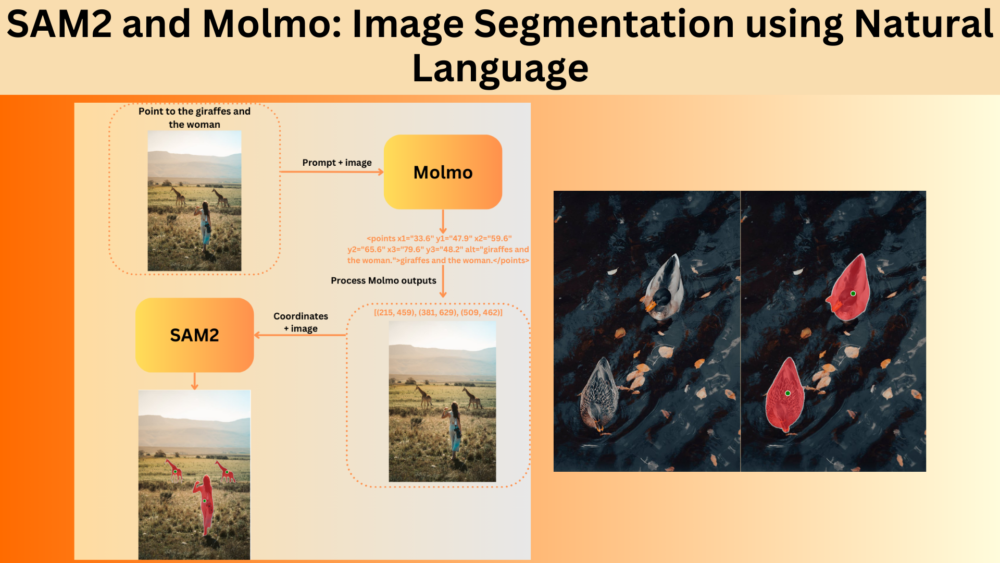
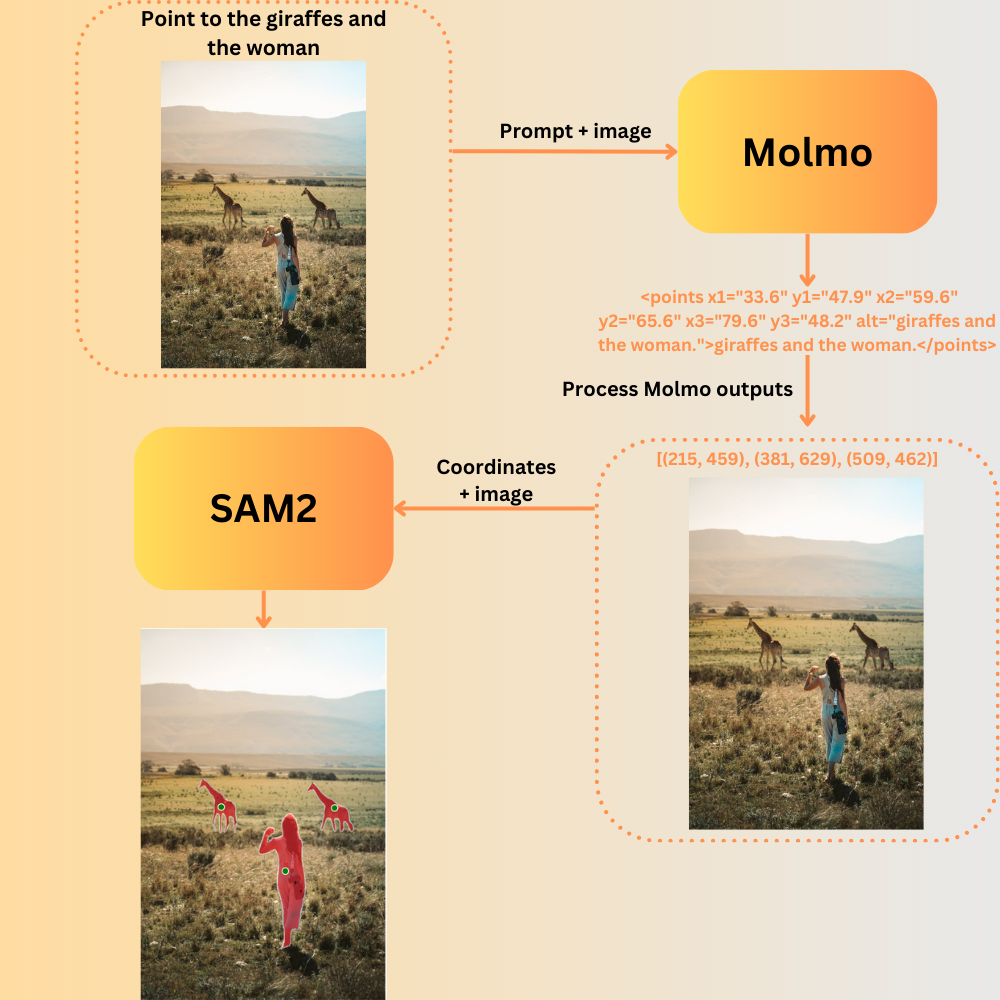
The entire process looks like the following.
It is worthwhile to note that the entire process leverages the capabilities of both models. Molmo’s capabilities to provide x and y coordinates of objects from natural language, which we also experienced in the previous article. And SAM2’s ability to segment objects when prompted with an image and the coordinates of specific objects.
Although not fully automatic, the entire pipeline still reduces the extensive manual effort of segmenting different objects. Think about this, we just type, “point toward all the persons in the image” and get perfect segmentation maps of all. The amount of manual effort it reduces is tremendous.
Project Directory Structure
The following is the project directory structure.
├── input
├── README.md
├── requirements.txt
├── sam2_molmo_gradio.py
└── sam2_molmo.ipynb
- The
inputdirectory contains the images that we will use for inference. - We have a Jupyter Notebook and a
sam2_molmo_gradio.pyscript as well. The Jupyter Notebook is for exploration and experimentation of the pipeline. The script contains the final code that we will explore here. - Also, we have a requirements file to install all the dependencies.
You can download all the files via the download section.
Download Code
Installing Dependencies
Although the requirements.txt file contains the installation of PyTorch as well, it is highly recommended to install the latest version using Anaconda first. You can install a higher version as well if available.
conda install pytorch==2.4.0 torchvision==0.19.0 torchaudio==2.4.0 pytorch-cuda=11.8 -c pytorch -c nvidia
Next, install the rest of the dependencies (Do not forget to comment out the PyTorch dependency line in the requirements file in case you installed a higher version).
pip install -r requirements.txt
Setting Up SAM2
We also need to install SAM2 using the official GitHub repository. First, we need to import and then run the setup file. Make sure to clone and install SAM2 in a different directory and not in the directory where you installed the code. It may cause conflicts.
git clone https://github.com/facebookresearch/sam2.git && cd sam2

pip install -e .
This will allow us to import sam2 into any project that we want. With this, we complete the setup needed for the SAM2 and Molmo image segmentation pipeline.
Image Segmentation using Natural Language with SAM2 and Molmo
From this section onward, we will focus on the coding part. We will go through the code in sam2_molmo_gradio.py and cover all the essential components involved in the image segmentation using natural language pipeline.
Importing Modules and Setting Up Computation Device
First, let’s import all the necessary modules involved and set the computation device as well.
import numpy as np
import torch
import matplotlib.pyplot as plt
import re
import gradio as gr

from PIL import Image
from sam2.sam2_image_predictor import SAM2ImagePredictor
from transformers import (
    AutoModelForCausalLM,
    AutoProcessor,
    GenerationConfig,
    BitsAndBytesConfig
)

device = torch.device('cuda' if torch.cuda.is_available() else 'cpu')
To initialize the SAM2 model, we are importing the SAM2ImagePredictor class. We will initialize the Molmo model using Hugging Face Transformers in INT4 quantized format. For that, we need bitsandbytes as well.
It is essential that we run the entire pipeline on GPU to get the best performance. The complete process, starting from the loading of the models to the forward passes through both models requires around 9GB of GPU memory. The examples shown here were run on a machine with 10GB RTX 3080 GPU.
Helper Functions for SAM2 Segmentation Maps
SAM2 offers a variety of methods to segment an object in an image. We can prompt SAM2 to segment the entire image, or a particular object using keypoints and bounding boxes. Although we will specifically use keypoints to prompt SAM2 here, the following helper functions (credits to the official repository) cover all the bases in case we expand the functionalities in the future.
# Helper functions for SAM2 segmentation map visualization.
def show_mask(mask, ax, random_color=False, borders = True):
    if random_color:
        color = np.concatenate([np.random.random(3), np.array([0.6])], axis=0)
    else:
        color = np.array([255/255, 40/255, 50/255, 0.6])
    h, w = mask.shape[-2:]
    mask = mask.astype(np.uint8)
    mask_image =  mask.reshape(h, w, 1) * color.reshape(1, 1, -1)

    if borders:
        import cv2
        contours, _ = cv2.findContours(
            mask,cv2.RETR_EXTERNAL,
            cv2.CHAIN_APPROX_NONE
        )
        # Try to smooth contours
        contours = [
            cv2.approxPolyDP(
                contour, epsilon=0.01, closed=True
            ) for contour in contours
        ]
        mask_image = cv2.drawContours(
            mask_image,
            contours,
            -1,
            (1, 1, 1, 0.5),
            thickness=2
        )
    ax.imshow(mask_image)

def show_points(coords, labels, ax, marker_size=375):
    pos_points = coords[labels==1]
    neg_points = coords[labels==0]
    ax.scatter(
        pos_points[:, 0],
        pos_points[:, 1],
        color='green',
        marker='.',
        s=marker_size,
        edgecolor='white',
        linewidth=1.25
    )
    ax.scatter(
        neg_points[:, 0],
        neg_points[:, 1],
        color='red',
        marker='.',
        s=marker_size,
        edgecolor='white',
        linewidth=1.25
    )

def show_box(box, ax):
    x0, y0 = box[0], box[1]
    w, h = box[2] - box[0], box[3] - box[1]
    ax.add_patch(plt.Rectangle(
        (x0, y0),
        w,
        h,
        edgecolor='green',
        facecolor=(0, 0, 0, 0),
        lw=2)
    )

def show_masks(
    image,
    masks,
    scores,
    point_coords=None,
    box_coords=None,
    input_labels=None,
    borders=True
):
    plt.figure(figsize=(10, 10))
    plt.imshow(image)
    for i, (mask, score) in enumerate(zip(masks, scores)):
        if i == 0:  # Only show the highest scoring mask.
            show_mask(mask, plt.gca(), random_color=False, borders=borders)
    if point_coords is not None:
        assert input_labels is not None
        show_points(point_coords, input_labels, plt.gca())
    if box_coords is not None:
        show_box(box_coords, plt.gca())
    plt.axis('off')
    return plt
The show_mask function plots the segmentation given a mask and a matplotlib image plot. According to the parameters, we may draw borders around the mask or segment each image with a random color.
The show_points function plots the keypoints (2D coordinates) that we provide to SAM2 for segmenting the objects. We get these 2D coordinates from Molmo.
In case we prompt SAM2 with bounding boxes, the show_box function draws them on the image. It will not be used in our pipeline.
The show_masks function accepts the input image, all the masks we get from SAM2, the scores, coordinates, and other necessary parameters. This function in turn calls the show_mask function to draw the segmentation maps on each object.
Loading the SAM2 and Molmo Models
The following code block loads the SAM2.1 Hiera Large and the MolmoE-1B-7B models.
quant_config = BitsAndBytesConfig(load_in_4bit=True)

# Load SAM2 model.
predictor = SAM2ImagePredictor.from_pretrained('facebook/sam2.1-hiera-large')

# Load Molmo model.
processor = AutoProcessor.from_pretrained(
    'allenai/MolmoE-1B-0924',
    trust_remote_code=True,
    device_map='auto',
    torch_dtype='auto'
)
model = AutoModelForCausalLM.from_pretrained(
    'allenai/MolmoE-1B-0924',
    trust_remote_code=True,
    offload_folder='offload',
    quantization_config=quant_config,
    torch_dtype='auto'
)
We are loading SAM2.1 from Hugging Face using the from_pretrained method by providing the appropriate model tag. We are loading the Molmo model in a 4-bit quantized format to reduce the GPU memory consumption.
Helper Functions for Molmo 2D Coordinates and Inference
As Molmo provides the outputs for keypoints in a specialized string format, we need a function to process that.
We have covered the keypoint output format and how we process them in the previous article. I highly recommend going through it in case you need a deeper understanding.
The following function processes the keypoint outputs from Molmo and returns them in a more generalized format.
def get_coords(output_string, image):
    """
    Function to get x, y coordinates given Molmo model outputs.

    :param output_string: Output from the Molmo model.
    :param image: Image in PIL format.

    Returns:
        coordinates: Coordinates in format of [(x, y), (x, y)]
    """
    image = np.array(image)
    h, w = image.shape[:2]

    if 'points' in output_string:
        matches = re.findall(r'(x\d+)="([\d.]+)" (y\d+)="([\d.]+)"', output_string)
        coordinates = [(int(float(x_val)/100*w), int(float(y_val)/100*h)) for _, x_val, _, y_val in matches]
    else:
        match = re.search(r'x="([\d.]+)" y="([\d.]+)"', output_string)
        if match:
            coordinates = [(int(float(match.group(1))/100*w), int(float(match.group(2))/100*h))]

    return coordinates
The next function carries out the forward pass through the Molmo model by accepting an image and a prompt parameter.
def get_output(image, prompt='Describe this image.'):
    """
    Function to get output from Molmo model given an image and a prompt.

    :param image: PIL image.
    :param prompt: User prompt.

    Returns:
        generated_text: Output generated by the model.
    """
    inputs = processor.process(images=[image], text=prompt)
    inputs = {k: v.to(model.device).unsqueeze(0) for k, v in inputs.items()}

    output = model.generate_from_batch(
        inputs,
        GenerationConfig(max_new_tokens=200, stop_strings='<|endoftext|>'),
        tokenizer=processor.tokenizer
    )

    generated_tokens = output[0, inputs['input_ids'].size(1):]
    generated_text = processor.tokenizer.decode(generated_tokens, skip_special_tokens=True)

    return generated_text
The final helper function combines everything, which includes:
- Forward pass through the Molmo model.
- Processing the keypoint coordinates.
- Getting the object masks from SAM2.
- Plotting the segmentation masks on the objects.
def process_image(image, prompt):
    """
    Function combining all the components and returning the final
    segmentation map.

    :param image: PIL image.
    :param prompt: User prompt.

    Returns:
        fig: Final segmentation map.
        prompt: Prompt from the Molmo model.
    """
    # Get coordinates from the model output.
    output = get_output(image, prompt)
    coords = get_coords(output, image)

    # Prepare input for SAM
    input_points = np.array(coords)
    input_labels = np.ones(len(input_points), dtype=np.int32)

    # Convert image to numpy array if it's not already.
    if isinstance(image, Image.Image):
        image = np.array(image)

    # Predict mask.
    predictor.set_image(image)
    with torch.no_grad():
        masks, scores, logits = predictor.predict(
            point_coords=input_points,
            point_labels=input_labels,
            multimask_output=True,
        )

    # Sort masks by score.
    sorted_ind = np.argsort(scores)[::-1]
    masks = masks[sorted_ind]
    scores = scores[sorted_ind]

    # Visualize results.
    fig = show_masks(
        image,
        masks,
        scores,
        point_coords=input_points,
        input_labels=input_labels,
        borders=True
    )

    return fig, output
This is all the code that we need on the deep learning part and dealing with the models.
Building the Gradio Interface
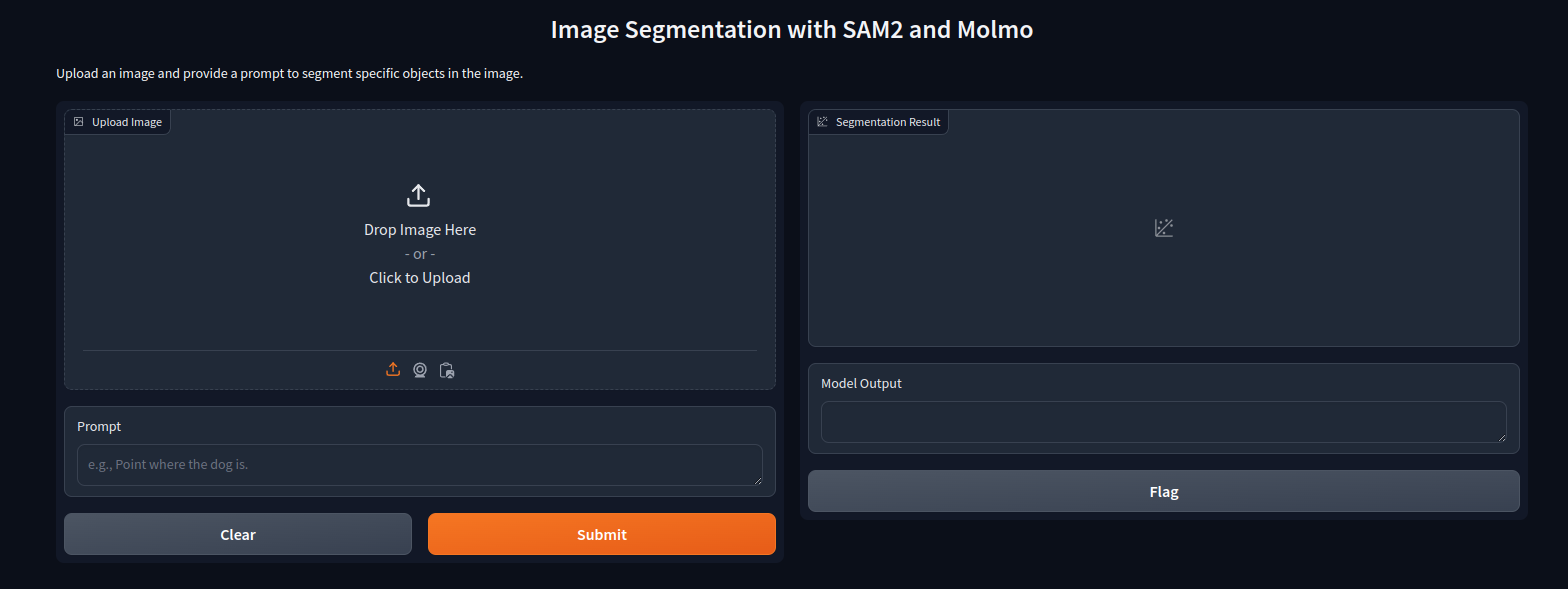
We have a simple Gradio interface. One input image box, one text prompt box, one output image box, and an output text box to show the Molmo outputs.
# Gradio interface.
iface = gr.Interface(
    fn=process_image,
    inputs=[
        gr.Image(type='pil', label='Upload Image'),
        gr.Textbox(label='Prompt', placeholder='e.g., Point where the dog is.')
    ],
    outputs=[
        gr.Plot(label='Segmentation Result', format='png'),
        gr.Textbox(label='Model Output')
    ],
    title='Image Segmentation with SAM and Molmo',
    description='Upload an image and provide a prompt to segment specific objects in the image.',
)

iface.launch(share=True)
This completes all the code that we need for using SAM2 and Molmo for image segmentation using natural language.
Executing the Script and Running Inference
We can execute the script by running the following command on the terminal and opening the local host link.
python sam2_molmo_gradio.py
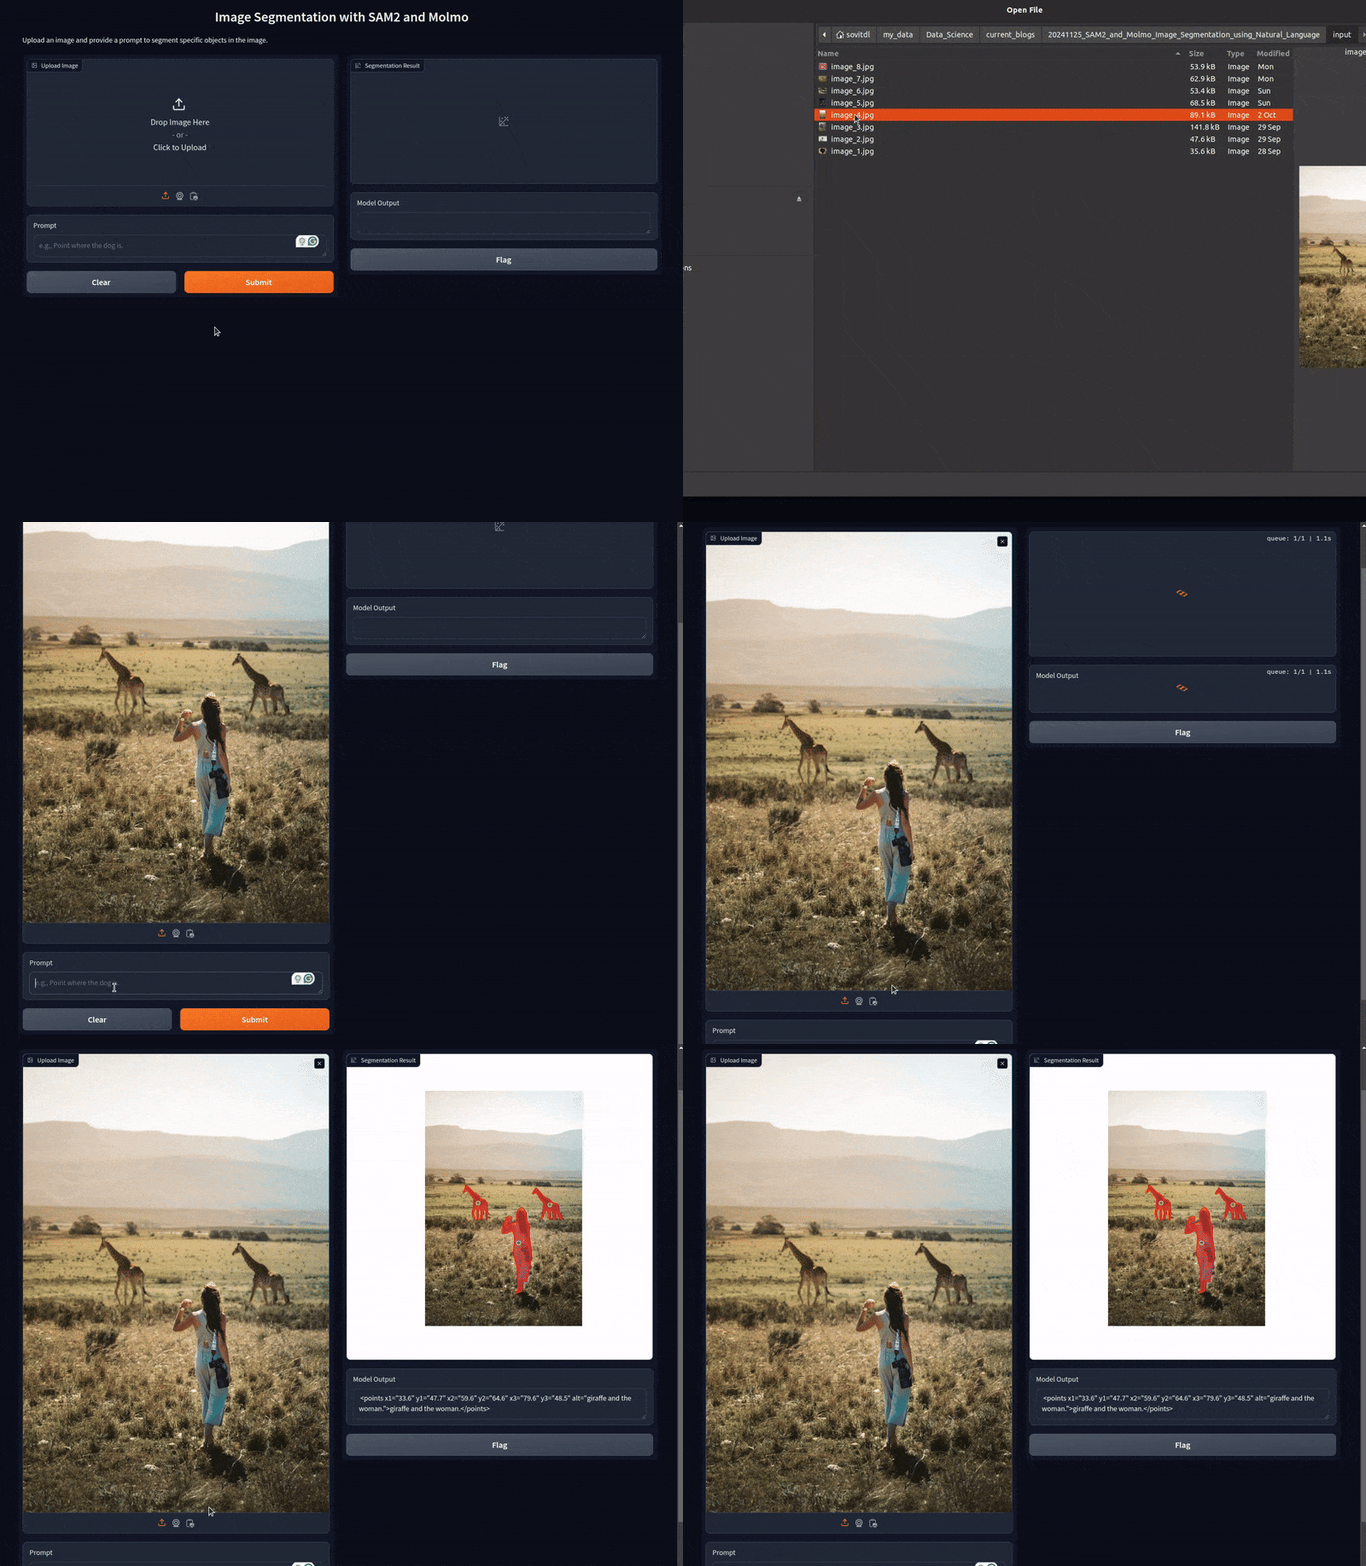
Following is the default interface that we have.
Inference Results for Image Segmentation using Natural Language with SAM2 and Molmo
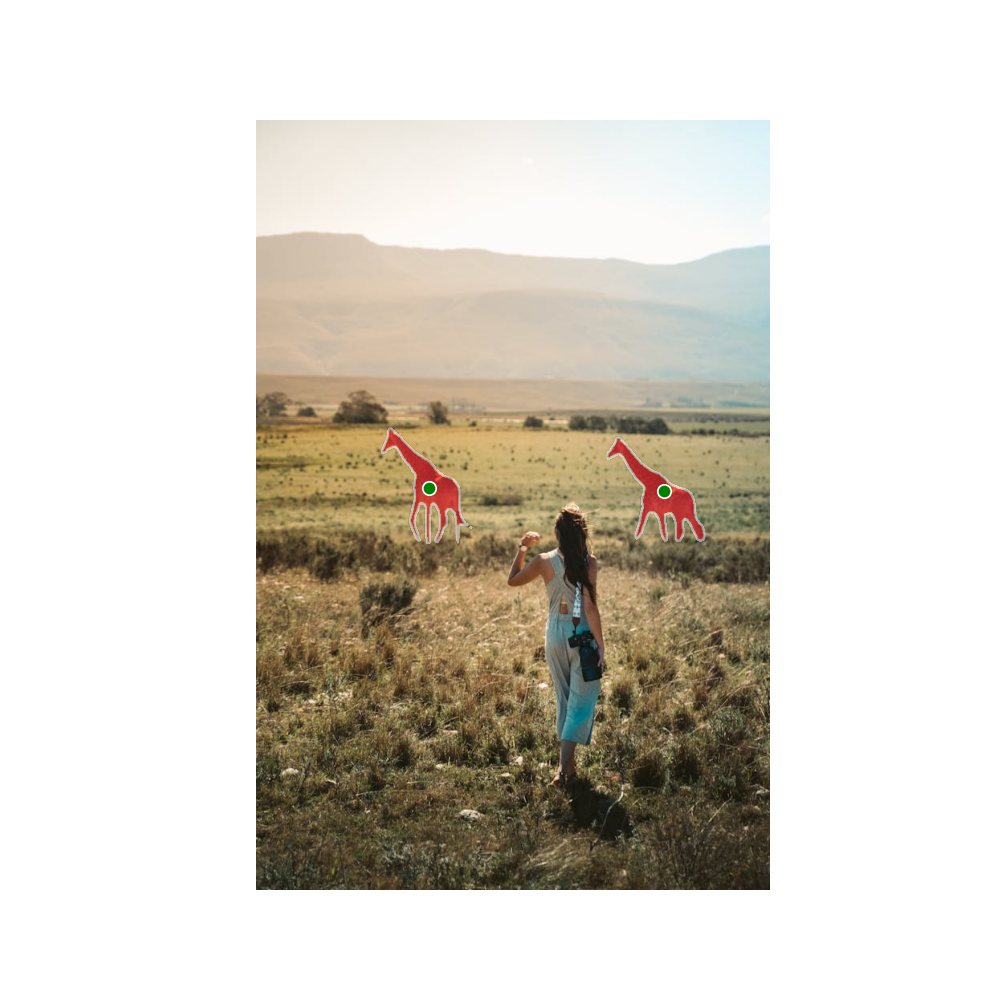
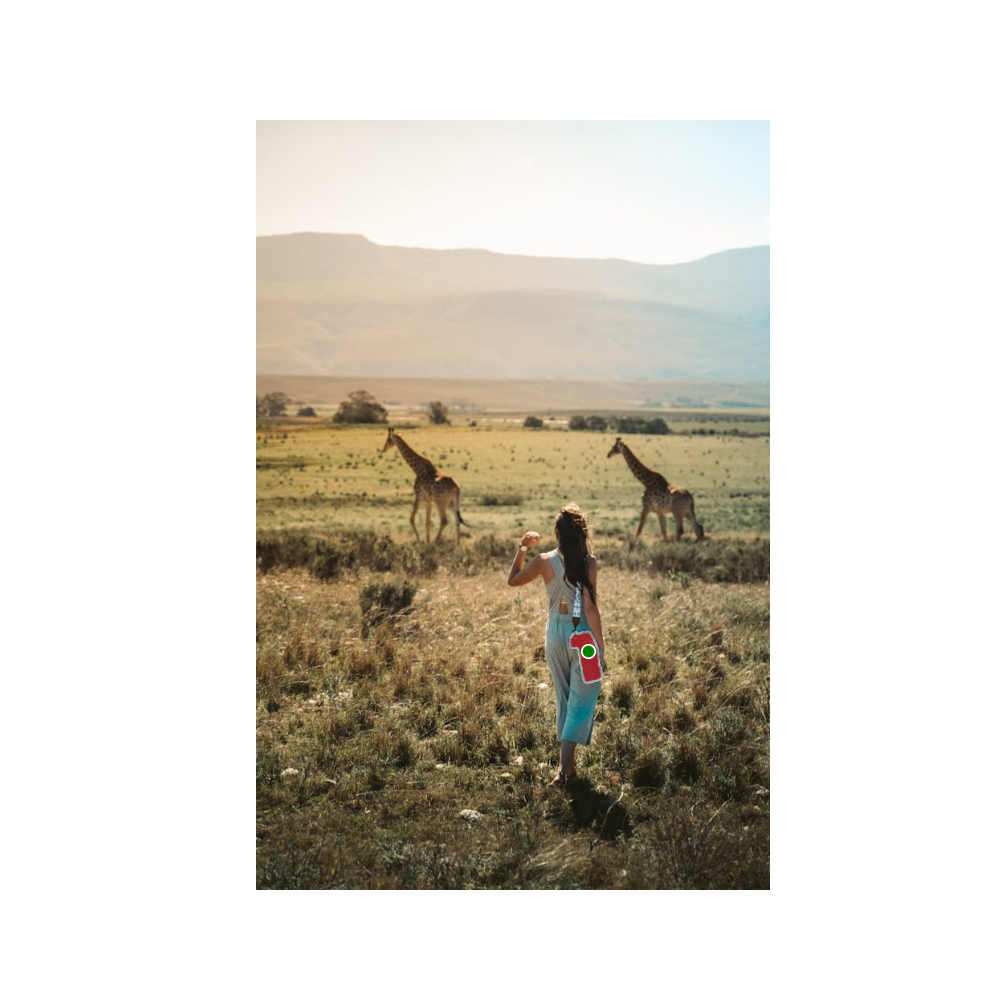
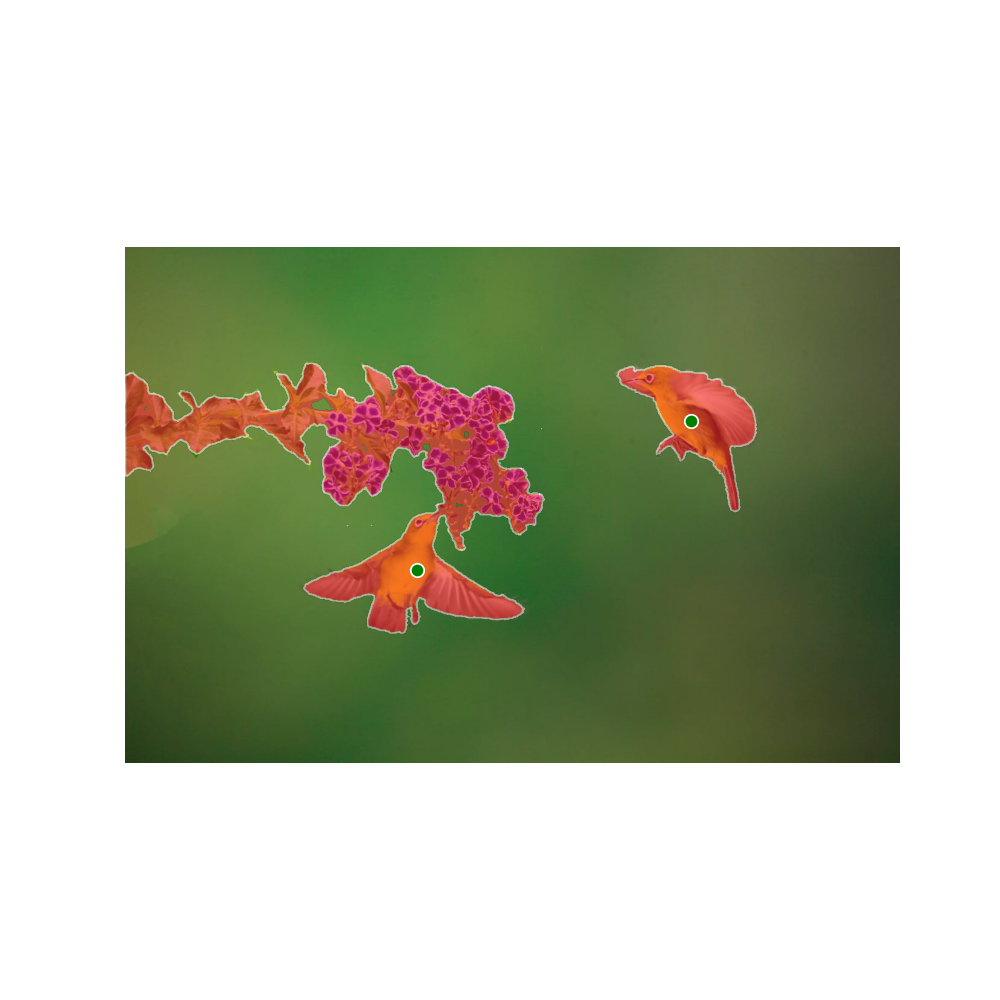
Here, we will go through some inference results from the experiments that were carried out. The figures show the final result and the prompt that was used to get the results. The image captions show the prompt.
Good Inference Results
First, let’s go through some good inference results that we have.
Here, we can see that the Molmo model can point towards both giraffes and the SAM2.1 model segments them perfectly.
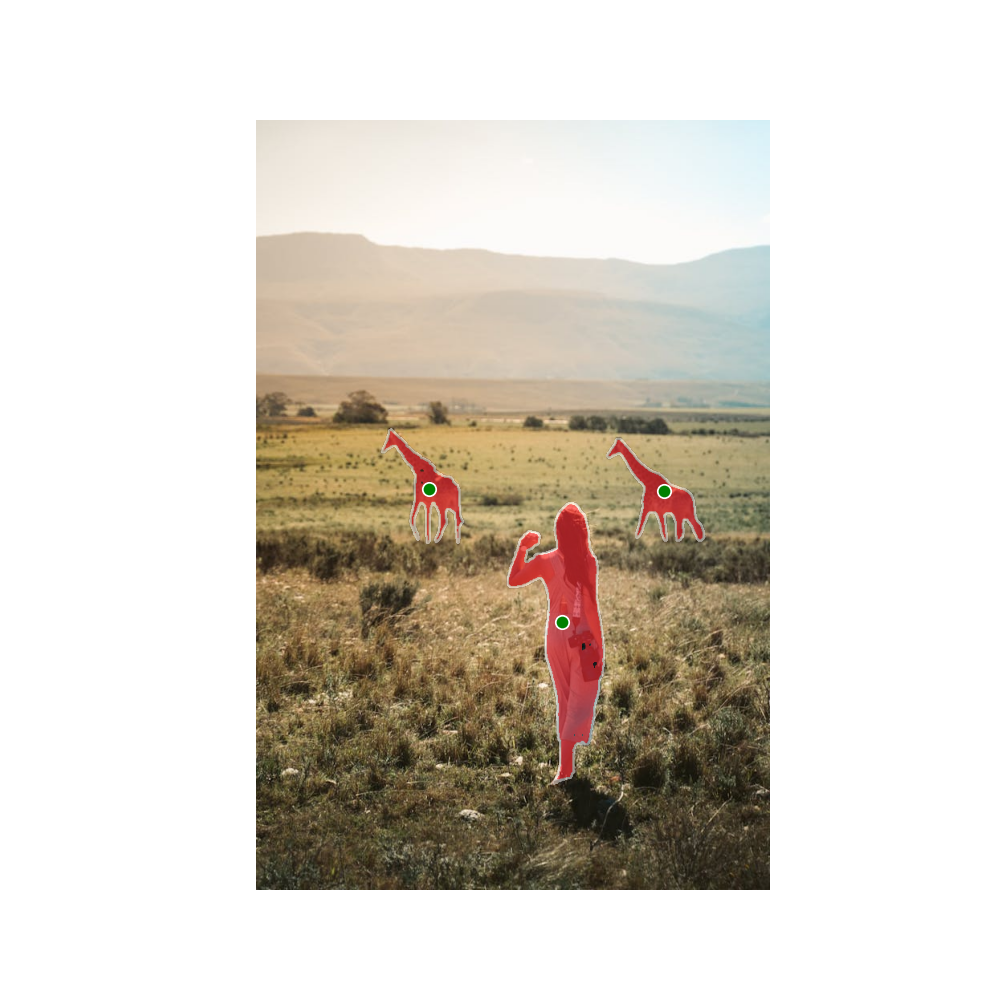
When we prompt Molmo to point towards the woman, it is able to do that as well. In this case, the image segmentation results are perfect.
Let’s try something a bit more difficult.
We ask the Molmo model to point towards the camera. Surprisingly, it is able to do so in spite of the camera being a small object. The SAM2.1’s segmentation results are perfect as well.
Let’s take it a step further and ask Molmo to recognize colors.
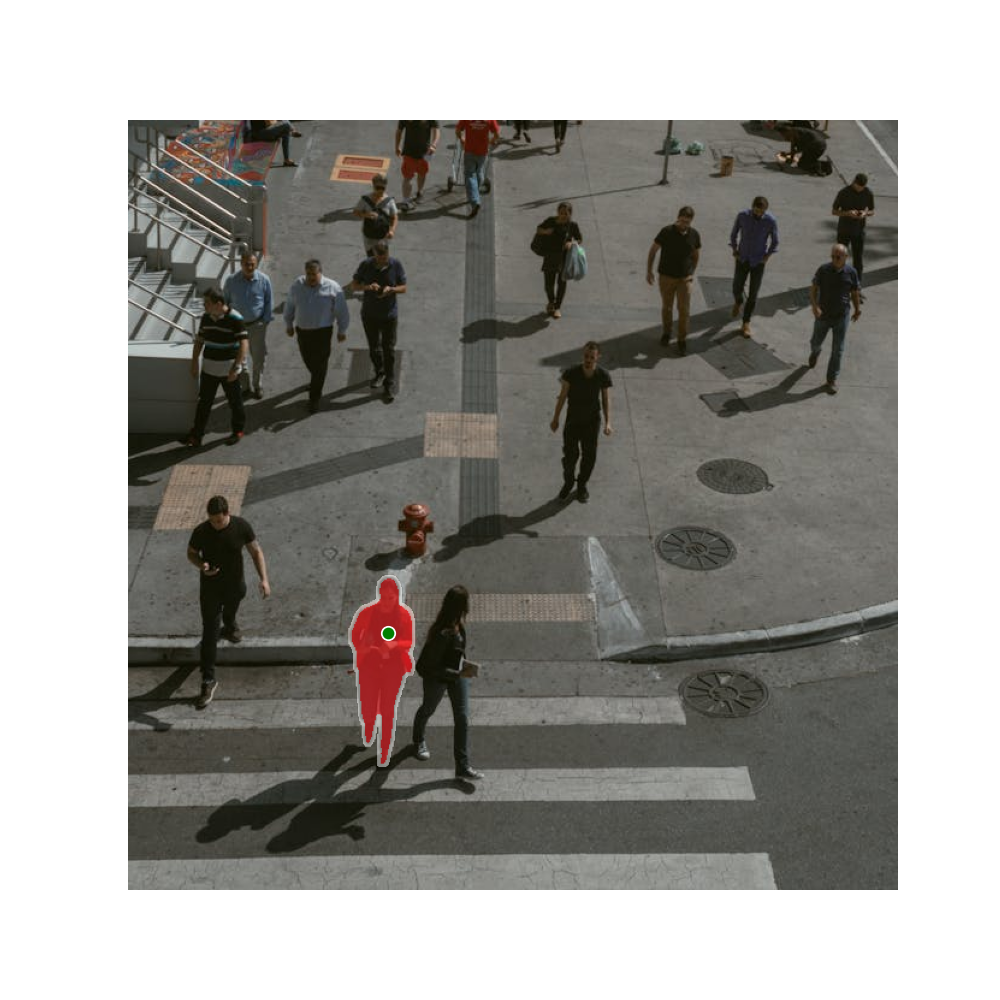
We ask the Molmo model to point towards the woman wearing a red jacket. It does exactly that and the SAM2.1 model segments the person as well.
Failure Cases
Following are some of the cases where either Molmo or SAM2 or both were unable to carry out their tasks properly.
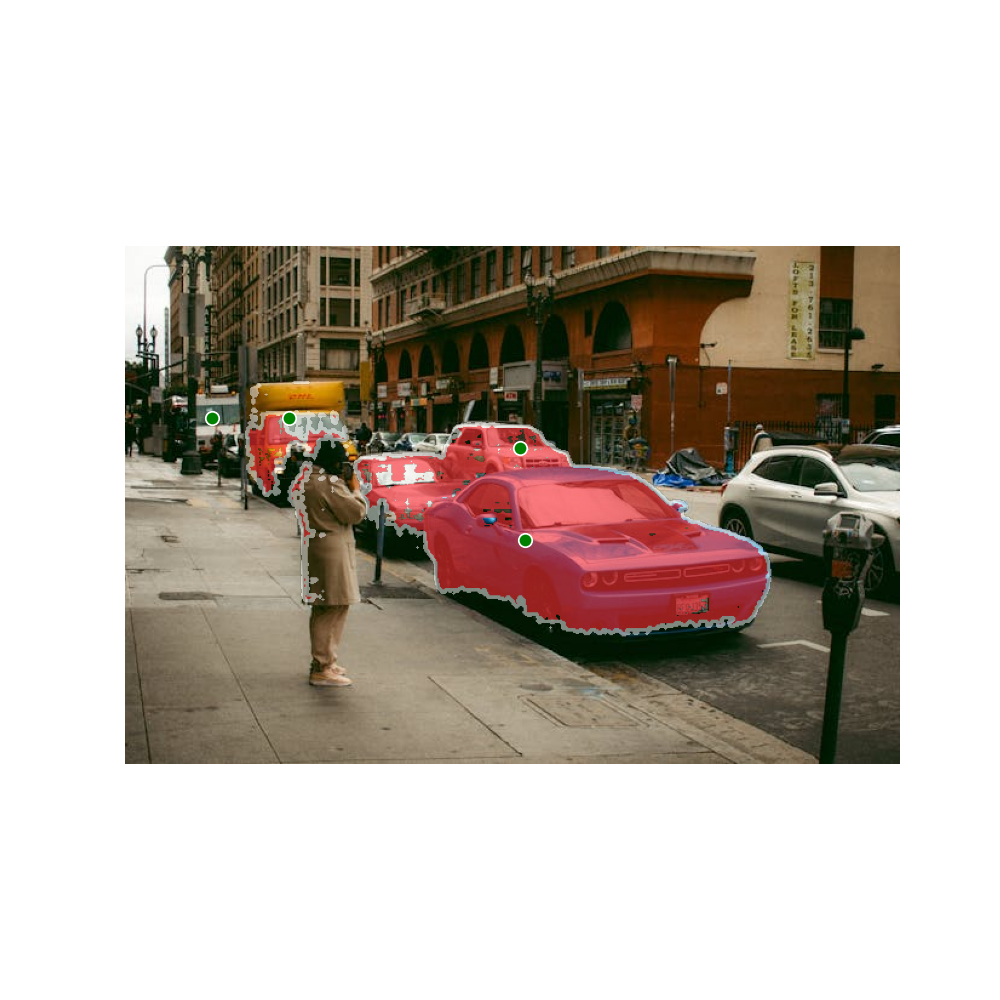
Here, we ask Molmo to point toward the blue car. However, it points to several other cars as well. Furthermore, SAM2.1 fails to properly segment all the cars when they are close to each other.
Here, we prompt Molmo to point towards the two birds which it does perfectly. However, SAM2.1 segments the birds and the flowers as well.
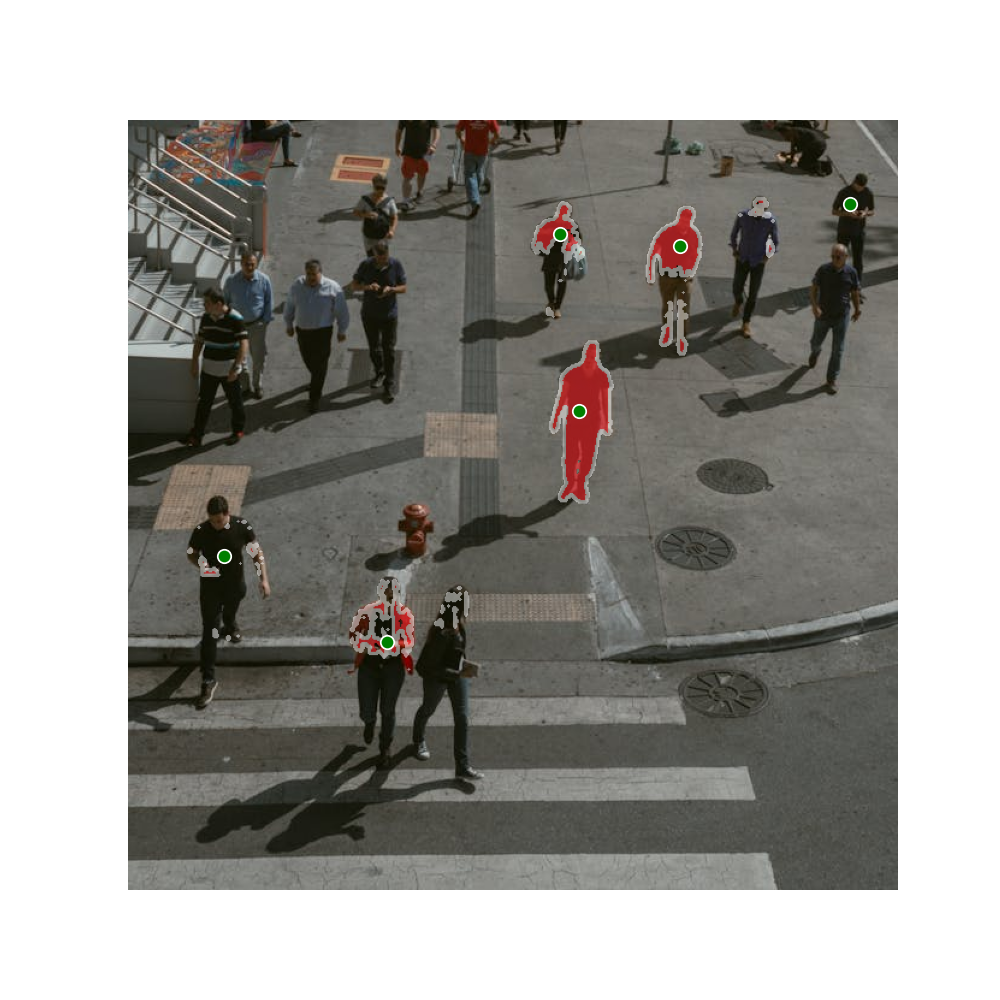
To test how far we can take the color recognition and counting capability of Molmo, we asked it to point toward all the persons in black shirts. It failed and so did SAM2.1 as well.
Key Takeaways
Here are some takeaways that we have from the above experiments.
- Integrating generative models like Molmo and foundation computer vision models like SAM2 can open a number of opportunities for automating tasks. Especially, tasks like automatic annotation in the field of computer vision.
- However, we have limitations at the moment. At times, Molmo fails to point toward objects when they are crowded. SAM2 fails to segment objects when the objects are not properly distinguished from each other. The issue may also lie because we are using a quantized version of Molmo here. Furthermore, fine-tuning SAM2 on such difficult scenes will surely help. These are subject to further experimentation.
- We need not stop here. We can automate the process even further by integrating speech-to-text models like Whisper and open-vocabulary classifiers like CLIP.
Summary and Conclusion
In this article, we used SAM2 and Molmo models for image segmentation using natural language. We experienced firsthand how generative and foundation models can give rise to new possibilities in deep learning, computer vision, and the creative industry. Although not perfect, we will surely reach a stage where we can entirely automate such tasks by combining them with other deep learning models. I hope this article was worth your time.
If you have any doubts, thoughts, or suggestions, please leave them in the comment section. I will surely address them.
You can contact me using the Contact section. You can also find me on LinkedIn, and Twitter.



2 thoughts on “SAM2 and Molmo: Image Segmentation using Natural Language”