

SAM 3, the third iteration in the Segment Anything Model series, has taken the centre stage in computer vision for the last few weeks. It can detect, segment, and track objects in images & videos. We can prompt via both text and bounding boxes. Furthermore, it now segments all the objects present in a scene belonging to a particular text or bounding box prompt, thanks to its new PCS (Promptable Concept Segmentation). In this article, we will start with creating a simple SAM 3 UI, where we will provide an easy-to-use interface for image & video segmentation, along with multi-object segmentation via text prompts.
In one of the previous articles, we covered the introduction to SAM 3, along with image and video inference using Python scripts. Here, we take a notch higher by creating a simple Gradio UI that we can use to play around and test the SAM 3 model.
What are we going to cover while creating SAM 3 UI?
- We will start by setting up the dependencies locally.
- Next, we will have an overview of the entire codebase and how everything is structured.
- We will also discuss why we deviate from the batched image inference provided in the official Jupyter Notebooks and what we do to implement our own multi-object inference in images and videos.
After doing all this, we can run multi-object inference for images and videos in less than 10GB VRAM with SAM 3 UI.
Disclaimer: This is one of the posts where the majority of the code was written by AI Assistants. This was an experiment for me as well to figure out how quickly we can iterate through an idea if we have a simple codebase ready on which the AI can build upon.
Note: We will not be covering any theory in this article. This is going to be a complete walkthrough of the code. However, in one of the previous articles, we covered the introduction to SAM 3, which includes simple image and video inference.
Project Directory Structure
The following is the project directory structure.
├── build_sam3
│   └── sam3
│       ├── assets
│       ├── examples
│       ├── sam3
│       ├── sam3.egg-info
│       ├── scripts
│       ├── CODE_OF_CONDUCT.md
│       ├── CONTRIBUTING.md
│       ├── LICENSE
│       ├── MANIFEST.in
│       ├── pyproject.toml
│       ├── README.md
│       └── README_TRAIN.md
├── input
│   ├── image_1.jpg
│   ├── image_2.jpg
│   ├── video_1_10sec.mp4
│   ...
│   └── video_3.mp4
├── outputs
│   ├── 004_20251225_090805
│   │   └── result.png
│   ...
│   └── video_3_5sec_20251227_153835
│       └── result.mp4
├── app.py
├── app_utils.py
├── NOTES.md
├── requirements.txt
├── requirements_win.txt
├── setup.bat
├── setup.sh
└── utils.py
- The
build_sam3directory contains the clonedsam3repository. We need to install SAM 3 as a module for the application to work as expected. However, all the installation steps are automated. We have a separate requirements file for Ubuntu and Windows, along with shell and batch scripts for each OS, respectively. - The
inputdirectory contains several images and video files that we can use for inference. Theoutputsdirectory contains the inference results in separate timestamped subdirectories. - All the core logic for the application is present in
app.py,app_utils.py, andutils.py.
All the code files, setup files, and input data are available via the downloadable zip file. If you wish to run the code locally, please follow the installation steps in the next section.
Download Code
Installation
The installation for SAM 3 UI is straightforward. Everything is taken care of by the shell and batch scripts.
If you are using Ubuntu:
sh setup.sh
If you are using Windows:
.\setup.bat
You might be occasionally asked to input your password for system-level installations.
Code Explanation for SAM 3 UI
We will discuss several things while exploring the code. These include:
- The logic for single class image and video inference.
- And the logic for multi-object image and video inference.
However, for the latter, we will not be using the official SAM 3 batched inference, which requires upwards of 29GB VRAM. Instead, we will use a simplified logic that lets us run the code in less than 10GB of VRAM.
Core App Module for SAM 3 UI
We will start with the discussion of app.py file, which is the executable application file.
Following is the entire code.
"""
SAM3 Gradio Web Application
Independent implementation with global model loading to avoid threading issues.
"""
import os
import gradio as gr
from sam3.model_builder import build_sam3_image_model, build_sam3_video_predictor
from sam3.model.sam3_image_processor import Sam3Processor
from app_utils import (
process_image,
process_batch_image,
save_image_result,
load_video_frames,
process_video,
process_batch_video,
save_batch_video_result,
save_video_result
)
os.makedirs('outputs', exist_ok=True)
# ======================= GLOBAL MODEL VARIABLES =======================
# Models are loaded once globally to avoid threading issues with Gradio
# Image model globals
IMAGE_MODEL = None
IMAGE_PROCESSOR = None
# Video model globals
VIDEO_PREDICTOR = None
def load_image_model():
"""Load the SAM3 image model and processor globally."""
global IMAGE_MODEL, IMAGE_PROCESSOR
if IMAGE_MODEL is None:
print('Loading SAM3 image model...')
IMAGE_MODEL = build_sam3_image_model()
IMAGE_PROCESSOR = Sam3Processor(IMAGE_MODEL)
print('SAM3 image model loaded successfully.')
return IMAGE_MODEL, IMAGE_PROCESSOR
def load_video_model():
"""Load the SAM3 video predictor globally."""
global VIDEO_PREDICTOR
if VIDEO_PREDICTOR is None:
print('Loading SAM3 video predictor...')
VIDEO_PREDICTOR = build_sam3_video_predictor(async_loading_frames=True)
print('SAM3 video predictor loaded successfully.')
return VIDEO_PREDICTOR
# ======================= INFERENCE FUNCTIONS =======================
def image_inference(image_path, prompt):
"""
Run image segmentation and return the result image path.
Args:
image_path: Path to the input image
prompt: Text prompt for segmentation
Returns:
str: Path to the saved result image
"""
if image_path is None:
return None
if not prompt or prompt.strip() == '':
return None
# Ensure model is loaded
_, processor = load_image_model()
# Process image
_, result, _, _, _ = process_image(processor, image_path, prompt)
# Save and return result
output_path = save_image_result(result, image_path)
return output_path
def batch_image_inference(image_path, prompt):
"""
Run batch image segmentation with multiple prompts and return the result image path.
Args:
image_path: Path to the input image
prompt: Comma-separated text prompts for segmentation
Returns:
str: Path to the saved result image
"""
if image_path is None:
return None
if not prompt or prompt.strip() == '':
return None
# Ensure model is loaded
_, processor = load_image_model()
# Process image with batch prompts
result = process_batch_image(processor, image_path, prompt)
# Save and return result (reusing save_image_result as it handles generic image saving)
output_path = save_image_result(result, image_path)
return output_path
def video_inference(video_path, prompt):
"""
Run video segmentation and return the result video path.
Args:
video_path: Path to the input video
prompt: Text prompt for segmentation
Returns:
str: Path to the saved result video
"""
if video_path is None:
return None
if not prompt or prompt.strip() == '':
return None
# Ensure model is loaded
predictor = load_video_model()
# Process video
session_id, initial_outputs, outputs_per_frame, video_fps = process_video(
predictor, video_path, prompt=prompt, frame_idx=0
)
# Load video frames for visualization
video_frames = load_video_frames(video_path)
# Save and return result
output_path = save_video_result(
video_frames, outputs_per_frame, video_path, fps=video_fps
)
return output_path
def batch_video_inference(video_path, prompt):
"""
Run batch video segmentation with multiple prompts and return the result video path.
Args:
video_path: Path to the input video
prompt: Comma-separated text prompts for segmentation
Returns:
str: Path to the saved result video
"""
if video_path is None:
return None
if not prompt or prompt.strip() == '':
return None
# Ensure model is loaded
predictor = load_video_model()
# Process video with batch prompts
batch_results, video_fps = process_batch_video(predictor, video_path, prompt)
# Load video frames for visualization
video_frames = load_video_frames(video_path)
# Save and return result
output_path = save_batch_video_result(
video_frames, batch_results, video_path, fps=video_fps
)
return output_path
def create_app():
"""Create and return the Gradio app."""
with gr.Blocks() as demo:
with gr.Tabs():
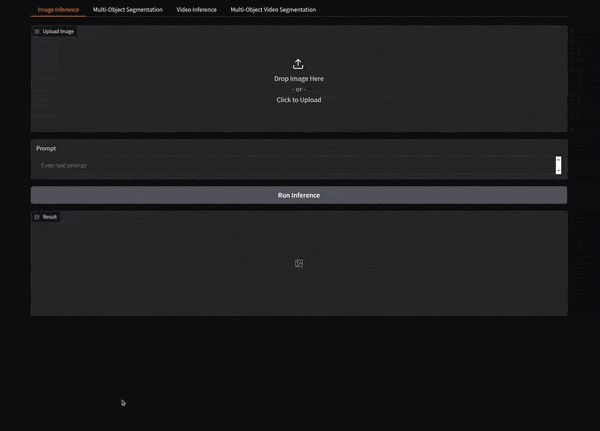
with gr.TabItem('Image Inference'):
img_input = gr.Image(
type='filepath',
label='Upload Image',
sources=['upload'] # Only upload, no webcam/clipboard
)
prompt_input = gr.Textbox(label='Prompt', placeholder='Enter text prompt')
run_btn = gr.Button('Run Inference')
img_output = gr.Image(label='Result')
run_btn.click(
fn=image_inference,
inputs=[img_input, prompt_input],
outputs=img_output
)
with gr.TabItem('Multi-Object Segmentation'):
gr.Markdown(
"""
### Multi-Object Segmentation
This mode runs independent inference loops for each object prompt provided below.
It segments each object separately and combines the results (bounding boxes, class names, and masks) onto the final image.
"""
)
batch_img_input = gr.Image(
type='filepath',
label='Upload Image',
sources=['upload']
)
batch_prompt_input = gr.Textbox(label='Prompts (comma-separated)', placeholder='e.g. cat, dog, car')
batch_run_btn = gr.Button('Run Batch Inference')
batch_img_output = gr.Image(label='Result')
batch_run_btn.click(
fn=batch_image_inference,
inputs=[batch_img_input, batch_prompt_input],
outputs=batch_img_output
)
with gr.TabItem('Video Inference'):
vid_input = gr.Video(
label='Upload Video',
sources=['upload']
)
prompt_input_vid = gr.Textbox(label='Prompt', placeholder='Enter text prompt')
run_btn_vid = gr.Button('Run Inference')
vid_output = gr.Video(label='Result Video')
run_btn_vid.click(
fn=video_inference,
inputs=[vid_input, prompt_input_vid],
outputs=vid_output
)
with gr.TabItem('Multi-Object Video Segmentation'):
gr.Markdown(
"""
### Multi-Object Video Segmentation
This mode runs independent inference loops for each object prompt provided below.
It segments each object separately throughout the video and combines the results (bounding boxes, class names, and masks) onto the final video.
"""
)
batch_vid_input = gr.Video(
label='Upload Video',
sources=['upload']
)
batch_prompt_input_vid = gr.Textbox(label='Prompts (comma-separated)', placeholder='e.g. cat, dog, car')
batch_run_btn_vid = gr.Button('Run Batch Inference')
batch_vid_output = gr.Video(label='Result Video')
batch_run_btn_vid.click(
fn=batch_video_inference,
inputs=[batch_vid_input, batch_prompt_input_vid],
outputs=batch_vid_output
)
return demo
if __name__ == '__main__':
# Create and launch the app
# Models are lazy-loaded on first inference call
demo = create_app()
demo.launch(demo.launch(share=True))
app.pyis the executable entry point that builds a small Gradio UI and launches it. It intentionally stays lightweight, and delegates all heavy processing toapp_utils.pyso the UI wiring and model-loading logic are easy to follow.- The file creates an outputs folder at startup (
os.makedirs('outputs', exist_ok=True)) and exposes four user flows via Gradio Tabs: Image Inference, Multi‑Object (image), Video Inference, and Multi‑Object Video. - Inputs use file paths (
gr.Image type='filepath'andgr.Video). So, helper functions receive local file paths directly. - We lazy-load the models into module-level globals (
IMAGE_MODEL,IMAGE_PROCESSOR,VIDEO_PREDICTOR) viaload_image_model()andload_video_model(). This avoids Gradio threading/reload issues and prevents reinitializing heavy models on every request. - Single-class inference functions:
image_inference()function: validates inputs, ensures the image model is loaded, callsprocess_image(), then saves and returns a result image path viasave_image_result().video_inference()function: validates inputs, ensures the video predictor is loaded, callsprocess_video(...), loads frames for visualization, and saves the final video viasave_video_result().
- Multi-object (batch) inference functions:
batch_image_inference()function: This ensures the image model is loaded, callsprocess_batch_image()which runs independent prompt loops, and saves the combined image.batch_video_inference(): ensures the video predictor is loaded, callsprocess_batch_video()which runs per-prompt inference across frames, loads frames for visualization, and saves the combined video.
Note: The biggest difference between actual batched inference and what we are doing here is how we handle multiple class prompts. The users can provide comma-separated class names. But for each class, we run independent inference loops. This means that we only detect and segment the objects, but do not track them. This works really well as a starting point and saves us from the heavy requirement of 29GB VRAM. After each inference loop, we keep on annotating the segmentation map on the previous results.
Application Utilities
The app_utils.py file contains all the core logic for image and video inference. It is quite a large file, so we will discuss only the absolutely necessary ones here.
tl:dr
app_utils.py contains the helper logic the Gradio UI delegates to: image/video loading, running SAM3 prompts, propagating video masks, overlay/rendering, and saving results to timestamped subfolders under outputs. It keeps model and predictor-specific calls out of app.py so the UI code stays focused on wiring and validation.
For Image Inference
We mainly focus on the process_image, proces_batch_image, and save_image_result functions here.
def process_image(processor, image_path, prompt):
    """
    Process an image with SAM3 using a text prompt.

    Args:
        processor: Sam3Processor instance
        image_path: Path to the input image
        prompt: Text prompt for segmentation

    Returns:
        tuple: (original_image, result_image, masks, boxes, scores)
    """
    # Load the image
    image = Image.open(image_path)

    # Set image and get inference state
    inference_state = processor.set_image(image)

    # Prompt the model with text
    output = processor.set_text_prompt(state=inference_state, prompt=prompt)

    # Get the masks, bounding boxes, and scores
    masks = output['masks']
    boxes = output['boxes']
    scores = output['scores']

    # Create overlay visualization
    result = overlay_masks(image, masks)

    return image, result, masks, boxes, scores


def process_batch_image(processor, image_path, prompts_text):
    """
    Process an image with SAM3 using multiple comma-separated prompts.

    Args:
        processor: Sam3Processor instance
        image_path: Path to the input image
        prompts_text: Comma-separated text prompts

    Returns:
        PIL.Image: Result image with overlays
    """
    # Load the image
    image = Image.open(image_path)

    # Set image and get inference state
    inference_state = processor.set_image(image)

    # Parse prompts
    prompts = [p.strip() for p in prompts_text.split(',') if p.strip()]

    # Initialize result image
    result_image = image.copy()

    for prompt in prompts:
        # Prompt the model with text
        output = processor.set_text_prompt(state=inference_state, prompt=prompt)

        # Get the masks and boxes
        masks = output['masks']
        boxes = output['boxes']

        # Overlay masks
        # Note: overlay_masks converts input to RGBA and returns RGBA
        result_image = overlay_masks(result_image, masks)

        # Draw bounding boxes and text
        draw = ImageDraw.Draw(result_image)

        # Draw boxes
        if boxes is not None:
            # Check if boxes is a tensor or numpy array, usually tensor from model
            boxes_np = boxes.cpu().numpy() if hasattr(boxes, 'cpu') else boxes

            for box in boxes_np:
                # box is [x1, y1, x2, y2]
                draw.rectangle(box.tolist(), outline='red', width=3)

                # Draw text background
                text_pos = (box[0], max(0, box[1] - 20))
                # rough estimation of text size, or just draw
                draw.text(text_pos, prompt, fill='white')

    return result_image.convert('RGB')


def save_image_result(result_image, input_image_path, output_base_dir='outputs'):
    """
    Save the result image to outputs/image_name_datetime/result.png

    Args:
        result_image: PIL Image to save
        input_image_path: Path to the input image (used to determine output directory name)
        output_base_dir: Base directory for outputs (default: 'outputs')

    Returns:
        str: Path where the result was saved
    """
    # Get the image name without extension
    image_name = Path(input_image_path).stem

    # Get current timestamp
    timestamp = datetime.now().strftime('%Y%m%d_%H%M%S')

    # Create output directory: outputs/image_name_datetime/
    output_dir = Path(output_base_dir) / f"{image_name}_{timestamp}"
    output_dir.mkdir(parents=True, exist_ok=True)

    # Save result
    output_path = output_dir / 'result.png'
    result_image.save(output_path)

    print(f"Result saved to: {output_path}")
    return str(output_path)
process_image(): loads a PIL image, callsprocessor.set_image and processor.set_text_prompt. Then it extracts masks/boxes/scores, composes a visual overlay (viaoverlay_masks), and finally returns the original image plus the overlay and raw outputs.process_batch_image(): runs the single‑prompt loop for each comma‑separated prompt, overlays masks incrementally, draws bounding boxes and labels, and returns a final RGB image.save_image_result(): writes the final image intooutputs/<image_name>_<timestamp>/result.pngand returns the path.
For Video Inference
All the video inference logic and utilities are present in the following five functions.
def load_video_frames(video_path):
    """
    Load video frames for visualization.

    Args:
        video_path: Path to video file (.mp4) or directory containing JPEG frames

    Returns:
        list: List of video frames (numpy arrays in RGB format) or list of frame paths
    """
    # Load "video_frames_for_vis" for visualization purposes (they are not used by the model).
    if isinstance(video_path, str) and video_path.endswith('.mp4'):
        cap = cv2.VideoCapture(video_path)
        video_frames_for_vis = []
        while True:
            ret, frame = cap.read()
            if not ret:
                break
            video_frames_for_vis.append(cv2.cvtColor(frame, cv2.COLOR_BGR2RGB))
        cap.release()
    else:
        video_frames_for_vis = glob.glob(os.path.join(video_path, '*.jpg'))
        try:
            # integer sort instead of string sort (so that e.g. "2.jpg" is before "11.jpg").
            video_frames_for_vis.sort(
                key=lambda p: int(os.path.splitext(os.path.basename(p))[0])
            )
        except ValueError:
            # fallback to lexicographic sort if the format is not "<frame_index>.jpg".
            print(
                f'frame names are not in "<frame_index>.jpg" format: {video_frames_for_vis[:5]=}, '
                f"falling back to lexicographic sort."
            )
            video_frames_for_vis.sort()

    return video_frames_for_vis


def process_video(video_predictor, video_path, prompt, frame_idx=0):
    """
    Process a video with SAM3 using a text prompt.

    Args:
        video_predictor: SAM3 video predictor instance
        video_path: Path to the video file or frame directory
        prompt: Text prompt for segmentation
        frame_idx: Frame index to add the prompt (default: 0)

    Returns:
        tuple: (session_id, initial_outputs, outputs_per_frame, video_fps)
    """
    # Read video for retrieving framerate.
    video = cv2.VideoCapture(video_path)
    video_fps = video.get(cv2.CAP_PROP_FPS)
    video.release()

    # Start a session.
    response = video_predictor.handle_request(
        request=dict(
            type='start_session',
            resource_path=video_path
        )
    )
    session_id = response['session_id']

    # Add text prompt on specified frame.
    response = video_predictor.handle_request(
        request=dict(
            type='add_prompt',
            session_id=session_id,
            frame_index=frame_idx,
            text=prompt
        )
    )
    initial_outputs = response['outputs']

    # Propagate the outputs from frame 0 to the end of the video.
    print(f"Propagating masks through video... {video_fps=}")
    outputs_per_frame = propagate_in_video(video_predictor, session_id)

    return session_id, initial_outputs, outputs_per_frame, video_fps


def save_video_result(video_frames, outputs_per_frame, input_video_path,
                      output_base_dir='outputs', alpha=0.5, fps=10):
    """
    Save the result video to outputs/video_name_datetime/result.mp4

    Args:
        video_frames: List of video frames
        outputs_per_frame: Per-frame segmentation outputs
        input_video_path: Path to the input video (used to determine output directory name)
        output_base_dir: Base directory for outputs (default: 'outputs')
        alpha: Transparency of mask overlay (default: 0.5)
        fps: Frames per second for output video (default: 10)

    Returns:
        str: Path where the result was saved
    """
    # Get the video name without extension.
    video_name = Path(input_video_path).stem

    # Get current timestamp.
    timestamp = datetime.now().strftime('%Y%m%d_%H%M%S')

    # Create output directory: outputs/video_name_datetime/
    output_dir = Path(output_base_dir) / f"{video_name}_{timestamp}"
    output_dir.mkdir(parents=True, exist_ok=True)

    # Save result video.
    output_path = output_dir / 'result.mp4'

    save_masklet_video(
        video_frames,
        outputs_per_frame,
        out_path=str(output_path),
        alpha=alpha,
        fps=fps,
    )


    print(f"Result saved to: {output_path}")
    return str(output_path)


def process_batch_video(video_predictor, video_path, prompts_text):
    """
    Process a video with SAM3 using multiple comma-separated prompts.

    Args:
        video_predictor: SAM3 video predictor instance
        video_path: Path to the video file or frame directory
        prompts_text: Comma-separated text prompts

    Returns:
        tuple: (list of results, video_fps)
        results structure: [{'prompt': str, 'outputs': dict}, ...]
    """
    # Read video for retrieving framerate.
    if isinstance(video_path, str) and video_path.endswith('.mp4'):
        video = cv2.VideoCapture(video_path)
        video_fps = video.get(cv2.CAP_PROP_FPS)
        video.release()
    else:
        # Default for internal frames or if detection fails
        video_fps = 10.0

    prompts = [p.strip() for p in prompts_text.split(',') if p.strip()]
    batch_results = []

    for prompt in prompts:
        print(f"Processing video for prompt: {prompt}")

        # Start a session.
        response = video_predictor.handle_request(
            request=dict(
                type='start_session',
                resource_path=video_path
            )
        )
        session_id = response['session_id']

        # Add text prompt on frame 0.
        response = video_predictor.handle_request(
            request=dict(
                type='add_prompt',
                session_id=session_id,
                frame_index=0,
                text=prompt
            )
        )

        # Propagate the outputs from frame 0 to the end of the video.
        print(f"Propagating masks for '{prompt}'...")
        outputs_per_frame = propagate_in_video(video_predictor, session_id)

        batch_results.append({
            'prompt': prompt,
            'outputs': outputs_per_frame
        })

    return batch_results, video_fps


def save_batch_video_result(video_frames, batch_results, input_video_path,
                          output_base_dir='outputs', fps=10):
    """
    Save the batch result video to outputs/video_name_timestamp/result.mp4
    """
    # Get the video name without extension.
    video_name = Path(input_video_path).stem

    # Get current timestamp.
    timestamp = datetime.now().strftime('%Y%m%d_%H%M%S')

    # Create output directory: outputs/video_name_timestamp/
    output_dir = Path(output_base_dir) / f"{video_name}_{timestamp}"
    output_dir.mkdir(parents=True, exist_ok=True)

    output_path = output_dir / 'result_batch.mp4'

    # Check frame size from first frame
    if not video_frames:
        return None

    first_frame = video_frames[0]
    if isinstance(first_frame, str):
        img_ex = cv2.imread(first_frame)
        height, width = img_ex.shape[:2]
    else:
        height, width = first_frame.shape[:2]

    print(f"Saving batch video to {output_path} with {len(video_frames)} frames at {fps} fps.")

    # Initialize VideoWriter
    # Use 'mp4v' for best compatibility
    fourcc = cv2.VideoWriter_fourcc(*'mp4v')
    out = cv2.VideoWriter(str(output_path), fourcc, fps, (width, height))

    for i, frame in enumerate(video_frames):

        # Helper to get RGB frame
        if isinstance(frame, str):
            # Read as BGR then convert to RGB
            frame_rgb = cv2.cvtColor(cv2.imread(frame), cv2.COLOR_BGR2RGB)
        else:
            # Usually frames loaded by load_video_frames are already RGB (see line 161)
            frame_rgb = frame

        # We start with the base frame
        current_overlay = frame_rgb.copy()

        # Composite results sequentially
        for res in batch_results:
            outputs = res['outputs'] # dict of frame_idx -> outputs
            prompt = res['prompt']

            if i in outputs:
                out_data = outputs[i]
                # out_data has keys: 'out_boxes_xywh', 'out_probs', 'out_obj_ids', 'out_binary_masks'

                # Use custom render function to show prompt instead of ID
                current_overlay = custom_render_masklet_frame(current_overlay, out_data, frame_idx=None, custom_label=prompt)


        # Convert final RGB overlay to BGR for VideoWriter
        frame_bgr = cv2.cvtColor(current_overlay, cv2.COLOR_RGB2BGR)
        out.write(frame_bgr)

    out.release()

    print(f"Batch video saved: {output_path}")
    return str(output_path)
load_video_frames():reads either an.mp4into an RGB frame list or a directory of numbered frames for visualization.process_video(): opens a predictor session (start_session), adds a text prompt on a frame (add_prompt), then propagates masks across frames viapropagate_in_videoand returns session id / initial outputs / per-frame outputs / fps.process_batch_video(): repeats thestart_session=>add_prompt=> propagate flow for each prompt and, collects per‑prompt per‑frame outputs.save_video_result(): writes an mp4 usingsam3.save_masklet_video(handles overlay + encoding) and returns the path.save_batch_video_result(): composes per-prompt overlays per frame (using render/custom render helper), writes an mp4 with OpenCV, and returns the path.
The above are all the core logic and workflows for SAM 3 UI.
Other Utility Functions
Finally, we have a few additional utility functions in utils.py.
import numpy as np
import matplotlib
import cv2

from PIL import Image
from sam3.visualization_utils import COLORS

def overlay_masks(image, masks):
    image = image.convert('RGBA')
    masks = 255 * masks.cpu().numpy().astype(np.uint8)

    n_masks = masks.shape[0]
    cmap = matplotlib.colormaps.get_cmap('rainbow').resampled(n_masks)
    colors = [
        tuple(int(c * 255) for c in cmap(i)[:3])
        for i in range(n_masks)
    ]

    for mask, color in zip(masks, colors):
        mask = mask.squeeze()
        mask = Image.fromarray(mask)
        overlay = Image.new('RGBA', image.size, color + (0,))
        alpha = mask.point(lambda v: int(v * 0.5))
        overlay.putalpha(alpha)
        image = Image.alpha_composite(image, overlay)
    return image


def propagate_in_video(predictor, session_id):
    # we will just propagate from frame 0 to the end of the video
    outputs_per_frame = {}
    for response in predictor.handle_stream_request(
        request=dict(
            type='propagate_in_video',
            session_id=session_id,
        )
    ):
        outputs_per_frame[response['frame_index']] = response['outputs']

    return outputs_per_frame


def custom_render_masklet_frame(img, outputs, frame_idx=None, alpha=0.5, custom_label=None):
    """
    Overlays masklets and bounding boxes on a single image frame.
    Modified to allow custom label instead of ID.

    Args:
        img: np.ndarray, shape (H, W, 3), uint8 or float32 in [0,255] or [0,1]
        outputs: dict with keys: out_boxes_xywh, out_probs, out_obj_ids, out_binary_masks
        frame_idx: int or None, for overlaying frame index text
        alpha: float, mask overlay alpha
        custom_label: str or None, text to display instead of ID.
    Returns:
        overlay: np.ndarray, shape (H, W, 3), uint8
    """
    if img.dtype == np.float32 or img.max() <= 1.0:
        img = (img * 255).astype(np.uint8)
    img = img[..., :3]  # drop alpha if present
    height, width = img.shape[:2]
    overlay = img.copy()

    for i in range(len(outputs['out_probs'])):
        obj_id = outputs['out_obj_ids'][i]
        color = COLORS[obj_id % len(COLORS)]
        color255 = (color * 255).astype(np.uint8)
        mask = outputs['out_binary_masks'][i]
        if mask.shape != img.shape[:2]:
            mask = cv2.resize(
                mask.astype(np.float32),
                (img.shape[1], img.shape[0]),
                interpolation=cv2.INTER_NEAREST,
            )
        mask_bool = mask > 0.5
        for c in range(3):
            overlay[..., c][mask_bool] = (
                alpha * color255[c] + (1 - alpha) * overlay[..., c][mask_bool]
            ).astype(np.uint8)

    # Draw bounding boxes and text
    for i in range(len(outputs['out_probs'])):
        box_xywh = outputs['out_boxes_xywh'][i]
        obj_id = outputs['out_obj_ids'][i]
        prob = outputs['out_probs'][i]
        color = COLORS[obj_id % len(COLORS)]
        color255 = tuple(int(x * 255) for x in color)
        x, y, w, h = box_xywh
        x1 = int(x * width)
        y1 = int(y * height)
        x2 = int((x + w) * width)
        y2 = int((y + h) * height)
        cv2.rectangle(overlay, (x1, y1), (x2, y2), color255, 2)

        if custom_label:
            label = custom_label
        elif prob is not None:
            label = f"id={obj_id}, p={prob:.2f}"
        else:
            label = f"id={obj_id}"

        cv2.putText(
            overlay,
            label,
            (x1, max(y1 - 10, 0)),
            cv2.FONT_HERSHEY_SIMPLEX,
            0.5,
            color255,
            1,
            cv2.LINE_AA,
        )

    # Overlay frame index at the top-left corner
    if frame_idx is not None:
        cv2.putText(
            overlay,
            f"Frame {frame_idx}",
            (10, 30),
            cv2.FONT_HERSHEY_SIMPLEX,
            1.0,
            (255, 255, 255),
            2,
            cv2.LINE_AA,
        )

    return overlay
- We use the
overlay_masksfunction in theapp_utils.pymodule when overlaying the segmentation mask on top of the source image. - The
propagate_in_videofunction is used to propagate the masks and object IDs in the rest of the frames after the inference on the initial frame of a video. - The
custom_render_masklet_framefunction is specifically for the multi-object video segmentation, where we do not annotate the ID on the resulting video. We just show the segmentation mask and the bounding box.
This is all the code we have for SAM 3 UI and carrying out inference on images, videos, and multiple objects in one shot.
Inference on Images and Videos using SAM 3 UI
All the inference experiments were run on an RTX 3080 10GB GPU.
We can easily launch the application using the following command.
python app.py
Let’s start with a simple image inference.
The following result is after uploading the image and giving the prompt as dog.
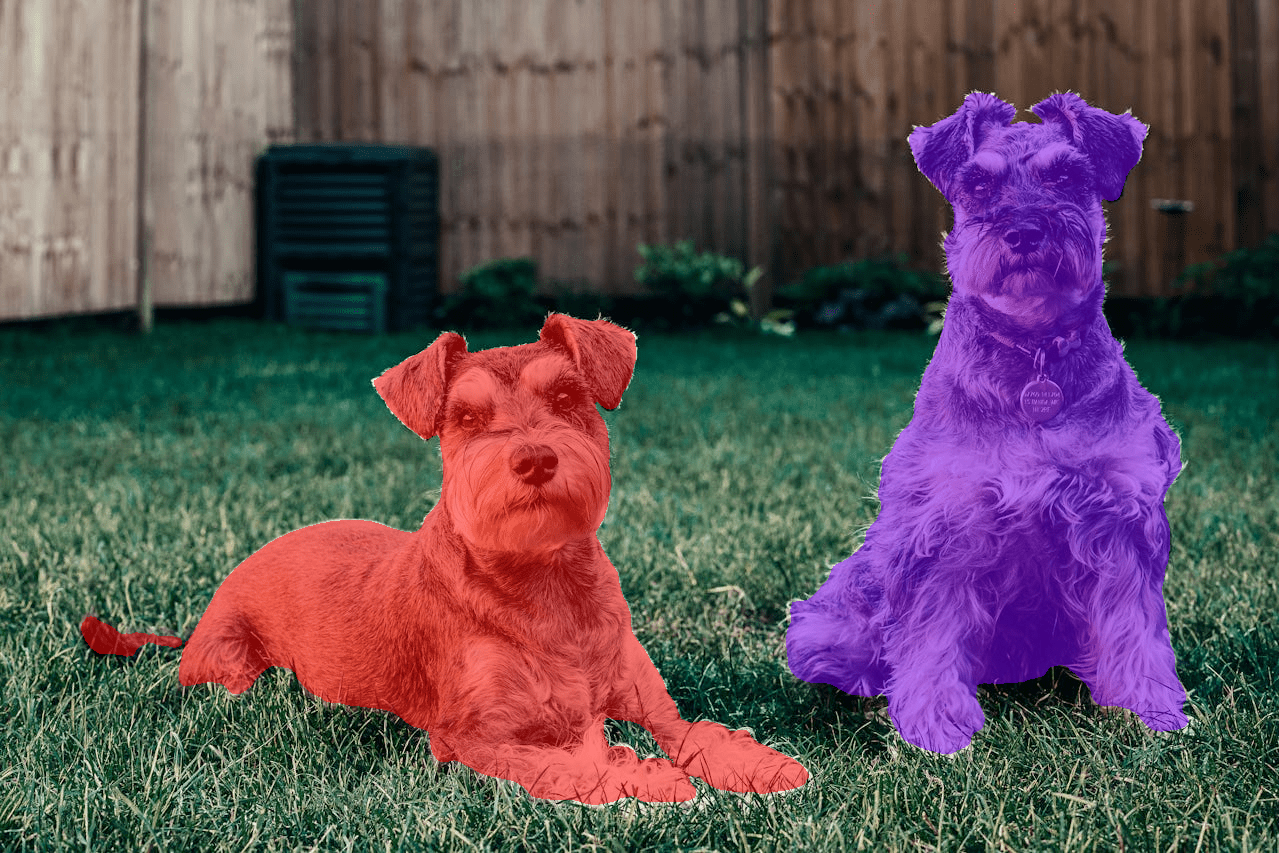
The model segments as many dogs present in the image.
In the following experiment, we segment multiple objects present in the image using the Multi-Object Segmentation tab.
We provide a comma separated prompt for person and bird, and the model is able to segment them properly.
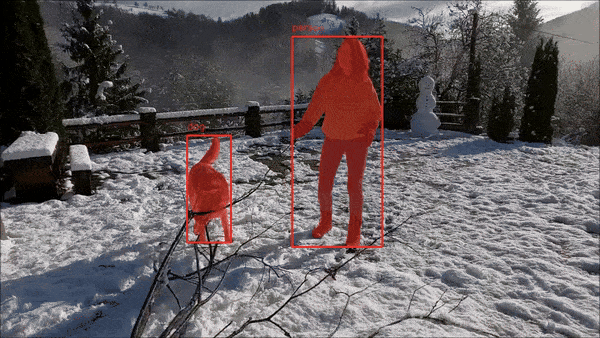
The next one is a single object video segmentation result, where we prompt the model to segment the dog. We use the Video Inference tab for this.
In single object video segmentation, SAM 3 will segment, detect, and track as many objects present in the video belonging to the same category.
In the final experiment, we carry out multi-object video segmentation using the Multi-Object Video Segmentation tab.
Just like in multi-object image segmentation, we provide command separated object names that we want to segment.
Here, SAM 3 is able to segment the person and one of the birds properly. However, as we can see, as another bird emerges, it segments the wings as birds instead.
Summary and Conclusion
In this article, we created a simple application and UI to use SAM 3 for image and video segmentation and detection. We carried out some simple experiments. Going further, this project can be expanded to be a full-blown auto segmentation and detection pipeline for dataset annotation.
If you have any questions, thoughts, or suggestiones, please leave them in the comment section. I will surely address them.
You can contact me using the Contact section. You can also find me on LinkedIn, and X.
Refernces
