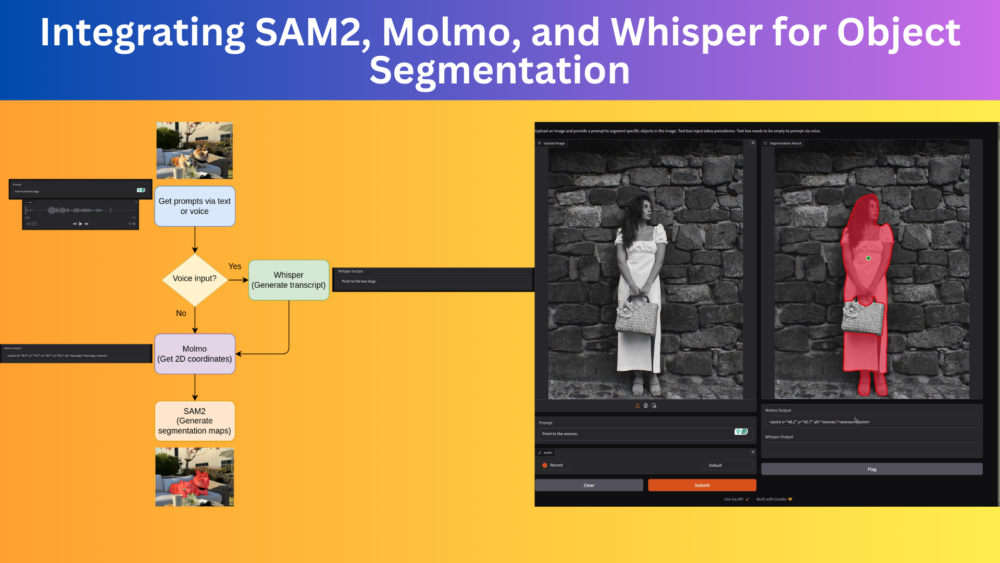
In this article, we will be integrating SAM2, Molmo, and Whisper for automated object segmentation in images.
Object segmentation in images for annotation was primarily a manual task till now. Annotators would choose the objects of interest and annotate them using a tool. This has been changing rapidly since frontier and generative models took over. With foundation computer vision models like SAM (Segment Anything), image and object segmentation could be automated.
Here, we will combine three different modalities to create a (semi) automated object segmentation pipeline – image, language, and audio. This project is going to be extremely interesting and will let us explore the real potential of frontier and generative models.
We will cover the following topics while integrating SAM2, Molmo, and Whisper
- We will start with a brief background of automated image/object segmentation.
- Next, we will discuss the steps and models involved in this automated object segmentation pipeline.
- Then we will move on to the coding part. Here, we will explore:
- How to load each model?
- How to get the outputs of each model?
- And how to integrate them to get the final desired output?
- Finally, we will run a demo using the Gradio pipeline.
Background on Creating an Automated Object Segmentation Pipeline using SAM2, Molmo, and Whisper
Many annotation tools have already integrated SAM into their system for semi-automated segmentation. They use bounding boxes to prompt SAM instead of using boundary points. In such cases, however, we need to draw bounding boxes over each object of interest. We can automate this process even further using the pointing capabilities of the Molmo VLM. Along with captioning and image description, Molmo can also point out 2D coordinates of objects when prompted appropriately.
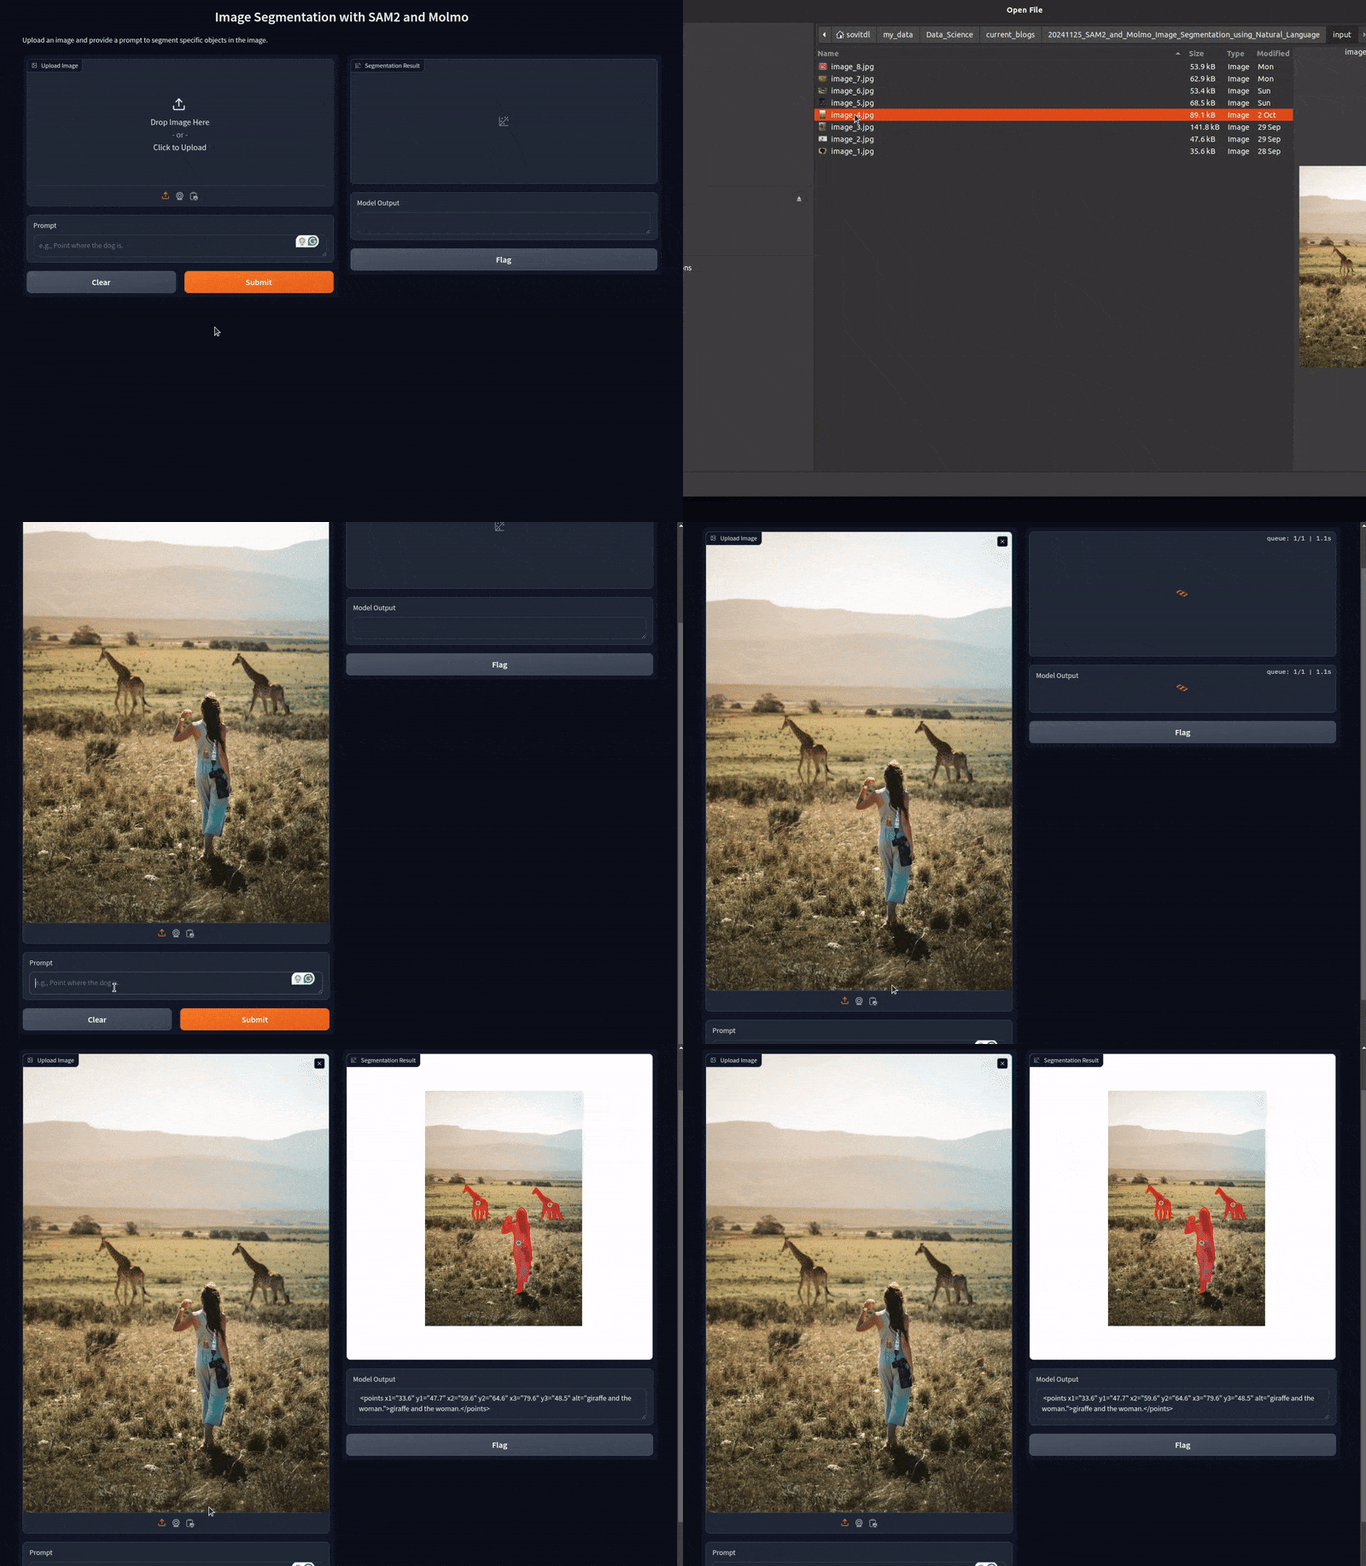
As we saw in the previous article, we can integrate SAM2 and Molmo to achieve this. We prompted Molmo using text prompts, got the 2D coordinate of objects, and the segmentation was handled by SAM2.
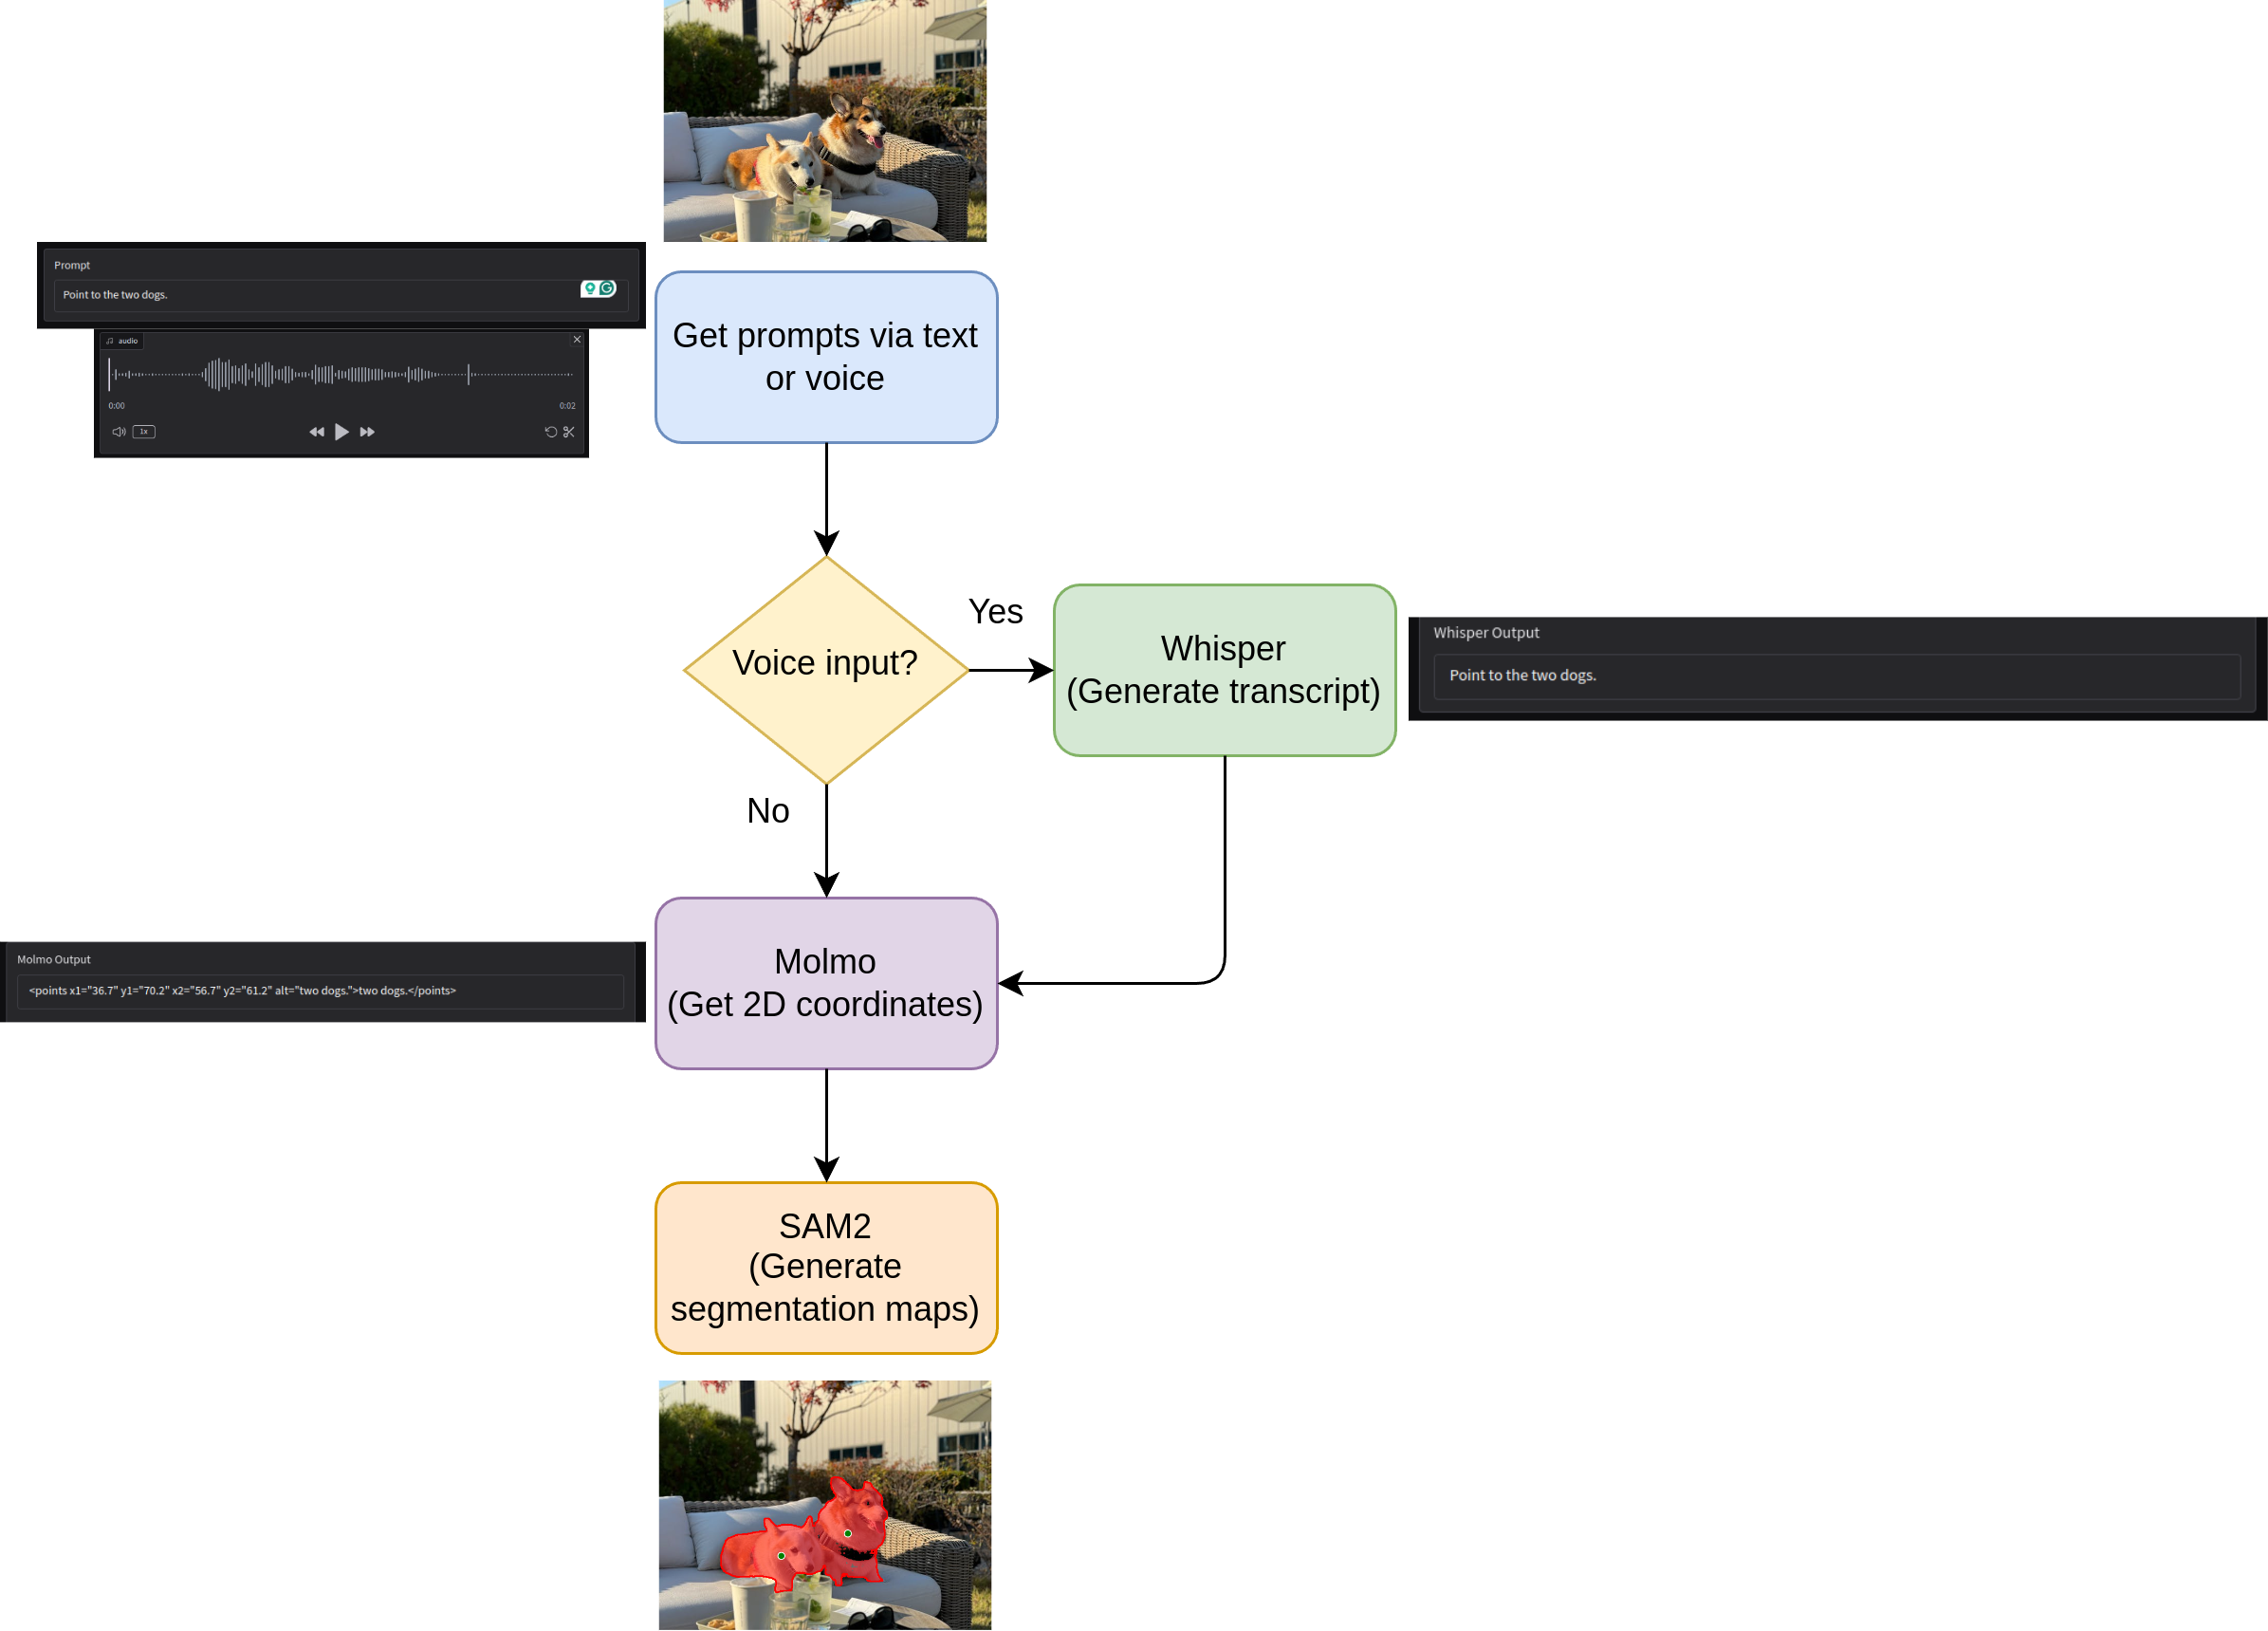
We can take this a step further. What if instead of typing we can give voice commands – making it almost hands-free? In fact, that’s what we are going to do here precisely. We will integrate another model into the pipeline, Whisper, that will convert voice commands to text, which will then pass through Molmo.
What are the Steps for Integrating SAM2, Molmo, and Whisper for Object Segmentation?
Our approach consists of three different deep learning models.
- Molmo: A foundation VLM (Vision Language Model) capable of pointing/counting objects and generating image captions.
- SAM2: A foundation image segmentation model that can generate segmentation maps for almost any object.
- Whisper: A foundation STT (Speech-to-Text) model for generating transcripts from voice commands.
Overall, our entire pipeline will look like the following:
With that said, let’s dive deep into the code for this project. The code that we will cover here, is part of a bigger project called SAM_Molmo_Whisper that we are developing at DebuggerCafe. As the project will change considerably in the near future, you will get access to a zip file containing all the code that has been committed to the project till now. This ensures that the code in this article remains standalone and does not break.
Further, covering the basics of Molmo, VLMs, SAM, or speech-to-text is out of the scope of this article. We will entirely focus on writing the code and creating this application.
Project Directory Structure
Let’s take a look at the project directory structure.
├── demo_data
│   ├── image_1.jpg
│   ├── image_2.jpg
│   ├── image_3.jpg
│   ├── image_4.jpg
│   ├── image_5.jpg
│   ├── image_6.jpg
│   ├── image_7.jpg
│   └── image_8.jpg
├── docs
│   ├── readme_media
│   │   └── sam2_molmo_whisper-2024-10-11_07.09.47.mp4
│   └── data_credits.md
├── experiments
│   ├── figure.png
│   └── sam2_molmo.ipynb
├── utils
│   ├── general.py
│   ├── load_models.py
│   ├── model_utils.py
│   └── sam_utils.py
├── app.py
├── LICENSE
├── README.md
└── requirements.txt
- The
app.pyscript is the executable Gradio application. - The
utilsdirectory contains several helper functions and utilities for image processing, and loading models, among others. - We have some sample images in the
demo_datadirectory. Theexperimentsdirectory contains any experimental code that is not part of the main application. - Additionally, we have the license, readme, and requirements file in the parent project directory.
Installing Dependencies
Before we move further, let’s install all the dependencies needed for the project. It is recommended to create a new Anaconda environment for the project.
pip install -r requirements.txt
Now, clone SAM2 into a separate directory and install it.
git clone https://github.com/facebookresearch/sam2.git && cd sam2

pip install -e .
After installation, we can import SAM2 into any project in the same environment.
The zip file containing code scripts, demo data, and requirements file are downloadable via the download section.
Download Code
SAM2, Molmo, and Whisper for Object Segmentation using Natural Language and Voice
Here, we will go through all the important code snippets. All the code present here have been covered in some form or the other in the previous two articles.
- Introduction to Molmo – Overview and Inference
- SAM2 and Molmo: Image Segmentation using Natural Language
They have been slightly modified to adhere to the modular structure of the project and for future expandability.
We will start with the important code snippets in the utils directory and then move to the main application which we will cover in detail.
Helper Script to Process Molmo Object Coordinate Outputs
When we prompt Molmo with a text like Point to the dog, it gives output in the following format:
<point x="56.2" y="32.7" alt="dog">dog</point>
However, SAM2 cannot process this. We need a list of 2D coordinate tuples. For this we have a helper function in utils/general.py.
"""
General and miscellaneous helper utilities.
"""

import re
import numpy as np

def get_coords(output_string, image):
    """
    Function to get x, y coordinates given Molmo model outputs.

    :param output_string: Output from the Molmo model.
    :param image: Image in PIL format.

    Returns:
        coordinates: Coordinates in format of [(x, y), (x, y)]
    """
    image = np.array(image)
    h, w = image.shape[:2]

    if 'points' in output_string:
        matches = re.findall(r'(x\d+)="([\d.]+)" (y\d+)="([\d.]+)"', output_string)
        coordinates = [(int(float(x_val)/100*w), int(float(y_val)/100*h)) for _, x_val, _, y_val in matches]
    else:
        match = re.search(r'x="([\d.]+)" y="([\d.]+)"', output_string)
        if match:
            coordinates = [(int(float(match.group(1))/100*w), int(float(match.group(2))/100*h))]

    return coordinates
This function accepts the output string from Molmo along with the image and uses regex to extract the coordinates. However, these coordinates are not in the correct scale. So, we scale them to the original image size as well and return the list of coordinate tuples.
Utilities to Draw Segmentation Maps from SAM2 Outputs
We have several helper functions that help us visualize and plot the segmentation maps that we get from SAM2.
This code is present in the utils/sam_utils.py file. The following block shows all the code.
"""
Helper functions for SAM visualization and plotting.
"""

import numpy as np
import matplotlib.pyplot as plt

# Helper functions for SAM2 segmentation map visualization.
def show_mask(mask, plt, random_color=False, borders = True):
    if random_color:
        color = np.concatenate([np.random.random(3), np.array([0.6])], axis=0)
    else:
        color = np.array([255/255, 40/255, 50/255, 0.6])
    h, w = mask.shape[-2:]
    mask = mask.astype(np.uint8)
    mask_image =  mask.reshape(h, w, 1) * color.reshape(1, 1, -1)

    if borders:
        import cv2
        contours, _ = cv2.findContours(
            mask,cv2.RETR_EXTERNAL,
            cv2.CHAIN_APPROX_NONE
        )
        # Try to smooth contours
        contours = [
            cv2.approxPolyDP(
                contour, epsilon=0.01, closed=True
            ) for contour in contours
        ]
        mask_image = cv2.drawContours(
            mask_image,
            contours,
            -1,
            (1, 0, 0, 1),
            thickness=2
        )
    plt.imshow(mask_image)

def show_points(coords, labels, ax, marker_size=375):
    pos_points = coords[labels==1]
    neg_points = coords[labels==0]
    ax.scatter(
        pos_points[:, 0],
        pos_points[:, 1],
        color='green',
        marker='.',
        s=marker_size,
        edgecolor='white',
        linewidth=1.25
    )
    ax.scatter(
        neg_points[:, 0],
        neg_points[:, 1],
        color='red',
        marker='.',
        s=marker_size,
        edgecolor='white',
        linewidth=1.25
    )

def show_box(box, ax):
    x0, y0 = box[0], box[1]
    w, h = box[2] - box[0], box[3] - box[1]
    ax.add_patch(plt.Rectangle(
        (x0, y0),
        w,
        h,
        edgecolor='green',
        facecolor=(0, 0, 0, 0),
        lw=2)
    )

def show_masks(
    image,
    masks,
    scores,
    point_coords=None,
    box_coords=None,
    input_labels=None,
    borders=True
):
    dpi = plt.rcParams['figure.dpi']
    figsize = image.shape[1] / dpi, image.shape[0] / dpi

    plt.figure(figsize=figsize)
    plt.imshow(image)

    for i, (mask, score) in enumerate(zip(masks, scores)):
        if i == 0:  # Only show the highest scoring mask.
            show_mask(mask, plt.gca(), random_color=False, borders=borders)
    if point_coords is not None:
        assert input_labels is not None
        show_points(point_coords, input_labels, plt.gca())
    if box_coords is not None:
        show_box(box_coords, plt)

    plt.tight_layout()
    plt.subplots_adjust(left=0, right=1, top=1, bottom=0)
    plt.axis('off')
    return plt
In short, the show_masks function calls the rest of the helper functions to plot the 2D coordinate points and the segmentation masks on top of the image. Finally, it returns the plot.
I highly recommend going through the previous article where we cover the code in slightly more detail.
Loading Models
We have a separate module containing all the functions to load models. The utils/load_models.py file contains the code for this.
"""
Code for loading SAM, Molmo, and Whisper models.
"""
from sam2.sam2_image_predictor import SAM2ImagePredictor
from transformers import (
    AutoModelForCausalLM,
    AutoProcessor,
    BitsAndBytesConfig,
    pipeline
)

quant_config = BitsAndBytesConfig(load_in_4bit=True)

def load_sam(model_name='facebook/sam2.1-hiera-large', device='cpu'):
    """
    Load SAM2 model.
    """
    sam_predictor = SAM2ImagePredictor.from_pretrained(model_name)
    return sam_predictor

def load_molmo(model_name='allenai/MolmoE-1B-0924', device='cpu'):
    """
    Load Molmo model and processor.
    """
    processor = AutoProcessor.from_pretrained(
        model_name,
        trust_remote_code=True,
        device_map=device,
        torch_dtype='auto'
    )
    molmo_model = AutoModelForCausalLM.from_pretrained(
        model_name,
        trust_remote_code=True,
        offload_folder='offload',
        quantization_config=quant_config,
        torch_dtype='auto',
        device_map=device
    )
    return processor, molmo_model

def load_whisper(model_name='openai/whisper-small', device='cpu'):
    """
    Load Whisper model.
    """
    transcriber = pipeline(
        'automatic-speech-recognition',
        model=model_name,
        device=device
    )
    return transcriber
We have three different functions to load the SAM2, Molmo, and Whisper models respectively. They accept the model tag from Hugging Face, and the compute device to be loaded onto.
Model Forward Pass Utilities
As each model has its own preprocessing and forward pass steps, it is better to break them down into individual functions. The code for this resides in the utils/model_utils.py file.
"""
Model forward passes and other model processing utilities.
"""

from utils.load_models import (
    load_molmo, load_sam, load_whisper
)
from transformers import GenerationConfig

import torch
import numpy as np

device = torch.device('cuda' if torch.cuda.is_available() else 'cpu')

# Load models.
transcriber = load_whisper(
    model_name='openai/whisper-small', device='cpu'
)
processor, molmo_model = load_molmo(
    model_name='allenai/MolmoE-1B-0924', device=device
)
sam_predictor = load_sam(
    model_name='facebook/sam2.1-hiera-large'
)

def get_molmo_output(image, prompt='Describe this image.'):
    """
    Function to get output from Molmo model given an image and a prompt.

    :param image: PIL image.
    :param prompt: User prompt.

    Returns:
        generated_text: Output generated by the model.
    """
    inputs = processor.process(images=[image], text=prompt)
    inputs = {k: v.to(molmo_model.device).unsqueeze(0) for k, v in inputs.items()}

    output = molmo_model.generate_from_batch(
        inputs,
        GenerationConfig(max_new_tokens=200, stop_strings='<|endoftext|>'),
        tokenizer=processor.tokenizer
    )

    generated_tokens = output[0, inputs['input_ids'].size(1):]
    generated_text = processor.tokenizer.decode(generated_tokens, skip_special_tokens=True)

    return generated_text

def get_sam_output(image, input_points, input_labels):
    """
    Function to predict SAM output.

    :param image: Numpy array image.
    :param input_points: 2D coordinates in form [(x, y), (x, y), ...]
    :param input_labels: Array of 0 or 1 for each 2D coordinate indicating
        negative and positive prompts, format => [1, 1, 1, 0, 1, 0]

    Returns:
        masks: The segmentation mask.
        scores: Scores for the masks.
        logits: Model mask logits.
        sorted_ind: Mask indices sorted according to score.
    """
    # with torch.no_grad():
    with torch.inference_mode(), torch.autocast(device_type='cuda'):
        sam_predictor.set_image(image)
        masks, scores, logits = sam_predictor.predict(
            point_coords=input_points,
            point_labels=input_labels,
            multimask_output=True,
        )

    # Sort masks by score.
    sorted_ind = np.argsort(scores)[::-1]
    masks = masks[sorted_ind]
    scores = scores[sorted_ind]

    return masks, scores, logits, sorted_ind

def get_whisper_output(audio):
    """
    Function to get audio transcription from Whisper.

    :param audio: Audio file or recorded audio from Gradio microphone input.

    Returns:
        transcripted_text: The transcripted text from Whisper.
        prompt: The updated prompt.
    """
    sr, y = audio
    # Convert to mono if stereo
    if y.ndim > 1:
        y = y.mean(axis=1)

    y = y.astype(np.float32)
    y /= np.max(np.abs(y))

    transcribed_text = transcriber({'sampling_rate': sr, 'raw': y})['text']
    prompt = transcribed_text

    return transcribed_text, prompt
The get_molmo_output function, first processes the input image (PIL format) using the processor. Then it passes the inputs through the model to generate the text.
The get_sam_output function accepts a Numpy array image, the input points list, and the input labels for each point. We first set the image for prediction using the set_image method and then use the predict method to get the mask output.
The get_whisper_output function accepts the audio file from the Gradio interface as the parameter. First, we extract the sampling rate, and the audio array, convert the audio array to mono-channel if not already, and then pass the data through the transcriber. The function returns the transcribed text and the updated prompt.
The Main Gradio Application
In the parent project directory, we have app.py. This Python script combines everything that we have seen above and launches the Gradio application.
The following code block contains the import statements.
import numpy as np
import gradio as gr

from PIL import Image

from utils.sam_utils import show_masks
from utils.general import get_coords
from utils.model_utils import (
    get_whisper_output, get_molmo_output, get_sam_output
)
We import all the necessary modules further needed in the application.
Next, we have a function called processs_image.
def process_image(image, prompt, audio):
    """
    Function combining all the components and returning the final
    segmentation map.

    :param image: PIL image.
    :param prompt: User prompt.

    Returns:
        fig: Final segmentation map.
        prompt: Prompt from the Molmo model.
    """

    transcribed_text = ''

    if len(prompt) == 0:
        transcribed_text, prompt = get_whisper_output(audio)

    print(prompt)

    # Get coordinates from the model output.
    output = get_molmo_output(image, prompt)
    coords = get_coords(output, image)

    # Prepare input for SAM
    input_points = np.array(coords)
    input_labels = np.ones(len(input_points), dtype=np.int32)

    # Convert image to numpy array if it's not already.
    if isinstance(image, Image.Image):
        image = np.array(image)

    # Get SAM output
    masks, scores, logits, sorted_ind = get_sam_output(
        image, input_points, input_labels
    )

    # Visualize results.
    fig = show_masks(
        image,
        masks,
        scores,
        point_coords=input_points,
        input_labels=input_labels,
        borders=True
    )

    return fig, output, transcribed_text
The function accepts the uploaded image, the text prompt, and the audio file from the Gradio UI. The audio file from the UI is first passed through Whisper. This returns the transcribed text. However, if the user passes both, an audio file and also a text prompt, then the text prompt takes precedence, rejecting the audio input.
Next, either the transcribed text or the input prompt and image are passed through Molmo. We get the object coordinates from this step. Then we pass the 2D coordinate list and the image to SAM2 which returns the segmentation map. In the next step, we overlay the segmentation map on the original image. Finally, we return the image, the Molmo output, and the transcribed text to show in the Gradio UI.
The final code block contains a simple Gradio interface with three inputs and three outputs.
if __name__ == '__main__':
    # Gradio interface.
    iface = gr.Interface(
        fn=process_image,
        inputs=[
            gr.Image(type='pil', label='Upload Image'),
            gr.Textbox(label='Prompt', placeholder='e.g., Point where the dog is.'),
            gr.Audio(sources=['microphone'])
        ],
        outputs=[
            gr.Plot(label='Segmentation Result', format='png'),
            gr.Textbox(label='Molmo Output'),
            gr.Textbox(label='Whisper Output'),
        ],
        title='Image Segmentation with SAM2, Molmo, and Whisper',
        description=f"Upload an image and provide a prompt to segment specific objects in the image. \
                    Text box input takes precedence. Text box needs to be empty to prompt via voice."
    )

    iface.launch(share=True)
This completes the coding part of the application. We are ready to launch it.
Launching the Application – Generating Object Segmentation Maps with SAM2, Molmo, and Whisper
Let’s launch the application and see what it can do. We can execute the following command in the terminal while being the parent directory to launch it.
python app.py
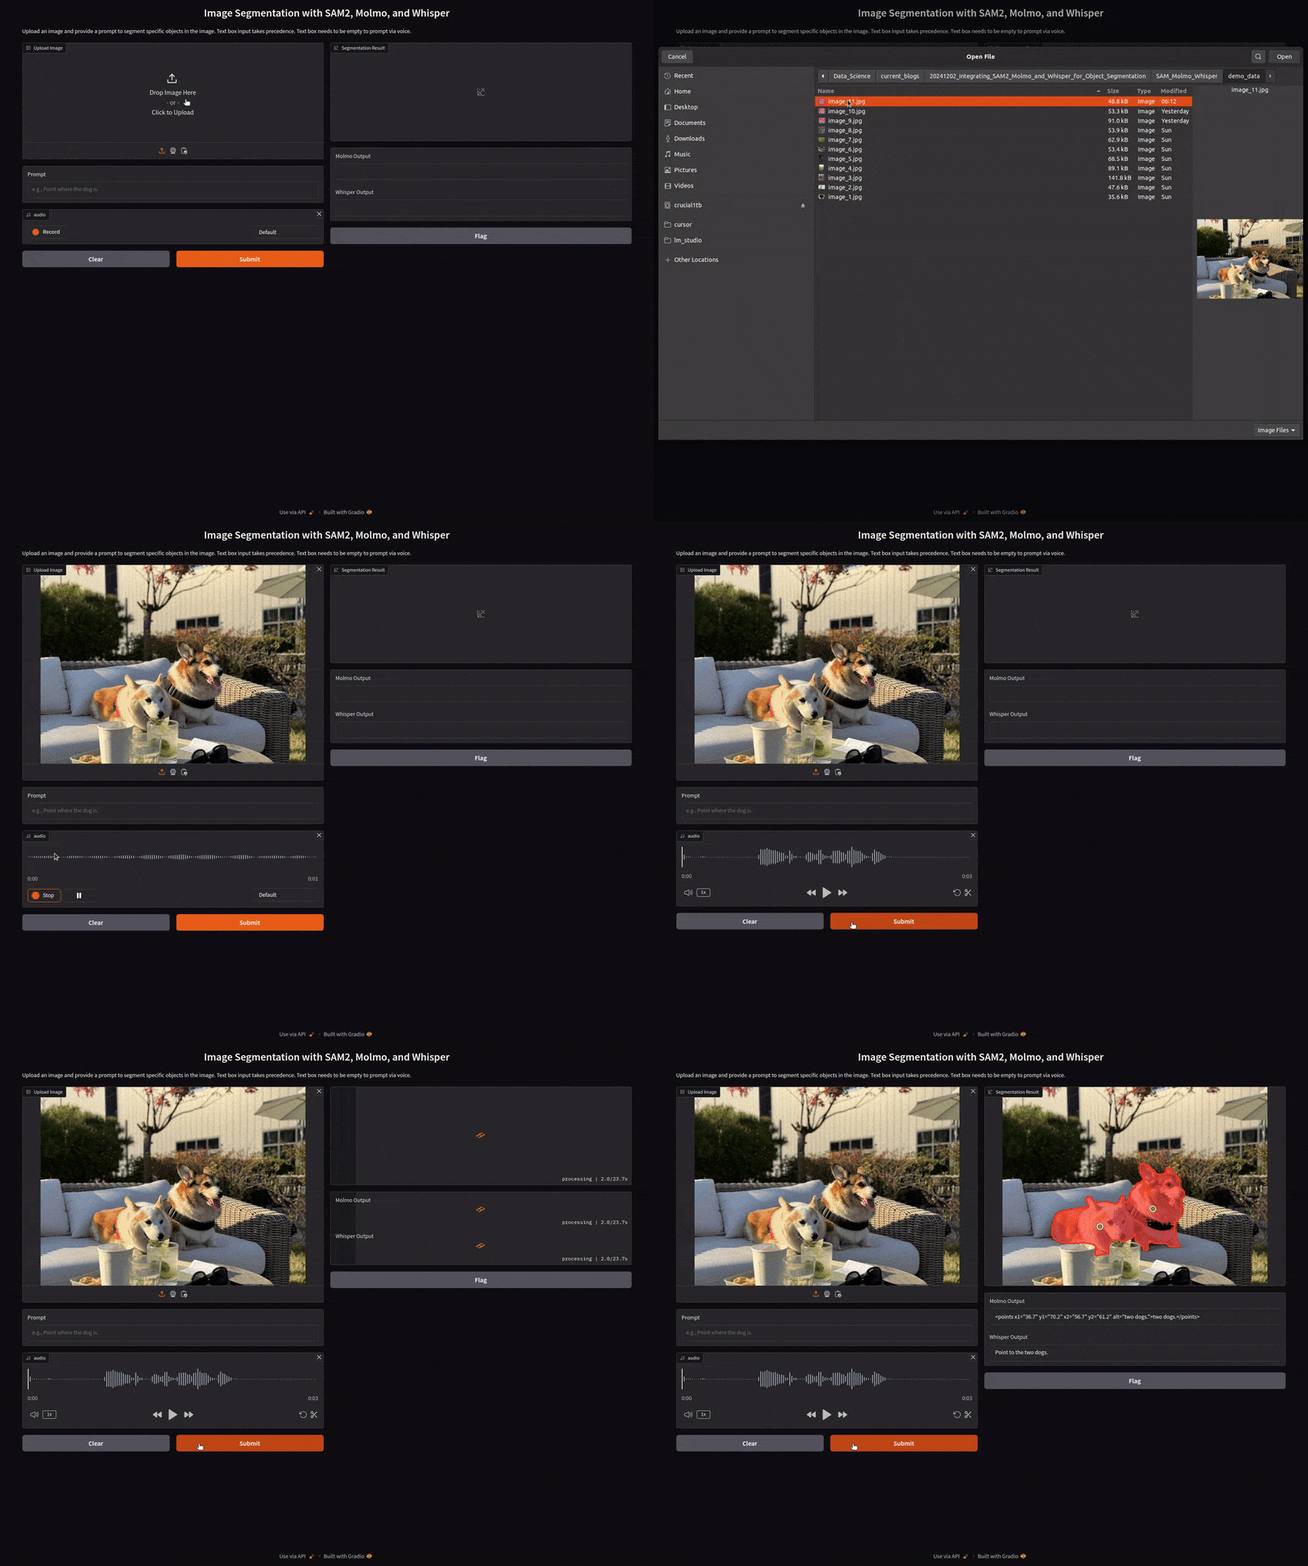
The following video shows how we can use text prompts to segment objects.
We ask Molmo to point to the woman, then the bag, and finally, the shoes. Each time, Molmo gave the correct points. Furthermore, the segmentation maps of SAM2 were accurate as well. Each time it was able to segment the points of interest correctly.
The next video demo shows how we use audio prompts to employ Whisper for speech-to-text, then Molmo for pointing, and finally, SAM2 for segmentation.
Here, each of the models does their job perfectly. We get perfect transcriptions from Whisper, coordinates from Molmo, and good segmentation maps from SAM2. One thing to note here, the more the number of coordinates we get from Molmo, the more the segmentation time from SAM2. It has to segment objects in regard to each point. In the above video, when we ask it to point to the oranges, the processing time between the starting and the result has been skipped which was more than 40 seconds.
Future Improvements
Among all these amazing results, there are of course limitations, as discussed in the previous post.
Also, we can employ SAM-HQ for high resolution segmentation maps of people, small objects, and scenes where objects are close to each other. Furthermore, we can integrate faster versions of SAM for applications where time is a critical factor.
We will try to add these to the GitHub project in the near future.
Summary and Conclusion
In this article, we integrated SAM2, Molmo, and Whisper for a semi-automated object segmentation pipeline. We can prompt either via text or voice to segment objects of interest in an image. We covered the code explanation and also demos showing the capability of each model. I hope this article was worth your time.
If you have any doubts, thoughts, or suggestions, please leave them in the comment section. I will surely address them.
You can contact me using the Contact section. You can also find me on LinkedIn, and Twitter.


