Vision Language Models (VLMs) are rapidly transforming how we interact with visual data. From generating descriptive captions to identifying objects with pinpoint accuracy, these models are becoming indispensable tools for a wide range of applications. Among the most promising is the Qwen2.5-VL family, known for its impressive performance and open-source availability. In this article, we will create a Gradio application using Qwen2.5-VL for image & video captioning, and object detection.
This article covers the practical aspects of leveraging Qwen2.5-VL, demonstrating how to build a user-friendly Gradio application that showcases its core capabilities: image captioning, video captioning, and object detection. We will cover the necessary code and explain the key components, enabling you to get hands-on experience with this powerful VLM.
What We Will Cover?
- Image Captioning with Qwen2.5-VL
- Video Captioning with Qwen2.5-VL
- Object Detection with Qwen2.5-VL
- Building a Gradio application to access the Qwen2.5-VL functionality
If you wish to get an introduction to the model, the introductory article to Qwen2.5-VL will surely help you. It covers the architecture, datasets, benchmarks, and running inference using Python scripts.
Why We Need a Qwen2.5-VL Gradio Application?
Direct interaction with VLMs like Qwen2.5-VL typically involves writing code to process images or videos, formulate prompts, and interpret the model’s output. This can be cumbersome for users who simply want to explore the model’s capabilities or quickly test it with their own data. A Gradio application addresses this challenge by providing:
- Ease of Use: A simple web interface allows users to upload images and videos, enter prompts, and visualize the results without writing any code.
- Rapid Prototyping: Developers can quickly iterate on different prompts and configurations to fine-tune the model’s behavior for specific tasks.
- Shareability: Gradio applications can be easily shared with others, enabling collaboration and wider access to Qwen2.5-VL’s functionality.
- Unified Interface: Combining image captioning, video captioning and object detection in one application allows easy exploration of all functionalities of Qwen2.5-VL
- Immediate Rendering: User can preview the input file that helps with debugging and experimentation with the different functionalities of Qwen2.5-VL.
The Qwen2.5-VL Model
Qwen2.5-VL builds upon the strengths of its predecessors, offering improved performance in understanding and reasoning about both images and videos. Its architecture combines a vision encoder with a language decoder, allowing it to seamlessly bridge the gap between visual input and textual output. The “Instruct” variant of the model is particularly well-suited for tasks where specific instructions guide the model’s behavior, making it ideal for interactive applications.
While the original research papers provide detailed insights, our focus here is on practical implementation. We’ll be using the Qwen2.5-VL-3B-Instruct-AWQ model, a 3 billion parameter variant optimized for faster inference using the AWQ quantization technique. This makes it a great choice for resource-constrained environments.
If you wish to know further, I highly recommend covering these two articles:
- Qwen2 VL – Inference and Fine-Tuning for Understanding Charts
- Qwen2.5-VL: Architecture, Benchmarks and Inference
Directory Structure
Let’s take a look at the directory structure before moving forward with the Qwen2.5-VL Gradio application.
├── input
│   ├── demo.jpeg
│   ├── image_1.jpg
│   └── video_1.mp4
├── app.py
└── requirements.txt
- We have one Python script integrating all the applications that we want to show with the model.
- The
inputdirectory contains the images and videos that we will use for inference. - And the
requirements.txtfile contains all the major libraries that we need to install before proceeding.
All the code and inference data are available for download via the download section.
Download Code
Installing Dependencies
The code requires PyTorch as the base framework. It is recommended to create a new Anaconda environment and install the latest version of PyTorch from here.
After that, you can install the rest of the libraries using the requirements file.
pip install -r requirements.txt
Building the Qwen2.5-VL Gradio Interface: A Multi-Task Demo
Let’s get into the coding part without any further delay. We will use Gradio’s Tabbed interface to build the demo so that each application can have its own section.
First, we will cover the complete code and then break down each section of the code with their respective outputs.
Complete Code for the Qwen2.5-VL Gradio Application
Here’s the complete code for the Gradio application. We’ll break it down into smaller, manageable sections below.
import gradio as gr
from transformers import (
    Qwen2_5_VLForConditionalGeneration, AutoProcessor
)
from qwen_vl_utils import process_vision_info
import cv2
import ast

# Load model and processor outside the function for efficiency
model = Qwen2_5_VLForConditionalGeneration.from_pretrained(
    'Qwen/Qwen2.5-VL-3B-Instruct-AWQ',
    torch_dtype='auto',
    device_map='auto',
    attn_implementation='flash_attention_2'  # Comment this if you have GPUs older than Ampere.
)
processor = AutoProcessor.from_pretrained('Qwen/Qwen2.5-VL-3B-Instruct-AWQ')


def image_captioning(image_input, prompt):
    """Image Captioning Function."""

    if not image_input:
        return None, "Please upload an image."

    messages = [
        {
            'role': 'user',
            'content': [
                {'type': 'image', 'image': image_input.name if hasattr(image_input, 'name') else image_input},
                {'type': 'text', 'text': prompt},
            ],
        }
    ]

    text = processor.apply_chat_template(
        messages, tokenize=False, add_generation_prompt=True
    )

    image_inputs, video_inputs = process_vision_info(messages)
    inputs = processor(
        text=[text],
        images=image_inputs,
        videos=video_inputs,
        padding=True,
        return_tensors='pt',
    )
    inputs = inputs.to('cuda')

    generated_ids = model.generate(**inputs, max_new_tokens=128)
    generated_ids_trimmed = [
        out_ids[len(in_ids) :] for in_ids, out_ids in zip(inputs.input_ids, generated_ids)
    ]
    output_text = processor.batch_decode(
        generated_ids_trimmed,
        skip_special_tokens=True,
        clean_up_tokenization_spaces=False
    )[0]

    return image_input, output_text


def video_captioning(video_input, prompt):
    """Video Captioning Function."""

    if not video_input:
        return None, "Please upload a video."

    messages = [
        {
            'role': 'user',
            'content': [
                {'type': 'video', 'video': video_input.name if hasattr(video_input, 'name') else video_input},
                {'type': 'text', 'text': prompt},
            ],
        }
    ]

    text = processor.apply_chat_template(
        messages, tokenize=False, add_generation_prompt=True
    )

    image_inputs, video_inputs, video_kwargs = process_vision_info(
        messages,
        return_video_kwargs=True
    )
    inputs = processor(
        text=[text],
        images=image_inputs,
        videos=video_inputs,
        padding=True,
        return_tensors='pt',
        **video_kwargs
    )
    inputs = inputs.to('cuda')

    generated_ids = model.generate(**inputs, max_new_tokens=128)
    generated_ids_trimmed = [
        out_ids[len(in_ids) :] for in_ids, out_ids in zip(inputs.input_ids, generated_ids)
    ]
    output_text = processor.batch_decode(
        generated_ids_trimmed,
        skip_special_tokens=True,
        clean_up_tokenization_spaces=False
    )[0]

    return video_input, output_text


def object_detection(image_input, prompt):
    """Object Detection Function."""

    if not image_input:
        return None, "Please upload an image."

    try:
        image_path = image_input.name if hasattr(image_input, 'name') else image_input
        image = cv2.imread(image_path)
        if image is None:
            raise ValueError(f"Could not read image file: {image_path}")

        messages = [
            {
                'role': 'user',
                'content': [
                    {'type': 'image', 'image': image_input.name if hasattr(image_input, 'name') else image_input},
                    {'type': 'text', 'text': prompt},
                ],
            }
        ]

        text = processor.apply_chat_template(
            messages, tokenize=False, add_generation_prompt=True
        )

        image_inputs, video_inputs = process_vision_info(messages)
        inputs = processor(
            text=[text],
            images=image_inputs,
            videos=video_inputs,
            padding=True,
            return_tensors='pt',
        )
        inputs = inputs.to('cuda')

        generated_ids = model.generate(**inputs, max_new_tokens=128)
        generated_ids_trimmed = [
            out_ids[len(in_ids) :] for in_ids, out_ids in zip(inputs.input_ids, generated_ids)
        ]
        output_text = processor.batch_decode(
            generated_ids_trimmed,
            skip_special_tokens=True,
            clean_up_tokenization_spaces=False
        )[0]

        try:
            string_list = output_text[8:-3:]
            final_output = ast.literal_eval(string_list)

            def annotate_image(image, output):
                annotated_image = image.copy()
                for i, obj in enumerate(output):
                    bbox = obj['bbox_2d']
                    label = obj['label']
                    cv2.rectangle(
                        annotated_image,
                        pt1=(bbox[0], bbox[1]),
                        pt2=(bbox[2], bbox[3]),
                        color=(0, 0, 255),
                        thickness=2,
                        lineType=cv2.LINE_AA
                    )
                    cv2.putText(
                        annotated_image,
                        text=label,
                        org=(bbox[0], bbox[1] - 5),
                        fontFace=cv2.FONT_HERSHEY_SIMPLEX,
                        fontScale=1,
                        color=(0, 0, 255),
                        thickness=2,
                        lineType=cv2.LINE_AA
                    )
                return annotated_image

            annotated_image = annotate_image(image, final_output)
            annotated_image = cv2.cvtColor(annotated_image, cv2.COLOR_BGR2RGB)
            return annotated_image, "Object Detection Complete"

        except Exception as e:
            print(f"Error during object detection processing: {e}")
            return None, f"Error: Could not process object detection output. {e}"

    except Exception as e:
        print(f"Error during object detection setup: {e}")
        return None, f"Error setting up object detection: {e}"


with gr.Blocks() as demo:
    gr.Markdown("# Qwen2.5-VL Demo")

    with gr.Tabs():
        with gr.TabItem("Image Captioning"):
            image_input = gr.File(label="Input Image", file_types=["image"])
            prompt_image = gr.Textbox(label="Prompt", value="Describe this image.")
            image_output = gr.Image(label="Uploaded Image")
            caption_output = gr.Textbox(label="Caption Output")
            image_button = gr.Button("Run")

            image_button.click(
                image_captioning,
                inputs=[image_input, prompt_image],
                outputs=[image_output, caption_output]
            )

        with gr.TabItem("Video Captioning"):
            video_input = gr.File(label="Input Video", file_types=["video"])
            prompt_video = gr.Textbox(label="Prompt", value="Describe this video.")
            video_output = gr.Video(label="Uploaded Video")
            video_caption_output = gr.Textbox(label="Caption Output")
            video_button = gr.Button("Run")

            video_button.click(
                video_captioning,
                inputs=[video_input, prompt_video],
                outputs=[video_output, video_caption_output]
            )

        with gr.TabItem("Object Detection"):
            object_input = gr.File(label="Input Image", file_types=["image"])
            prompt_object = gr.Textbox(label="Prompt", value="""Detect all objects in the image and give the coordinates. The format of output should be like {"bbox_2d": [x1, y1, x2, y2], "label": label}""")
            object_output = gr.Image(label="Annotated Image")
            object_caption_output = gr.Textbox(label="Output")  # For messages or errors
            object_button = gr.Button("Run")

            object_button.click(
                object_detection,
                inputs=[object_input, prompt_object],
                outputs=[object_output, object_caption_output]
            )

demo.launch()
You can directly copy-paste this code into your own file and execute via python app.py and start playing around.
Just for showcasing, here is a video showing all the tabbed interface demos.
Code Breakdown
Let’s cover each of the tabbed interfaces separately now and follow through the outputs separately.
First and foremost, the import statements and loading the Qwen2.5-VL model and the processor. We are using the Qwen2.5-3B AWQ model which can easily run on an 8GB VRAM machine.
import gradio as gr
from transformers import (
    Qwen2_5_VLForConditionalGeneration, AutoProcessor
)
from qwen_vl_utils import process_vision_info
import cv2
import ast

# Load model and processor outside the function for efficiency
model = Qwen2_5_VLForConditionalGeneration.from_pretrained(
    'Qwen/Qwen2.5-VL-3B-Instruct-AWQ',
    torch_dtype='auto',
    device_map='auto',
    attn_implementation='flash_attention_2'  # Comment this if you have GPUs older than Ampere.
)
processor = AutoProcessor.from_pretrained('Qwen/Qwen2.5-VL-3B-Instruct-AWQ')
This section imports the necessary libraries and loads the pre-trained Qwen2.5-VL model and its associated processor.
gradio: For creating the web interface.transformers: Provides access to the Qwen2.5-VL model.qwen_vl_utils: Contains helper functions specifically designed for Qwen2.5-VL.cv2: OpenCV library for image processing.ast: For parsing output of Object Detection model- The model and processor are loaded outside the predict function for efficiency. This ensures that the model is loaded only once when the application starts, rather than every time a prediction is made.
The core logic of the application is encapsulated in three separate functions, each responsible for handling a specific task: image_captioning, video_captioning, and object_detection.
Image Captioning
Following is the logic for image captioning.
def image_captioning(image_input, prompt):
    """Image Captioning Function."""

    if not image_input:
        return None, "Please upload an image."

    messages = [
        {
            'role': 'user',
            'content': [
                {'type': 'image', 'image': image_input.name if hasattr(image_input, 'name') else image_input},
                {'type': 'text', 'text': prompt},
            ],
        }
    ]

    text = processor.apply_chat_template(
        messages, tokenize=False, add_generation_prompt=True
    )

    image_inputs, video_inputs = process_vision_info(messages)
    inputs = processor(
        text=[text],
        images=image_inputs,
        videos=video_inputs,
        padding=True,
        return_tensors='pt',
    )
    inputs = inputs.to('cuda')

    generated_ids = model.generate(**inputs, max_new_tokens=128)
    generated_ids_trimmed = [
        out_ids[len(in_ids) :] for in_ids, out_ids in zip(inputs.input_ids, generated_ids)
    ]
    output_text = processor.batch_decode(
        generated_ids_trimmed,
        skip_special_tokens=True,
        clean_up_tokenization_spaces=False
    )[0]

    return image_input, output_text
This function takes an image file and a text prompt as input.
- It constructs a message dictionary that includes the image and the prompt.
- It uses the
processorto convert the message into a format suitable for the Qwen2.5-VL model. - The
process_vision_infofunction preprocesses the image. - The
model.generatemethod generates the caption. - Finally, the generated caption is decoded and returned along with the input image.
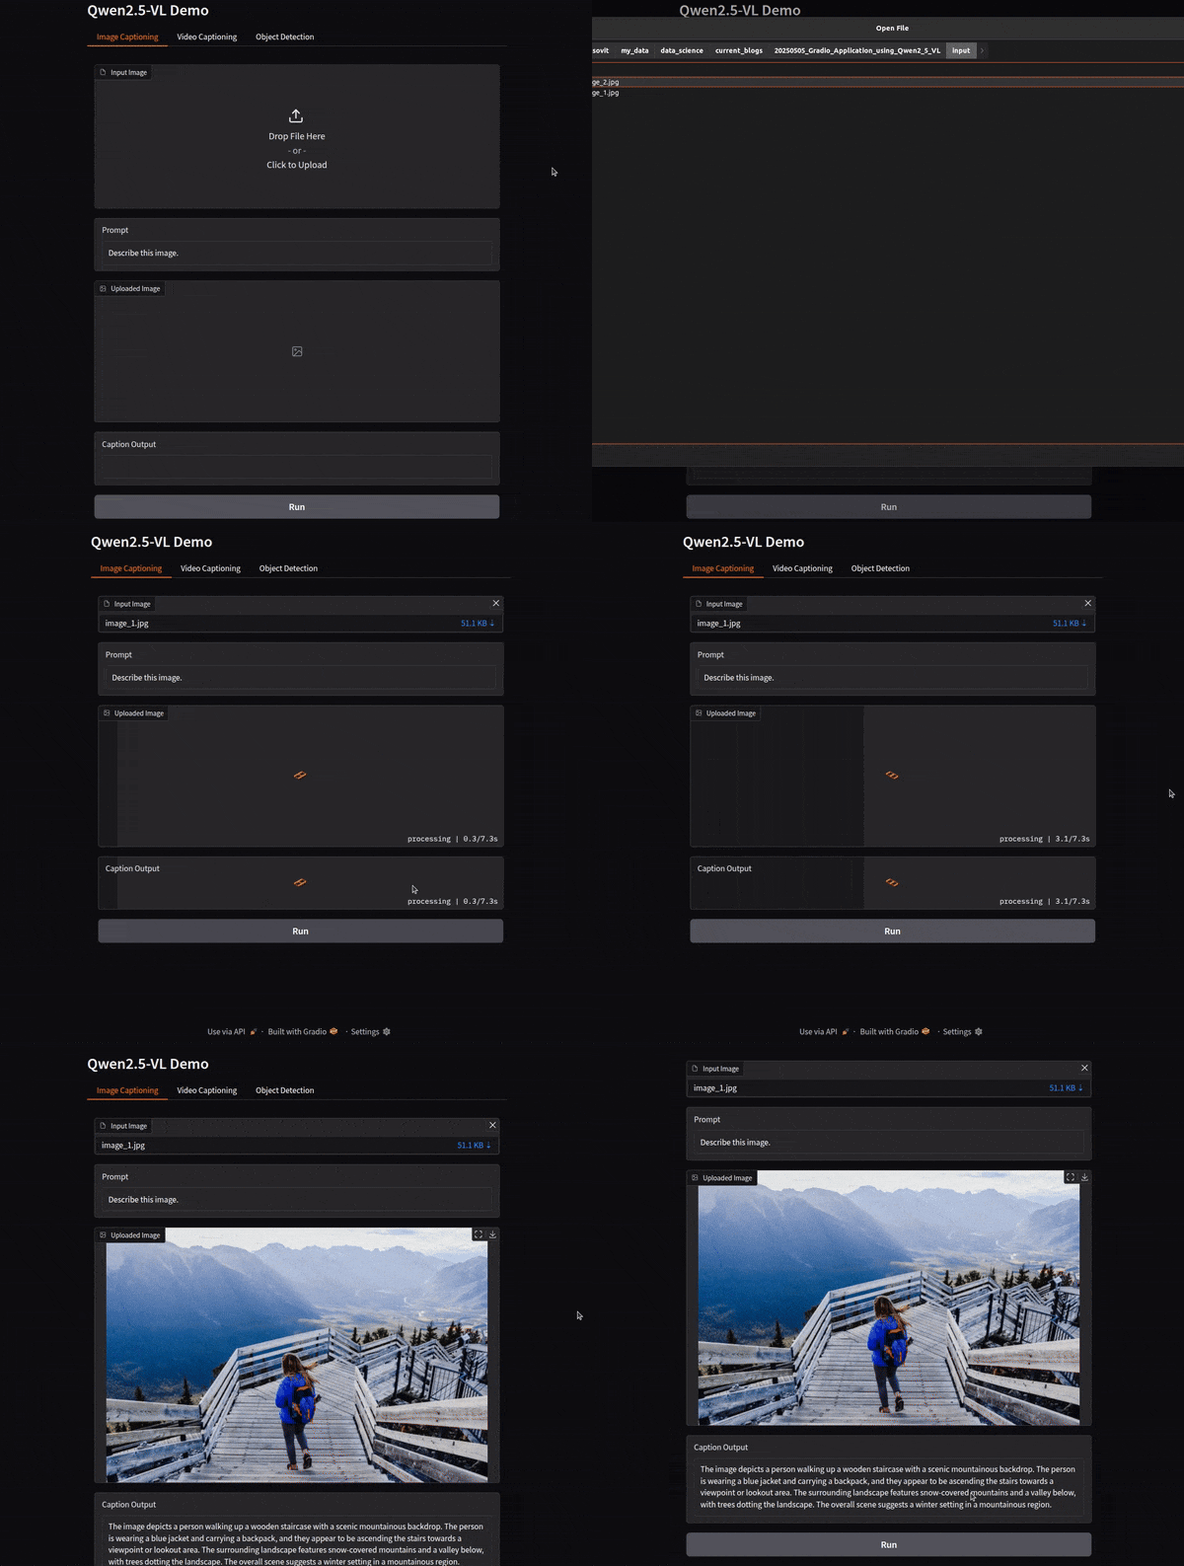
Let’s take a look at an example output for this function.
Video Captioning
The following code block contains the logic for video captioning/description.
def video_captioning(video_input, prompt):
    """Video Captioning Function."""

    if not video_input:
        return None, "Please upload a video."

    messages = [
        {
            'role': 'user',
            'content': [
                {'type': 'video', 'video': video_input.name if hasattr(video_input, 'name') else video_input},
                {'type': 'text', 'text': prompt},
            ],
        }
    ]

    text = processor.apply_chat_template(
        messages, tokenize=False, add_generation_prompt=True
    )

    image_inputs, video_inputs, video_kwargs = process_vision_info(
        messages,
        return_video_kwargs=True
    )
    inputs = processor(
        text=[text],
        images=image_inputs,
        videos=video_inputs,
        padding=True,
        return_tensors='pt',
        **video_kwargs
    )
    inputs = inputs.to('cuda')

    generated_ids = model.generate(**inputs, max_new_tokens=128)
    generated_ids_trimmed = [
        out_ids[len(in_ids) :] for in_ids, out_ids in zip(inputs.input_ids, generated_ids)
    ]
    output_text = processor.batch_decode(
        generated_ids_trimmed,
        skip_special_tokens=True,
        clean_up_tokenization_spaces=False
    )[0]

    return video_input, output_text
The video_captioning function is very similar to image_captioning, but it handles video input.
- The primary difference is the use of
video_kwargsin the processor, which are obtained from theprocess_vision_infofunction with thereturn_video_kwargs=Trueargument.
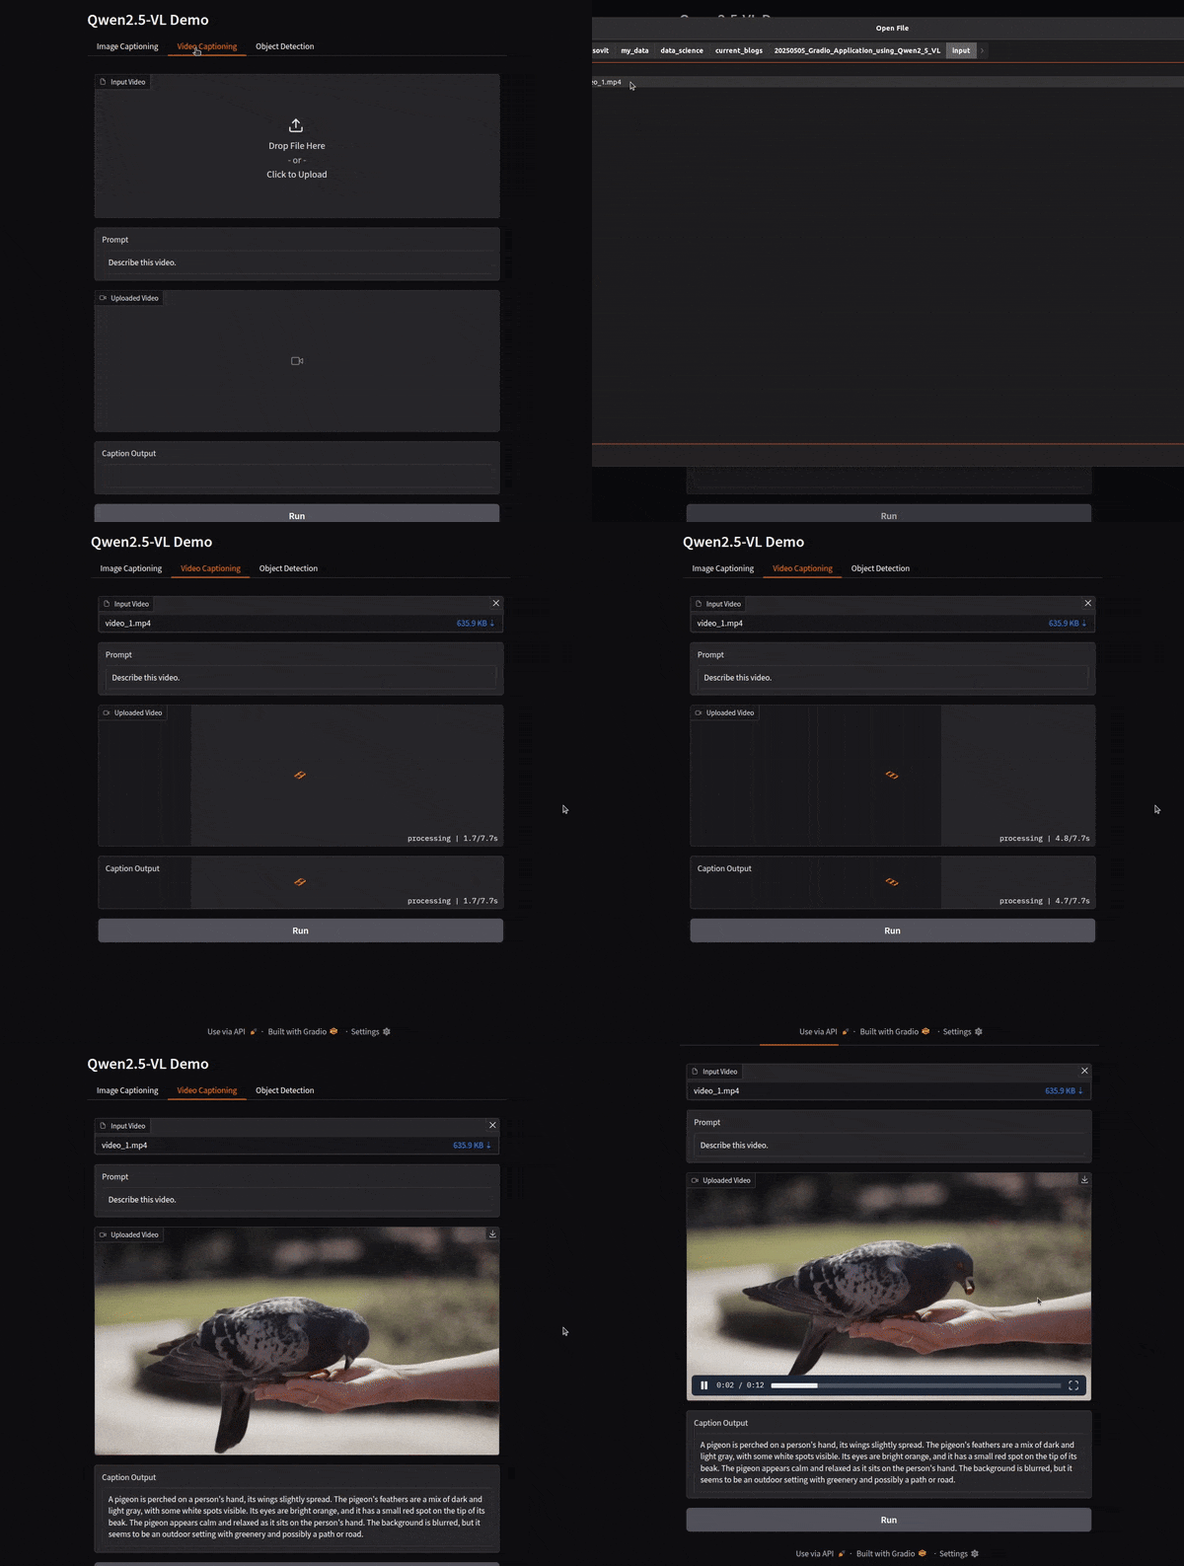
The following GIF shows an example output of video captioning.
Object Detection
Next, we have the function for object detection.
def object_detection(image_input, prompt):
    """Object Detection Function."""

    if not image_input:
        return None, "Please upload an image."

    try:
        image_path = image_input.name if hasattr(image_input, 'name') else image_input
        image = cv2.imread(image_path)
        if image is None:
            raise ValueError(f"Could not read image file: {image_path}")

        messages = [
            {
                'role': 'user',
                'content': [
                    {'type': 'image', 'image': image_input.name if hasattr(image_input, 'name') else image_input},
                    {'type': 'text', 'text': prompt},
                ],
            }
        ]

        text = processor.apply_chat_template(
            messages, tokenize=False, add_generation_prompt=True
        )

        image_inputs, video_inputs = process_vision_info(messages)
        inputs = processor(
            text=[text],
            images=image_inputs,
            videos=video_inputs,
            padding=True,
            return_tensors='pt',
        )
        inputs = inputs.to('cuda')

        generated_ids = model.generate(**inputs, max_new_tokens=128)
        generated_ids_trimmed = [
            out_ids[len(in_ids) :] for in_ids, out_ids in zip(inputs.input_ids, generated_ids)
        ]
        output_text = processor.batch_decode(
            generated_ids_trimmed,
            skip_special_tokens=True,
            clean_up_tokenization_spaces=False
        )[0]

        try:
            string_list = output_text[8:-3:]
            final_output = ast.literal_eval(string_list)

            def annotate_image(image, output):
                annotated_image = image.copy()
                for i, obj in enumerate(output):
                    bbox = obj['bbox_2d']
                    label = obj['label']
                    cv2.rectangle(
                        annotated_image,
                        pt1=(bbox[0], bbox[1]),
                        pt2=(bbox[2], bbox[3]),
                        color=(0, 0, 255),
                        thickness=2,
                        lineType=cv2.LINE_AA
                    )
                    cv2.putText(
                        annotated_image,
                        text=label,
                        org=(bbox[0], bbox[1] - 5),
                        fontFace=cv2.FONT_HERSHEY_SIMPLEX,
                        fontScale=1,
                        color=(0, 0, 255),
                        thickness=2,
                        lineType=cv2.LINE_AA
                    )
                return annotated_image

            annotated_image = annotate_image(image, final_output)
            annotated_image = cv2.cvtColor(annotated_image, cv2.COLOR_BGR2RGB)
            return annotated_image, "Object Detection Complete"

        except Exception as e:
            print(f"Error during object detection processing: {e}")
            return None, f"Error: Could not process object detection output. {e}"

    except Exception as e:
        print(f"Error during object detection setup: {e}")
        return None, f"Error setting up object detection: {e}"
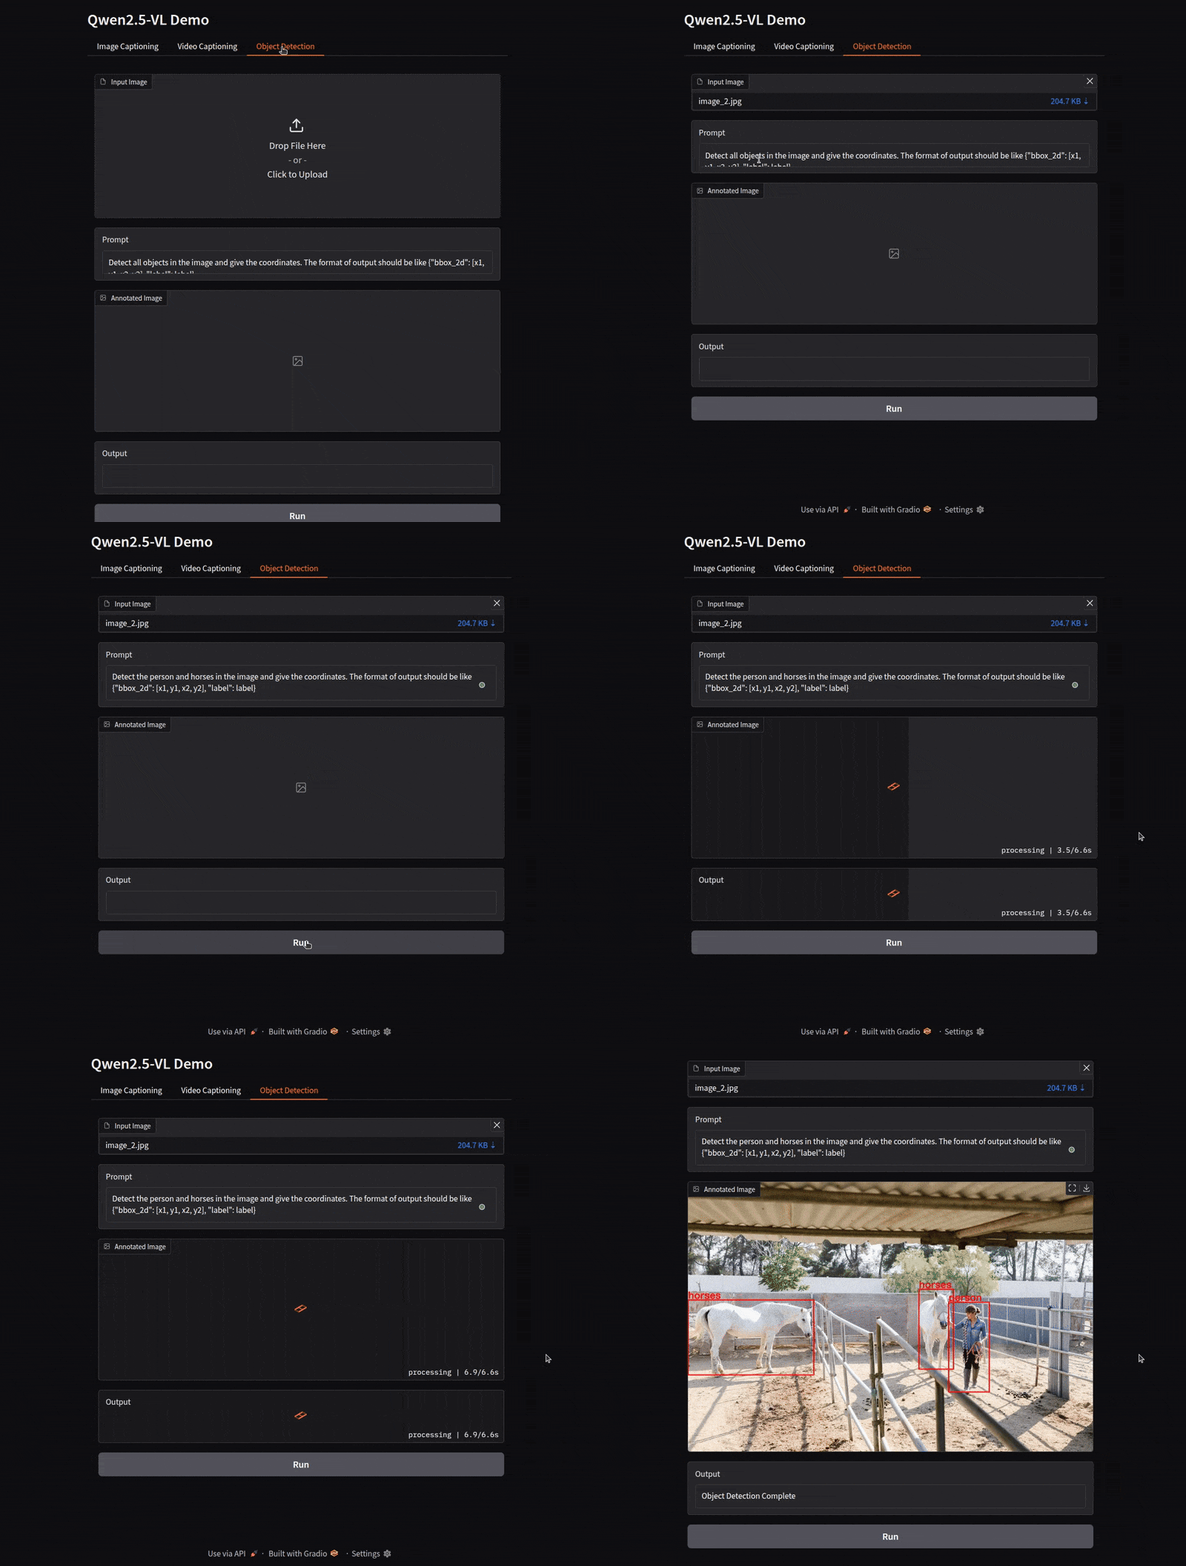
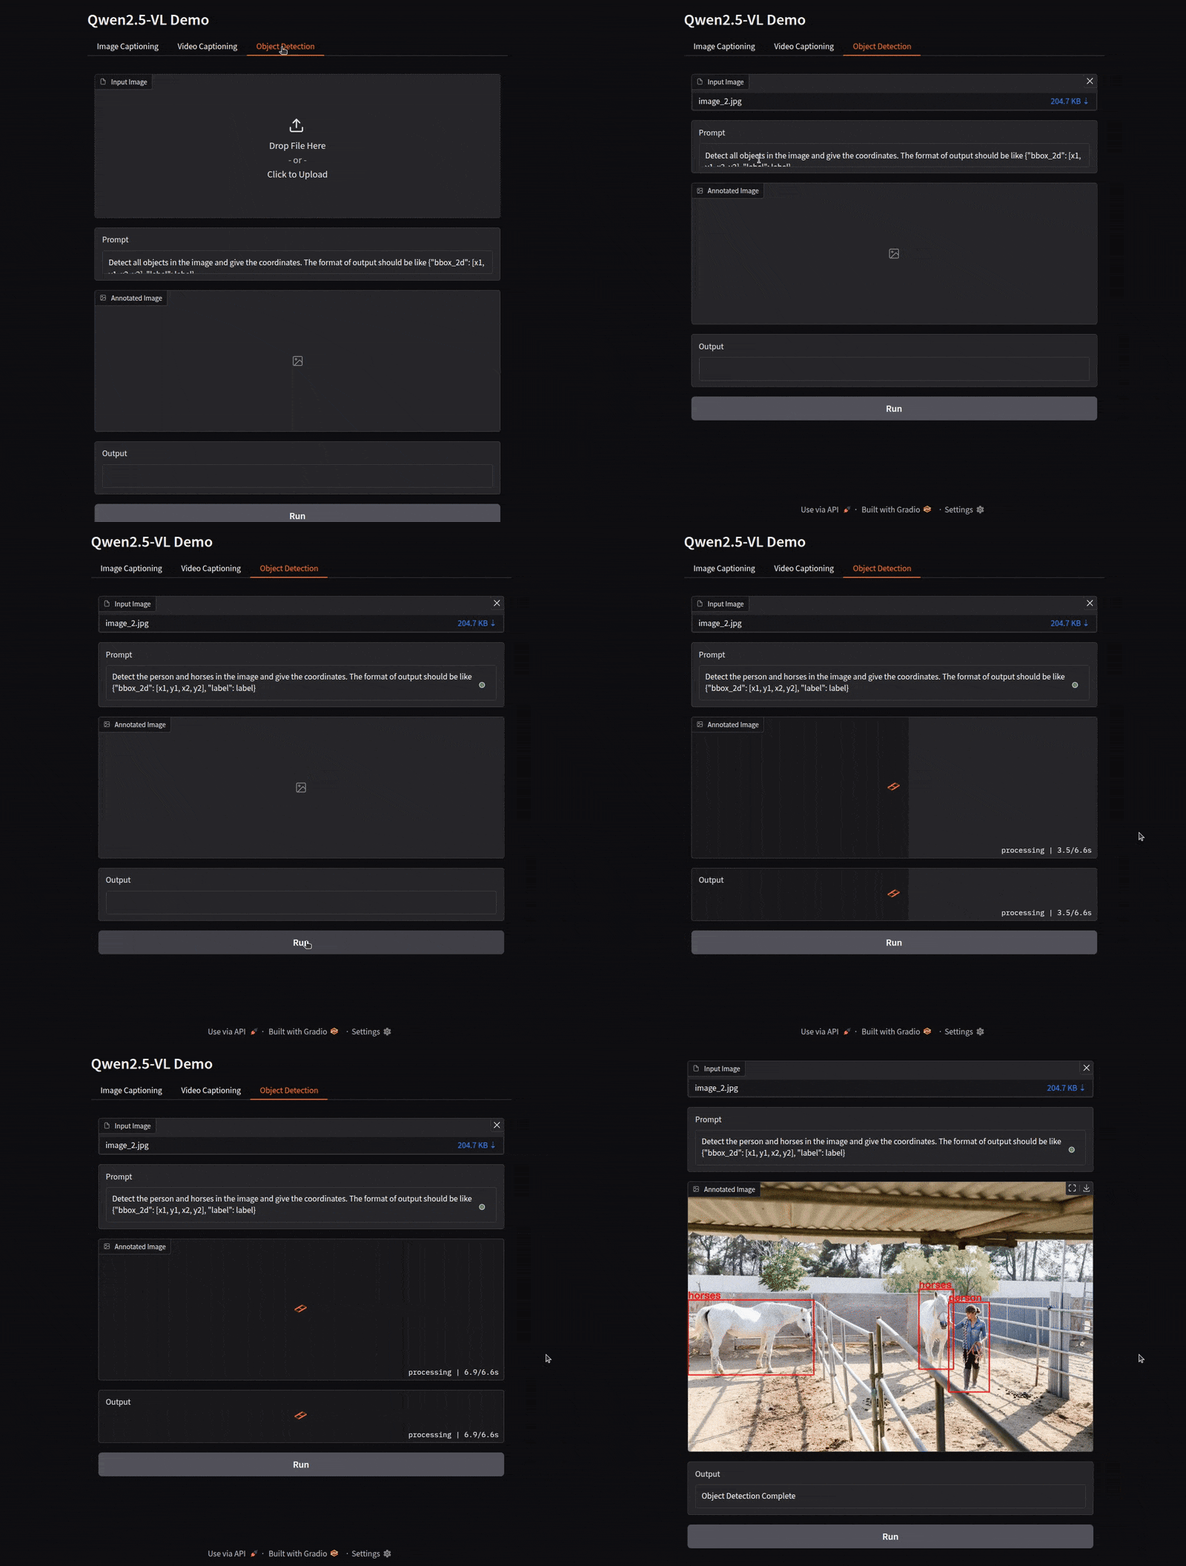
The object_detection function performs object detection on an image.
- It reads the image using OpenCV (
cv2.imread). - It calls the Qwen model to detect the objects.
- It parses the model’s output to extract bounding box coordinates and labels.
- Finally, it annotates the image with the detected objects and returns the annotated image.
Here, we are only experimenting with object detection on images. Following is an example.
Combining All Functions Through a Tabbed Interface
with gr.Blocks() as demo:
    gr.Markdown("# Qwen2.5-VL Demo")

    with gr.Tabs():
        with gr.TabItem("Image Captioning"):
            image_input = gr.File(label="Input Image", file_types=["image"])
            prompt_image = gr.Textbox(label="Prompt", value="Describe this image.")
            image_output = gr.Image(label="Uploaded Image")
            caption_output = gr.Textbox(label="Caption Output")
            image_button = gr.Button("Run")

            image_button.click(
                image_captioning,
                inputs=[image_input, prompt_image],
                outputs=[image_output, caption_output]
            )

        with gr.TabItem("Video Captioning"):
            video_input = gr.File(label="Input Video", file_types=["video"])
            prompt_video = gr.Textbox(label="Prompt", value="Describe this video.")
            video_output = gr.Video(label="Uploaded Video")
            video_caption_output = gr.Textbox(label="Caption Output")
            video_button = gr.Button("Run")

            video_button.click(
                video_captioning,
                inputs=[video_input, prompt_video],
                outputs=[video_output, video_caption_output]
            )

        with gr.TabItem("Object Detection"):
            object_input = gr.File(label="Input Image", file_types=["image"])
            prompt_object = gr.Textbox(label="Prompt", value="""Detect all objects in the image and give the coordinates. The format of output should be like {"bbox_2d": [x1, y1, x2, y2], "label": label}""")
            object_output = gr.Image(label="Annotated Image")
            object_caption_output = gr.Textbox(label="Output")  # For messages or errors
            object_button = gr.Button("Run")

            object_button.click(
                object_detection,
                inputs=[object_input, prompt_object],
                outputs=[object_output, object_caption_output]
            )

demo.launch()
This section defines the Gradio interface.
- It uses
gr.Blocks()to create a block-based layout. - It uses
gr.Tabs()to create separate tabs for each task. - Each tab contains the necessary input and output components for the corresponding task.
- The
clickmethod is used to link the “Run” button to the appropriate function.
We can run the application by executing the following on a terminal.
python app.py
Try to play around with the application and experiment with different images and videos. If you want to take it a step further may be try adding video object detection as another tabbed interface and get to know the workflow.
Summary and Conclusion
In this article, we created a simple Gradio application using Qwen2.5-VL for easier image captioning, video description, and object detection. We covered each step and saw the workflow in detail. I hope this article was worth your time.
If you have any questions, thoughts, or suggestions, please leave them in the comment section. I will surely address them.
You can contact me using the Contact section. You can also find me on LinkedIn, and Twitter.

