In this article, we will carry forward with the series of fine tuning LRASPP MobileNetV3 on the IDD Segmentation dataset. This time, we will train on the entire Indian Driving Dataset (IDD) and export the model to ONNX.
Following are the previous two articles in the series of training the LRASPP MobileNetV3 segmentation model:
- Fine Tuning LRASPP MobileNetV3 on the KITTI Segmentation Dataset
- Training LRASPP MobileNetV3 on Indian Driving Dataset Subset for Semantic Segmentation
Large scale training of deep learning models requires meticulous tuning of hyperparameters. We have already discovered some of those optimal parameters in the previous two articles. Once we trained on the very small KITTI segmentation dataset and the other time, on a subset of IDD. However, we also observed that the LRASPP MobileNetV3 model is not very good at dealing with too many complex classes simultaneously. For instance, in our previous experiment, we prepared the IDD with 26 object classes and did not get good results when fine tuning on 6000 images. This time, along with training on the entire dataset, we will also reduce the scope of the labels that we deal with. More on this during the dataset preparation discussion.
We will cover the following points in this article
- We will start with a discussion of the dataset preparation for choosing the label IDs in IDD.
- Next, we will directly jump into the training section.
- After obtaining the trained weights, we will convert the model to ONNX and run inference on CPU and GPU.
The IDD Segmentation Dataset
We have discussed IDD for segmentation at length in the previous article. We covered the number of samples in part 2 of the dataset, how the ID levels are structured, and what classes are included.
As we discovered in the article, it is difficult to train LRASPP on such a complex dataset with 27 classes. For that reason, in this article, we limit the number of classes by generating level 1 label IDs. This reduces the scope to 7 object classes and one background/void class. Furthermore, in this article, we will train the model on the entire dataset. You can find the entire IDD for segmentation here on Kaggle. The dataset includes the RGB images, the original JSON files, the grayscale label maps with 8 class IDs, and the RGB label maps.
Following is the directory structure after downloading and extracting the dataset.
idd
├── test
│   └── images
├── train
│   ├── gray_labels
│   ├── images
│   ├── json
│   └── rgb_labels
└── val
    ├── gray_labels
    ├── images
    ├── json
    └── rgb_labels
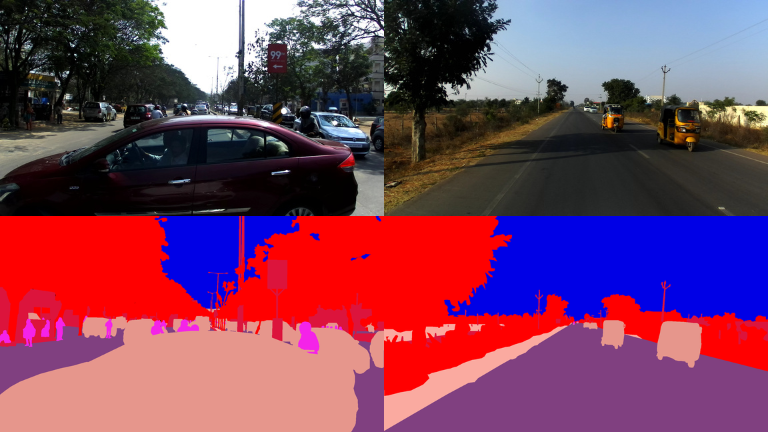
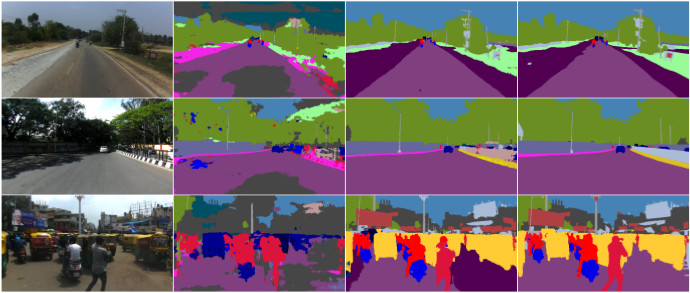
Here are some of the images and their corresponding masks.
There are 8 classes in the dataset that we will use.
- drivable
- non-drivable
- vehicles
- barrier
- structures
- construction
- sky and object fallback
- void
The final dataset contains 12872 training samples, 1995 validation samples, and 3938 test samples (no ground truth masks).
The Project Directory Structure
Let’s take a look at the project directory structure.
├── input
│   ├── idd
│   └── inference_data
├── outputs
│   ├── full_training
│   ├── onnx_inference
│   ├── trial
│   └── video_inference
├── src
│   ├── config.py
│   ├── datasets.py
│   ├── engine.py
│   ├── inference_image.py
│   ├── inference_video.py
│   ├── label_map_to_rgb.py
│   ├── metrics.py
│   ├── model.py
│   ├── onnx_export.py
│   ├── onnx_inference_video.py
│   ├── train.py
│   └── utils.py
└── idd_model.onnx
- The
inputdirectory contains the idd dataset directory that we saw in the previous section. Along with that, it contains the inference videos as well. - The
outputsdirectory contains the training artifacts and inference results. - In the
srcdirectory, we have all the Python scripts and training code. - Finally, in the root directory we have the ONNX exported weights that we will later generate in this article.
All the code files, best trained weights, and a few of the inference videos will be provided via the download code section. In case you wish to train the model, you can download the dataset and arrange it according to the above structure.
Download Code
Installing Dependencies
We use PyTorch 2.0.1 for the codebase. It is best to install the framework using the conda package manager.
conda install pytorch==2.0.1 torchvision==0.15.2 torchaudio==2.0.2 pytorch-cuda=11.8 -c pytorch -c nvidia
Now install the rest of the requirements using the requirements.txt file.
pip install -r requirements.txt
We are all done with the setup. Now, we can move to the training part.
Fine Tuning the LRASPP MobileNetV3 on IDD for Semantic Segmentation
We keep all the hyperparameters the same as in the previous article. The dataset augmentations also remain the same. I highly recommend going through the previous article once to get more insights on these.
Here we will directly jump into the training process.
All the training and inference experiments were carried out on a system with 10GB RTX 3080 GPU, i7 10th generation CPU, and 32 GB of RAM.
We can execute the following command within the src directory to start the LRASPP MobileNetV3 fine tuning process on IDD for segmentation.
python train.py --epoch 50 --lr 0.0001 --batch 8 --height 720 --width 1024 --out new_training --data ../input/idd/
We are training for 50 epochs, with a batch size of 8 and a constant learning rate of 0.0001. The images will be resized to 1024 pixels in width and 720 pixels in height. All the results will be in the outputs/new_training directory.
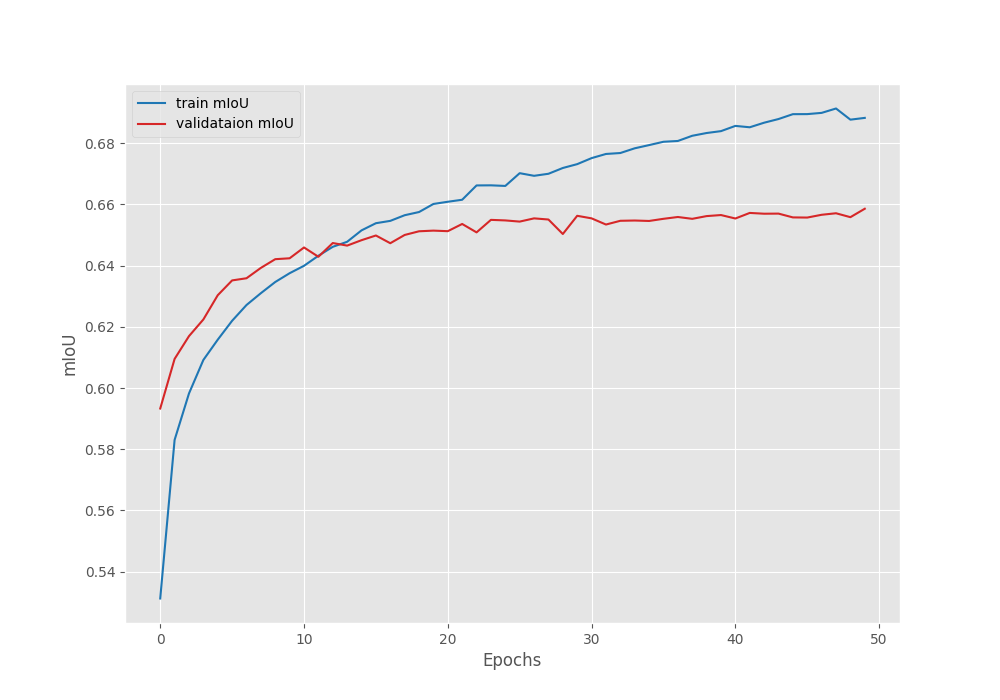
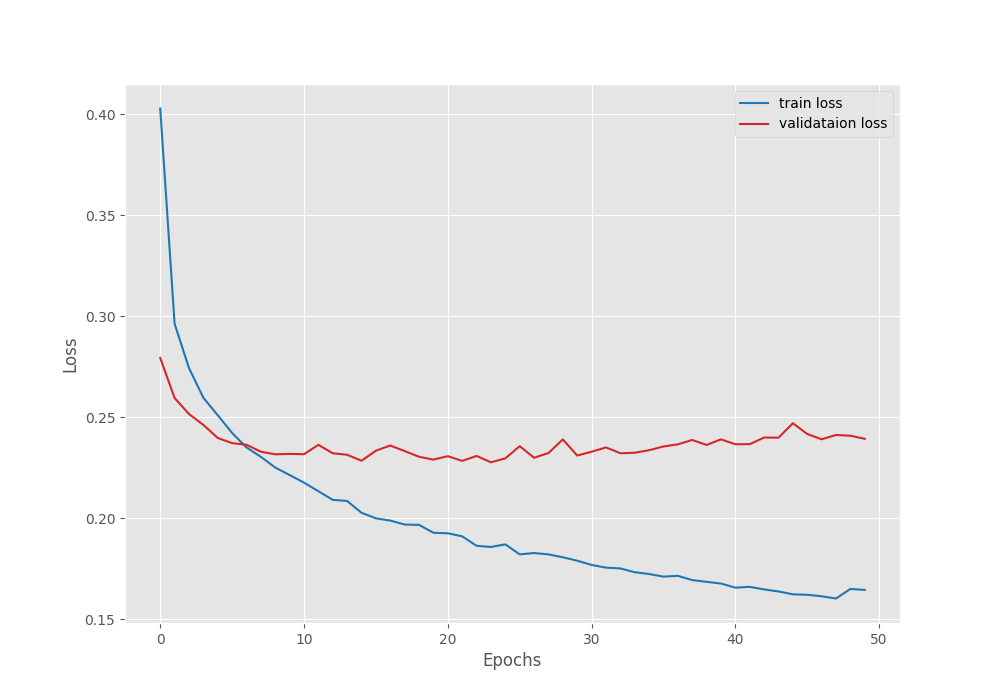
The model reached the best validation Mean IoU of 65.85% on the last epoch.
EPOCH: 50
Training
100%|████████████████████| 1609/1609 [08:16<00:00,  3.24it/s]
Validating
100%|████████████████████| 250/250 [00:51<00:00,  4.82it/s]

Best validation IoU: 0.6585902566690444

Saving best model for epoch: 50

Train Epoch Loss: 0.1645, Train Epoch PixAcc: 0.9354, Train Epoch mIOU: 0.688276
Valid Epoch Loss: 0.2393, Valid Epoch PixAcc: 0.9182 Valid Epoch mIOU: 0.658590
Here are the graphs from the training run.
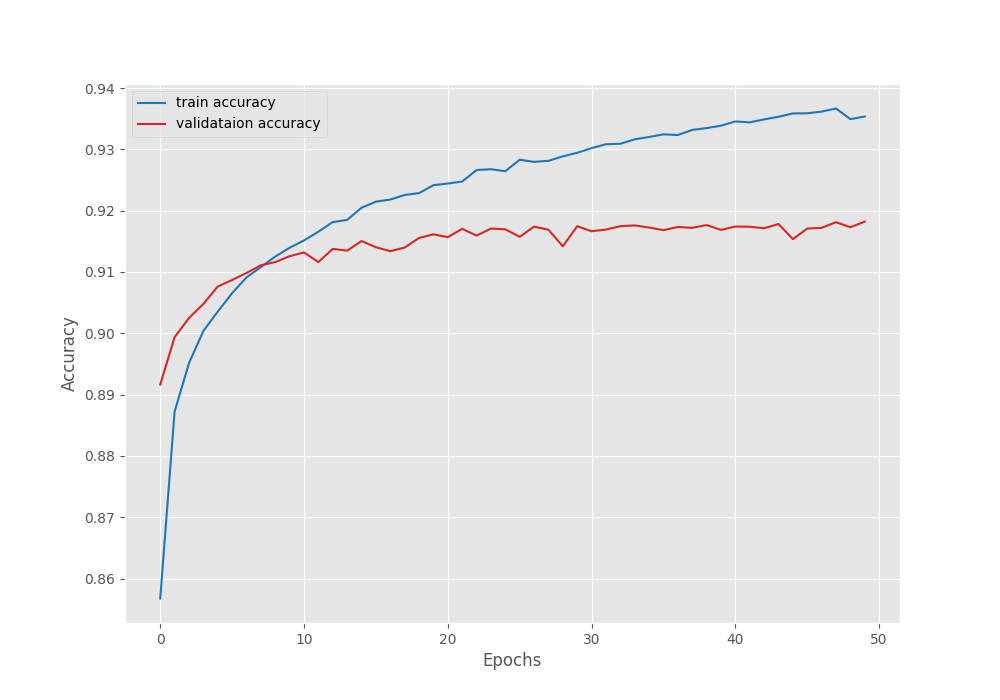
With a learning rate scheduler, we can train the model for even longer.
Exporting the IDD Segmentation LRASPP MobileNetV3 Model to ONNX Format
Now, we will write a simple script to export the fine tuned model to ONNX format.
For the ONNX conversion and the ONNX runtime, we are using the following versions.
- onnx==1.16.0
- onnxruntime-gpu==1.15.0
These are already a part of the requirements.txt file so, we need not install them again manually.
Following is the code in the onnx_export.py file to convert the model to ONNX format.
"""
Convert the fine-tuned PyTorch segmentation model to ONNX format.
"""

import torch
import torch.onnx

from model import prepare_model
from config import ALL_CLASSES

model = prepare_model(len(ALL_CLASSES))
ckpt = torch.load('../outputs/new_training/best_model_iou.pth')
model.load_state_dict(ckpt['model_state_dict'])
model.eval()

# Create a dummy input tensor
dummy_input = torch.randn(1, 3, 720, 1024)

# Export the model
torch.onnx.export(model,         # model being run
                  dummy_input,       # model input (or a tuple for multiple inputs)
                  '../idd_model.onnx',   # where to save the model (can be a file or file-like object)
                  export_params=True,  # store the trained parameter weights inside the model file
                  opset_version=11,   # the ONNX version to export the model to
                  do_constant_folding=True,  # whether to execute constant folding for optimization
                  input_names = ['model_input'],   # the model's input names
                  output_names = ['model_output'], # the model's output names
                  dynamic_axes={'model_input' : {0 : 'batch_size'},    # variable length axes
                                'model_output' : {0 : 'batch_size'}})
We load the model weights from the directory, create a dummy input of the same dimensions as the training process, and export the model. The exported model will be saved in the project’s root directory.
We can execute the following command to export the fine tuned LRASPP MobileNetV3 model.
python onnx_export.py
Inference using the ONNX Exported Model
In the last article, we were getting somewhere between 35-45 FPS during the forward pass on the RTX 3080 GPU. Let’s check the performance gain with the exported model.
The ONNX inference code is present in the onnx_inference_video.py file. It is a standalone script without any dependency on PyTorch, other configuration files, and scripts. So, we can use the ONNX exported weights and this script to run the inference anywhere. The script contains the command line arguments to pass the input video and the computation device.
Let’s run inference on the GPU first.
python onnx_inference_video.py --input ../input/inference_data/video_2.mov --device gpu
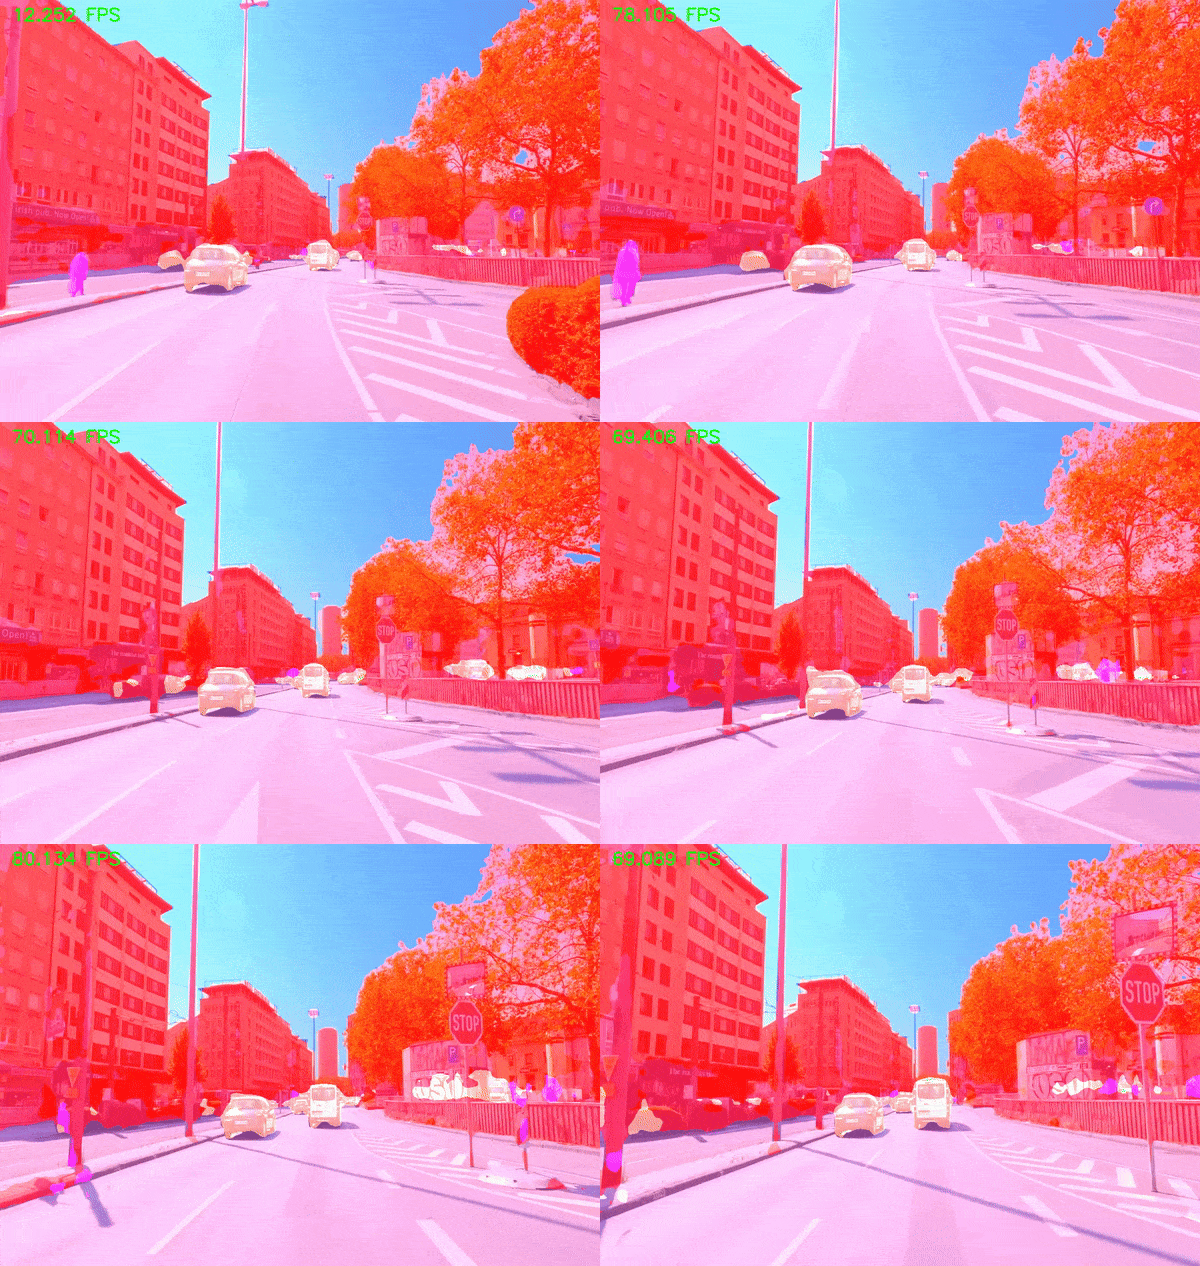
Following is the output that we get.
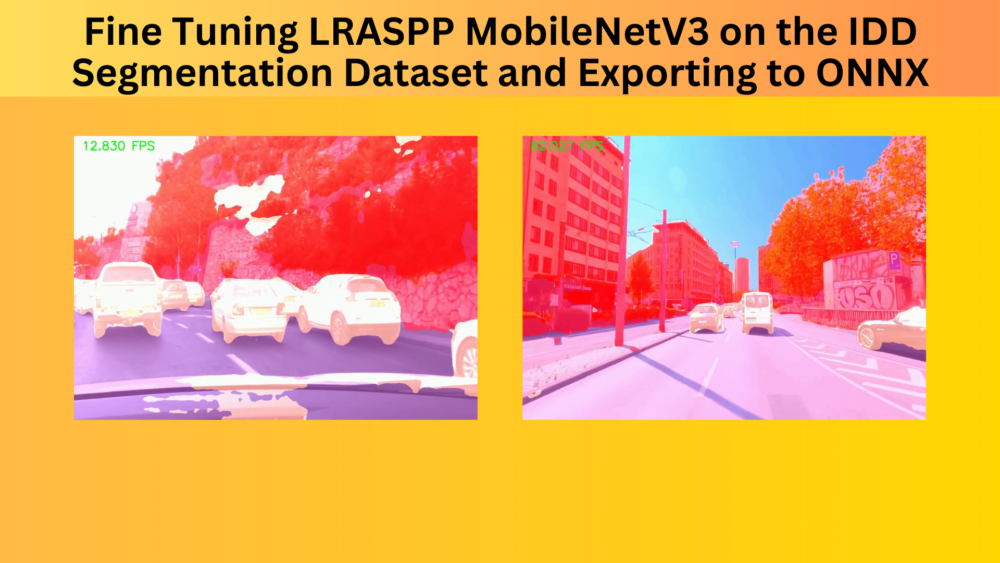
We are easily getting more than 75 FPS during the forward pass of the model. This is a huge boost compared to the 45 FPS using the PyTorch weights. Remember, we did not optimize the model explicitly. We just exported the model to ONNX and it applied the default optimizations.
Now, coming to the results. The model seems to be able to segment the cars and roads properly. Of course, the results will improve a lot with more training.
Let’s try the same video but on the CPU.
python onnx_inference_video.py --input ../input/inference_data/video_2.mov --device cpu
This time, we are getting somewhere between 13 FPS to 15 FPS. Considering the inference is running at a resolution of 1024×720, the FPS is not bad at all.
Following is another inference experiment result from a different video.
Compared to the previous article’s results, the flickering has reduced a lot. The model is also able to segment the persons now. Although the segmentation maps are not perfect, overall, with an increase in the dataset, the results are much better.
Summary and Conclusion
In this article, we carried out the fine tuning of the LRASPP MobileNetV3 on IDD segmentation dataset. We observed first hand, how we can overcome the limitations of a small model by increasing the training dataset samples. We also exported the model to ONNX format to optimize the inference process. I hope that this article was worth your time.
If you have any doubts, thoughts, or suggestions, you can leave them in the comment section. I will surely address them.
You can contact me using the Contact section. You can also find me on LinkedIn, and Twitter.

