
In this article, we will fine tune the StarCoder2-3B model for instruction following.
Coding assistants are starting to prove useful for software developers across all fields. Most common use cases trace back to either ChatGPT or GitHub co-pilot. But what if we want a small, performant, and fast, local coding assistant? We will explore that in this article. In this article, we will fine tune the StarCoder2-3B model on the same dataset that was used to train StarCoder2-15B to create an instruction tuned version of the model.
This is the first part of the article in fine tuning StarCoder2-3B. In the next article, we will convert the model to GGUF format and upload it to Ollama.
We will cover the following topics in this article
- An overview of the self-aligning instruction tuning dataset.
- Cloning and setting up the official repository.
- Preparing the dataset in the correct format.
- Training and inference.
The Self-Align Instruction Tuning Dataset to Fine Tune StarCoder2-3B
The dataset that we are using here is part of the open-source project by BigCode to instruction tune StarCoder2-15B.
In the repository, the authors elaborate on how the dataset was created for self-aligning the model without any human interventions.
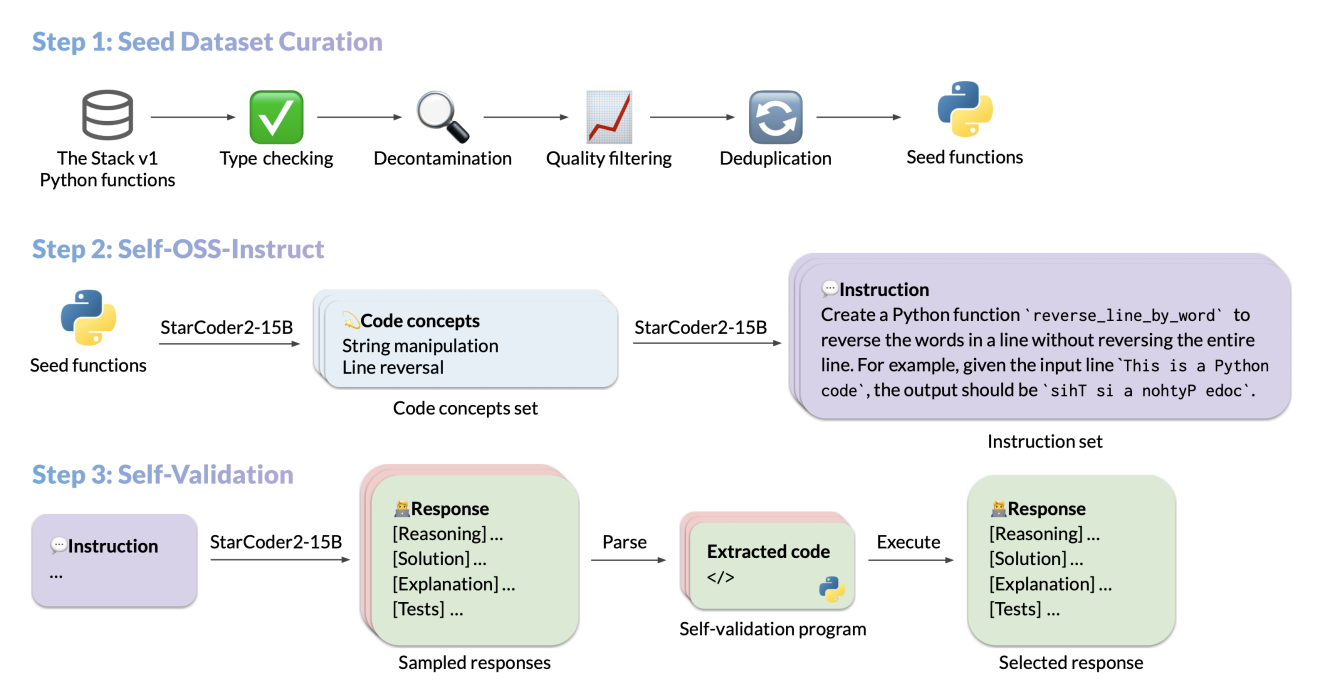
I highly recommend going through the blog post to understand more about the dataset curation process.
In the end, we have an instruction tuning dataset of 50000 Python code samples.
Why fine-tune another model, when we already have a 15B model?
A 15B parameter LLM is difficult to run on limited resources. If we fine tune the StarCoder2-3B model on the same dataset, then we can have a local LLM that can run even on a 6GB GPU with 4-bit quantization with enough overhead for context.
Directory Structure
As we will use the official GitHub repository for training purpose, the following directory structure mostly matches it with a few changes.
starcoder2-self-align/
├── evaluation
│   ├── evalplus_results
│   ├── README.md
│   └── text2code.py
├── inference.py
├── LICENSE
├── outputs_starcoder3b_4e
│   ├── config.json
│   ├── generation_config.json
│   ├── merges.txt
│   ├── model-00001-of-00002.safetensors
│   ├── model-00002-of-00002.safetensors
│   ├── model.safetensors.index.json
│   ├── README.md
│   ├── special_tokens_map.json
│   ├── tokenizer_config.json
│   ├── tokenizer.json
│   ├── trainer_state.json
│   ├── training_args.bin
│   └── vocab.json
├── prompts
│   └── self-ossinstruct-fewshot.txt
├── pyproject.toml
├── README.md
├── requirements.txt
├── seed_gathering
│   ├── benchmark_data.py
│   ├── filter_dataset.py
│   ├── generate_from_the_stack.py
│   ├── high_quality_subset.py
│   ├── README.md
│   ├── requirements.txt
│   ├── tree_sitter_parser.py
│   └── tree-sitter-python
├── src
│   ├── star_align
│   └── star_align.egg-info
├── train-00000-of-00001.parquet
├── train_data.jsonl
├── training_commands
└── wandb
    ├── ...
    └── run-20240727_152631-4hpkpdta
Apart from the official content, we have the inference.py script that we will use for prompting the trained model and generating responses.
The inference script is available for download via the download button.
Download Code
Fine Tuning StarCoder2-3B
Before we can get into the fine-tuning process, the first step is cloning the repository and setting up the environment.
Installing Dependencies
We will use the official GitHub codebase for the full fine tuning purpose. First, let’s clone the repository.
git clone https://github.com/bigcode-project/starcoder2-self-align.git
As the codebase uses Flash Attention 2, please ensure that you have CUDA installed on your system.
Then we can install Flash Attention 2.
pip install flash-attn
To train the StarCoder2 models, we need to install the package. This makes the commands available via the terminal.
pip install -e .
The above also installs all the remaining dependencies from the requirements.txt file.
Preparing the Instruction Tuning Dataset for Fine Tuning StarCoder2-3B
The self-oss-instruct-sc2-exec-filter-50k available on Hugging Face is in parquet format. However, the training script expects it to be in JSONL format. For that, we need to first download it and then covert it. We can easily do it with two lines of code. You may execute the following in the terminal with Python interpreter or a Jupyter Notebook inside the cloned starcoder2-self-align directory.
from datasets import load_dataset

load_dataset("bigcode/self-oss-instruct-sc2-exec-filter-50k", split="train").to_json("train_data.jsonl", lines=True)
The above code downloads the dataset from Hugging Face Datasets, coverts it to JSON format, and stores the train_data.jsonl in the same directory.
Starting the Fine Tuning Process of StarCoder2-3B
Before moving forward with the fine tuning process, it is essential to know that we are doing a full fine tuning here. So, the computational requirements are quite high. The training experiments explained in this article were carried out on a machine with 40 GB A100 GPU.
If you wish to use the model directly instead of training it, you can find it on Hugging Face.
To start the training, we need to execute the following command in the terminal.
MODEL_KEY=bigcode/starcoder2-3b
LR=1e-5
EPOCH=4
SEQ_LEN=1280
WARMUP_RATIO=0.05
OUTPUT_DIR=outputs_starcoder3b_4e
DATASET_FILE=train_data.jsonl
accelerate launch -m star_align.train \
    --model_key $MODEL_KEY \
    --model_name_or_path $MODEL_KEY \
    --use_flash_attention True \
    --datafile_paths $DATASET_FILE \
    --output_dir $OUTPUT_DIR \
    --bf16 True \
    --num_train_epochs $EPOCH \
    --max_training_seq_length $SEQ_LEN \
    --pad_to_max_length False \
    --per_device_train_batch_size 2 \
    --gradient_accumulation_steps 256 \
    --group_by_length False \
    --ddp_find_unused_parameters False \
    --logging_steps 1 \
    --log_level info \
    --optim adafactor \
    --max_grad_norm -1 \
    --warmup_ratio $WARMUP_RATIO \
    --learning_rate $LR \
    --lr_scheduler_type linear \
    --attention_dropout 0.0 \
    --residual_dropout 0.0 \
    --embedding_dropout 0.0
We keep all the hyperparameters the same as in the official codebase to get the best results. Some key hyperparameters are:
MODEL_KEY: We need to ensure that we are training the correct model. You may also train the StarCoder2-7B model if you have the computational resources.SEQ_LEN: The sequence length for creating the data loader.per_device_train_batch_size: Batch size for the data loader.
You may try reducing the sequence length and batch size if you train with a GPU with less than 40 GB of VRAM. However, it may impact the model’s performance as it does not get to see a large amount of code in a single pass.
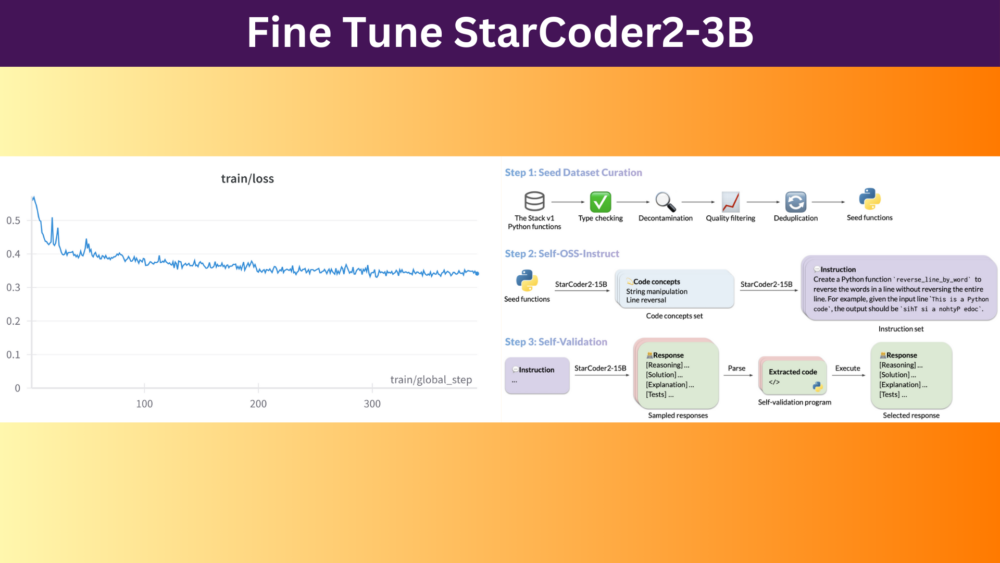
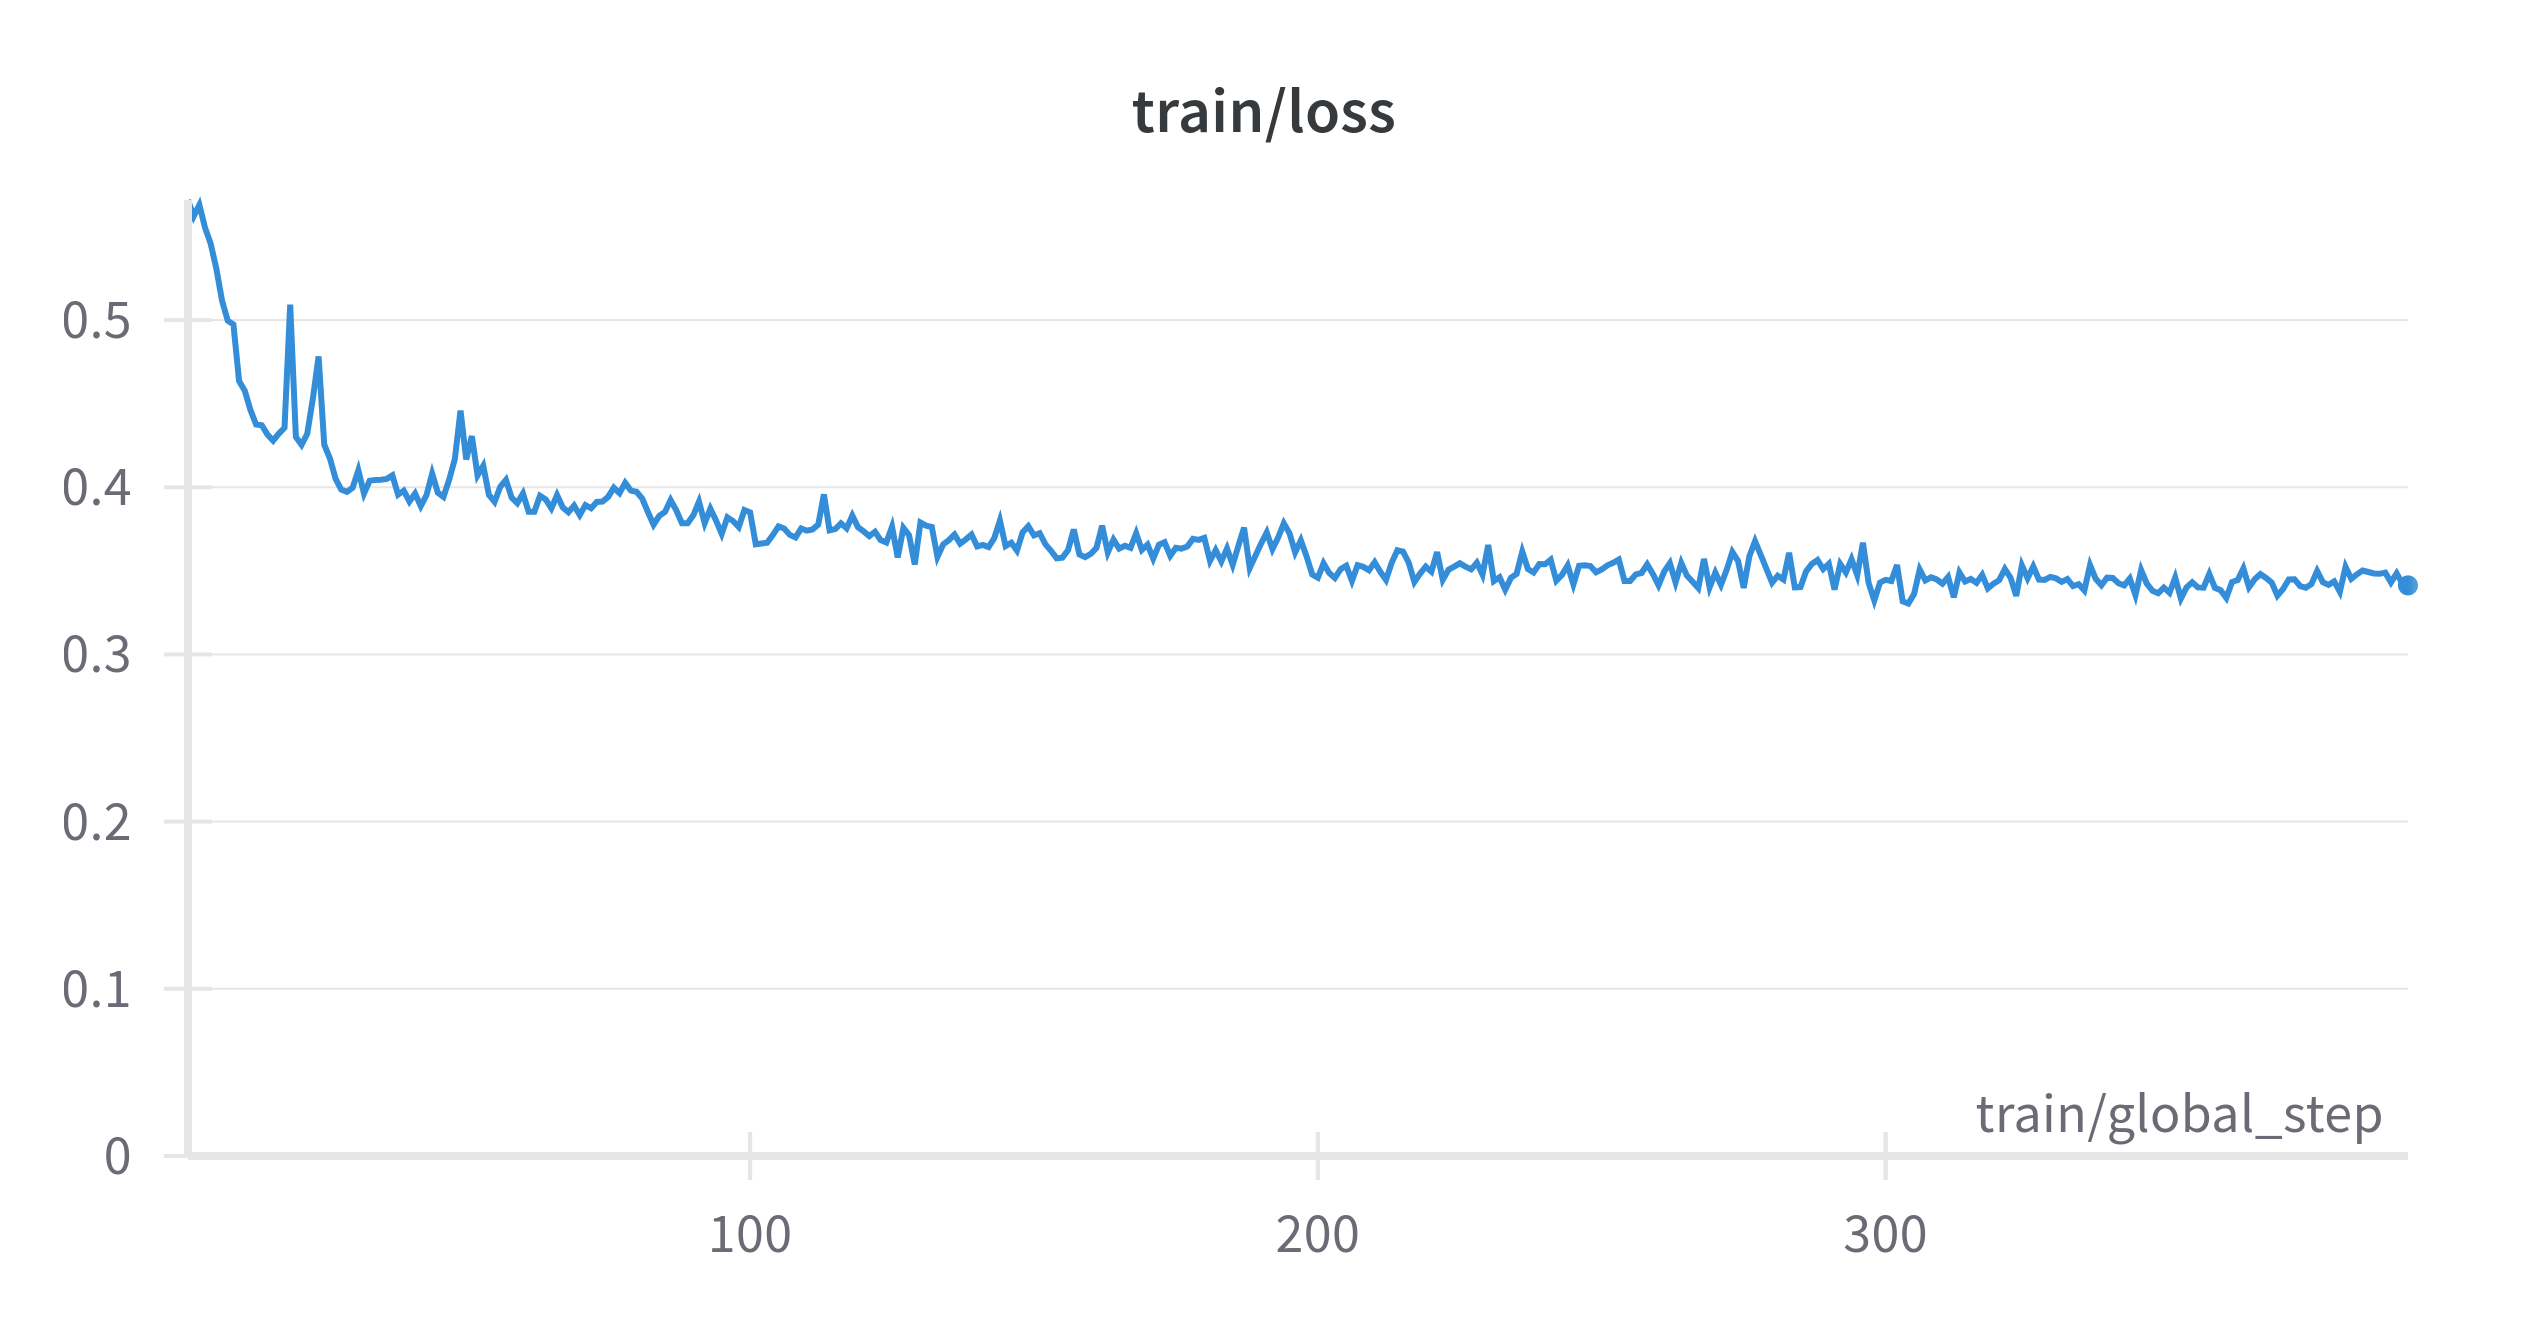
If you have logged in to Weight&Biases through the command line, you can track your training experiments on their dashboard. Following is the training loss graph for the above experiments.
After the training finishes, you can also push the model to your own Hugging Face Models repository.
Following are the exact details of fine tuning StarCoder2-3B:
- 4 epochs
- Training type: Full fine tuning
- Training time: ~4 hours
- Batch size: 2
- Gradient accumulation step: 256
- Sequence length: 1280
Inference Using The Fine Tuned StarCoder2-3B
The inference script that we will use here is a modified version from the official StarCoder2 repository.
We just change the model path to the fine-tuned StarCoder2-3B model on Hugging Face. If you train and upload your version of the model, you can use that as well.
import transformers
import torch
import argparse

parser = argparse.ArgumentParser()
parser.add_argument(
    '--prompt',
    help='user prompt',
    default='Write Matplotlib code to read and display an image'
)
args = parser.parse_args()

pipeline = transformers.pipeline(
    model='sovitrath/starcoder2-3b-instruct',
    task='text-generation',
    torch_dtype=torch.bfloat16,
    device_map='auto',
)

def respond(instruction: str, response_prefix: str) -> str:
    messages = [{'role': 'user', 'content': instruction}]
    prompt = pipeline.tokenizer.apply_chat_template(messages, tokenize=False)

    prompt += response_prefix

    teminators = [
        pipeline.tokenizer.eos_token_id,
        pipeline.tokenizer.convert_tokens_to_ids('###'),
    ]

    result = pipeline(
        prompt,
        max_length=1024,
        num_return_sequences=1,
        do_sample=False,
        eos_token_id=teminators,
        pad_token_id=pipeline.tokenizer.eos_token_id,
        truncation=True,
    )
    response = response_prefix + result[0]['generated_text'][len(prompt) :].split('###')[0].rstrip()
    return response


instruction = args.prompt
response_prefix = ''

print(respond(instruction, response_prefix))
In the above script, we import the necessary arguments and have a command line argument parser to pass user prompts while executing the code.
First, we load the model and then have a respond function that accepts the user prompt and a response_prefix. Next, we define the message and apply the tokenizer to the chat template that will add all the necessary strings that the model recognizes. We discuss more about chat/prompt templates in this article while creating a custom Phi-3 Gradio chat application.
Finally, we pass the prompt through the pipeline and return the response to be printed on the terminal.
Let’s execute the script with the default prompt.
python inference.py
We get the following output from the model.
Here's how you can do it in Python:

```python
import matplotlib.pyplot as plt

image_path = 'path/to/image.png'
image = plt.imread(image_path)
plt.imshow(image)
plt.show()
```
This looks correct. However, it was a simple prompt. Now, let’s try something more complex.
python inference.py --prompt "Write the Transformer Encoder from scratch in PyTorch"
Following is the model response.
Here's how you can implement the Transformer Encoder in PyTorch:

```python
import torch
import torch.nn as nn

class TransformerEncoder(nn.Module):
    def __init__(self, d_model, nhead, num_layers, dim_feedforward=2048, dropout=0.1):
        super(TransformerEncoder, self).__init__()
        self.encoder_layer = nn.TransformerEncoderLayer(d_model, nhead, dim_feedforward, dropout)
        self.transformer_encoder = nn.TransformerEncoder(self.encoder_layer, num_layers)

    def forward(self, src):
        return self.transformer_encoder(src)
```
Instead of writing it from scratch, the model imports it from PyTorch, and we could do a few minor adjustments as well. However, the code is correct and will run as well.
For the last prompt, let’s give it something more complex. We will ask the model to create a custom image classifier model in Numpy.
python inference.py --prompt "Implement a simple CNN image classifier in Numpy"
We get the following output from the model.
Here's how you can implement a simple CNN image classifier in Numpy:

```python
import numpy as np

def conv2d(image, kernel):
    """
    Performs a 2D convolution on an image and a kernel.
    """
    output = np.zeros_like(image)
    for i in range(image.shape[0] - kernel.shape[0] + 1):
        for j in range(image.shape[1] - kernel.shape[1] + 1):
            output[i, j] = (image[i:i+kernel.shape[0], j:j+kernel.shape[1]] * kernel).sum()
    return output

def max_pool2d(image, kernel_size):
    """
    Performs a 2D max pooling on an image.
    """
    output = np.zeros((image.shape[0] // kernel_size, image.shape[1] // kernel_size))
    for i in range(output.shape[0]):
        for j in range(output.shape[1]):
            output[i, j] = image[i*kernel_size:(i+1)*kernel_size, j*kernel_size:(j+1)*kernel_size].max()
    return output

def conv_pool_layer(image, kernel, kernel_size):
    """
    Performs a convolution and a max pooling operation on an image.
    """
    conv_output = conv2d(image, kernel)
    pool_output = max_pool2d(conv_output, kernel_size)
    return pool_output

def fully_connected_layer(image, kernel):
    """
    Performs a fully connected layer operation on an image.
    """
    output = np.zeros_like(image)
    for i in range(image.shape[0]):
        for j in range(image.shape[1]):
            output[i, j] = (image[i, j] * kernel).sum()
    return output

def cnn_image_classifier(image, kernel, kernel_size):
    """
    Performs a CNN image classifier on an image.
    """
    conv_output = conv_pool_layer(image, kernel, kernel_size)
    fc_output = fully_connected_layer(conv_output, kernel)
    return fc_output
```
This time, the code is not entirely correct. There are a few issues with the conv2d function, the implementation of the fully_connected_layer is wrong, and the model did not handle the flattening of the input as well. This goes on to show how difficult it can be to create a small coding LLM. Of course, with more training, and more instruction tuning data it will improve, but that requires more resources as well.
Summary and Conclusion
In this article, we fine tuned the StarCoder2-3B model for instruction following. We discussed the setup, the dataset praparation, training, and carried out inference as well. Along the way, we discovered the limitation of our fine tuned model as well. In the next article, we will understand how to add such a fine tuned model to Ollama. I hope this article was worth your time.
If you have any doubts, thoughts, or suggestions, please leave them in the comment section. I will surely address them.
You can contact me using the Contact section. You can also find me on LinkedIn, and X.
References

1 thought on “Fine Tune StarCoder2-3B”