
With the emergence of LLMs, RAG (Retrieval Augmented Generation) is a new way of infusing updated knowledge into them. Starting from basic search queries to chatting with large documents, RAG has innumerable useful applications. At the moment, the deep learning industry is seeing a flood of RAG libraries, vector databases, and pipelines. However, we will take a different and simpler approach in this article. We will create a custom RAG pipeline from scratch, and, of course, with an LLM chat element.
First, let’s clarify what this article is not about:
- This is not an introduction to RAG and RAG based libraries.
- Neither is this a detailed writeup of Vector DBs.
- Nor is this an introduction to embedding models.
Instead, we cover the following points in this article:
- How to create vector embeddings for text and PDF files?
- How to create and manage text chunks for embedding models?
- When to search for files only based on a query and when to return context for LLM calls?
To put it forward from the beginning, our codebase will employ Sentence Transformers for embedding generation and Phi-3 Mini for LLM calls.
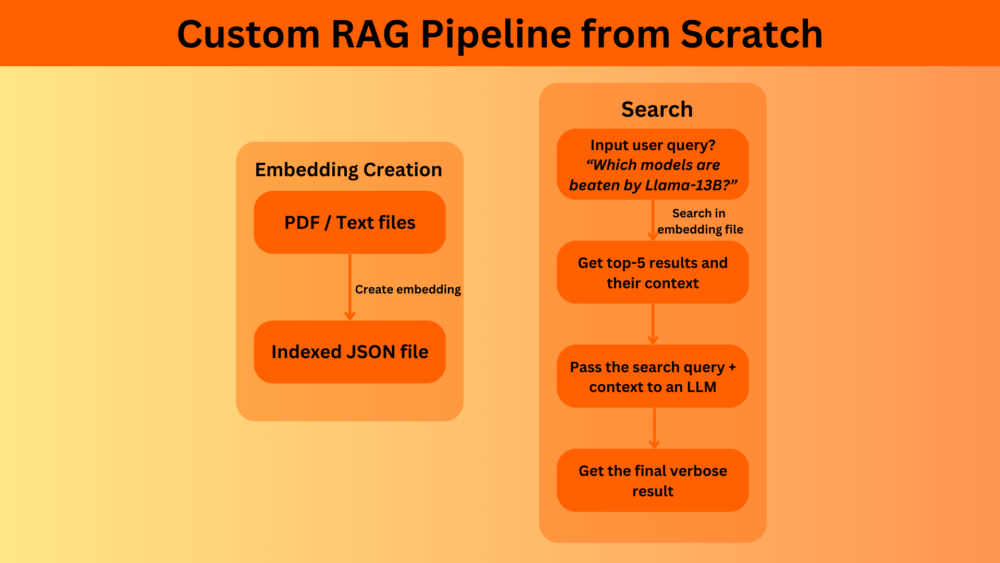
How Does a Simple RAG Pipeline Work?
- We first create vector embeddings of the files that we want to search or chat with using an embedding model.
- Then we input a user query. This user query is again converted to vector embeddings and matched with each of the vector chunks stored in the indexed file. The text chunks corresponding to the highest-rated (Top K) vector chunks are returned.
- If an LLM chat element is in the loop, then the same user query and the retrieved text context is passed to the LLM to get an elaborate answer.
Project Directory Structure
Following is the project directory structure.
├── data
│   └── readme.txt
├── LICENSE
├── README.md
├── requirements.txt
├── setup.sh
└── src
    ├── create_embeddings.py
    ├── csv_to_text_files.py
    ├── llm.py
    ├── pdf_file_check.py
    ├── search.py
    └── train.py
As we are using a specific commit, the codebase is complete with the requirements files, license, and an src and a data directory.
- The
srcdirectory contains all the source code that we will need along with some additional Python scripts that we can safely skip. - The
datadirectory is where we will store the PDF and text files.
Download Code
Installing Dependencies
PyTorch and Sentence Transformers are two of the primary requirements. You can safely install all the requirements by executing the shell script.
sh setup.sh
Custom RAG Pipeline from Scratch

From here onwards, we will explore the necessary code files to understand how we can create a simple RAG pipeline from scratch. These are the files we will focus on:
create_embeddings.pyllm.pysearch.py
For now, we can ignore the other files.
Creating File Embeddings
Let’s start with the create_embeddings.py file. The function of this script is simple, to create embeddings from text files and PDFs. We are not choosing any complex database or Vector DBs here. Instead, we will simply store the embeddings in JSON files. There are other nuances as well that we will figure out as we go through the script.
Starting with the import statements.
import os
import json
import argparse
import multiprocessing
import glob as glob

from sentence_transformers import SentenceTransformer
from tqdm.auto import tqdm
from pypdf import PdfReader
from joblib import Parallel, delayed

multiprocessing.set_start_method('spawn', force=True)
Here are the important modules and libraries:
SetenceTransformers: We will choose embedding models from theSentenceTransformers. They have several pretrained models that work well out of the box.pypdf: To read PDF files.joblib: Sometimes, we may need to create embeddings of thousands of files in a directory. Sequential processing will be extremely slow in such cases. For this, we will usejoblibto parallelize the entire process.
Additionally, with joblib, multiple CUDA processes need to be spawned as each process will store a copy of the model. To handle, this, we need multiprocessing as well as we have set above.
Necessary Command Line Arguments
As we are creating a custom RAG pipeline from scratch, the users will need flexibility. So, we have several command line arguments to control how the script should behave.
parser = argparse.ArgumentParser()
parser.add_argument(
    '--add-file-content',
    dest='add_file_content',
    action='store_true',
    help='whether to store the file content in the final index file or not'
)
parser.add_argument(
    '--index-file-name',
    dest='index_file_name',
    help='file name for the index JSON file',
    required=True
)
parser.add_argument(
    '--directory-path',
    dest='directory_path',
    help='path to the directory either conteining text of PDF files',
    required=True
)
parser.add_argument(
    '--model',
    default='all-MiniLM-L6-v2',
    help='embedding model id from hugging face'
)
parser.add_argument(
    '--chunk-size',
    dest='chunk_size',
    default=512,
    type=int,
    help='chunk size of embedding creation and extracing content if needed'
)
parser.add_argument(
    '--overlap',
    default=50,
    type=int,
    help='text overlap when creating chunks'
)
parser.add_argument(
    '--njobs',
    default=8,
    help='number of parallel processes to use'
)
args = parser.parse_args()
Let’s go over the arguments:
--add-file-content: Sometimes, our use case may only demand searching specific file names in a directory. This requires only storing the vector embeddings and not the file content in the index file. In case, we need to extract the content while searching as well, we should pass this boolean argument while executing the script.--index-file-name: The name of the index file, e.g.index_file.json. This will be stored in the data directory.--directory-path: Each time we need to provide a directory path where text files of PDFs are present whose embeddings we want to generate.--model: The model tag from the Sentence Transformers library. Default isall-MiniLM-L6-v2.--chunk-size: The chunk size of text before creating embeddings. For best results, this needs to be approximately the same as the maximum sequence length the embedding model was trained with.--overlap: Number of characters overlap between the chunks.--njobs: The number of parallel processes to create for generating embeddings. We need to deal with this carefully as multiple processes need more GPU memory. For example, if a model consumes 1 GB of GPU memory, then creating 4 processes will need 4 GB of memory.
The following code block defines the model and computation device.
# Load SBERT model
model_id = args.model
model = SentenceTransformer(model_id)
# Device setup (not needed for SentenceTransformer as it handles it internally)
device = model.device
print(device)

# -1 = embed all files
total_files_to_embed = -1
We also have a variable called total_files_to_embed. If there are a large number of files in a directory and we want to embed only a few, then we can just change this to that number. A value of -1 will create embeddings for all the files. This will change to a command line argument in the future.
Helper Functions
We have quite a few helper functions. The docstring at the moment is lacking and will improve in the GitHub project page in the future. The following code block contains all the functions.
def file_reader(filename):
    if filename.endswith('.txt'):
        with open(os.path.join(filename), 'r', errors='ignore') as file:
            content = file.read()

            return content

    elif filename.endswith('.pdf'):
        reader = PdfReader(os.path.join(filename))
        all_text = ''
        for page in reader.pages:
            all_text += page.extract_text() + ' '

        return all_text

def extract_features(text):
    """
    Extracts embeddings from a given text using the SentenceTransformer model.

    :param text: The text to embed.

    Returns:
        embeddings: A list of embeddings.
    """
    embeddings = model.encode(text)
    return embeddings

def chunk_text(text, chunk_size=512, overlap=50):
    """Chunk the text into overlapping windows."""
    words = text.split()
    chunks = []
    for i in range(0, len(words), chunk_size - overlap):
        chunk = ' '.join(words[i:i + chunk_size])
        chunks.append(chunk)
        if i + chunk_size >= len(words):
            break
    return chunks

def encode_document(
    filename, documents, add_file_content, content, chunk_size=512, overlap=50
):
    """Encode the document in chunks."""
    chunks = chunk_text(content, chunk_size, overlap)

    if not chunks:  # If no chunks are possible.
        features = extract_features(content).tolist()
        if add_file_content: # If original file content to be added.
            documents.append({
                'filename': filename,
                'chunk': 0,
                'content': content,
                'features': features
            })
        else:
            documents.append({
                'filename': filename,
                'chunk': 0,
                'features': features
            })

    else:
        for i, chunk in enumerate(chunks):
            features = extract_features(chunk).tolist()
            if add_file_content: # If original file content to be added.
                documents.append({
                    'filename': filename,
                    'chunk': i,
                    'content': chunk,
                    'features': features
                })
            else:
                documents.append({
                    'filename': filename,
                    'chunk': i,
                    'features': features
                })

    return documents

def load_and_preprocess_text_files(documents, filename):
    """
    Loads and preprocesses text files in a directory.

    :param directory: The directory containing the text files.

    Returns:
        documents: A list of dictionaries containing filename and embeddings.
    """
    content = file_reader(filename)

    documents = encode_document(
        filename,
        documents,
        args.add_file_content,
        content,
        chunk_size=args.chunk_size,
        overlap=args.overlap
    )

    return documents
file_reader()
It is a simple function that checks whether the file is a text file or a PDF and extracts the content accordingly.
extract_features()
This function accepts chunks of text files and creates embeddings by passing them through the Sentence Transformer embedding model.
chunk_text()
This function creates chunks from the entire document according to the chunk size and the overlap that we pass from the command line.
encode_document()
The embeddings from the chunks have to be indexed in an appropriate format. For that, we need a dictionary with the necessary key-value pairs. Additionally, this function also handles whether the file content (raw) text will be stored in the dictionary or not.
load_and_preprocess_text_files()
This function calls the encode_document() function with the necessary parameters and returns the populated document dictionary.
Main Block
To combine everything, we have the main code block at the end.
if __name__ == '__main__':
    results = []

    all_files = glob.glob(os.path.join(args.directory_path, '**'), recursive=True)
    all_files = [filename for filename in all_files if not os.path.isdir(filename)]
    print(all_files)
    all_files.sort()
    if total_files_to_embed > -1:
        files_to_embed = all_files[:total_files_to_embed]
    else:
        files_to_embed = all_files

    results = Parallel(
        n_jobs=args.njobs,
        backend='multiprocessing'
    )(delayed(load_and_preprocess_text_files)(results, filename) \
            for filename in tqdm(files_to_embed, total=len(files_to_embed))
        )

    documents = [res for result in results for res in result]

    # Save documents with embeddings to a JSON file
    with open(os.path.join('..', 'data', args.index_file_name), 'w') as f:
        json.dump(documents, f)
This encapsulates everything and runs the parallel processing for creating the file embeddings. In the end, we store the file as a JSON file in the data directory.
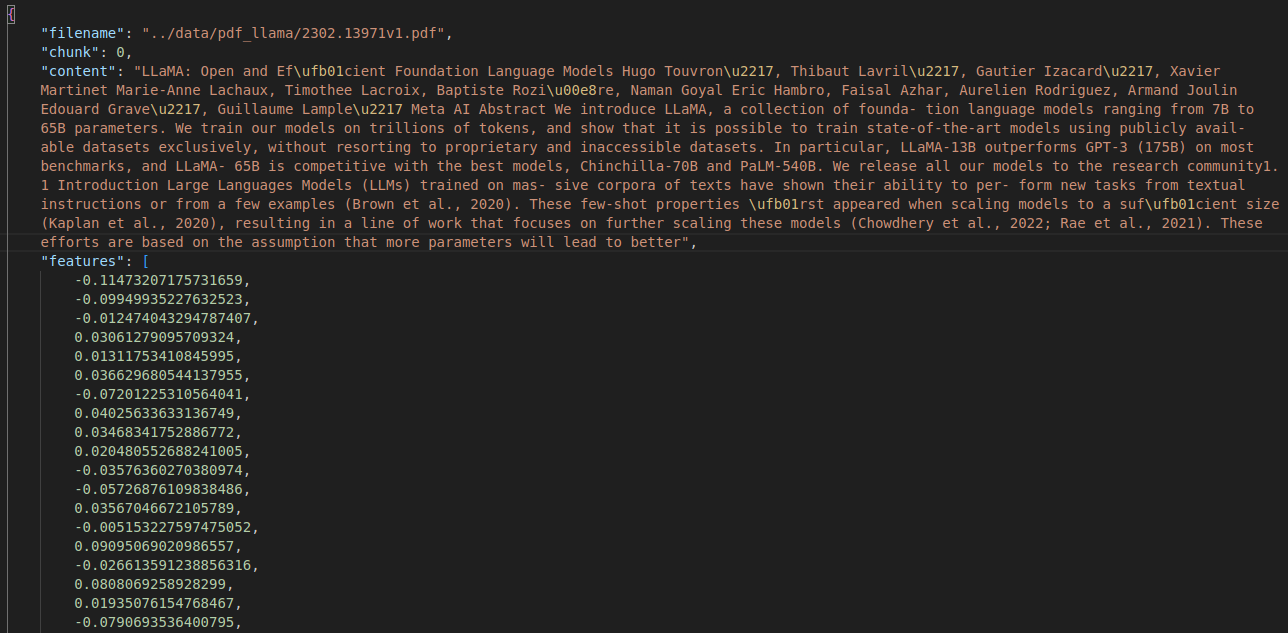
The following image shows what an indexed file looks like with the stored context.
To create the vector embeddings of PDF, we can keep it in a subdirectory in the data directory and execute the following command within the src directory.
python create_embeddings.py --index-file-name llama.json --add-file-content --directory-path ../data/pdf_llama/ --chunk-size 200 --overlap 32
We create the index file for the Llama 1 paper here that we will later use for retrieval and LLM chat. The llama.json file will be stored in the data directory.
Script for LLM Call
We have the llm.py file which facilitates calling an LLM with the user query and the retrieved context. This is helpful when wanting a detailed answer to a query.
Here, we will use the Phi-3 Mini 4K model.
The following code block includes the necessary imports, initializing the model, and defining a context length.
from transformers import (
    AutoModelForCausalLM,
    AutoTokenizer,
    BitsAndBytesConfig,
    AutoProcessor
)

device = 'cuda'

quant_config = BitsAndBytesConfig(
    load_in_4bit=True
)

tokenizer = AutoTokenizer.from_pretrained('microsoft/Phi-3-mini-4k-instruct')
model = AutoModelForCausalLM.from_pretrained(
    'microsoft/Phi-3-mini-4k-instruct',
    quantization_config=quant_config,
    device_map=device
)
processor = AutoProcessor.from_pretrained('microsoft/Phi-3-mini-4k-instruct')

CONTEXT_LENGTH = 3800 # This uses around 9.9GB of GPU memory when highest context length is reached.
Whenever the user query + the retrieved context will be more than 3800 tokens, they will be truncated to 3800 tokens. Along with the need to manage the context length according to what the model supports, this helps in keeping the memory requirement in check when running locally on GPUs with less VRAM.
The next code block contains the function that processes the input and generates the tokens.
def generate_next_tokens(user_input, context, history):
    print('History: ', history)
    print('*' * 50)

    chat = [
        {'role': 'user', 'content': 'Hi'},
        {'role': 'assistant', 'content': 'Hello.'},
        {'role': 'user', 'content': user_input + '\n' + 'Answer the above question based on the following context:\n' + context},
    ]

    template = tokenizer.apply_chat_template(
        chat,
        tokenize=False,
        add_generation_prompt=True
    )

    print(template)

    if len(history) <= 1:
        prompt = '<s>' + template
    else:
        prompt = '<s>'
        for history_list in history:
            prompt += f"<|user|>\n{history_list[0]}<|end|>\n<|assistant|>\n{history_list[1]}<|end|>\n"
        prompt += f"<|user|>\n{user_input}<|end|>\n<|assistant|>\n"

    print('Prompt: ', prompt)
    print('*' * 50)

    inputs = tokenizer(prompt, return_tensors='pt').to(device)
    input_ids, attention_mask = inputs.input_ids, inputs.attention_mask

    # A way to manage context length + memory for best results.
    print('Global context length till now: ', input_ids.shape[1])
    if input_ids.shape[1] > CONTEXT_LENGTH:
        input_ids = input_ids[:, -CONTEXT_LENGTH:]
        attention_mask = attention_mask[:, -CONTEXT_LENGTH:]

    print('-' * 100)

    generate_kwargs = {
        "max_new_tokens": 1024
    }

    outputs = model.generate(**inputs, **generate_kwargs)

    answer = tokenizer.batch_decode(outputs[:, inputs['input_ids'].shape[1]:], skip_special_tokens=True)

    print(answer[0])

if __name__ == '__main__':
    generate_next_tokens('Who are you and what can you do?', context='', history='')
This is an extremely simplified version of LLM chat that does not manage any history at the moment. I highly recommend going through the article where we cover the creation of Phi-3 Gradio Chat UI that explains managing user queries and history in much more detail.
You can check whether the script is running properly just by executing it, though not mandatory.
The Search Functionality
The final code file that we need to deal with is search.py.
Following are the imports that we need along the way.
import json
import argparse

from sentence_transformers import SentenceTransformer
from tqdm import tqdm
from llm import generate_next_tokens
Two of the important ones are SentenceTransformer and generate_next_tokens from llm.
Next, we have a few command line arguments that will help us control the search process.
parser = argparse.ArgumentParser()
parser.add_argument(
    '--index-file',
    dest='index_file',
    required=True,
    help='path to an indexed embedding JSON file'
)
parser.add_argument(
    '--extract-content',
    dest='extract_content',
    action='store_true',
    help='whether to print the related content or not \
          as the index file does not always contain file content'
)
parser.add_argument(
    '--model',
    default='all-MiniLM-L6-v2',
    help='embedding model id from hugging face'
)
parser.add_argument(
    '--llm-call',
    dest='llm_call',
    action='store_true',
    help='make call to an llm to restructure the answer'
)
parser.add_argument(
    '--topk',
    default=5,
    type=int,
    help='number of chunks to retrieve'
)
args = parser.parse_args()
--index-file: Accepts the path to the indexed JSON file.--extract-content: A boolean argument specifying whether to extract the text chunks or just output the best matching file names. Only works if--add-file-contentwas used while generating the index file.--model: Tag of the Sentence Transformer embedding model that was used for generating the vector embeddings.--topk: The number of top vector embedding matches to return.--llm-call: Whether to pass the context along with the user query to an LLM for an elaborate answer. Only works if--extract-contentis passed.
The next code block loads the model.
# Load SBERT model
model = SentenceTransformer(args.model)
Helper Functions for Search
Next, we have some helper functions for doing the heavy lifting while searching.
def extract_features(text):
    """Generate SBERT embeddings for the input text."""
    return model.encode(text)

def process_query(query):
    """Preprocess the query and generate SBERT embeddings."""
    query_features = extract_features(query).tolist()
    return query_features

def search(query, documents, top_k=5):
    """Search for the most relevant documents to the query."""
    print('SEARCHING...')
    query_features = process_query(query)
    scores = []
    for document in tqdm(documents, total=len(documents)):
        score = model.similarity([query_features], [document['features']])[0][0]
        scores.append((document, score))
    scores.sort(key=lambda x: x[1], reverse=True)
    return scores[:top_k]

def chunk_text(text, chunk_size=100, overlap=50):
    """Chunk the text into overlapping windows."""
    words = text.split()
    chunks = []
    for i in range(0, len(words), chunk_size - overlap):
        chunk = ' '.join(words[i:i + chunk_size])
        chunks.append(chunk)
        if i + chunk_size >= len(words):
            break
    return chunks

def extract_relevant_part(query, content, chunk_size=96, overlap=8):
    """Extract the part of the content that is most relevant to the query."""
    chunks = chunk_text(content, chunk_size, overlap)
    if not chunks:
        return content  # Return full content if it can't be split

    chunk_embeddings = model.encode(chunks)
    query_embedding = extract_features(query)
    scores = model.similarity([query_embedding], chunk_embeddings).flatten()
    best_chunk_idx = scores.argmax()
    return chunks[best_chunk_idx]

def load_documents(file_path):
    """Load preprocessed documents and embeddings from a JSON file."""
    with open(file_path, 'r') as f:
        documents = json.load(f)
    return documents
extract_features() and process_query()
These two functions convert the user query or any text to vector embeddings by forward passing it through the model.
search()
The search functionality is simply a cosine similarity. For the number of top K vector embeddings that we want to extract, the search() function will match the user query with the vector embeddings stored in the index file.
chunk_text() and extract_relevant_part()
We have additional functionality of highlighting the part of the extracted content in red in case the user query exactly matches a part of the extracted content. This is handled by these two functions. They simply chunk the text into 96 words and match the query again with the chunked text. If the highest matched chunks contain the exact wording, then it is highlighted in red.
load_document()
This function simply loads the index JSON file for further processing.
The Main Code Block
Finally, we have the main code block that combines everything and starts the search.
def main():
    documents_file_path = args.index_file

    # Load documents.
    documents = load_documents(documents_file_path)

    # Example query
    query = input("Enter your search query: ")

    # Perform search
    results = search(query, documents, args.topk)
    relevant_parts = []
    for result in results:
        document = result[0]
        print(f"Filename: {result[0]['filename']}, Score: {result[1]}")
        # Search for relevevant content if `--extract-content` is passed.
        if args.extract_content:
            try:
                document['content']
            except:
                raise AssertionError(f"It looks like you have passed "
                f"`--extract-content` but the document does not contain "
                f"original file content. Please check again... "
                f"Either create a new index file with the file content or "
                f"remove `--extract-content` while executing the search script"
                )

            relevant_part = extract_relevant_part(query, document['content'])
            relevant_parts.append(relevant_part)
            # Few color modifications to make the output more legible.
            if query in relevant_part:
                RED = "\033[31m"
                RESET = "\033[0m"
                relevant_part = relevant_part.replace(query, f"{RED}{query}{RESET}")
            print(f"Relevant part: {relevant_part}\n")

    return relevant_parts, query

if __name__ == "__main__":
    context_list, query = main()

    if args.llm_call:
        context = '\n\n'.join(context_list)

        generate_next_tokens(user_input=query, context=context, history='')
The main() function loads the JSON file, asks the user for an input query on the terminal, and starts the matching process. If we have passed --extract-content, then the relevant part of the user query is also searched in the extracted chunks. If --llm-call is passed, then the generate_next_tokens function is executed with the user input and the extracted content becomes the content.
Executing the Search Functionality
Now, let’s execute the search functionality. For the first use case, let’s just try searching the file that matches the user query the best.
python search.py --index-file ../data/llama.json
So, here, we do not pass --extract-content and pass “Llama LLM” as the search query.

As we have indexed only one file here, so it is not much useful. However, we get a sense of the functionality it serves.
Now, let’s try extracting content with the top 3 chunks.
python search.py --index-file ../data/llama.json --extract-content --topk 3
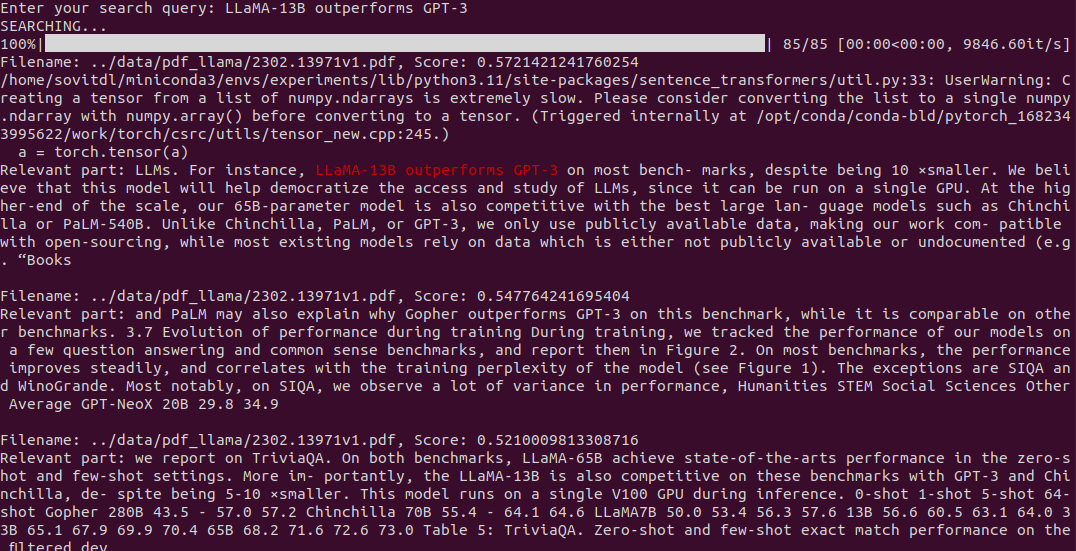
We get nice results in this case. We get the best matching chunks and also part of the text that entirely matches the search query. This makes it a lot easier for the user to focus on the most relevant part.
Next, let’s try asking a question with an LLM call.
python search.py --index-file ../data/llama.json --extract-content --topk 3 --llm-call
We ask “Which models does Llama outperform and which models is it competitive with?”
Note: You will also get to see the structure of the prompt that contains the tokenized prompt template, the user query, and the context that we pass to the Phi-3 model on the terminal.
Following is the output that we get.

The answer looks perfect. If we extract more top K chunks then we can get even better answers. However, as the number of chunks increases, the LLM call time also increases.
The following video shows a complete search + LLM call example.
Takeaways and Limitations
- It is fairly safe to say that a simple custom RAG pipeline from scratch can be set up without using any Vector DBs. And it works quite well.
- However, such a file structure may be difficult to scale up which libraries like Langchain handle quite well.
- At the moment, another limitation is the history. We do not store any history of that chat and no GUI is present for easier querying.
A few of the limitations will be solved in the Local File Search project in the future. So, keep an eye on it if you are interested.
Summary and Conclusion
In this article, we built a simple and custom RAG pipeline from scratch with terminal based interface along with LLM calls. Such a system can prove useful for learning the different components of the RAG pipeline and implementing scalable solutions better with libraries like Langchain. We will implement more scalable real-life projects with Vector DBs and libraries like Langchain in future articles. I hope this article was worth your time.
If you have any doubts, thoughts, or suggestions, please leave them in the comment section. I will surely address them.
You can contact me using the Contact section. You can also find me on LinkedIn, and X.

1 thought on “Custom RAG Pipeline from Scratch”