
In this article, we will cover the process of adding models to Ollama.
Ollama already provides thousands of LLMs. Starting from text completion ones, instruction-tuned, to code LLMs, it has everything. So, what is the need for adding new models to Ollama? Sometimes, we may train an architecture already present on Ollama, but with a different strategy or a different dataset. After training, adding and uploading the model to Ollama makes it simpler for us to access it. It also has the added benefit that everybody else around the globe can use it.
Once we go through the process of adding one custom model to Ollama, we can do so with any model in the future.
Here, we will use the StarCoder2-3B model fine tuned in the last article.
In the previous article, we already trained the model for instruction following.
What are we going to cover in this article?
- How to convert the fine tuned StarCoder2-3B model to GGUF/GGML format?
- How to add the custom model to local Ollama?
- What are the steps to upload the model to the Ollama hub?
- Downloading the model and running it locally for testing.
Let’s jump into the technical details without any further delay.
Prerequisites To Add Models to Ollama
Essentially, we need three components to add a custom trained model to Ollama.
- The custom fine-tuned weights
- Familiarity with llama.cpp
- An Ollama account with local installation
If you need to get familiar with Ollama, check the Getting Started with Ollama article.
Furthermore, it is better to create an Ollama account before moving further into the article.
Next, be sure to clone the llama.cpp repository to your working directory.
$ git clone https://github.com/ggerganov/llama.cpp.git
Then enter the cloned directory and install the requirements.
$ cd llama.cpp
$ pip install -r requirements.txt
Primarily, llama.cpp is meant for running LLMs in GGUF format locally in the CLI. However, it also provides scripts to convert supported Hugging Face checkpoints/custom models to GGUF format.
What are the Steps to Add a Model To Ollama?
- Convert the Hugging Face/Pytorch model to GGUF format using llama.cpp conversion scripts.
- Create an Ollama Modelfile and add the GGUF model to local Ollama. Additionally, define the context length, instruction, and stop parameters in the Modelfile.
- Create a new model repository in our Ollama account and upload the model
Project Directory Structure
Following is the project directory structure. You can maintain a similar structure to use the same commands that we will execute further.
├── gguf_models
│   ├── Modelfile
│   └── starcoder2_3b_instruct_fp16.gguf
├── llama.cpp [38 entries exceeds filelimit, not opening dir]
└── outputs_starcoder3b_4e
    ├── config.json
    ├── generation_config.json
    ├── merges.txt
    ├── model-00001-of-00002.safetensors
    ├── model-00002-of-00002.safetensors
    ├── model.safetensors.index.json
    ├── README.md
    ├── special_tokens_map.json
    ├── tokenizer_config.json
    ├── tokenizer.json
    ├── trainer_state.json
    ├── training_args.bin
    └── vocab.json
- The
llama.cppdirectory is the one that we cloned above. - The
gguf_modelsdirectory contains the converted models and the Modelfile that we will use to create local Ollama models. - And the
outputs_starcoder3b_4econtains the fine-tuned Hugging Face weights and other configuration files.
A PDF file containing all the commands in the article and the Modelfile is downloadable via the download section.
Download Code
Converting the Hugging Face Model to GGUF Format
The first step is converting the Hugging Face model in the outputs_starcoder3b_4e to GGUF format. The process is simple using llama.cpp.
Create a gguf_models directory in the working directory where the converted model will be stored.
Enter the llama.cpp directory.
$ cd llama.cpp
Execute the convert_hf_to_gguf.py script with the necessary arguments.
$ python convert_hf_to_gguf.py ../outputs_starcoder3b_4e/ --outfile ../gguf_models/starcoder3b_instruct.gguf
The first command line argument is always going to be the path where our Hugging Face model and tokenizer files reside. The second argument is --outfile which is the file name where the new GGUF model should be saved.
After executing this, you can find the GGUF model in the gguf_models directory.
Creating an Ollama Modelfile and Adding The Model To Local Ollama
The next step is creating a Modelfile.
To add models to Ollama, we need to provide all the configurations in a file called Modelfile. This is simply a file without any extension that Ollama expects during the creation of a new model. It contains the GGUF model path, the instruction prompt format, and several other optional parameters.
Let’s take a look at the contents of our Modelfile.
FROM starcoder2_3b_instruct_fp16.gguf

PARAMETER num_ctx 4096

TEMPLATE """<|endoftext|>You are an exceptionally intelligent coding assistant that consistently delivers accurate and reliable responses to user instructions.

### Instruction
{{ .Prompt }}

### Response
"""

PARAMETER stop "###"
PARAMETER stop "<|endoftext|>"
PARAMETER stop "<file_sep>"
Let’s go through the parameters:
FROM: This is the path to the GGUF model. As theModelfileand the GGUF models are present in the same directory, so, we directly append the file name.PARAMETER: We can add several model parameters. The first one isctxwhich defines the context length of the model. We have set the context length to 4096 tokens. We also have severalstopparameters that define where the model generation should stop. This is known from the tokenizer configuration file and can differ from model to model.TEMPLATE: This is one of the most important parameters. It is the prompt template that adds an optional system prompt, and user prompt and where the model should start its response. This is known from the prompt template that is used during native Hugging Face PyTorch inference. Basically, we need to print the tokenized prompt template and know the structure beforehand to create this. For our use case, it starts with the<|endoftext|>token along with a common system prompt. Then we have### Instructionbelow which{{ .Prompt }}will be replaced by the user prompt during runtime. And the model will start its response from### Response.
It can be a bit confusing if this is your first time creating a Modelfile. Going through the file contents a few times will make it easier to understand.
The next step is simply adding a new model to Ollama using our Modelfile. Open a terminal in the same directory where the file is present and execute the following command.
$ ollama create starcoder2_3b_new_fp16 -f Modelfile
If everything goes well, you will see output similar to the following on the terminal.
transferring model data
using existing layer sha256:7a6eb17080bd7b2f06b475fede80da0735e4b4e3f62bcdef7932d543f70015d8
creating new layer sha256:71a883a957802eba8a1904ce522928769d79e2eb55cb07d17d128a861a264bad
creating new layer sha256:2684c4a97f197552d2b6ebc28d2380d2a79071992ecd68ffd1465522ffb7a27a
creating new layer sha256:50899f548092ffe42ffcd7e8e2c8ec9b8d0ea4864f5db3ecba0b13651e4d468c
writing manifest
success
That’s it, we have added a new model to local Ollama. You can check the model by running it locally as well.
$ ollama run starcoder2_3b_new_fp16:latest
Then instruct it when the >>> prompt appears.
>>> Write two different modular functions with documentation to add and multiply two numbers in Python
For instance, here is a sample output that we get.
Here is the code for the two modular functions:

```python
def add(x, y):
    """Add two numbers

    Args:
        x (int or float): First number
        y (int or float): Second number

    Returns:
        int or float: The sum of `x` and `y`
    """
    return x + y


def multiply(x, y):
    """Multiply two numbers

    Args:
        x (int or float): First number
        y (int or float): Second number

    Returns:
        int or float: The product of `x` and `y`
    """
    return x * y
```
Looks like the conversion is working well. Now, let’s upload the model to an Ollama repository.
Uploading Model to Ollama
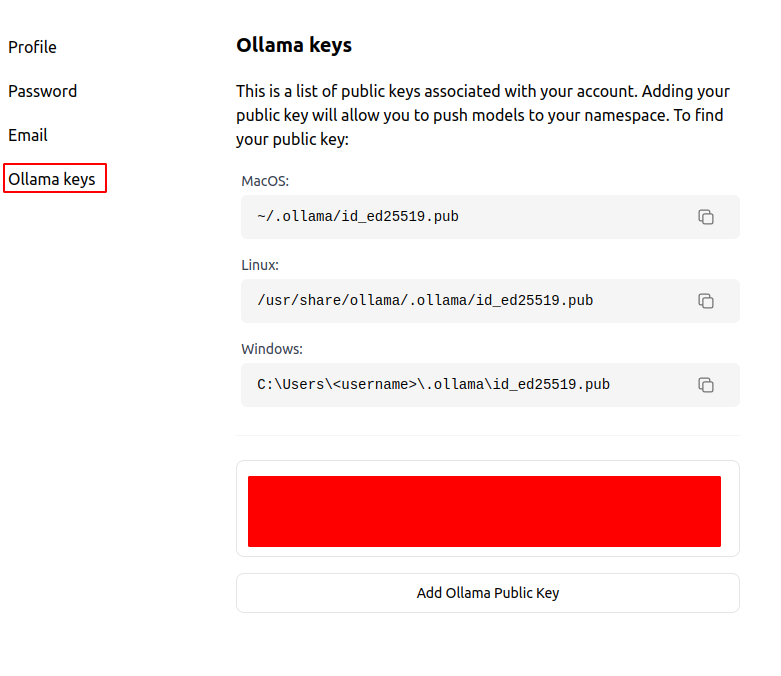
Ensure that you have logged into your Ollama account before this step.
Next, go to your profile settings, then the Ollama keys option on the left tab. According to your OS, find the public key, and copy & paste it into the box at the bottom. We have to do it only once.
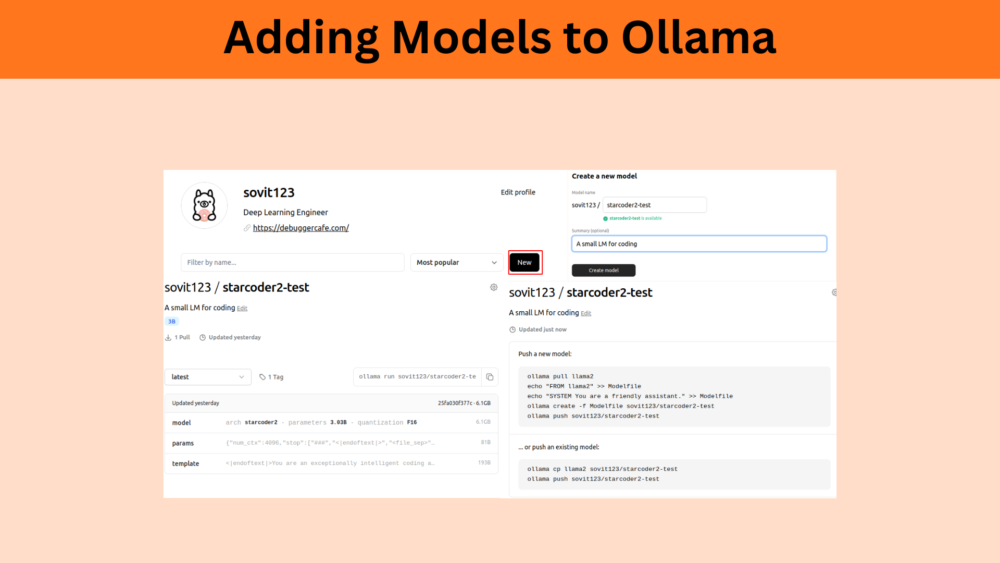
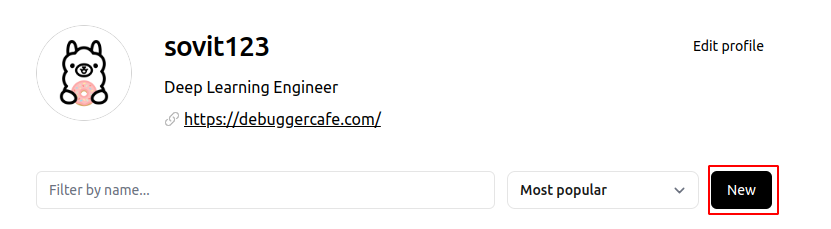
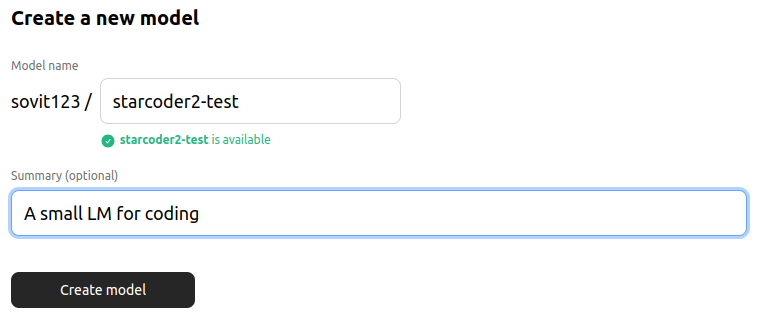
In your account home screen, click on the New button.
Then give your model a name, an optional summary, and click on the Create model button.
Next, we see two options on the screen. Either to push a new model or to push an existing model. As we already have a model locally, we have to go with the “push an existing model” option.
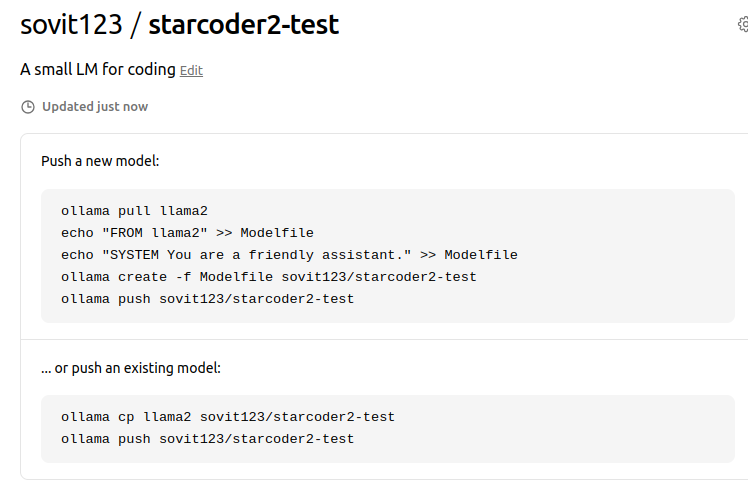
Locally, our model is named starcoder2_3b_new_fp16:latest. First, we have to create a copy of the model in the format shown, that is username/model repository name. For that, we need to execute the following command on the terminal (ensure to replace the username with your username).
$ ollama cp starcoder2_3b_new_fp16:latest sovit123/starcoder2-test
You should get output similar to the following upon the success of the operation.
copied 'starcoder2_3b_new_fp16:latest' to 'sovit123/starcoder2-test'
Next, execute the push command, this time also replacing the username with yours.
$ ollama push sovit123/starcoder2-test
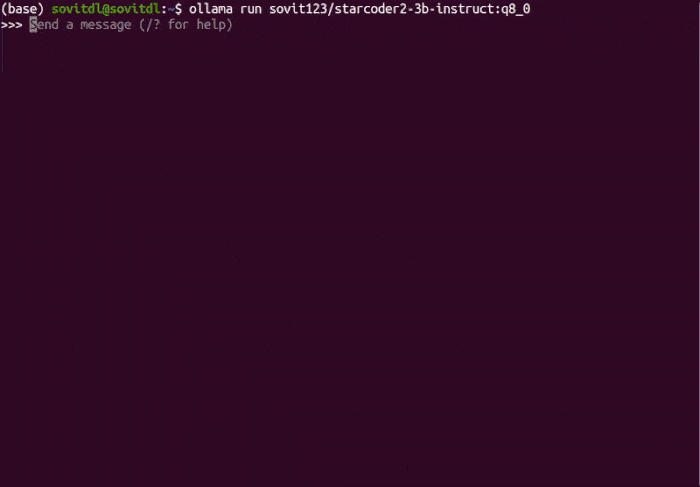
This should start the upload process and upon completion, you can see a model available in your account. Now, anyone can download and use your model locally.
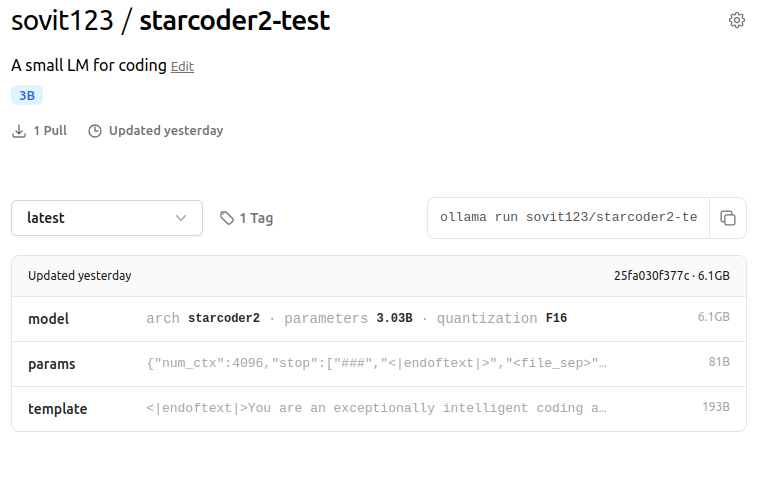
You can access the StarCoder2-3B Instruct model on Ollama here. Give it a try on your local system.
That’s all we need for converting models to GGUF format, uploading, and adding the models to Ollama.
Summary and Conclusion
We covered the process of adding new models to Ollama in this article. We started with the process of converting the Hugging Face fine-tuned model to GGUF format using llama.cpp. Then, we created a new repository in our Ollama account, copied the local Ollama model to be upload-compliant, and finally added it to the repository. I hope this article was worth your time.
If you have any doubts, thoughts, or suggestions, please leave them in the comment section. I will surely address them.
You can contact me using the Contact section. You can also find me on LinkedIn, and X.
