VLMs, LLMs, and foundation vision models, we are seeing an abundance of these in the AI world at the moment. Although proprietary models like ChatGPT and Claude drive the business use cases at large organizations, smaller open variations of these LLMs and VLMs drive the startups and their products. Building a demo or prototype can be about saving costs and creating something valuable for the customers. The primary question that arises here is, “How do we build something using a combination of different foundation models that has value?” In this article, although not a complete product, we will create something exciting by combining the Molmo VLM, SAM2.1 foundation segmentation model, CLIP, and a small NLP model from spaCy. In short, we will use a mixture of foundation models for segmentation and detection tasks in computer vision.
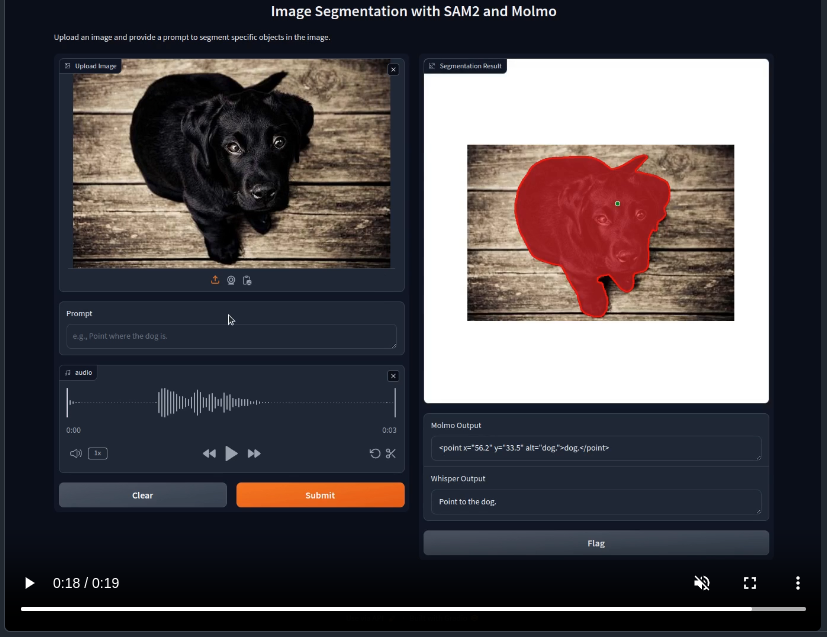
This project is still in its inception phase and will change a lot in the future, maybe pan out to be something different, or perhaps even change the name as the functionalities increase. This is a semi-automated segmentation pipeline using natural language and voice-assisted support, with different features to choose from. The above video gives a glimpse of what the current version of the application looks like.
Previous Work on the Same Line
There were two more articles before this when the project started. The articles have self-contained code (zip files) to download so that it does not conflict with the current code that we are working with.
- SAM2 and Molmo: Image Segmentation using Natural Language: This article contains the explanation when just pointing with Molmo and segmentation with SAM2.1 was available.
- Integrating SAM2, Molmo, and Whisper for Object Segmentation: This article shows how Whisper-assisted voice command was added which can be helpful for mobile and edge devices.
The code is comparatively more complex now. A self-contained zip file of the current code base will be provided with this article. However, feel free to explore the SAM_Molmo_Whisper repository as well.
What are we going to cover in this article of SAM_Molmo_Whisper?
- How does every major foundation model – SAM2.1, Molmo VLM, CLIP, and Whisper integrate with the rest of the code to create a seamless pipeline?
- How can a small NLP model from spaCy help in creating a class label without pretraining/fine-tuning for real-world objects?
- What different features does the application support?
- Sequential processing of masks for better results.
- Auto-labeling using CLIP.
- Pointing and chatting with images without SAM2.1 mask processing.
- Draw bounding boxes around all the segmented objects without using a deep learning model.
NOTE: This project majorly shows what integrating different foundational AI models, modalities, and tasks may help us create. This is entirely based on a Gradio App. In the future, such task pipelines can be integrated with various 3rd party applications to create fully or semi-automated pipelines.
About This Project – Why Combine Molmo VLM, SAM Segmentation, Whisper Voice Assistant, and CLIP Auto-Labeling?
Why use a mixture of foundation models for segmentation and detection tasks?
This project mainly started as an afterthought after seeing SAM2’s segmentation and Molmo’s pointing capabilities. Although SAM2 can segment all objects in an image when manually prompted through pointing and bounding boxes, no automated pipeline exists that works with natural language. What happens when there are hundreds of similar objects in an image? Should we point and click on all of them?
Update to the above paragraph: While writing this article, DINO-X was released which can accept point or boxes as prompts for a single object recognize similar objects in an image.
In such cases, the pointing capabilities of Molmo paired with natural language is a lifesaver. Just type, “Point to the cars” and if everything favors, we will have a hundred automatically pointed (along with coordinates from Molmo) and segmented cars. That’s where the project started.
As the project grew, the possibilities grew as well. Initially, the application could not assign class levels to segmented objects. This is where CLIP and spaCy came in.
Furthermore, we can also easily extend the final result to contain bounding boxes around the segmented objects without using a deep learning model.
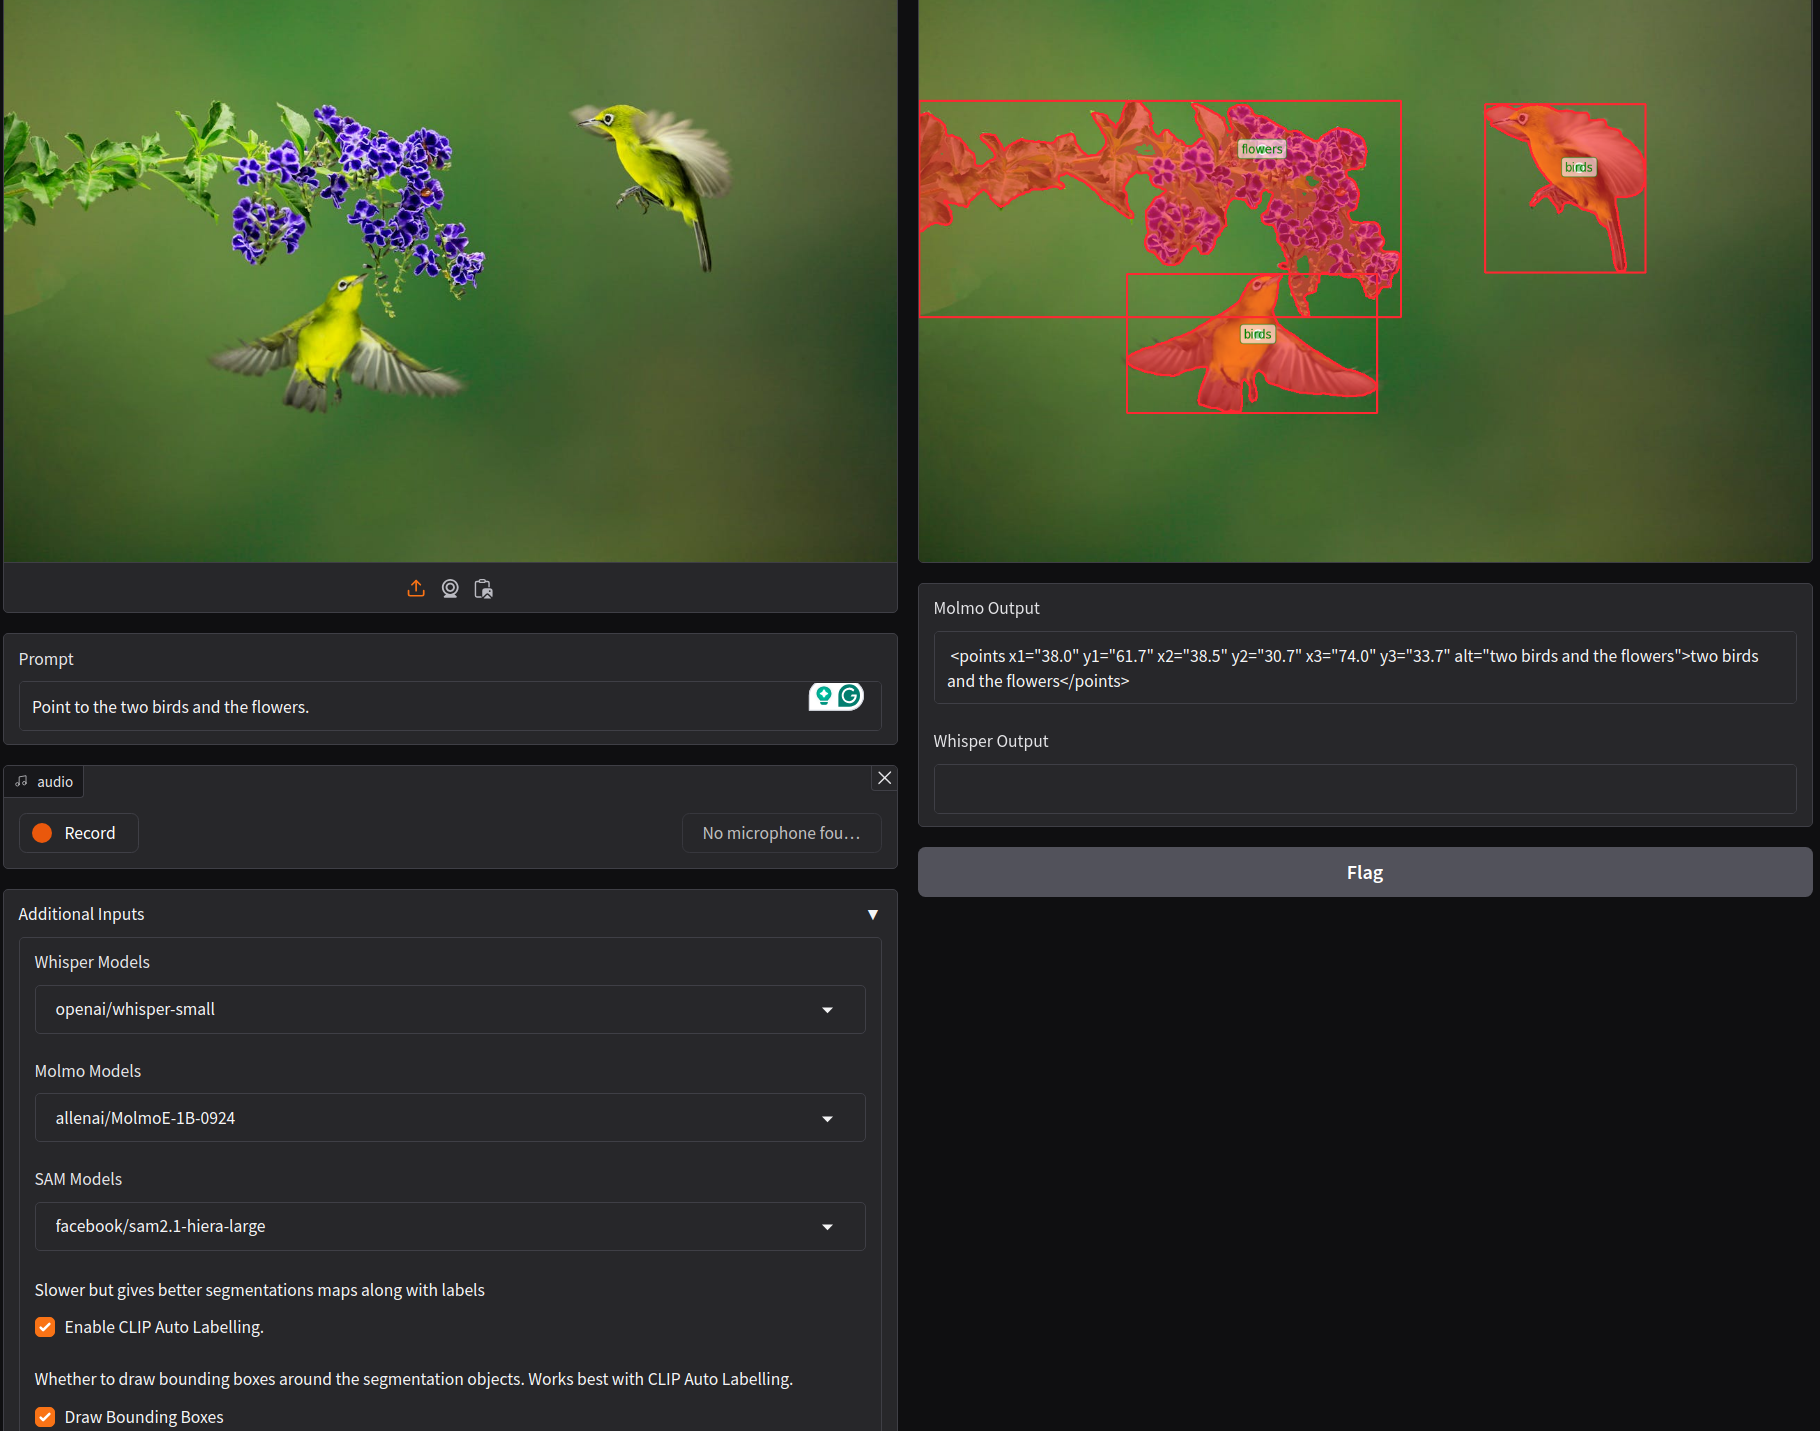
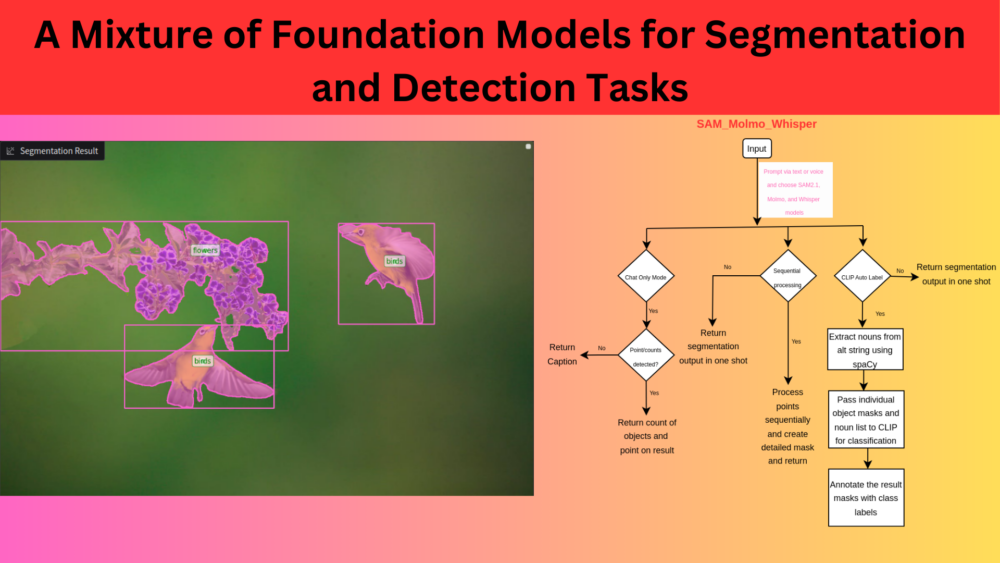
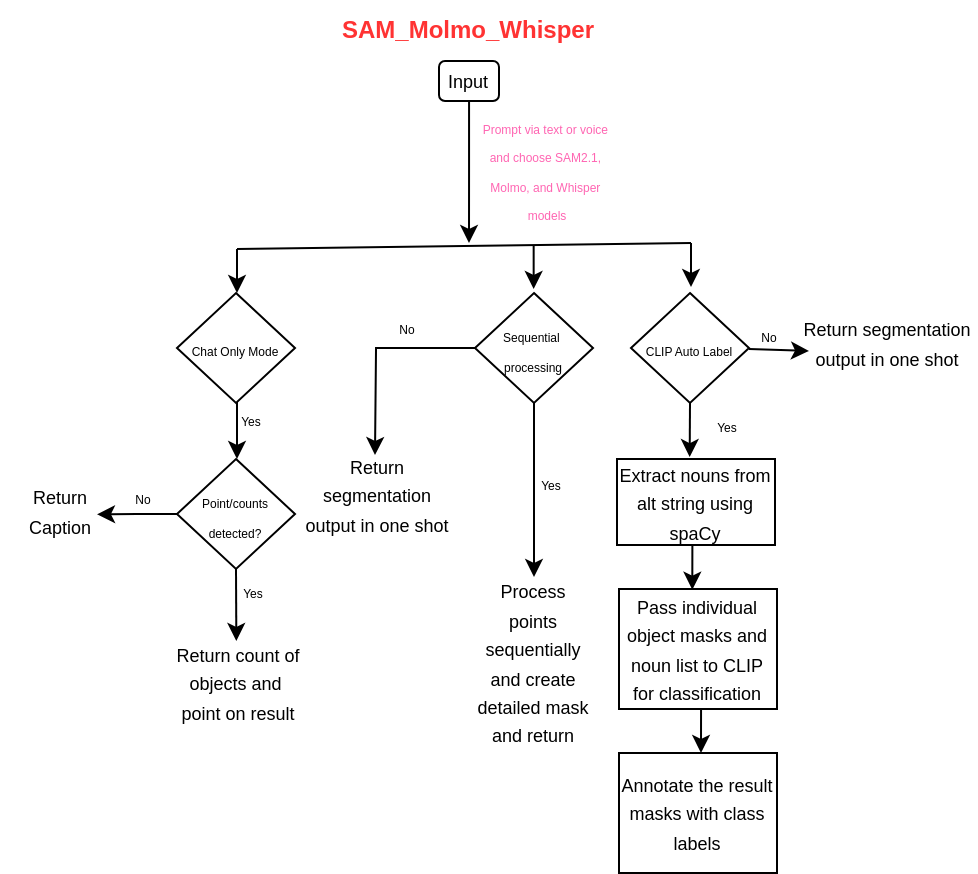
The above figure illustrates the best-case scenario from the pipeline when all the models and tasks work in tandem.
Primarily, we will discuss three major capabilities of the application along with pointing and segmenting:
- How do we carry out open-ended classification of the segmented objects using CLIP and spaCy?
- What is the process to obtain bounding boxes from the segmentation masks without using a detector?
- How can we make the segmentation masks better with the SAM2.1 model?
It is worthwhile to note that we will discuss the code snippets of the very important sections only including the above three points.
The Application Tasks Pipeline
The following diagram shows the application’s entire workflow and tasks.
Project Directory Structure
You will find the following directory structure after downloading and extracting the zip file.
├── demo_data
│   ├── image_1.jpg
│   ├── image_2.jpg
│   ├── image_3.jpg
│   ├── image_4.jpg
│   ├── image_5.jpg
│   ├── image_6.jpg
│   ├── image_7.jpg
│   ├── image_8.jpg
│   ├── image_9.jpg
│   ├── video_1.mp4
│   └── video_1_short.mp4
├── docs
│   ├── readme_media
│   │   └── sam2_molmo_whisper-2024-10-11_07.09.47.mp4
│   └── data_credits.md
├── experiments
│   ├── video_frames  [352 entries exceeds filelimit, not opening dir]
│   ├── video_out
│   │   ├── molmo_points_output.avi
│   │   └── output.avi
│   ├── figure.png
│   ├── sam2_molmo_clip.ipynb
│   ├── sam2_molmo.ipynb
│   └── sam2_molmo_video.ipynb
├── flagged
├── outputs
│   └── molmo_points_output.webm
├── temp
├── utils
│   ├── general.py
│   ├── load_models.py
│   ├── model_utils.py
│   └── sam_utils.py
├── app.py
├── LICENSE
├── README.md
└── requirements.txt
- The parent project directory contains the executable
app.pyscript, the license, README, and requirements file. - The
utilsdirectory contains all the helper scripts for loading models, the logic for model forward pass, and visualization code among other utility functions. - We have an
experimentsdirectory as well that contains experimental Jupyter Notebooks. - The
demo_datadirectory contains a few sample images and videos that we use for experiments.
Download Code
Setting Up the SAM_Molmo_Whisper
The README file contains all the steps for setting up the project. As we are working with a self-contained codebase, we do not need to clone the repository. We can directly jump to installing the requirements.
pip install -r requirements.txt
Next, install SAM2 which is required for segmentation. It is recommended to clone SAM2 into a separate directory and then run the installation command.
git clone https://github.com/facebookresearch/sam2.git && cd sam2

pip install -e .
Finally, install the spaCy English model that we need for CLIP auto-labeling.
spacy download en_core_web_sm
Combining Foundation Models for Segmentation and Detection Tasks
As we have established till now, the application uses several models:
- Molmo for pointing/counting/captioning.
- SAM for image segmentation.
- CLIP and spaCy English models for classification.
- Whisper for voice-assisted prompting.
In the rest of the article and the following subsections, we will explore how each of the above models interact and help us achieve open-ended segmentation, detection, and classification of objects in images.
Pointing and Counting Capabilities of Molmo
We will start with the simplest possible task in the application. The pointing, counting, and image captioning capability of Molmo.
The code for this task mainly resides in app.py and utils/sam_utils.py. When we choose the Chat Only mode from the Additional Inputs, then all other options are ignored including segmentation.
In this case, the following chunk of code in the process_image function of app.py gets executed.
else:
        masks, scores, logits, sorted_ind = None, None, None, None
        if not chat_only: # Get SAM output
            masks, scores, logits, sorted_ind = get_sam_output(
                image, sam_predictor, input_points, input_labels
            )

        # Visualize results.
        fig = show_masks(
            image,
            masks,
            scores,
            point_coords=input_points,
            input_labels=input_labels,
            borders=True,
            draw_bbox=draw_bbox,
            chat_only=chat_only
        )

        return fig, output, transcribed_text
As we are choosing the Chat Only mode, we do not need SAM2.1 masks, scores, and logits. If the user prompts to point to an object, then the extracted points are plotted on the image using the following show_points function from utils/sam_utils.py.
def show_points(coords, labels, ax, clip_label, marker_size=375):
    pos_points = coords[labels==1]
    neg_points = coords[labels==0]
    ax.scatter(
        pos_points[:, 0],
        pos_points[:, 1],
        color='green',
        marker='.',
        s=marker_size,
        edgecolor='white',
        linewidth=1.25
    )
    ax.scatter(
        neg_points[:, 0],
        neg_points[:, 1],
        color='red',
        marker='.',
        s=marker_size,
        edgecolor='white',
        linewidth=1.25
    )

    if clip_label is not None:
        ax = add_labels(
            ax,
            clip_label=clip_label,
            labels=labels,
            pos_points=pos_points,
            neg_points=neg_points
        )
Let’s see three different types of user prompts and Molmo responses in this mode: captioning, pointing, and counting.
Starting with image captioning, we upload the image and choose Chat Only Mode.
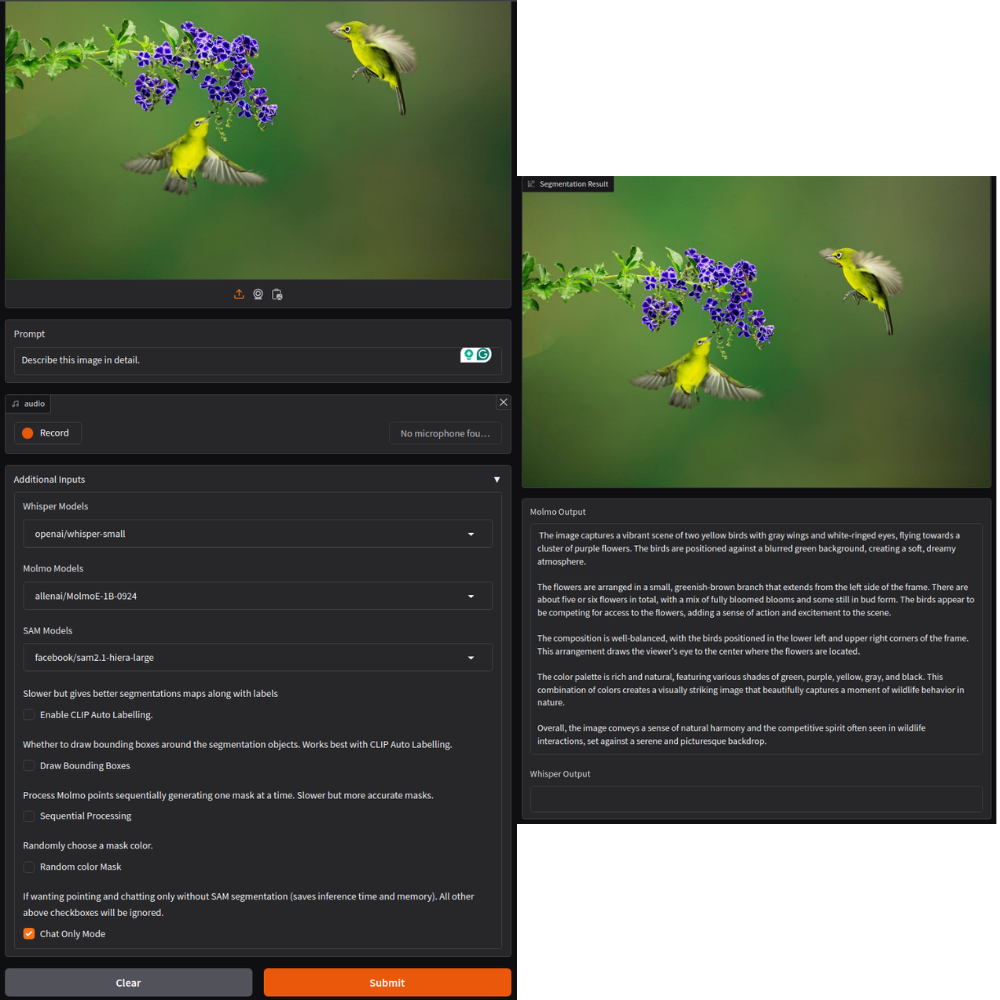
We use the default Molmo-1B MoE (Mixture of Experts) model with 7B total and 1B active parameters during inference. As we can see from the above results, the description is quite apt and detailed.
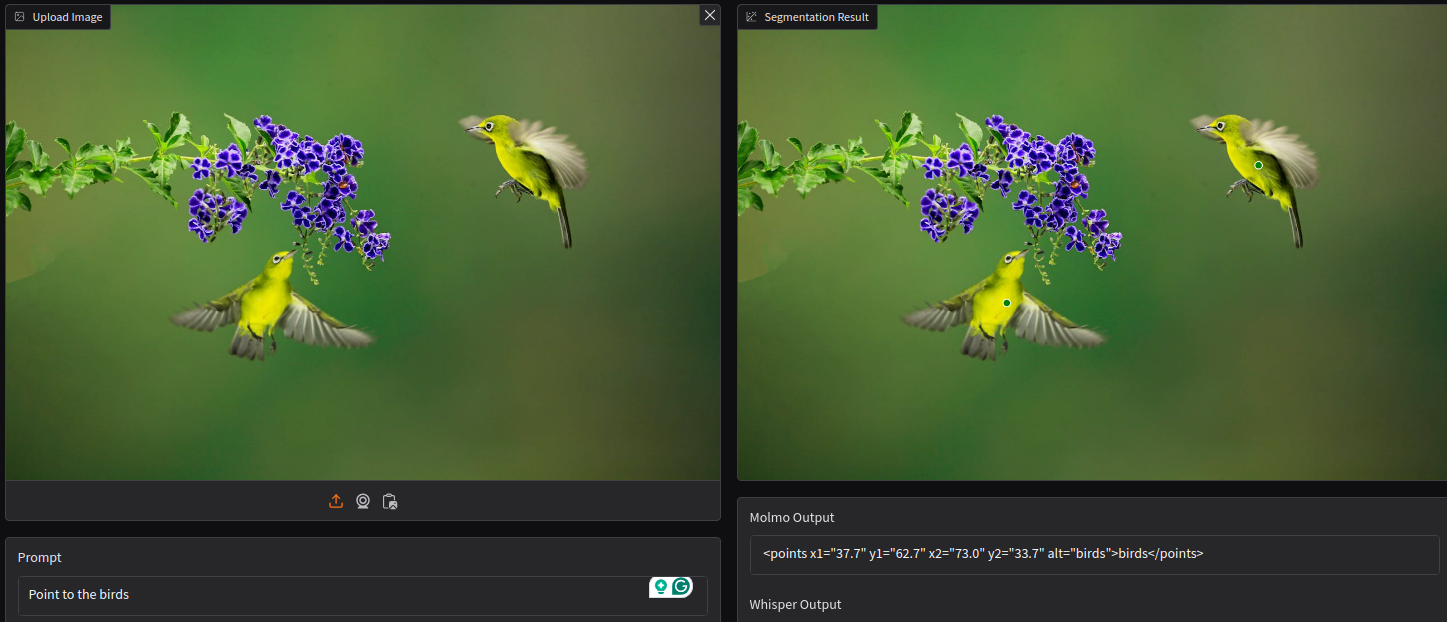
Next, let’s ask the model to point to the two birds: “Point to the birds”.
The model successfully points to the two birds.
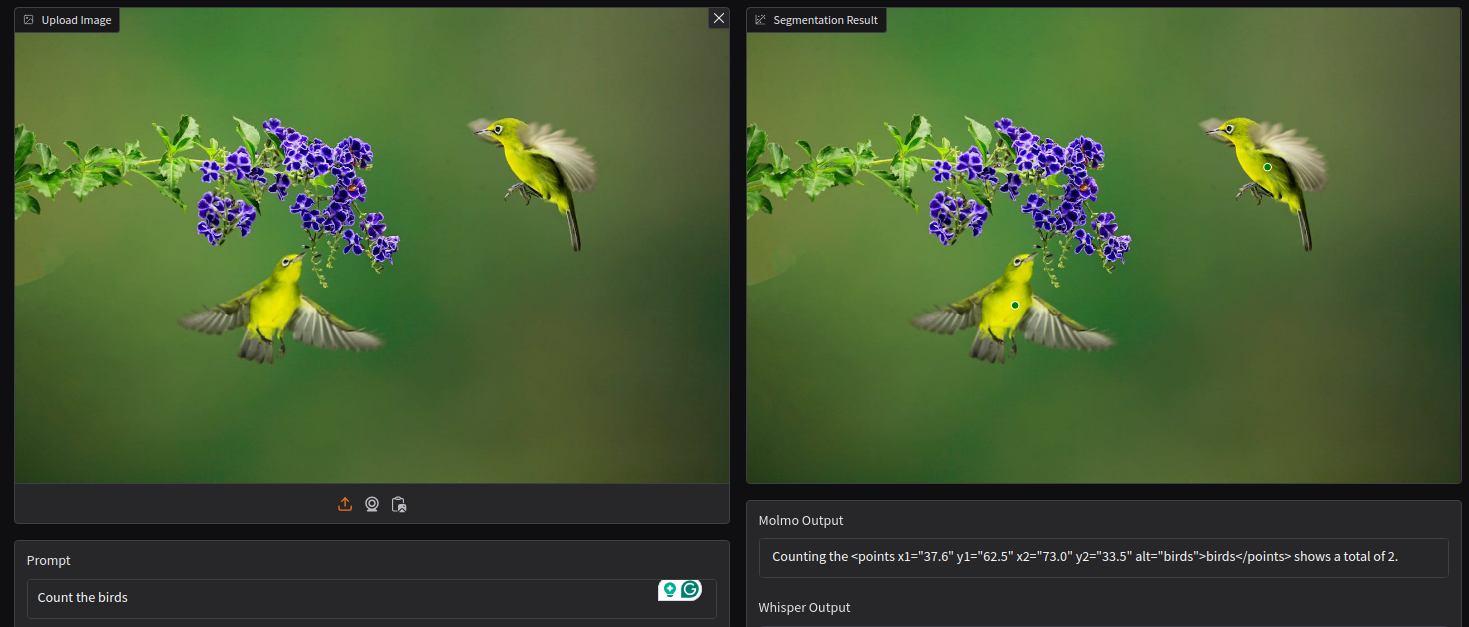
The third task involved counting objects. We prompt the model with “Count the birds”.
Molmo gives coordinate outputs while counting as well. In this scenario, we get the total number of objects from the caption, and the point on the birds as well.
The above three tasks summarize what we can achieve solely with Molmo.
Combining Molmo and SAM2.1
The set of experiments will combine the point coordinate outputs of Molmo and the segmentation ability of SAM2.1
One Shot Segmentation with Molmo and SAM2.1
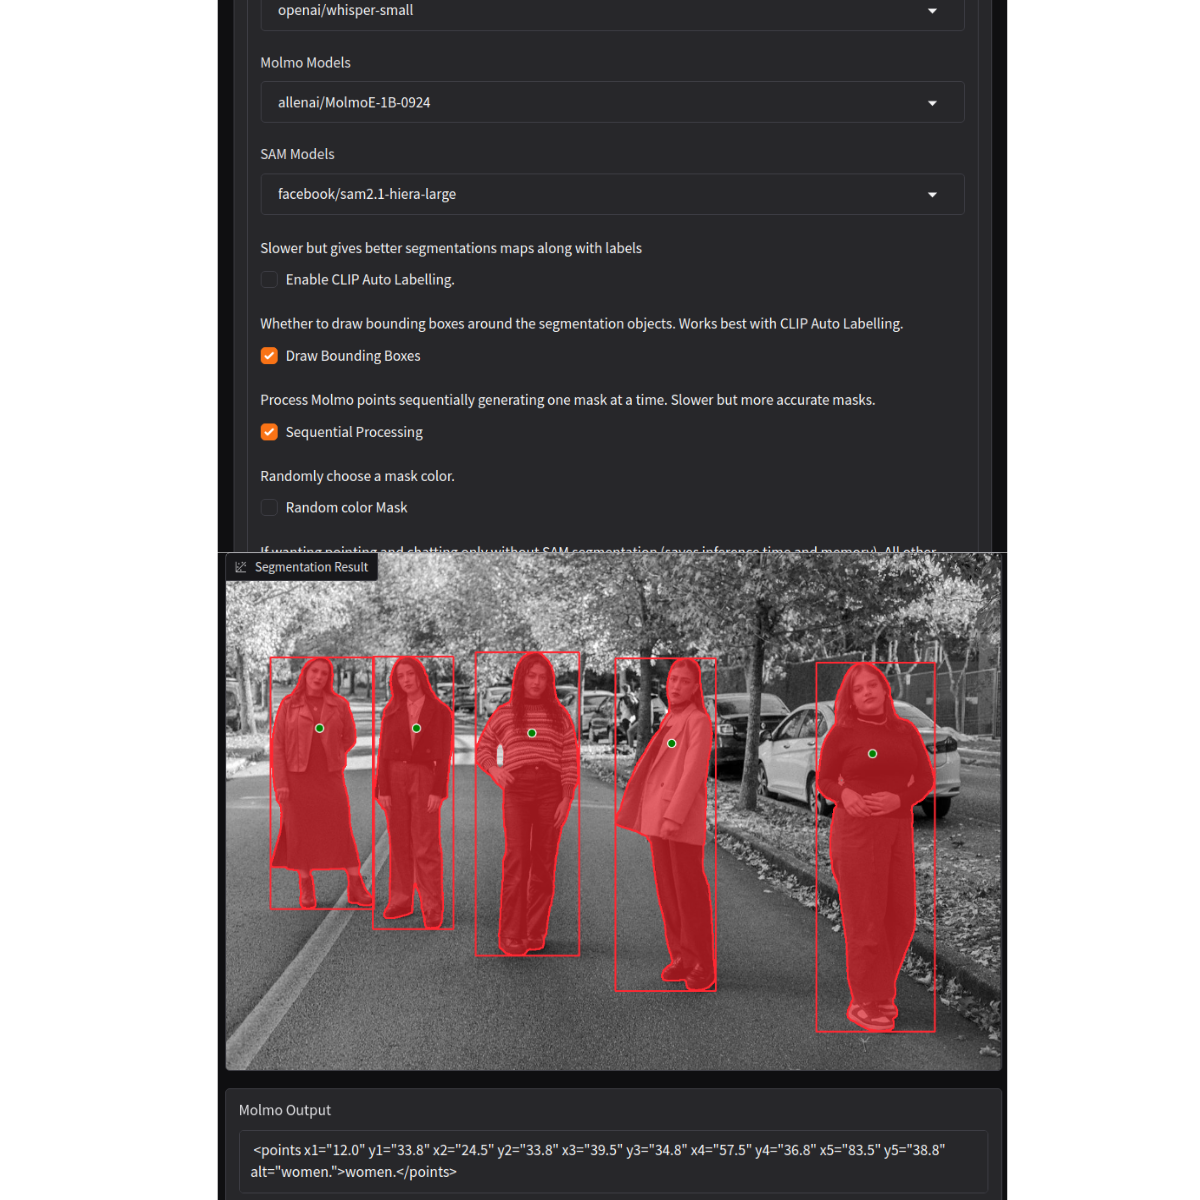
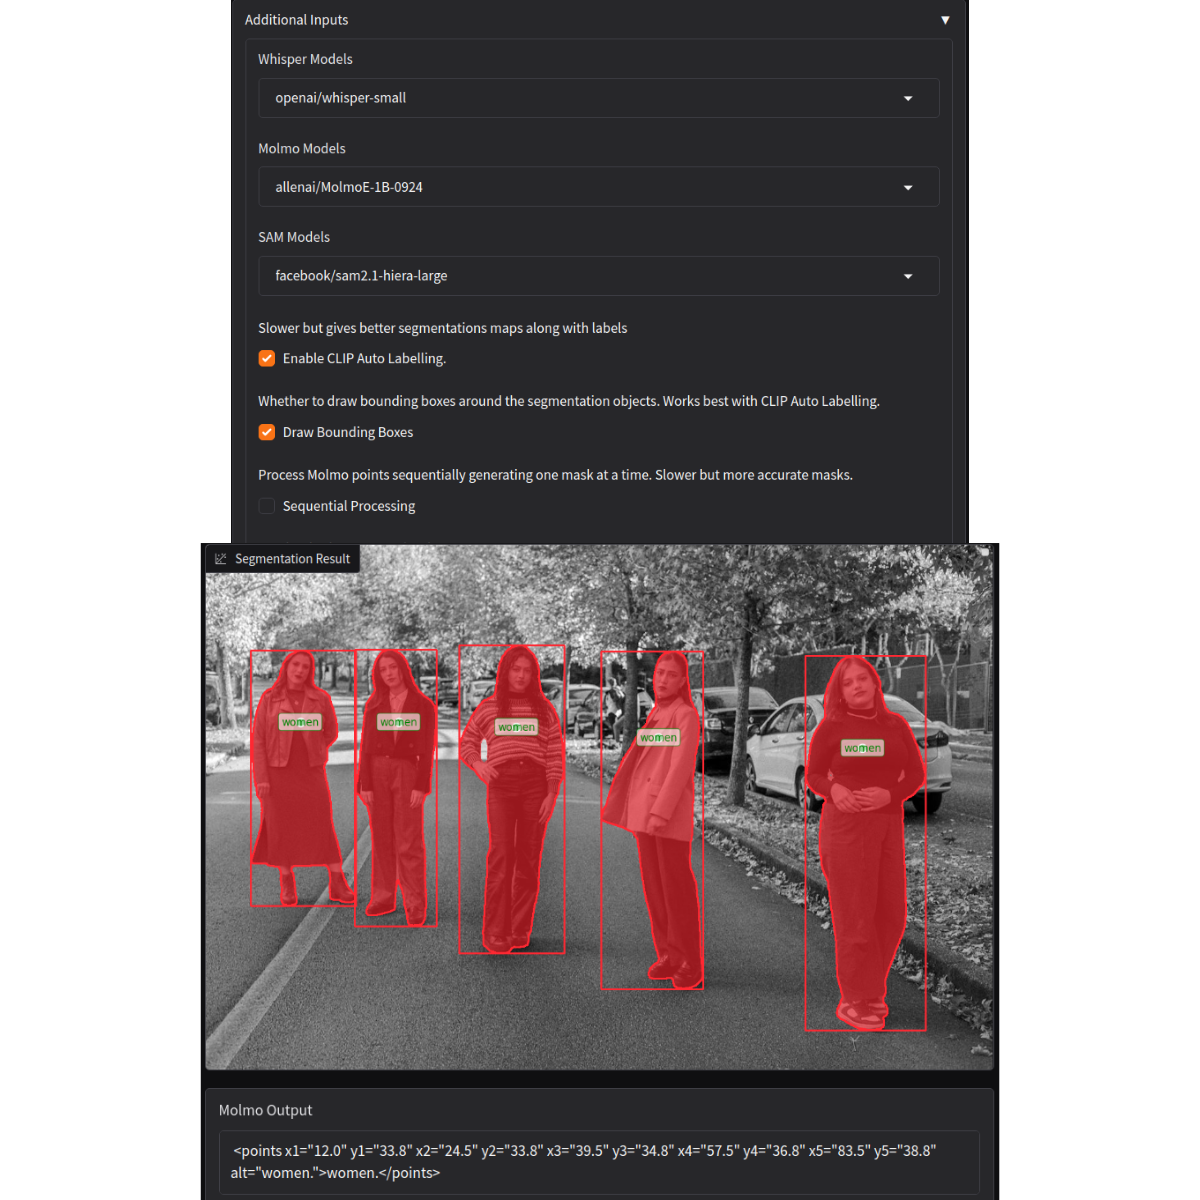
Let’s start with a simple image where a few people are present. We prompt with “Point to the women”.
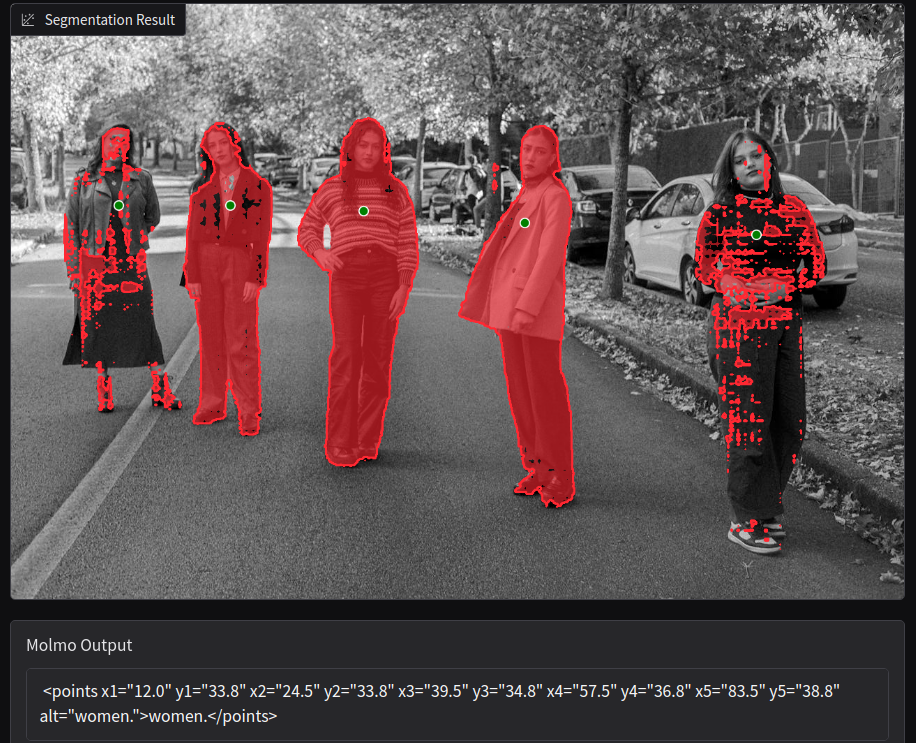
We skip the Chat Only Mode this time which automatically loads the SAM2.1 Hiera Large model for segmentation. Keeping all other options to default passes all the detected points and the image through SAM2.1 in one shot. As we can see, only two of them are segmented properly. This usually happens when we pass several point coordinates at once to SAM2.1.
Sequential Processing with Molmo and SAM2.1
To overcome the above issue, we can use the Sequential Processing option. This passes each of the detected points and the original image through SAM2.1 sequentially. The mask returned by SAM2.1 is appended to a default dummy mask and aggregated. Finally, the pixel values are bounded between 0 and 1. The following code block in the process_image function in app.py handles that piece of logic.
    if not chat_only and  sequential_processing: # If sequential processing of points is enabled without CLIP.
        final_mask = np.zeros_like(image.transpose(2, 0, 1), dtype=np.float32)

        # This probably takes as many times longer as the number of objects
        # detected by Molmo.
        for input_point, input_label in zip(input_points, input_labels):
            masks, scores, logits, sorted_ind = get_sam_output(
                image,
                sam_predictor,
                input_points=[input_point],
                input_labels=[input_label]
            )
            sorted_ind = np.argsort(scores)[::-1]
            masks = masks[sorted_ind]
            scores = scores[sorted_ind]
            logits = logits[sorted_ind]

            final_mask += masks

            masks_copy = masks.copy()
            masks_copy = masks_copy.transpose(1, 2, 0)

            masked_image = (image * np.expand_dims(masks_copy[:, :, 0], axis=-1))
            masked_image = masked_image.astype(np.uint8)

        im = final_mask >= 1
        final_mask[im] = 1
        final_mask[np.logical_not(im)] = 0

        fig = show_masks(
            image,
            final_mask,
            scores,
            point_coords=input_points,
            input_labels=input_labels,
            borders=True,
            draw_bbox=draw_bbox,
            random_color=random_color
        )

        return fig, output, transcribed_text
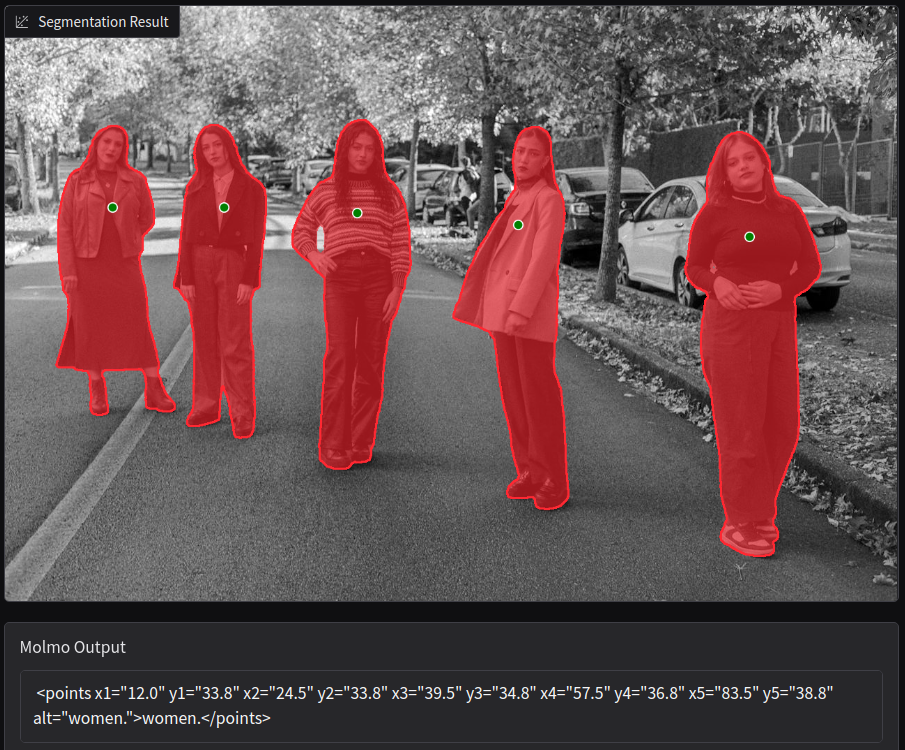
Because SAM2.1 processes only one point in the image at a time, the results are excellent this time.
Drawing Bounding Boxes with the Help of Contours
As you might have observed above, we are drawing contours around the segmented masks. This is achieved with OpenCV. OpenCV also allows the extraction of the top-left and the width and height of all contours using the cv2.boundingRect. This leads us to draw bounding boxes around segmented objects for free (parametrically speaking).
The following code block in the show_mask function of utils/sam_utils.py handles this.
    if borders:
        import cv2
        contours_orig, _ = cv2.findContours(
            mask, cv2.RETR_EXTERNAL,
            cv2.CHAIN_APPROX_NONE
        )
        # Try to smooth contours
        contours_smoothed = [
            cv2.approxPolyDP(
                contour, epsilon=0.01, closed=True
            ) for contour in contours_orig
        ]
        mask_image = cv2.drawContours(
            mask_image,
            contours_smoothed,
            -1,
            (color[0], color[1], color[2], 1),
            thickness=2
        )

        if bboxes: # Draw bounding boxes from contours if chosen from UI.
            for contour in contours_orig:
                bounding_boxes = cv2.boundingRect(contour)
                cv2.rectangle(
                    mask_image,
                    pt1=(int(bounding_boxes[0]), int(bounding_boxes[1])),
                    pt2=(int(bounding_boxes[0]+bounding_boxes[2]), int(bounding_boxes[1]+bounding_boxes[3])),
                    color=(color[0], color[1], color[2], 1),
                    thickness=2
                )

    plt.imshow(mask_image)
The above code block annotates the image with both, the contours as well as the bounding boxes when the Draw Bounding Boxes option is chosen. Let’s try that with the same input image of the women.
The pipeline is able to draw the bounding boxes around the segmented objects correctly.
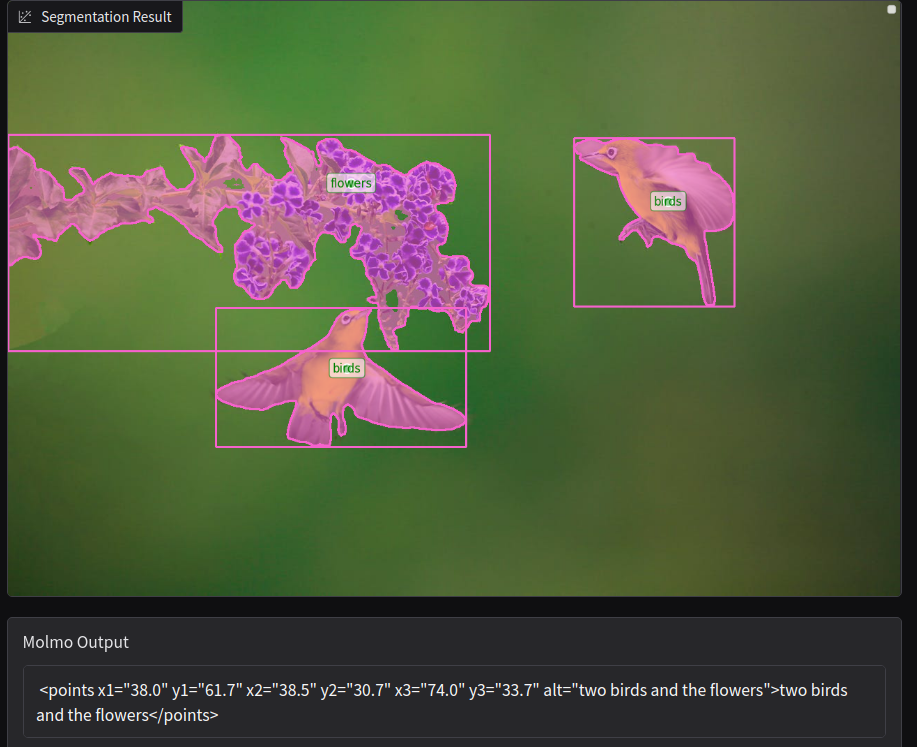
However, in some cases, when two contours overlap (or continue from one object to another), then two separate objects will have the same bounding box. Following is such a failure case.
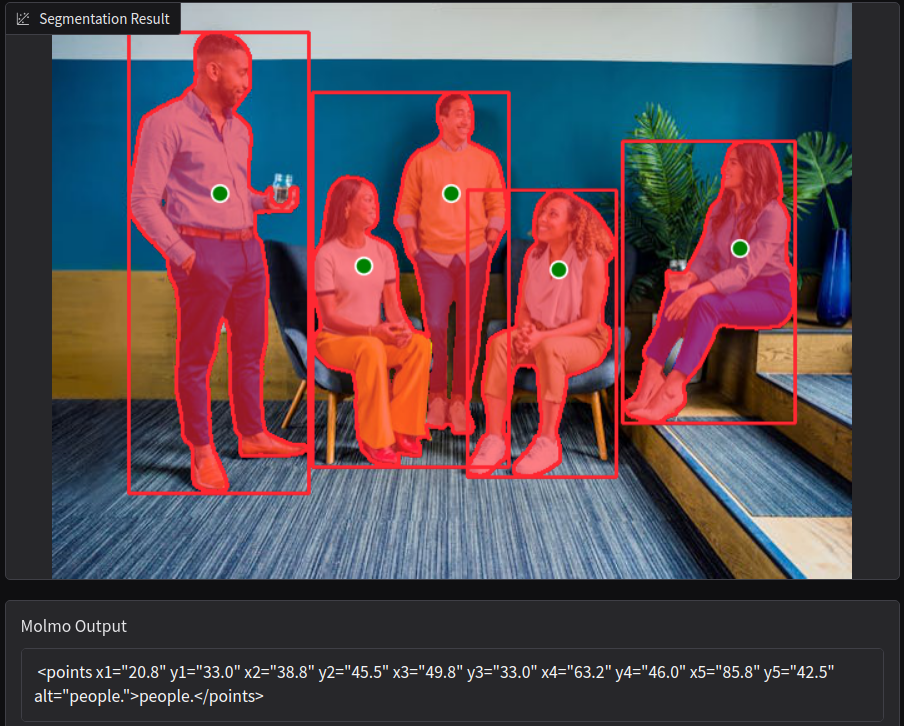
In the above result, two persons have the same bounding boxes which might not be ideal in some cases. This is something that has to be rectified in the future scope of the project.
Using CLIP and spaCy for Auto-Labeling
By now, we understand that we can segment almost any object in an image. This is extremely useful if we can integrate such pipelines into different editing and annotation software. However, in those cases, getting a label (or class name) for the object might also be important. Although SAM2.1 is not inherently capable of labeling objects, we can use a few low computational approaches to get the class labels of the segmented/detected objects.
This is where the capabilities of CLIP and spaCy NLP come in. The OpenAI CLIP model can accept an image and a list containing all possible classes that it belongs to and is capable of outputting the correct class name from the list by processing the image.
For example, we feed CLIP an image of a cat and a list containing – ['cat', 'dog', 'panda']and we can expect it to correctly assign the highest probability to cat.
In our case, this is slightly more complex. We have an entire image and several segmented objects. So, we have to process each mask sequentially and feed the RGB segmented mask to CLIP along with a list to CLIP individually. For example, we get the mask of a person, extract the RGB pixel, and append it to a black background image to get the following:
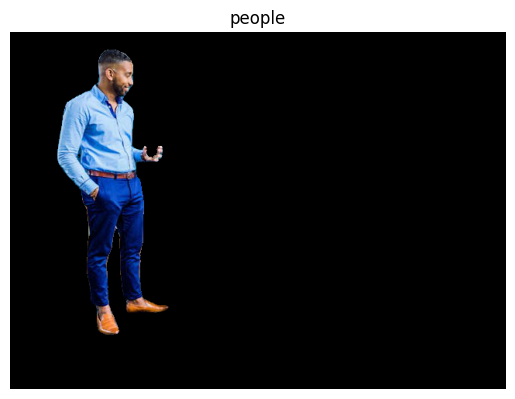
All such extracted masks and a class list are fed to CLIP sequentially. So, choosing the Enable CLIP Auto Labelling option implicitly uses sequential processing.
The following code block handles the logic in process_image function of app.py.
if not chat_only and clip_label: # If CLIP auto-labelling is enabled.
        label_array = [] # To store CLIP label after each loop.
        final_mask = np.zeros_like(image.transpose(2, 0, 1), dtype=np.float32)

        # This probably takes as many times longer as the number of objects
        # detected by Molmo.
        for input_point, input_label in zip(input_points, input_labels):
            masks, scores, logits, sorted_ind = get_sam_output(
                image,
                sam_predictor,
                input_points=[input_point],
                input_labels=[input_label]
            )
            sorted_ind = np.argsort(scores)[::-1]
            masks = masks[sorted_ind]
            scores = scores[sorted_ind]
            logits = logits[sorted_ind]

            final_mask += masks

            masks_copy = masks.copy()
            masks_copy = masks_copy.transpose(1, 2, 0)

            masked_image = (image * np.expand_dims(masks_copy[:, :, 0], axis=-1))
            masked_image = masked_image.astype(np.uint8)

            # Process masked image and give input to CLIP.
            clip_inputs = clip_processor(
                text=nouns,
                images=Image.fromarray(masked_image),
                return_tensors='pt',
                padding=True
            )
            clip_outputs = clip_model(**clip_inputs)
            clip_logits_per_image = clip_outputs.logits_per_image # this is the image-text similarity score
            clip_probs = clip_logits_per_image.softmax(dim=1) # we can take the softmax to get the label probabilities
            clip_label = nouns[np.argmax(clip_probs.detach().cpu())]

            label_array.append(clip_label)

        im = final_mask >= 1
        final_mask[im] = 1
        final_mask[np.logical_not(im)] = 0

        fig = show_masks(
            image,
            final_mask,
            scores,
            point_coords=input_points,
            input_labels=input_labels,
            borders=True,
            clip_label=label_array,
            draw_bbox=draw_bbox,
            random_color=random_color
        )

        return fig, output, transcribed_text
Obtaining Class Name List
One question arises here, how do we obtain the class name list? We can utilize the string output from Molmo. Whenever we prompt Molmo, say, with “Point to the people”, it returns a string output like the following.
<points x1="27.0" y1="62.0" x2="43.5" y2="48.5" x3="57.0" y3="64.5" x4="72.0" y4="39.5" x5="82.5" y5="62.0" alt="people.">people.</points>
Of course, we use the above string output to extract the coordinates. Along with that, the alt string part of the output contains all the classes it is able to identify and point to. So, we just need to find a way to extract all the nouns from this alt string.
For noun extraction, we can use the spaCy model pipeline like en_core_web_sm which is capable of POS tagging, lemmatization, noun extraction, and NER, among many others.
The get_spacy_output function in utils/model_utils.py handles this part.
def get_spacy_output(outputs, model):
    """
    Get the nouns from the alt tags produced by Molmo:

    :param outputs: Output string from Molmo.
    :param model: The Spacy model.

    Returns:
        nouns: A list containing the nouns, e.g. ['bird', 'person']
    """
    print(outputs)
    if 'alt=\"' in outputs:
        match = re.search(r'alt="([^"]*)"', outputs)
        if match:
            alt_tag = match.group(1)

        doc = model(alt_tag)
        nouns = [token.text for token in doc if token.pos_ == 'NOUN']

    return nouns
It accepts the entire output along with the spaCy model and uses regex to extract all the nouns, append them to a list, and return it. The pipeline further passes this list and the RGB masks sequentially to the CLIP model to obtain the highest-scoring class index for each mask.
Let’s see the functionality in action.
We use the same prompt as above to point and segment the people.
The above figure shows how we obtain class names using the pipeline. This is more beneficial than using a model specifically pretrained on ImageNet-22k as a user can ask anything. We just need to pick the nouns and process them further.
Let’s try with a complex image where two different objects are present.
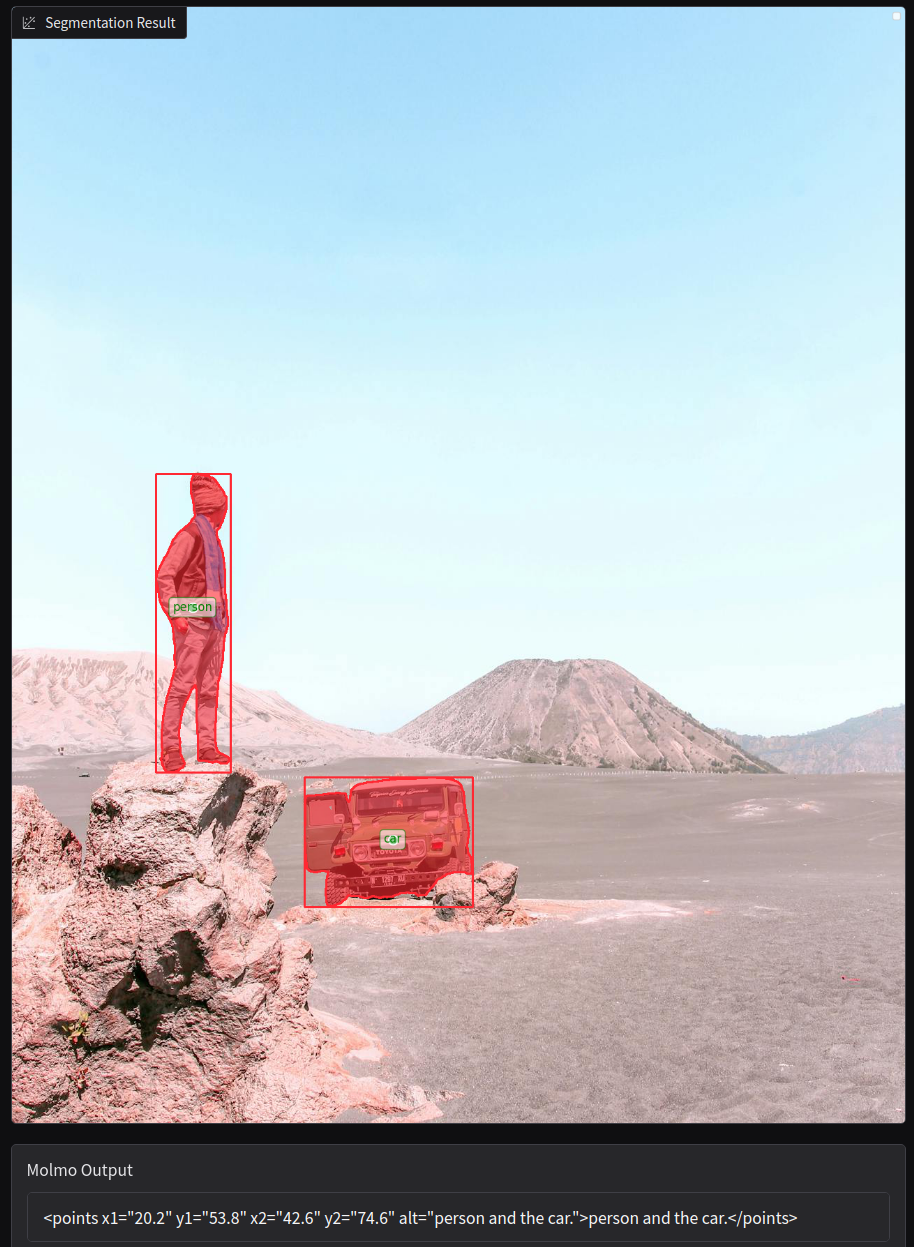
However, just like any application, this is prone to failure as well, which we can see below.
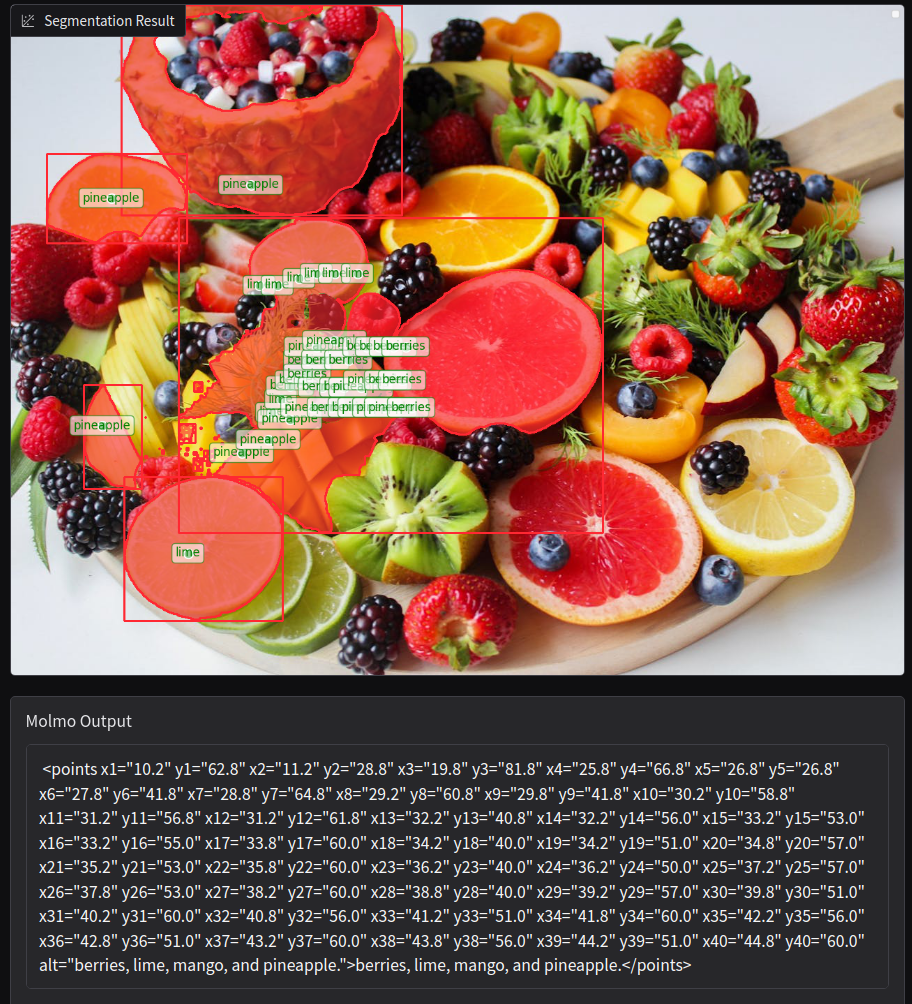
We plan to address such failures in future improvements.
Random Colored Masks
The final feature (a simple one) is to generate a differently colored mask instead of the default red one.
We just need to choose the Random color Mask option from the interface.
Key Takeaways from Using Mixture of Foundation Models For Computer Vision Tasks
Above we saw how to combine LLMs, VLMs, NLP, and Computer Vision models to achieve class-agnostic object segmentation along with parameter-free bounding box detection. Building such a pipeline is often complex and even prototyping and experiments require a decent system with an optimum amount of VRAM.
As we observed, there are a lot of optimizations possible. Starting from optimizing VRAM consumption to more efficient formats of models, model loading, and clearing memory cache. Additionally, in the above experiments, we were running the Molmo model in INT4 quantized mode. So, the pointing capabilities could be even better in full precision when dealing with dense objects.
Furthermore, in the current state, it is a standalone Gradio application. Integrating such a pipeline with any other application will require APIs and possible re-writing of parts of the pipeline in other languages.
Summary and Conclusion
In this article, we covered an application that uses a mixture of several foundational and NLP models for open-ended segmentation and detection of objects. Although in very nascent stages, scaling, integrating, and adding more features can prove valuable. Hopefully, we will be able to do so in the near future. I hope that this article was worth your time.
If you have any doubts, thoughts, or suggestions, please leave them in the comment section. I will surely address them.
You can contact me using the Contact section. You can also find me on LinkedIn, and Twitter.

