
In this tutorial, we will learn how to carry out object detection using RetinaNet with PyTorch and deep learning. Basically, we will use a PyTorch pre-trained model that has been on the COCO dataset. We will use the RetinaNet deep learning model to carry out inference in images and videos and analyze the results as well.
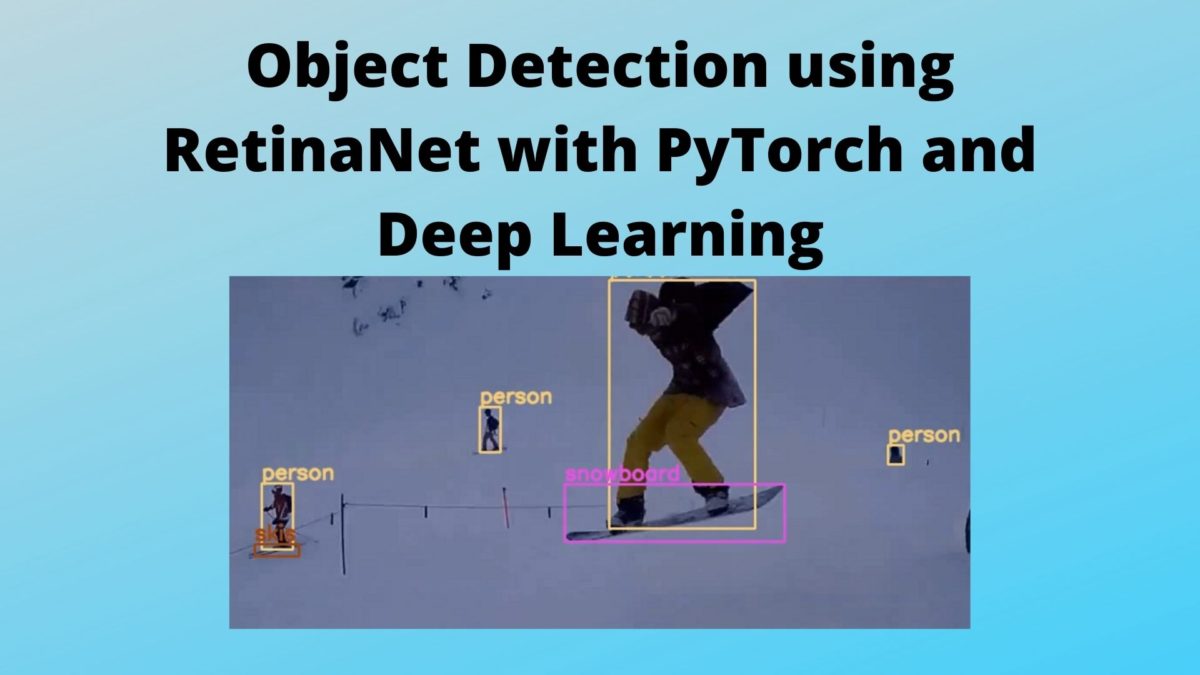
Now, you may be asking, what kind of results are we expecting to get after going through this tutorial? To get a brief answer to that, let’s take a look at an image.
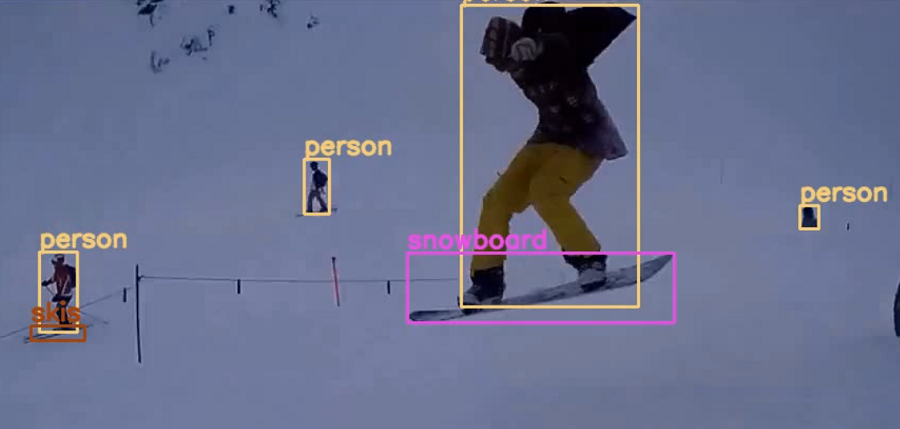
In figure 1, we can clearly see that the model can differentiate between the different persons, the ski, and even the snowboard. I hope that you get a brief idea of what to expect from this tutorial are excited to follow along. Also, figure 1 is just a snapshot from a video. We will be using that video in this tutorial for deep learning RetinaNet inference.
In specific, what you will be learning today?
- We will use the RetinaNet deep learning model to carry object detection in images and videos. We will not be training our own model. Instead, we will use a pre-trained model that PyTorch provides. Using this pre-trained deep learning model, we will be able to detect more than 80 classes of objects that are a part of the COCO dataset.
- You will learn how to properly draw bounding boxes around objects, where each class will have a different color bounding box.
- We will try out different confidence scores to see how it affects the results of the RetinaNet model.
- Apart from images, we will also see how RetinaNet performs while detecting objects in videos.
RetinaNet Deep Learning Model
In this section, we will learn a bit more about the input and output format of the RetinaNet deep learning model for object detection. This is in specific to carrying out inference using the RetinaNet object detection model.
The Input and Output Format for PyTorch RetinaNet Object Detection Model
The pre-trained RetinaNet model from PyTorch follows almost the same approach for input and output of data as any other pre-trained PyTorch model for object detection.
It expects an input image of the format [C, H, W], that is (channels, height, and width). And we will of course have to provide a batch size as well. This batch size will amount to the number of images in one batch. So, the final input format will be [N, C, H, W]. Also, the pixel values of each image should be between 0-1.
What we need to focus on is the output format from the RetinaNet model. It outputs a list containing a dictionary which in-turn contains the resulting tensors. The format is List[Dict[Tensor]]. The Dict contains the following keys:
- boxes (
FloatTensor[N, 4]): the predicted boxes in[x1, y1, x2, y2]format, with values between0andHand0andW - labels (
Int64Tensor[N]): the predicted labels for each image - scores (
Tensor[N]): the scores or each prediction
You will also find these details for this and other models as well in the Torchvision Models documentation.
We will not go into much details about RetianNet model here. If you want to learn about the model in detail, then you should surely give the paper a read.
The PyTorch Framework
By now, you know that we will use the PyTorch deep learning framework. And we will use the pre-trained RetinaNet model that PyTorch provides.
But the RetinaNet pre-trained model is not available till PyTorch version 1.6. It is only available starting from PyTorch 1.7 (the latest at the time of writing this). So, if you have already installed PyTorch version 1.7 or any of the later versions, then you are all set to move forward. If not, you can easily install PyTorch 1.7 from here.
We will also need the Python Imaging Library (PIL) and OpenCV computer vision library in this tutorial. If you do not have them, then please install them before moving ahead.
That’s all the major frameworks and libraries that we need.
Project Directory Structure and Input Data
We will follow the following directory structure in this tutorial.
│   coco_names.py
│   detect_images.py
│   detect_utils.py
│   detect_videos.py
│
├───input
│       image1.jpg
│       image2.jpg
│       ...
│       video2.mp4
│
├───outputs
│       image1_1200_t50.jpg
│       ...
- Directly inside the project folder, we have four Python scripts. We will get into the details while writing the code for them.
- The
inputfolder contains a few images and videos that we will use for inference using the RetinaNet object detection model. - The
outputsfolder will contain all the images and videos after we feed the input to the RetinaNet model and get the detections in them.
Now, if you wish, then you can use your own images and videos for detecting the objects in them. If you want to use the same input data as this tutorial, then you can download the zipped input file from below.
In you are downloading the data, then be sure to extract them before moving further.
Object Detection using RetinaNet with PyTorch and Deep Learning
From this section onward, we will focus on the coding part of this tutorial.
We will write the code for each of the four Python scripts in separate subsections.
Storing all the COCO Dataset Class Names
There are almost 90 classes in the COCO dataset on which the RetinaNet object detector has been trained on. We will need these class names further in the tutorial to label the detected objects.
Therefore, we will save all the class names in a Python script as a list which we can easily import and use.
Copy and paste the following list in the coco_names.py script.
COCO_INSTANCE_CATEGORY_NAMES = [
    '__background__', 'person', 'bicycle', 'car', 'motorcycle', 'airplane', 'bus',
    'train', 'truck', 'boat', 'traffic light', 'fire hydrant', 'N/A', 'stop sign',
    'parking meter', 'bench', 'bird', 'cat', 'dog', 'horse', 'sheep', 'cow',
    'elephant', 'bear', 'zebra', 'giraffe', 'N/A', 'backpack', 'umbrella', 'N/A', 'N/A',
    'handbag', 'tie', 'suitcase', 'frisbee', 'skis', 'snowboard', 'sports ball',
    'kite', 'baseball bat', 'baseball glove', 'skateboard', 'surfboard', 'tennis racket',
    'bottle', 'N/A', 'wine glass', 'cup', 'fork', 'knife', 'spoon', 'bowl',
    'banana', 'apple', 'sandwich', 'orange', 'broccoli', 'carrot', 'hot dog', 'pizza',
    'donut', 'cake', 'chair', 'couch', 'potted plant', 'bed', 'N/A', 'dining table',
    'N/A', 'N/A', 'toilet', 'N/A', 'tv', 'laptop', 'mouse', 'remote', 'keyboard', 'cell phone',
    'microwave', 'oven', 'toaster', 'sink', 'refrigerator', 'N/A', 'book',
    'clock', 'vase', 'scissors', 'teddy bear', 'hair drier', 'toothbrush'
]
We don’t need to add any other code here.
Writing Utility Functions for Object Detection and Drawing Bounding Boxes
Here, we will write the function that will help us detect the objects in the images and videos. We will also write the function to draw the bounding boxes around the detected objects.
All this code will go into the detect_utils.py Python script.
Let’s start with the imports.
import torchvision.transforms as transforms
import cv2
import numpy as np
import torch

from coco_names import COCO_INSTANCE_CATEGORY_NAMES as coco_names
We are importing the COCO_INSTANCE_CATEGORY_NAMES list as coco_names.
While drawing the bounding boxes, we do want the boxes for every class to be of the same color. It will be much easier to differentiate and pleasing as well if each of the classes have different color bounding boxes. The following line of code does just that for us.
# this will help us create a different color for each class
COLORS = np.random.uniform(0, 255, size=(len(coco_names), 3))
So, the above code block will generate a random tuple of RGB color for each of the 91 classes.
Next, let’s define the transforms that we will apply to the image pixels.
# define the torchvision image transforms
transform = transforms.Compose([
    transforms.ToTensor(),
])
We only need to convert the images to tensors for this tutorial.
Function to Predict the Outputs
We will need the bounding boxes and the class names for proper visualization of the outputs from the RetinaNet model.
To get the outputs, we will write a very simple function. We will call this function predict() and this will accept four input parameters. They are the the image, the RetinaNet model, the computation device, and the detection_threshold.
Let’s write the function definition first.
def predict(image, model, device, detection_threshold):
    # transform the image to tensor
    image = transform(image).to(device)

    image = image.unsqueeze(0) # add a batch dimension
    with torch.no_grad():
        outputs = model(image) # get the predictions on the image

    # get all the scores
    scores = list(outputs[0]['scores'].detach().cpu().numpy())
    # index of those scores which are above a certain threshold
    thresholded_preds_inidices = [scores.index(i) for i in scores if i > detection_threshold]

    # get all the predicted bounding boxes
    bboxes = outputs[0]['boxes'].detach().cpu().numpy()
    # get boxes above the threshold score
    boxes = bboxes[np.array(scores) >= detection_threshold].astype(np.int32)

    # get all the predicited class names
    labels = outputs[0]['labels'].cpu().numpy()
    pred_classes = [coco_names[labels[i]] for i in thresholded_preds_inidices]
    return boxes, pred_classes
- First, we apply the image transforms and add a batch dimension to the input.
- At lines 18 and 19, we feed the image to the RetinaNet deep learning object detection model which gives us the
outputs. - At line 22, we get all the
scoresfrom the output dictionary. And line 24 extracts all those indices of thescoreswhich are above the supplieddetection_thresholdscore. We ignore any detection below that score. We store these indices inthresholded_preds_inidices. - Line 27 extracts all the bounding box coordinates from the output dictionary. At line 29, we filter out those bounding box coordinates which have a score below the
detection_threshold. - Similarly, at line 32, we get all the class
labelsfrom the output. Then we map these numerical labels to the class names incoco_namesusing the index positions that we have stored inthresholded_preds_inidices.
Finally, we return the boxes, and the pred_classes. This is all we need for the prediction function. We have extracted all the relevant bounding box coordinates and the class labels as well.
Function to Draw the Bounding Boxes Around the Objects
Now, we will write a very simple function to draw the bounding boxes around the detected objects.
Let’s call this function draw_boxes(). This function accepts three input parameters. The first one is the boxes parameter which contains all the bounding box coordinates that we just extracted from the outputs. The second is the classes parameter containing all the class names. And the final one is the image on which we will draw the boxes and put class names as well.
The following is the function definition.
def draw_boxes(boxes, classes, image):
    for i, box in enumerate(boxes):
        color = COLORS[coco_names.index(classes[i])]
        cv2.rectangle(
            image,
            (int(box[0]), int(box[1])),
            (int(box[2]), int(box[3])),
            color, 2
        )
        cv2.putText(image, classes[i], (int(box[0]), int(box[1]-5)),
                    cv2.FONT_HERSHEY_SIMPLEX, 0.8, color, 2,
                    lineType=cv2.LINE_AA)

    return image
- We use a simple
forloop to iterate through all the detected objects’ bounding boxes. - At line 37, we get a
colortuple for the current object class. This is in tuple format as we are using OpenCV which accepts tuple. - From line 38 to 43, we draw the bounding boxes on the
image. - Then starting from lines 44 till 48, we put the class label text on the image.
- Finally, we return the
imagewith the bounding boxes and the class label text on the objects.
This is all we need for the utility functions. We can now move forward to write the code for detecting objects in images using the RetinaNet deep learning object detector.
Using PyTorch RetinaNet for Object Detection in Images
We are now ready to write code for detecting objects in images using RetinaNet and PyTorch.
All of the code here will go into the detect_images.py Python script.
As always, let’s start with importing the modules and libraries.
import torchvision
import torch
import argparse
import cv2
import detect_utils
import numpy as np

from PIL import Image
Note that we are importing the detect_utils script at line 5, that we have just written.
Next, let’s write the code to construct an argument parser. We will provide a few command-line arguments while executing this script that will save us a lot of hard-coding.
# construct the argument parser
parser = argparse.ArgumentParser()
parser.add_argument('-i', '--input', help='path to input image/video')
parser.add_argument('-m', '--min-size', dest='min_size', default=800,
                    help='minimum input size for the RetinaNet network')
parser.add_argument('-t', '--threshold', default=0.6, type=float,
                    help='minimum confidence score for detection')
args = vars(parser.parse_args())

print('USING:')
print(f"Minimum image size: {args['min_size']}")
print(f"Confidence threshold: {args['threshold']}")
--input: It is the path to the input image that we will provide.--min-size: The RetinaNet model accepts amin_sizeargument while initializing the model. This resizes the image to a minimum of the size that we provide. We need to use this with care. Resizing to a smaller size will increase the detection speed but will decrease the detection accuracy and vice-versa. The default value that PyTorch uses is 800 and we will use that default value too.-
--threshold: This is the detection threshold confidence score that you may remember from the utility scripts. Any detections with scores below this will be ignored. We are using a default value of 0.6.
Then we are just printing the values we are using for some more information.
Initialize the RetinaNet Model
We will initialize our deep learning RetinaNet object detection model now. Along with that we will also load it into the computation device.
For this tutorial, if you are going to follow through with the videos as well, then I highly recommend that you have an Nvidia GPU. For, detection of objects in images, you can use the CPU as well without any problems.
# download or load the model from disk
model = torchvision.models.detection.retinanet_resnet50_fpn(pretrained=True,
                                                            min_size=args['min_size'])

device = torch.device('cuda' if torch.cuda.is_available() else 'cpu')
# load the model onto the computation device
model.eval().to(device)
We are initializing the RetinaNet model with the pre-trained weights and ResNet50 backbone. Then we are loading the model on to the GPU.
Read the Image and Detect the Objects
We will read the image using the PIL Image module as that will make the pixel values between 0-1 by default.
image = Image.open(args['input']).convert('RGB')
# a NumPy copy for OpenCV functions
image_array = np.array(image)
# convert to OpenCV BGR color format
image_array = cv2.cvtColor(image_array, cv2.COLOR_RGB2BGR)
At line 28, we are also making a copy of the original image in NumPy array format. Then we are converting it into the OpenCV BGR color format. We need this as we will be drawing the bounding boxes and putting the text on the image using OpenCV functions.
Now, let’s feed the image to our RetinaNet model and get the desired outputs.
# get the bounding boxes and class labels
boxes, classes = detect_utils.predict(image, model, device, args['threshold'])
# get the final image
result = detect_utils.draw_boxes(boxes, classes, image_array)
First, we are using the predict() function to get the bounding boxes and the class labels from the detection outputs. Note that we are also providing the threshold value while calling predict(). Then we are calling the draw_boxes() function of detect_utils to draw the boxes around the detected objects and put the class label text on them.
Finally, we just need to visualize the image on the screen and save it to disk.
cv2.imshow('Image', result)
cv2.waitKey(0)
save_name = f"{args['input'].split('/')[-1].split('.')[0]}_{args['min_size']}_t{int(args['threshold']*100)}"
cv2.imwrite(f"outputs/{save_name}.jpg", result)
After visualizing the image, we are creating a save_name variable. This we get from splitting the original input path to the image, then appending the min_size and threshold argument information to the string. Doing this will not overwrite our previously saved image on the disk when we again execute the script using some different min_size and threshold. It will be much easier for us to compare the images. So, for example, we are using a min_size of 800 and a threshold of 0.6, then the image will be saved as imagename_800_t60.jpg.
We are done with the code to detect objects in images. We can now execute the detect_image.py script.
Execute detect_images.py for Object Detection in Images
We are all set to test the RetinaNet deep learning model on images. Open up your command line/terminal and cd into the parent directory where this tutorial’s code files are present.
We will try out two of the image from the input folder that I have provided. And you are free to use any image of your own as well.
Let’s start with image2.jpg. First, we will execute with the default min_size and threshold arguments.
python detect_images.py --input input/image2.jpg
There should be some information printed on the terminal which I am skipping here.
Let’s take look at the result.
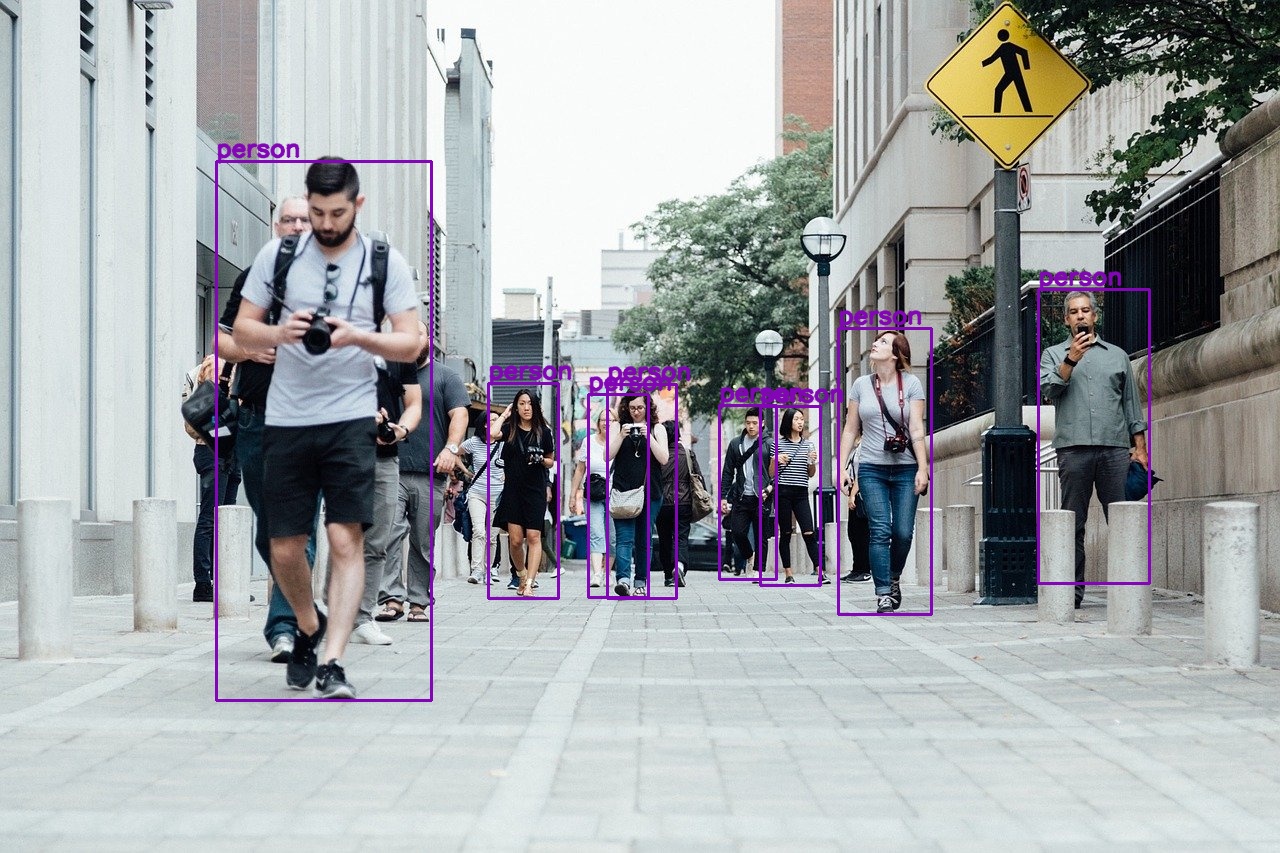
In figure 2, we can see that almost all the persons are being detected. However, I think that there is room for improvement here. Let’s try a bigger min_size and a lower threshold value. They are 1200 and 0.5 respectively.
python detect_images.py --input input/image2.jpg --min-size 1200 --threshold 0.5
Now, here is the result.
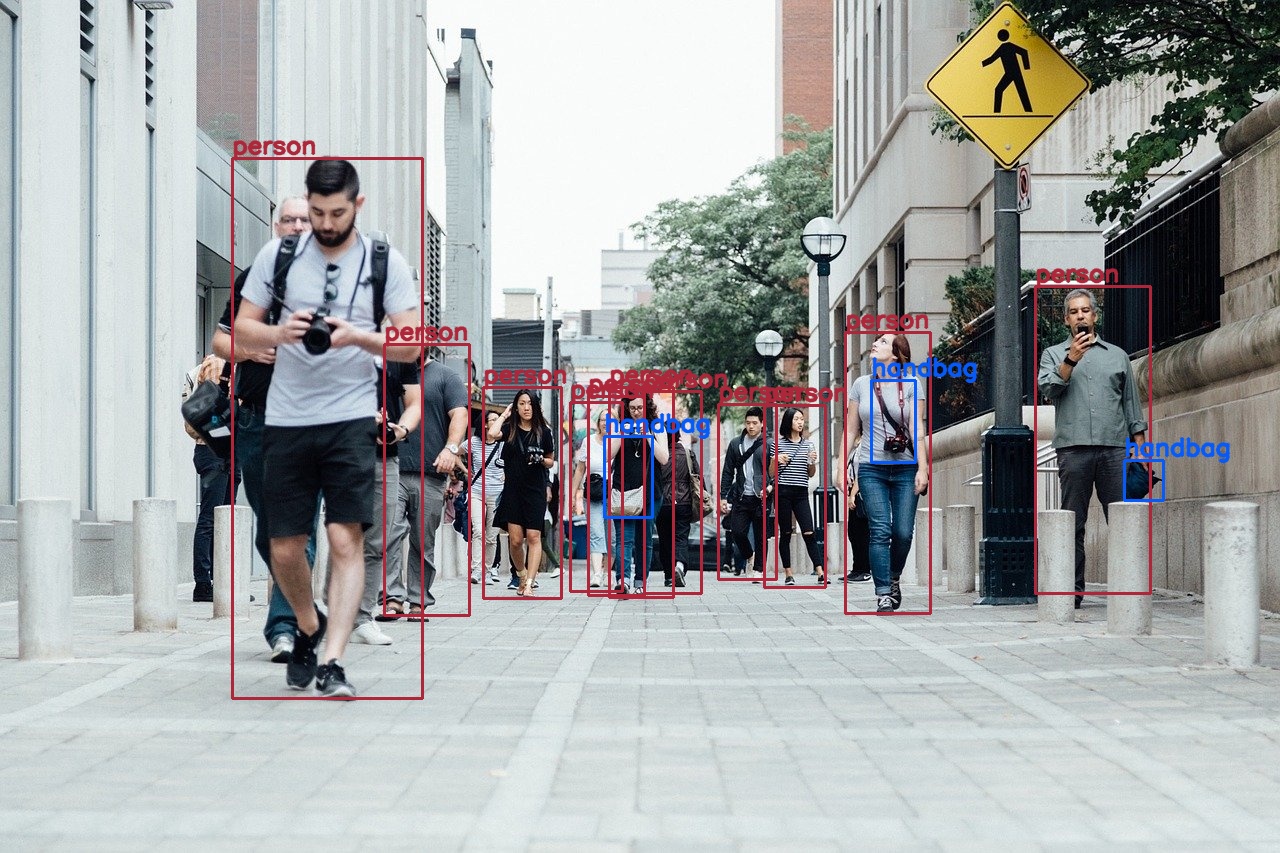
Wow! now the RetinaNet deep learning object detector is detecting some of the handbags as well. On top of that, it is also detecting some more persons in the image.
Now, maybe we can throw something a bit more challenging at the RetinaNet model. Let’s try out image3.jpg with the default values.
python detect_images.py --input input/image3.jpg

This time the results are not so good. The RetinaNet model is detecting the mouse alright but it is detecting the keyboard as a separate object and completely missing out the laptop.
Let’s see whether increasing the min_size and decreasing the threshold helps.
python detect_images.py --input input/image3.jpg --min-size 1200 --threshold 0.5
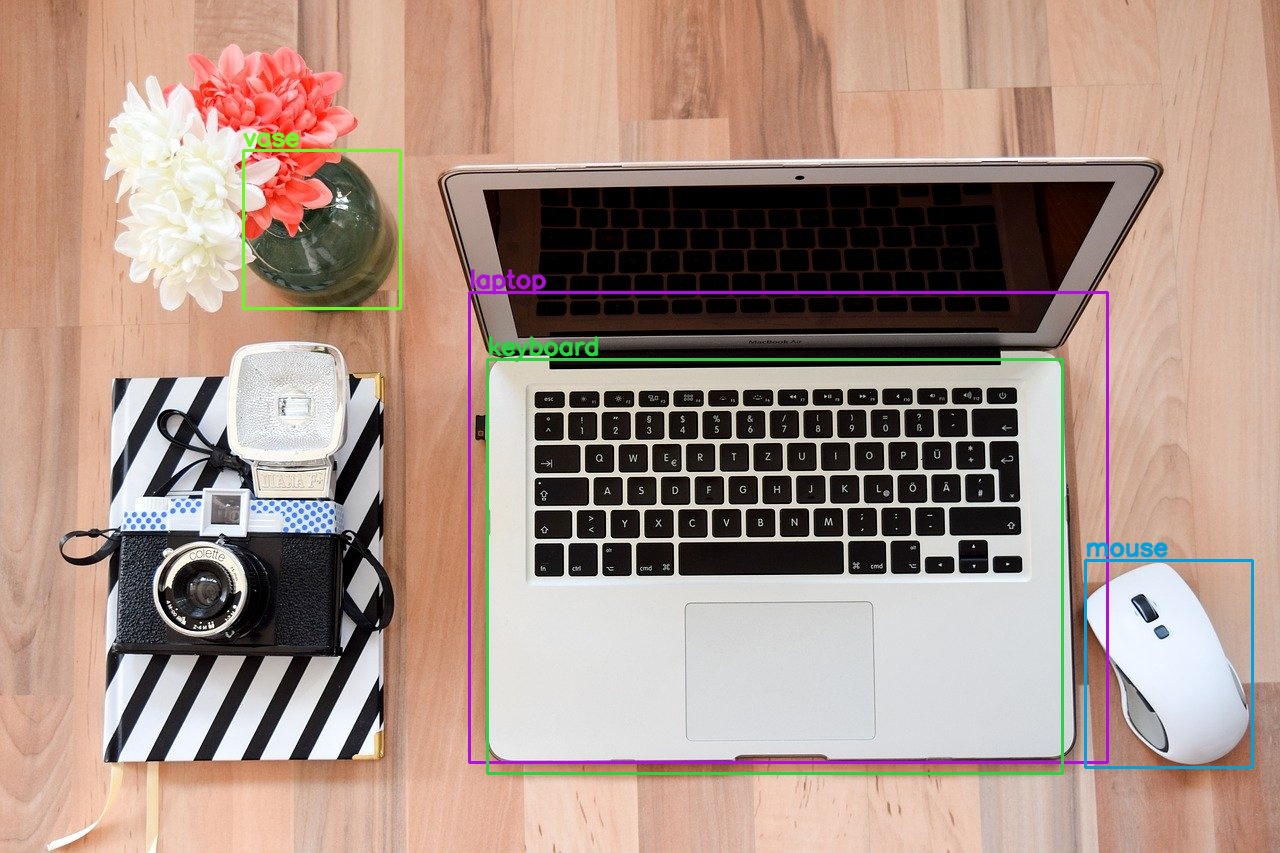
The results are surely better now. It is detecting the flower vase and the laptop this time. But it is still detecting the keyboard as a separate object. This may be due to the fact that the position of the keyboard is a bit too well-defined in itself. Also, it is not giving us all the correct coordinates for the laptop.
Looks like we have discovered some minor flaws in the RetinaNet deep learning object detector. It suffers when small objects are very close to each other or one object is part of another and it can also be a separate object according to the COCO dataset classes.
Now, let’s move on to writing the code for detecting objects in videos using the RetinaNet object detector.
Using PyTorch RetinaNet for Object Detection in Videos
From here on, we will write the code for detecting objects in videos using the RetinaNet model. It is going to be just as simple as images with a few tweaks.
All the code starting from here will go into the detect_videos.py Python script.
The following block of code does the initial preparation like importing the modules, constructing the argument parser, and preparing the model. It is the same as we did for images.
import torchvision
import cv2
import torch
import argparse
import time
import detect_utils

from PIL import Image

# construct the argument parser
parser = argparse.ArgumentParser()
parser.add_argument('-i', '--input', help='path to input video')
parser.add_argument('-m', '--min-size', dest='min_size', default=800,
                    help='minimum input size for the RetinaNet network')
parser.add_argument('-t', '--threshold', default=0.6, type=float,
                    help='minimum confidence score for detection')
args = vars(parser.parse_args())

print('USING:')
print(f"Minimum frame size: {args['min_size']}")
print(f"Confidence threshold: {args['threshold']}")

# download or load the model from disk
model = torchvision.models.detection.retinanet_resnet50_fpn(pretrained=True,
                                                            num_classes=91,
                                                            min_size=args['min_size'])
device = torch.device('cuda' if torch.cuda.is_available() else 'cpu')
# load the model onto the computation device
model = model.eval().to(device)
Capture the Video and Initialize the VideoWriter
We will capture the input video OpenCV.
cap = cv2.VideoCapture(args['input'])

if (cap.isOpened() == False):
    print('Error while trying to read video. Please check path again')

# get the frame width and height
frame_width = int(cap.get(3))
frame_height = int(cap.get(4))

save_name = f"{args['input'].split('/')[-1].split('.')[0]}_{args['min_size']}_t{int(args['threshold']*100)}"
# define codec and create VideoWriter object
out = cv2.VideoWriter(f"outputs/{save_name}.mp4",
                      cv2.VideoWriter_fourcc(*'mp4v'), 20,
                      (frame_width, frame_height))

frame_count = 0 # to count total frames
total_fps = 0 # to get the final frames per second
After capturing the video, we are getting the frame_width and frame_height at lines 36 and 37. At line 39, we again define a save_name variable for the name with which the resulting video will be saved.
At line 41, we are initializing the VideoWriter object and defining the codec to save the vidoe.
Finally, at lines 45 and 46, we are defining the frame_count and total_fps. These two will help us in keeping the count of the total number of frames and the total FPS (Frames Per Seconds) respectively.
Looping Over the Video Frames and Detecting the Objects
We have captured the video now. Next, we can loop over each frame and detect the objects that appear in the frames. In this way, we will be treating each frame as a separate image. We will use a simple while loop to do that.
# read until end of video
while(cap.isOpened()):
    # capture each frame of the video
    ret, frame = cap.read()
    if ret == True:
        # convert the frame into PIL Image format
        pil_image = Image.fromarray(frame).convert('RGB')
        # get the start time
        start_time = time.time()

        # get predictions for the current frame
        boxes, classes = detect_utils.predict(pil_image, model, device, args['threshold'])
        # draw boxes and show current frame on screen
        result = detect_utils.draw_boxes(boxes, classes, frame)

        # get the end time
        end_time = time.time()
        # get the fps
        fps = 1 / (end_time - start_time)
        # add fps to total fps
        total_fps += fps
        # increment frame count
        frame_count += 1

        # press `q` to exit
        wait_time = max(1, int(fps/4))
        cv2.imshow('image', result)
        out.write(result)
        if cv2.waitKey(wait_time) & 0xFF == ord('q'):
            break

    else:
        break
- Whenever we find a frame, first, we are converting the image from the array format to the PIL
Imageformat at line 53. - At line 55, we define
start_timeto track the time taken for detection. - Line 58 calls the
predict()function and we get the bounding boxes and the class labels. - At line 60, we draw the boxes around the detected objects and put the text as well.
- Then we define
end_timeto stop tracking the time. - From lines 65 till 69, we calculate the FPS, increment the total FPS, and the total frame count as well.
- Finally, we show the frame on screen and save the resulting frame to disk.
At last, we just have release VideoCapture() object and release all OpenCV video windows. We will calculate the average FPS as well.
# release VideoCapture()
cap.release()
# close all frames and video windows
cv2.destroyAllWindows()

# calculate and print the average FPS
avg_fps = total_fps / frame_count
print(f"Average FPS: {avg_fps:.3f}")
This is all the code we need to detect objects in videos. Let’s execute detect_videos.py now.
Executing detect_videos.py Script to Detect Objects in Videos
There are two videos in the input folder but we will just run inference on video2.mp4 file here. You can surely try out the other video and tell about your findings in the comment section.
Also, video2.mp4 is going to be a good challenge for the RetinaNet model as it contains some very small and far off objects.
Let’s execute the detect_videos.py script with the default min_size and threshold value
python detect_videos.py --input input/video2.mp4
With min_size value of 800, I got around 3.1 FPS on average. Yours may vary depending upon the hardware. Now, let’s take a look at the output.
Ok. The model is really amazing at times and totally wrong at some other time. For example, at the beginning of the video, the RetinaNet model detects the snowboard as a skateboard for a split second. Then again, at around 2 seconds into the video, it is correctly detecting the skis of the person at the left which are barely visible. At a later point, it is again detecting the snowboard as a ski. So, in this video, apart from the humans, the detections for the small objects are either a hit or miss.
What You can Do Further?
We have run the inference and detected the objects on some of the images and videos. But still, we have not tried all the size and threshold parameters for the videos. You can try increasing the min_size and decreasing the threshold and analyze the results. You can even post your findings in the comment section, which will help other readers. Or you can even try and detect objects in your own images and videos.
Summary and Conclusion
In this article, you learned about object detection using RetinaNet PyTorch and deep learning. You also got hands-on experience on detecting objects in images and videos using the RetinaNet model and PyTorch deep learning framework.
If you have any doubts, thoughts, or suggestions, then please leave them in the comment section. I will surely address them.
You can contact me using the Contact section. You can also find me on LinkedIn, and Twitter.

Hey, I am trying to add a few more classes to the model, some custom items I want the model to identify, how do I do that?
Your tutorials are amazing they are so straight forward and easy to understand.
Thanks for the amazing content! Cheers
I am glad that you find my tutorials useful, Subham.
Coming to your question. For this tutorial, we cannot add any more labels, the RetinaNet model has already been pre-trained on the COCO dataset. However, I have another tutorial that uses a pre-trained PyTorch Faster-RCNN model. In that tutorial, we fine-tune the model to detect potholes on roads. That tutorial can teach you how to fine-tune a pre-trained object detection model on your own dataset. You can find it here => https://debuggercafe.com/road-pothole-detection-with-pytorch-faster-rcnn-resnet50/
Thank you, that was helpful
You are welcome.
Hi! Your tutorial was very useful for my project. Is there other ways to improve the accuracy other than the min size and the threshold?
For instance, my project involves detecting objects mainly bags, backpacks, etc related things to bags. But the accuracy for detecting detect bags is quite low, hence I finding methods to improve the accuracy but not too sure how to increases the odds using retinanet.
Another question is can I use another backbone other than Resnet50 such as VGG16 and Resnet101? Tried to change the coding slightly but not too sure how to adjust it.
Thank you so much for this tutorial
Hi. I am really happy that my tutorial was helpful. I will first answer your backbone related question.
I am 100% sure that when using the FasterRCNN detector we can switch backbones, be it ResNet101 or ResNet152. You can take a look at this Kaggle notbook of mine to know exactly how to do it => https://www.kaggle.com/sovitrath/fasterrcnn-resnet152-train-final-clean-nb
It is in the first block of code. Maybe I will even write a tutorial on using different backbones and custom training. But I have not yet experimented with RetinaNet using different backbones. I will have to look into that.
Now, for getting better results. As you have already tried size and threshold, the best advice I can give you know is to train a FasterRCNN ResNet152 pre-trained model. But you will need a dataset for that. So, that might be an issue. But in my opinion, custom training a pre-trained network will work best.
Hello , Thanks for the tutorial on RetinaNet
The link which you have shared is not working. showing 404 error.
https://www.kaggle.com/sovitrath/fasterrcnn-resnet152-train-final-clean-nb
Also can you please share the tutorial how to fine-tune RetinaNet
Hi Ritika. The notebook was private before. Have made it public. Should work now. Apologies for the inconvenience.
Hello, thank you so much for the tutorial.
It is possible to fine tune the RetinaNet model?
I would like to freeze the weight of the FPN. This is possible with Tensorflow 2 API, but I would like to understand if this is also possible with PyTorch.
Thank you
Hello Max. Really happy that you liked the tutorial. And of course, it is possible to fine-tune RetinaNet. Let me see if I can add the fine-tuning tutorial to my pipeline of posts. Might take some time, though.
how can train my own model using pytorch – retinanet
hello, thanks for the tutorial, it was of great help. Can I know how can the model be trained on customized dataset.
Thanks
Yes, RetinaNet PyTorch can be trained. The best way is to use the Detectron2 library. Although I do not have any tutorial for Detectron2 right now, it is in the works.
Using PyTorch RetinaNet in mobile
Hello Rami. Are you looking to run models on Andriod phones?
hello Sovit i training a model using retinanet (pytorch,detectron2) i want to use the model in phone application
I am not sure how soon I will be able to do it but I will try to create a tutorial on it.