
By now, we are no longer an alien to online LLM chat interfaces or even using open-source ones. Most of us are aware of websites like ChatGPT, Claude, and Hugging Chat. They provide great interfaces, streaming chat, and excellent context for long-form conversation. But how is such an interface created? Can we replicate such a continuous, streaming chat interface? May be not 100%, we can surely try to start somewhere, maybe with 10% of the functionality. That’s exactly what we will do in this article. We will create an instruction following (not chat, just instruction) notebook interface using a fine-tuned Phi 1.5 model.

We will cover the following topics in this article
- We will start with a brief introduction of the dataset and the model. Although we will not cover the supervised fine-tuning of the model in detail, we will touch base.
- After obtaining the trained models, we will get on to create the notebook interface code.
- Next, we will test the model with several instructions to test how well our interface works.
Why is what we are creating here interesting?
- It will entirely run on a Jupyter Notebook.
- We will not need to execute one cell after another to prompt the model. It will be a minimal yet seamless instruction following the notebook interface.
- The model will not just throw the entire response at once. Instead, it is going to be streaming text which is just like how it happens on all the LLM chat websites.
I hope the above prospects interest you. Let’s jump into the technical part of the article now.
The Alpaca Dataset and the Trained Phi 1.5 Model
To create the instruction following notebook interface we will use an instruction tuned Phi 1.5 model. It has been trained on the Alpaca instruction following dataset using the QLoRA method. We will not go into the details of the dataset or the training process in this article. Please take a look at the Fine Tuning Phi 1.5 using QLoRA article to learn more about the process.
We will use a model checkpoint trained with the same method here. However, one important aspect that we need to cover is the format of the dataset which directly affects the prompt creation process. The dataset contains instructions, input, and response indicators. That will make our prompt format like the following when creating the prompts for the notebook interface.
prompt = """### Instruction:
{instruction}

### Input:
{inputs}

### Response:
"""
In short, our prompt will contain a mandatory instruction, an optional input, and a response tag so that the model knows how to start following our instructions. More on this later while creating the notebook.
Project Directory Structure
Let’s take a look at the directory structure before moving forward.
├── outputs
│   └── phi_1_5_alpaca_qlora
│       ├── best_model
│       └── logs
├── instruction_interface.ipynb
├── phi_1_5_alpaca_qlora.ipynb
└── requirements.txt
- First, we have the
outputsfolder containing the best model checkpoints that we will use during inference. - Second, we have two notebooks, the
phi_1_5_alpaca_qlora.ipynbfor training and theinstruction_interface.ipynbfor instruction-following interface. You can take an in-depth look at the training notebook and run it in case you want to train your own model. - Third, we have a requirements text file for easier installation of all the requirements.
All the trained adapters and both the notebooks and available via the download section. You can directly use the notebooks and start giving instructions to the Phi 1.5 model and play around with it.
After downloading and extracting the zip file, be sure to install the requirements using the following command.
pip install -r requirements.txt
That’s all we need for the setup. Now, let’s move forward and create our notebook for instruction following using the Phi 1.5 language model.
Download Code
Creating the Instruction Following Notebook Interface
All the code following here are present in the instruction_interface.ipynb notebook.
We will not be using a quantized mode here. So, please make sure that you run the code on a system with at least 7GB VRAM. You can also run it on a CPU. However, the generation process will be much slower.
The examples shown here were run on a system with 10GB RTX 3080 GPU.
Let’s start with the imports statements.
from transformers import (
    AutoModelForCausalLM,
    AutoTokenizer,
    TextStreamer
)

logging.set_verbosity(logging.CRITICAL)
We are using the AutoModelForCausalLM and AutoTokenizer for loading the model and the tokenizer. Furthermore, we also import the TextStreamer class. Remember we discussed the text streaming output instead of the model throwing the entire output at once. The TextStreamer class will help us achieve that.
Along with that we are also setting the logging status while running the code.
Next is loading the model and the tokenizer.
model = AutoModelForCausalLM.from_pretrained(
    'outputs/phi_1_5_alpaca_qlora/best_model/'
).to('cuda')
tokenizer = AutoTokenizer.from_pretrained(
    'outputs/phi_1_5_alpaca_qlora/best_model/'
)
We are loading the model directly on the CUDA device for the best performance.
Initializing the Text Streamer Class
Let’s initialize the TextStreamer class with all the necessary arguments.
streamer = TextStreamer(
    tokenizer,
    skip_prompt=True,
    skip_special_tokens=True,
    truncate_before_pattern=['###', 'Instruction:'],
    truncate=True
)
It accepts the following arguments:
tokenizer: This is the tokenizer that we loaded above.skip_prompt=True: While printing the text, it will not output the prompt. This improves readability during inference.skip_special_tokens=True: This is a decoder keyword argument that tells the tokenizer not to print the special tokens in the output string.truncate_before_pattern=['###', 'Instruction:']: We can pass a list of strings that tells the tokenizer to stop printing the output whenever any of the listed strings are encountered. The string that we pass here is part of the instruction template. So, after fulfilling the request to our instruction, there is a high chance its next token are going to be either of the above. This is because, under the hood, all LLMs are still a next token predictor. However, this argument is also a decoder keyword argument and we can only pass this if the tokenizer supports it. Fortunately, the Phi 1.5 tokenizer does support it.truncate=True: Coming to the final decoder keyword argument. This tells the tokenizer to truncate the prompt if it is too long.
Define the Prompt Template
Now, we will define the prompt template.
template = """### Instruction:
{prompt}

### Input:
{inputs}

### Response:
"""
This follows the same format as the dataset on which Phi 1.5 model has been trained on, i.e. Stanford Alpaca instruction tuning dataset. We can provide an instruction, an optional input, and the response prompt so that the model knows how to generate the results.
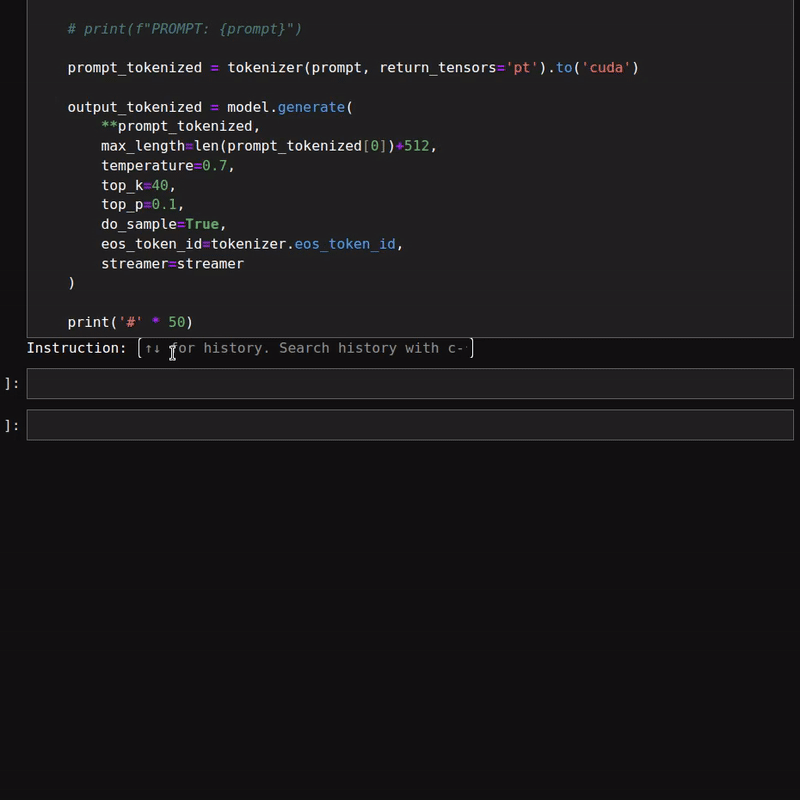
Creating a Continous Chat Loop
Finally, we will create a continuous chat loop with the while loop.
while True:
    question = input('Instruction: ')
    inputs = input('Input: ')

    prompt = template.format(prompt=question, inputs=inputs)

    # print(f"PROMPT: {prompt}")

    prompt_tokenized = tokenizer(prompt, return_tensors='pt').to('cuda')

    output_tokenized = model.generate(
        **prompt_tokenized,
        max_length=len(prompt_tokenized[0])+512,
        temperature=0.7,
        top_k=40,
        top_p=0.1,
        do_sample=True,
        eos_token_id=tokenizer.eos_token_id,
        streamer=streamer
    )

    print('#' * 50)
There are two inputs:
- The first one is the mandatory instruction input where we can either ask a question or provide an instruction.
- The second is the optional input. We can pass an empty string here or pass an input based on the above instruction.
Next, we create the final prompt string by formatting the template that we defined above with the question and the inputs.
Then we use the generate method of the model to generate the response to our instruction/prompt. Here are the arguments that we are passing:
**prompt_tokenized: This passes all the attributes of theprompt_tokenizedvariable. These include the input token IDs and the attention mask IDs.max_length: Apart from the prompt that we are passing we are telling the model to generate a maximum of 512 tokens.temperature: A higher temperature generally results in a more creative response. In this case, a temperature of 0.7 worked pretty well.top_k: This tells the model to sample these many top results from all the possible output tokens.top_p: Only those probable tokens are retained whose probabilities add up to the value provided here.do_sample: Whether to use sampling or greedy decoding.eos_tokenzer_id: The end of sequence ID so that the model knows where to stop.streamer: Finally, the streamer class object to obtain streaming outputs.
This is all we need to create a simple instruction following notebook interface using an LLM. Let’s try out some prompts and check the responses.
Here is a figure of a simple chat with the model.
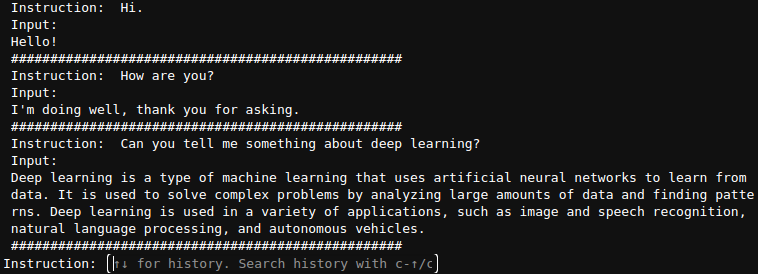
As we can see, in the first few prompts, we did not provide any input. Furthermore, the responses from the model seem quite impressive.
The following figure shows a few results where we provided an instruction and an input to the model.
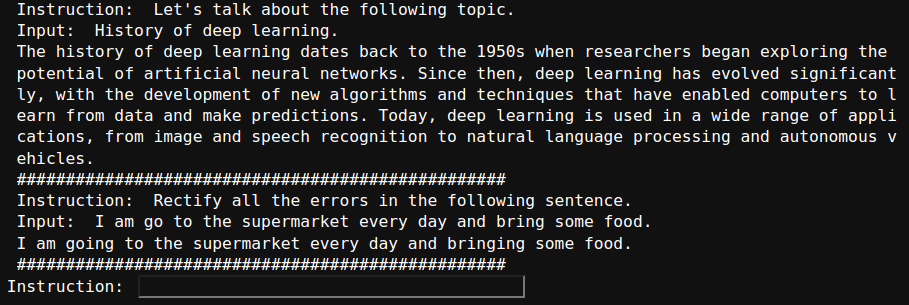
It is clear that the model is good at following instructions as well.
However, the above figures do not showcase the text streaming part of the response. Here is a simple example of the same.
As we are using a 1.3B parameter model, the responses are quite fast. We can also load the model in quantized format to get even faster results. However, that may lead to inferior results.
Further Steps
Although we were able to create a simple instruction following interface here, there are a few drawbacks.
- The model can only answer questions or follow instructions.
- It cannot chat with us, i.e. remember the context of the discussion and go back to a previous one.
- For this, we need to manage the context that we will cover in the upcoming articles.
Summary and Conclusion
In this article, we created a simple instruction following Jupyter Notebook interface for commanding a Phi 1.5 model. We used streaming text to make the output more appealing and our approach reduced the need of executing code cells multiple times. We also discussed some potential drawbacks that we will address in future posts. I hope that this article was worth your time.
If you have any doubts, thoughts, or suggestions, please leave them in the comment section. I will surely address them.
You can contact me using the Contact section. You can also find me on LinkedIn, and Twitter.

1 thought on “Instruction Following Notebook Interface using Phi 1.5”